|
|
www.onthewaymodels.com |
Maschinengewehrkraftwagen (Kfz.13) |
|||
| Kit # PS720013 | Construction review by Rob Haelterman | ||||
|
|
www.onthewaymodels.com |
Maschinengewehrkraftwagen (Kfz.13) |
|||
| Kit # PS720013 | Construction review by Rob Haelterman | ||||
.jpg) |
| A preview of the pre-production version of this kit can be found here.
History and version From
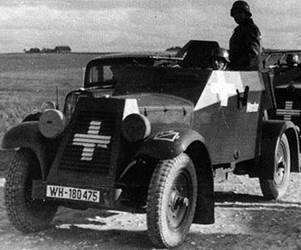
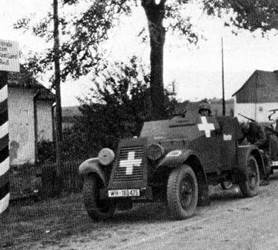
[3]: It seems
that two types of wheels existed and at least two types of tyres,
as can be seen in the pictures below. Note that the kit doesn't match
either wheel exactly, while the thread pattern matches the top picture
best.
It is actually not surprising to see differences between individual Kfz.13, as it seems they were built on two distinct chassis, one by Daimler-Benz and one by Adler [4]. Dimensions between both were slightly different.
The kit parts Little
seems to have been changed with respect to the pre-production kit,
except for the addition of a PE fret and the decals.
Note
that the PE fret is labeled "Kfz.13/14". Might we expect
a Kfz.14 soon ? Instructions
The instructions are clear and simple.
Camouflage and markings
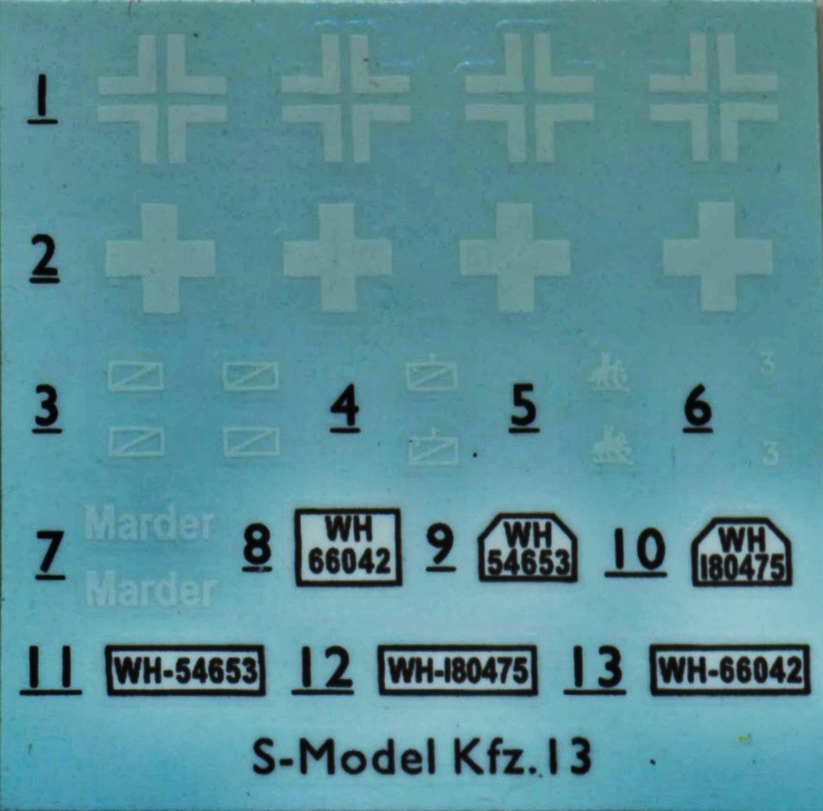
Markings
are given for two vehicles, both to be painted dark grey all over.
Construction The kit
is built up of four subassemblies which can be built in parallel:
The suspension is very nicely detailed, but very delicate. Not what you would expect when you hear that the S-Model kits are labeled as "wargame" material and actually better than what is found in most mainstream plastic kits. The wheels have an insert on the backside permitting detail on both sides (something another Chinese manufacturer seems to leave out); this insert doesn't require glue. The floor
has the fenders integrally attached to them (which will hinder the
paintwork later) and might benefit from an anti-slip pattern. The
headlights that mount to the fenders have a very weak attachment point.
I drilled holes in the fenders to get a more enduring fit. ("More"
in this case did not mean "sufficiently".) The way
the nose armor goes together is innovative. S-model gives a 5-pointed
element to which the panels attach, making the construction a lot
less fiddly than it might have been. Note that S-model only gives
the armored nose, but not the grille that went behind it. Little of
it could be seen on the real vehicle, but still. The small circular
plate (with the manufacturer's logo) is a fragile element, which I
easily managed to break and feed to the carpet monster.
The rear armor also received weld beads and the ejector mark on the inside was smoothed. A stowage plate was added.
Major
omissions in the kit are the boxes on the outside of the vehicle:
two on the rear armor and one on the right door. (Incidentally these
are also missing in the 1/48 WSW kit.) These boxes were sourced in
resp. the ACE kit of the Kfz.13 and the spares box. Minor omissions
are the turn indicators on the doors and the dashboard, which I made
from sheet plastic and a punch-and-die set. S-model gives two different styles of rear licence plates. I believe the square one is the early type and the beveled one the later type. PE parts for the width indicators and the rear view mirror are given. While it is nice to have them, the flatness of the PE parts doesn't do them justice. Adding insult to injury, there are no locating points on the fenders for them, and you are supposed to glue the knife thin edge to the (curved) plastic parts. This is bound to end up in a very weak joint. I decided to drill holes in the fenders to give the PE parts some grip. In the end I made the width indicators from scratch.
After I finished the model, I noticed that there is a see-through effect at the position where the shaft for the steering wheel enters the engine compartment. If I had caught it earlier, it would have been an easy fix to attach a scrap of plasticard. After almost finishing the model it was a lot harder. I decided to paint the vehicle in a pre-war Reichswehr Buntfarbenanstrich, which is not unlike the late war three-color camo. Disaster struck when masking, as my Maskol decided to go medieval on me and turn to a sticky, almost irremovable goo, instead of a thin easily peeled off film. During painting I noted that the ridge between the tyres and the wheel rims might have been more pronounced to ease painting, while the front fenders always get in the way. As the kit only comes with WH licence plates, I had some custom-made RW decals printed by Aleran to finish this kit off.
Note:
Conversion to Kfz.14 I decided to convert the second kit in the box as a Kfz.14 radio vehicle. For that purpose:
The map
is from Unicorn. I think
I actually used a map from the "Russia" set, while I plan
on using the kit in a "France" diorama. I just hope most
modelers won't be able to tell.
While not related to the model, I noticed that the ICM divisional insignia decals were impervious to my usual setting solution (Micro Sol), so I resorted to some more drastic measures. (Before you read on: don't try this at home !). I gently moistened the edges of the decal with a fine paintbrush dipped in acetone. This softens the decal film so it becomes as good as invisible and adheres perfectly. For the record: if you use just a smidgen too much the printed insignia will become invisible as well, so in case you didn't heed my warning: err on the side of caution. In the pictures below the model still needs some weathering, which I will apply when I finish the diorama allowing a good match in colors between the dust in the scene. The wheels are pressed on without glue (and will easily stay put like that), allowing easy removal for the weathering phase.
References [1] http://www.wwiivehicles.com/germany/armored-cars/sdkfz-13.asp (defunct) [2] http://www.armorama.com/modules.php?op=modload&name=Reviews&file=index&req=showcontent&id=4724 [3] http://forum.axishistory.com/viewtopic.php?t=1722 [4] Panzer Tracts No.13 Panzerspaehwagen, Armored Cars Sd.Kfz.3 to Sd.Kfz.263, T.L. Jentz, H.L. Doyle [5] Steelmasters 74 (April Avril 2006) - Kfz 13 et 14 1/48
Review sample kindly purchased by author. |
| Back to S-Model Kit List | Back to Construction Reviews |
Article Last Updated: 31 July 2014 |
Back to Home Page |

.jpg)
.jpg)
.jpg)
.jpg)
.jpg)
.jpg)
.jpg)
.JPG)
.JPG)
.JPG)
.JPG)
.JPG)
.JPG)
.JPG)
.JPG)
.JPG)
.JPG)
.JPG)
.JPG)
.JPG)
.JPG)
.JPG)
.JPG)
.JPG)
.JPG)
.JPG)
.JPG)
.JPG)
.jpg)
.JPG)
.JPG)
.JPG)
.JPG)
.JPG)
.JPG)
.JPG)
.JPG)