| A
preview of the kit (with scans of the sprues and manual) can be found
here.
I bought
this kit second hand and it came in a very battered box. Perhaps that
is the reason why my eye fell on it when I was looking for a kit that
would provide a destroyed Russian tank for a diorama. The fact that
the roadwheels come with separate rubber tyres, which are easy to
leave off if you want to represent a burnt-out tank (and reputedly
eat into the plastic if you do install them) might have been a contributing
factor as well.
1.
Accuracy
I didn't
check the kit for accuracy, apart from a check with the Mk.I eyeball
against plans in [2] and [3], but it looks rather ok.
As I have another box with the same kit on the shelf, I fool myself
into believing that I will do a complete analysis of the accuracy
when I come round to building that one.
(Possible)
Inaccuracies that I happened to notice (too late) are that
- the
road wheels have 12 bolts instead of 6.
- the
manual asks you to add strips to the top of the hull sides to reinforce
the turret ring. According to [1], this only happened on the ZiS-S-53
equipped tanks; the plans in [2] and a picture in [3] of a D5-T
tank show them in place. I would conclude that all except the first
D5-T equipped tanks had them and that UM is thus right.
- the
turret cupola should be 40cm further forward on this tank than on
the S-53 tanks. UM does provide for a different position than in
their later model T-34/85s, but the cupola is still too far aft.
It should be centred on the line connecting the widest points of
the turret and thus be in line with the loader's hatch [2,3]. [4]
claims that very late D5-T tanks might have had the cupola moved
further to the back, as for the S-53 tanks.
- UM
asks to fit the sharp hull nose. [1,2,3] would have me believe that
this specific variant of the T-34 had the rounded nose, while [4]
refers to a picture of a late D5-T tank with a sharp nose. There
is no need to wallow in despair however, as the rounded nose is
included as well and that's the one I chose.
- the
vent domes on the rear of the turret should perhaps be a bit more
towards the centreline [2,3].
- the
turret lacks the prominent lifting rings. I caught this too late.
- the
turret is extremely smooth and lacks cast lines, which is very,
very a-typical.
- no
track links are given for the glacis, although I am not sure they
were ever installed on this version of the T-34.
- the
single external fuel tank on the left hull is in the rearmost position.
Drawings and pictures in [3] (e.g. of "Dimitrii Donskoi",
which is one of the marking options) show them in the forward position.
I should have paid more attention to this as it is an easy fix.
Note
that the position of the radio antenna on the hull is correct, except
for very late D5-T tanks [3].
With only about 300 T-34 built with this gun (all in the first months
of 1944) pictures to confirm this are rare, though.
A good
article on T-34/85 turrets can be found here.
2.
Kit features
- The
kit comes with separate fenders, which I find nice, especially as
I wanted to leave a part off.
- The
driver's and loader's hatch are molded open but the commander’s
hatch is moulded closed.
- The
driver's hatch has separate periscope covers that can be installed
open or closed. (Not all manufacturers of T-34 kits offer this option.)
- The
tyres are separate and in rubber/vinyl. Nice for those who hate
painting them, or for those that would like to leave them off; not
so nice for those that have suffered from a chemical reaction between
the vinyl and the plastic. I've been told that coating the plastic
in acrylic varnish can help to eliminate this problem.
- The
tow cables are vinyl too and difficult to put into a realistic shape.
Better ones are on order.
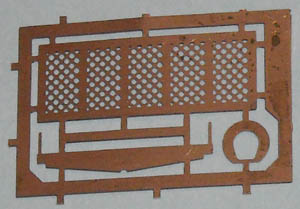
- The
engine deck comes as a solid plastic deck to which you need to add
a rather thickish PE part for the mesh. The problems here are
- it's
difficult to make the PE part conform to the deck;
- the
PE part will sit on top of the deck, not flush with it;
- you
can't see through the holes in the PE due to the plastic underneath.
- you
need superglue, which might clog the openings of the mesh.
- The
tracks are L&L and nicely done in my opinion.
- The
suspension arms are separate, making it easy to change their position.
- The
exhaust pipes are molded separate from their armored covers.
3.
Construction
The kit
was built mostly out of the box, except for the "necessary"
modifications to turn it into a smouldering hulk and some minor alterations.
- The
gun barrel and exhausts were hollowed out.
- The
surface of the turret (which is very smooth in the kit) was roughened
up by coating it in glue and then dabbing it with an old stiff brush.
This also helps to hide the seam at the back.
- Bits
and pieces are broken off or otherwise damaged.
- The
arms of the roadwheels were repositioned to create extra sag, typical
of a burned out tank.
- The
tank was "short-tracked" and a drive sprocket was removed
and the axle hollowed out.
- I
left the fuel tanks off, which required some carving to leave the
mounts in place. As mentioned earlier, I should perhaps have mounted
the left assembly further forward.
I noticed
- that
it is all too easy to insert the gun rotor upside down. The absence
of any type of locating pegs for the turret doesn't make assembly
any easier.
- that
the plastic is quite soft; those who like to use MEK in liberal
quantities risk ruining some of the smaller details.
- that
somewhere along the way I lost the part for the metal sheet that
goes on top of the rotor. Scratchbuilding it from plasticard also
allowed me to deform it, simulating battle damage.
- that
there are minor sink marks on the boxes on the fenders, which could
double as battle damage.
- that
the PE fret is common to most (all ?) UM T-34 based kits.
One other
thing to mention is that the kit has butt joints all over. For the
big parts, that doesn't matter too much, but for parts like head lights,
hand rails, exhausts, etc, it is a problem as the joint will be weak.
Worst of all, there are no locating pegs, holes or whatsoever to help
you install these parts. Keeping the symmetry thus becomes a real
challenge.
Due to
casting limitations, UM could not provide the detail on front of the
MG mount which comes as an integral part of the upper hull. The fix
UM provides is a PE part. I would have preferred that they would just
have given the complete MG mount as a separate plastic part; this
would have allowed for even better detail and far easier installation.
Further
notes are that the handrails are very delicate (even though they are
still too thick) and are prone to breaking when you remove them from
the sprue.
I have
been told that the cupola of the T-34/85 could rotate. That is why
mine isn't perfectly aligned, right ?
4.
Painting and markings
The tank
was painted using the hairspray technique. When I wanted to apply
the decals, they splintered upon the first (gentle) touch. This would
be a small disaster under normal conditions but actually suited my
purpose quite nicely as it would (more or less) correspond to what
would happen to a burnt-out tank.
_t.JPG) _t.JPG)
 _t.JPG)
 _t.JPG)
_t.JPG)
References
[1] The
T-34/85 in the Great Patriotic War, Part One, Brett Green.
[2] T-34
Bloody Peace-Maker Vol III, Ajaks.
[3] T-34
Mythical Weapon, R. Michulec, M. Zientarzewski, Armagedon & Airconnection
[4] The
T-34-85 in WWII: A Closer Look, R. Peterson
|


.JPG)
.JPG)
.JPG)
.JPG)
.JPG)
.JPG)
.JPG)