MK72(MPK) |
Zugkraftwagen 1t (Sd.Kfz.10) Demag "D7" |
|||
Kit # 7201 |
Construction Review by Rob Haelterman - heman_148(at)hotmail(dot)com |
|||
MK72(MPK) |
Zugkraftwagen 1t (Sd.Kfz.10) Demag "D7" |
|||
Kit # 7201 |
Construction Review by Rob Haelterman - heman_148(at)hotmail(dot)com |
|||
 Pictures from Henk of Holland website, used with permission. |
| History and version For the history of this vehicle I gladly
refer to my earlier preview. I still
haven't been able to tell if this is an Ausf. A or an Ausf. B, but
I guess this is a rather academical question as both vehicles appear
to be externally identical. The only thing I would like to add to my earlier preview is that it seems that the direction indicators were left off from March 1943 onwards, which would require a very minor modification to the kit.
Assembly The first thing I noticed when assembling
this kit is that it reacts very well to my favorite glue, MEK, which
means I had to use it sparingly. This observation is probably linked
to the styrene being somewhat softer than on other injection plastic
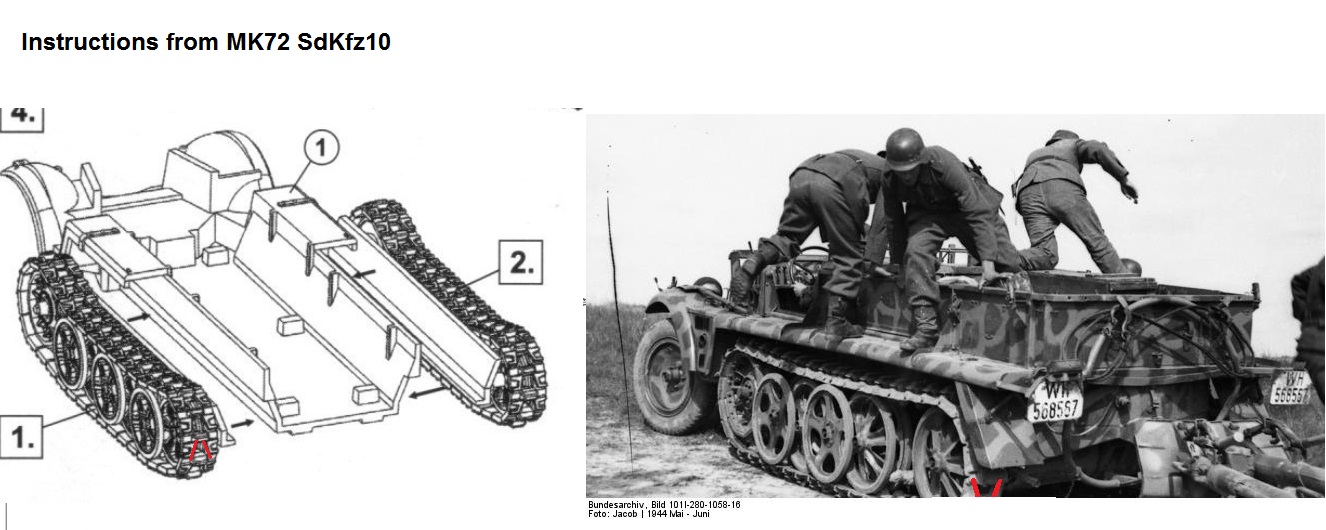
kits. An innovative feature is the way the
tracks have to be assembled: they are single lengths of styrene that
have to wrapped around the running gear. While at first a bit sceptical,
I am now fully convinced that this system mates the best of both the
link and length and rubber/DS band worlds. It is very quick, assures
perfect alignment of the track units, and - being styrene - glues
very easily. I would go for it any time !
After the tracks, the lower hull and
driver's compartment are to be assembled. The most annoying point
here the sink & ejector mark on the dashboard. Don't ask me why,
but I forgot to fix it until after assembly. Why follow the easy road,
huh ?
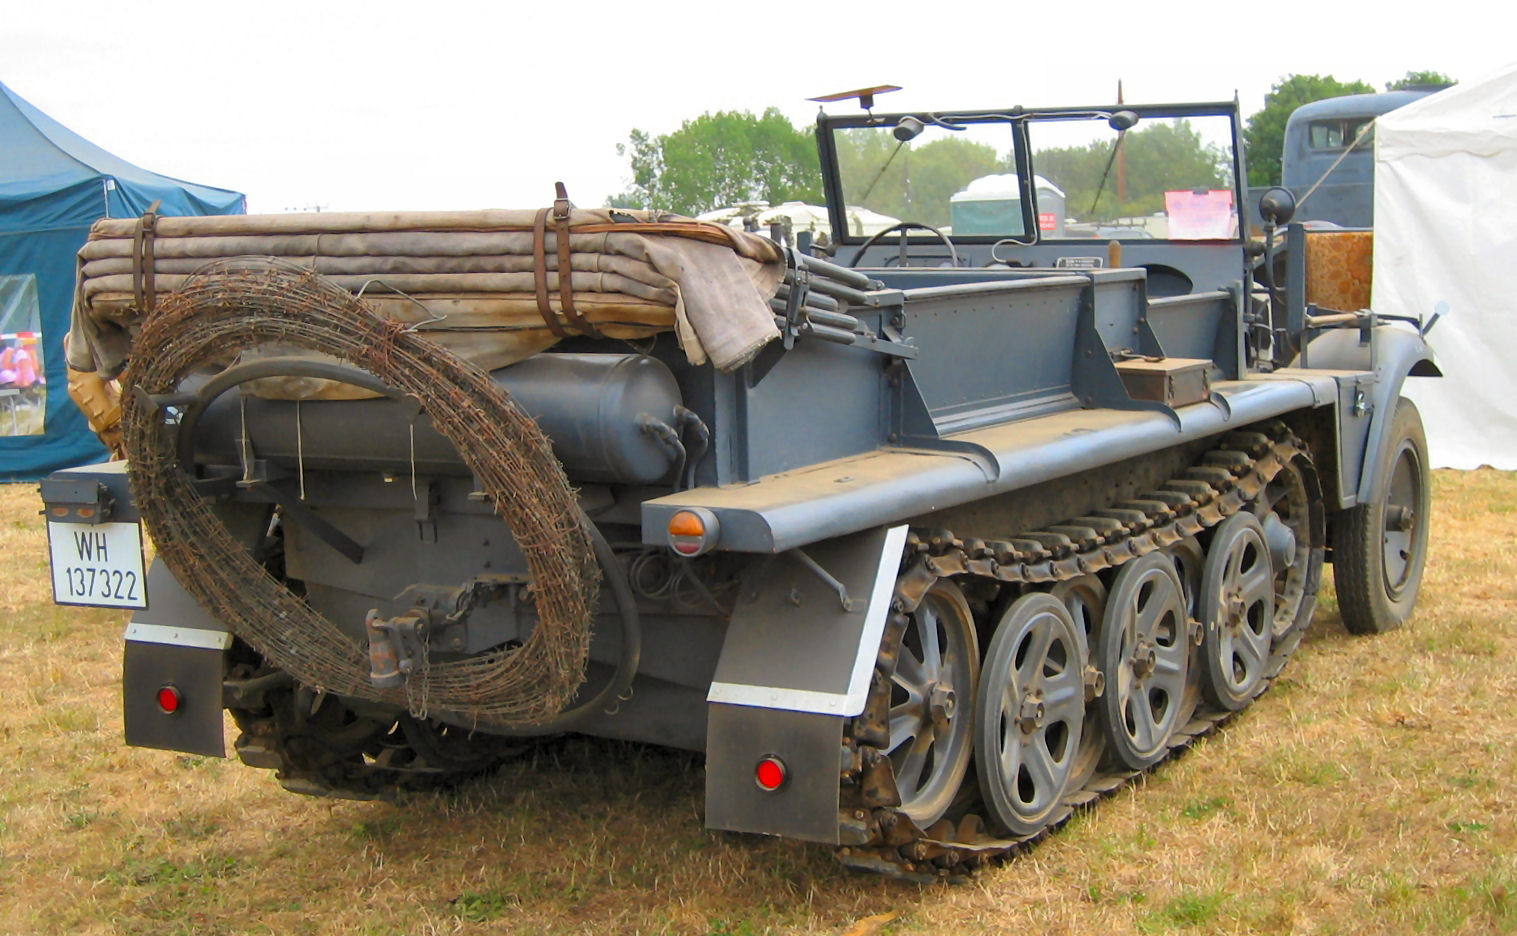
What I thought was a gap between the left fender and the box that covers the muffler (part 5) appeared to be there on the real vehicle; something Al pointed out to me when my model was already painted. Well, I comfort myself with the thought that most judges would think that the gap was just bad modeling, had I left it there.
Step 6 mentions the window insert that
you have to fabricate yourself. My advice would be to keep this until
most of the model is painted and weathered. The next steps have you add the wheels and suspension and the odd bit. Detail of the suspension is nice, but I noticed that pegs on part 24 in the drawings corresponded to holes on the plastic bits. As part 22 has holes as well, the pegged joint will become a butt joint in the end. The plastic being soft and reactive, this will not make it any less solid, you just have to practice more care when positioning these parts. The wheels are made of two halves, the seam being where it is easily taken care off. What is less easily remedied is the ejector mark on the concave wheel face. The kit could have easily been engineered with the ejector mark somewhere else (the back face for instance). A very thoughtful feature is the option between headlights with covers (the ones with horizontal slits) and hollowed out ones. While this is not mentioned in the manual, you can either leave the latter as such to simulate battle damage, or paint the insides silver and add a drop of Kristal Klear, Future or other transparent medium. Width indicators are present (which is not the case in every small scale kit), but somewhat oversize. An easy fix would be to shave of the spherical end of each indicator and replace the shaft with thinner sprue. After these steps, you proceed with
the upper hull and driver's compartment. I noticed that there were
some ejector marks on the inside of the walls of the rear compartment
which only disappeared after a couple of minutes of gentle persuasion
(and a couple of expletives).
The hoola-hoop at the rear is a hoop for a K-Rolle, in case you wonder. (And, no, K-Rolle is not the Teutonic word for hoola hoop, it's some kind of barbed wire.) Some of the supports that are on the inside of the part need to be removed. This is not mentioned in the manual, but the end result is shown; even then I feel the transversal bar ought to be removed when compared to pictures of the real thing, but this would make for a very fragile part. Lots of jerrycans are provided, most
of them being for the DAK version. While the pairs are nice, each
jerrycan is split in half, which leaves you with lots of difficult
joints to fill and sides that in my opinion should be flatter than
they are in the kit. The way the jerrycans are engineered also results
in a jerrycan with only two handles, so you will need to add the middle
one yourself. (The three handle system was a true revolution when
this can was first put into production, allowing a soldier to either
carry two full cans or four empty ones with his two hands.) The engineering of the tarp is also somewhat suboptimal, as it leaves you with a difficult seam. The best, and easiest, solution I could find was to cover it with some paper tissue, which not only took care of the seam but also gave some added texture to the canvas. Unlike what you might expect from the boxtop of the sister kit, only the folded down tarp is provided. The only extra detail I added was a small mirror on the side of the driver's position.
Accuracy I measured the overall dimensions of
this kit, and compared it with the recent Panzer Tracts [1]. It appears
that the kit is slightly overscale, with the length of the track units
scaling out to 1/67, the total width near to 1/68 and the total length
to 1/70. Front wheels are slightly under-scale, and appear to be close
to 1/76. What the casual observer might notice,
on the other hand, is that the width of the tracks scales out to 281mm,
which is almost spot on for a SdKfz251 (or Sd.Kfz 11 for that matter).
The tracks of the Sd.Kfz.10 and Sd.Kfz.250 were 240mm in width.
A feature that is often overlooked
is the staggering of the left and right hand set of road wheels. MPK
did its homework, and the staggering is there. I noticed something strange when finishing
the paintwork on my vehicle: the right wall of the cargo compartment
does not have a ridge, like the other doors. None of my references
indicate that this door was different and Peter of MPK confirmed that
this was an error, not in the master, but in the mold, which he will
try to fix.
The "walls" of the drivers'
compartment and rear cargo/troop compartment were sliding doors that
had a noticeable slant, which is not present in the kit. A picture of the real vehicle to compare with can be found here [4].
Some further nitpicking involves the following:
Painting and decals At this stage, the vehicle is painted, and partially weathered. As I hadn't decided yet if I was going to display it in a diorama setting, I refrained from further weathering. For the same reason I also chose to leave the decals off for the time being, except for the decal that provides the instrument panel. About that decal: I added it after construction and painting was complete. It would have been easier to leave the steering wheel off until the decal is in place.
Ten years
after building the kit, I decided to put it into a diorama in which
I wanted to represent a vehicle from Artillerie Regiment 160, 60th
Infantry Division on the Soviet border, minutes before the start
of Operation Barbarossa (where 60 Inf.Div. was part of the 1st Panzergruppe,
commanded by General Von Kleist). The figures are from Zvezda set 6133, while the chapel is from ADM Models. I added a flickering light inside the chapel from a cheap tabletop decoration (not visible in the pictures). The came glasswork was custom made by Unicorn. Plants came from Busch (roses), Model Scene (nettles), E.T. Models (vines aka "Leares [sic] type 1") and WG Figuren & Baume (shrub).
Conclusion For a company that is new to injection
plastic kits, this is a real gem, which is far superior to the first
releases of the "big names" like Revell, Dragon or Hasagawa,
and even compares very favorable to their newest kits. Taken into
account the difference in budgets between them, this is no mean feat
at all. 2021 edit: in the meantime the MK72 range has been taken over by Special Armour.
References [1] Panzer Tracts 22-1, leichter Zugkraftwagen 1t (Sd.Kfz.10), Panzer Tracts, T.L. Jentz and H.L. Doyle [2] Die Halbketten-Fahrzeuge des deutschen Heeres 1909-1945, Militärfahrzeuge 6, Motorbuch Verlag, W.J. Spielberger [3] German light half-tracked Prime Movers 1934-1945, Schiffer, R. Frank [4] http://www.primeportal.net/transports/alan_ranger/demag-d7_sd.kfz.10/
Thanks to MPK and Henk of Holland for the review sample. |
| Back to MK72(MPK) Kit List | Back to Construction Reviews |
Article Last Updated: |
Back to Home Page |


.JPG)
.JPG)
.JPG)
.JPG)
.JPG)