| ESCI & Italeri
|
www.onthewaymodels.com | Sd.Kfz.251 Ausf.C Variants | |||
Kit : #72274 & 72276 |
Review
by Stephen 'Tank Whisperer' Brezinski
sbrez1(at)comcast(dot)net |
||||
| ESCI & Italeri
|
www.onthewaymodels.com | Sd.Kfz.251 Ausf.C Variants | |||
Kit : #72274 & 72276 |
Review
by Stephen 'Tank Whisperer' Brezinski
sbrez1(at)comcast(dot)net |
||||
| The
Sd.Kfz.251 is one of my favorite vehicles to model and came in over
20 variants in four production models. The basic vehicle, the Sd.Kfz.251/1
was an armored personnel carrier referred to as a Schützenpanzerwagen
(SPW) and armed with two machine guns. It carried 12 Panzergrenadier
(motorized infantry) soldiers.
This is a preview of the Italeri and ESCI Sd.Kfz. 251 Ausf. C kits, discussing firstly the basic Sd.Kfz. 251/1 kit and then some variants such as engineer and ambulance vehicles. I will not use any reference kit numbers as there was more than one kit number for these models, depending on the time of release and the particular distributor. German terminology and spelling is taken from the Panzer Tracts books. Sd.Kfz.251/1 Schützenpanzerwagen (SPW) :This is the armored personnel carrier version of the vehicle with seating for a driver and commander up front, and for 10 infantry on bench seats in the back. The "/1" designation (as in Sd.Kfz.251/1) indicates it is the personnel carrier, the SPW variant. It typically had an MG34 (later MG42s) machine gun behind a shield at the front and an MG34 on a swinging mount at the rear for AA use. With each Italeri/ESCI Sd.Kfz.251 variant we get all the parts for the Sd.Kfz.251/1 model, so each ESCI/Italeri variant is based on this Sd.Kfz.251/1 model kit. |
|
|
|
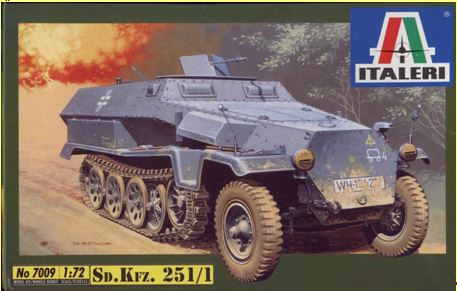
Left is a scan of Italeri's boxart for their re-release of ESCI's Sd.Kfz. 251/1 Ausf. C personnel carrier variant of the halftrack, kit 7009. Starting at the top we see the MG34 machine gun and shield. The front and side visors are portrayed closed, and they are molded closed on the kit hull. At the nose we see the hexagonal nose plate with towing hooks at the bottom. I find it interesting that there appear to be cloth covers with slits on the headlights and a Notek headlight on the driver's side. Just in front of the fender storage boxes, the fenders bend up over the tracks; this is a change of the Ausf. C version from the Ausf A and Ausf. B. The ventilation hoods sticking out from the engine compartment are another characteristic of the Ausf. C. Behind the vent hood we see a vertical turn signal. The rubber
padded track system rides on large interleaved roadwheels. Based on
the length of the track run I have read it referred to more accurately
as a 3/4-track vehicle rather than a halftrack. |
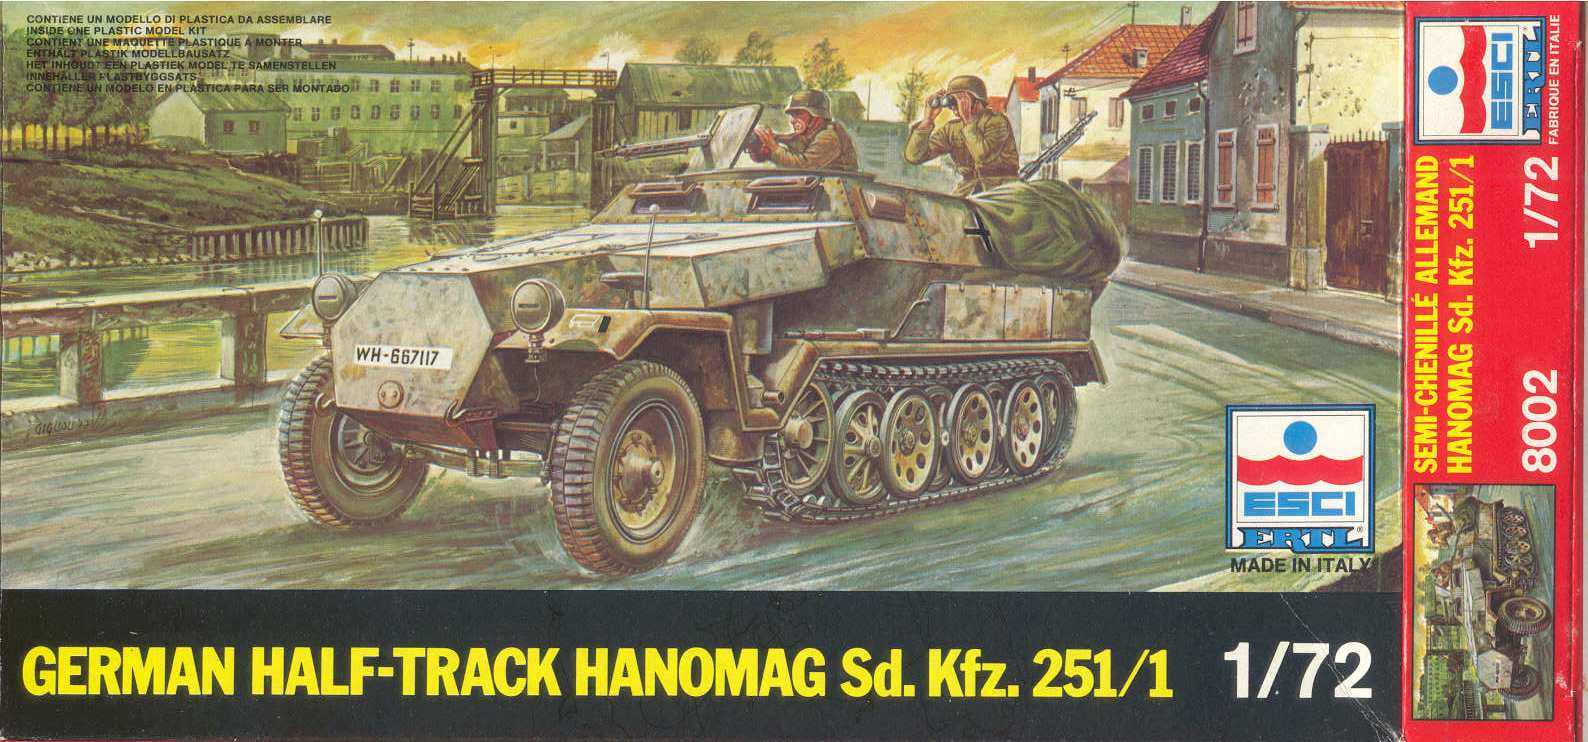
Right is one of the older box art for this halftrack Schützenpanzerwagen model kit, I really admire this boxart; it can give us inspiration as to colors and markings and placement for a diorama. The machine gunner closely matches the pose of the figure given in the kit. The tire tread in this box art more closely matches that of the kit tires than in Italeri's box art above. |
|
The Kit Parts The basic 1/72-scale ESCI/Italeri Sd.Kfz.251 Ausf. C kit comes with 58 injection molded styrene parts on two sprues, not including either two stiff polyethylene band tracks or a small sprue of hard styrene link & length track parts. Two crew figures are included. No etched brass or resin parts are included. Molding
and detail quality was excellent for the period these were released
(the 1980's). In 2014 they are challenged by more demanding standards
of current modelers and improved new releases in plastic by Hasegawa,
DML and by Revell. They are still worthy kits capable of being made
into a good wargaming or display model, in my opinion. |
|
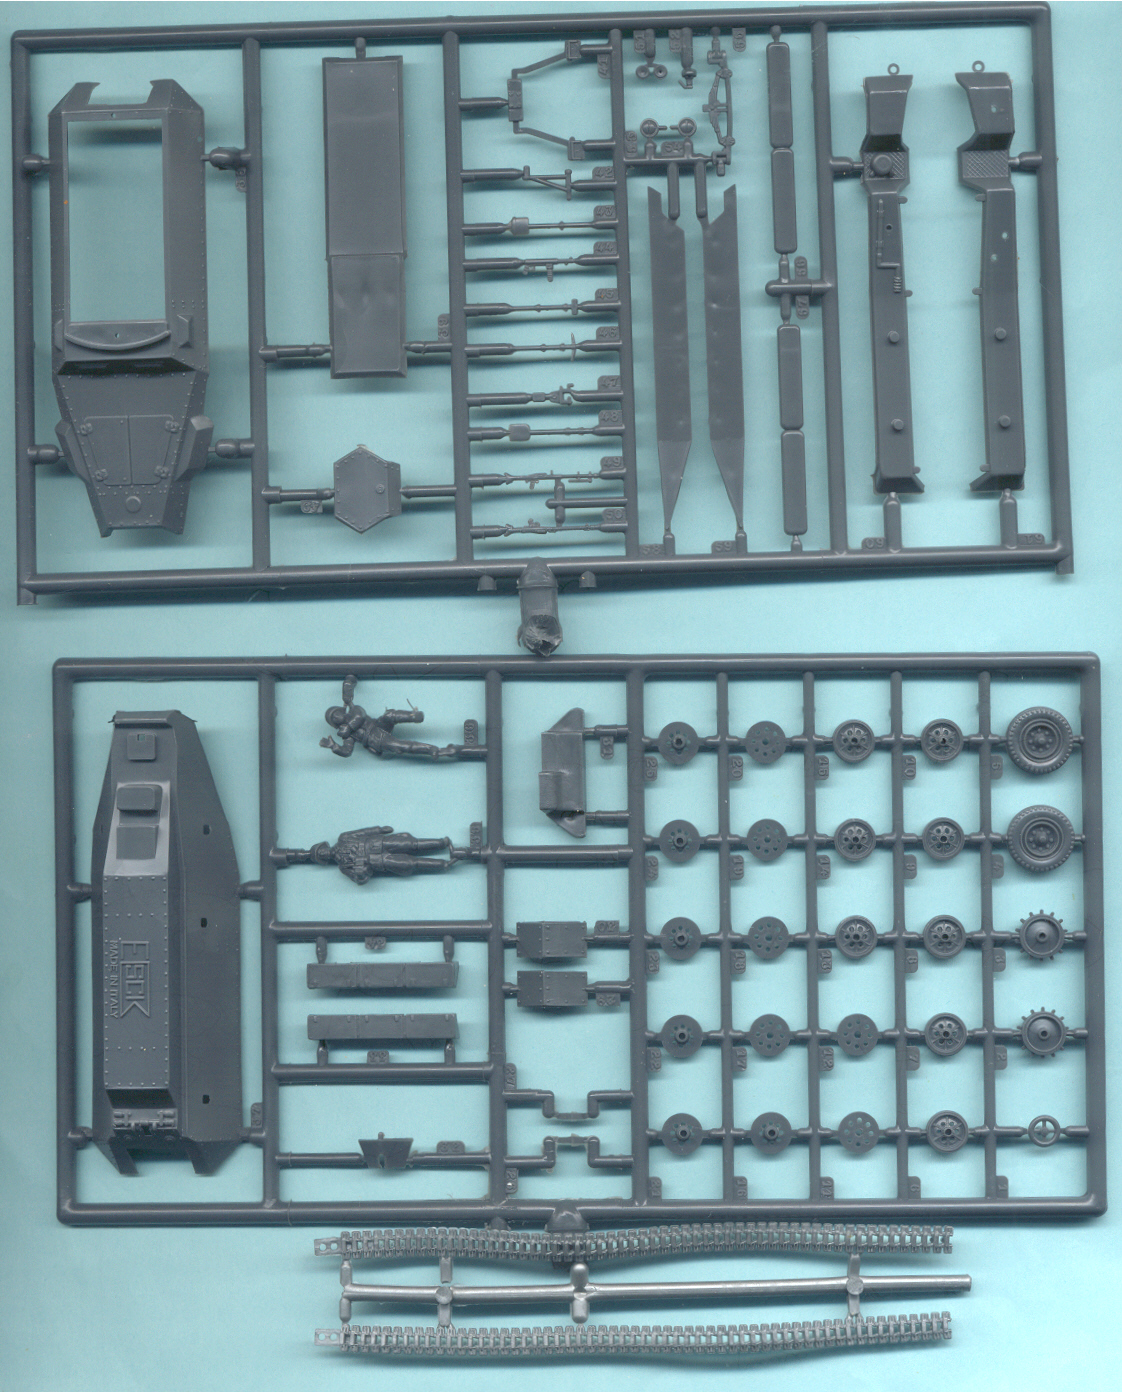
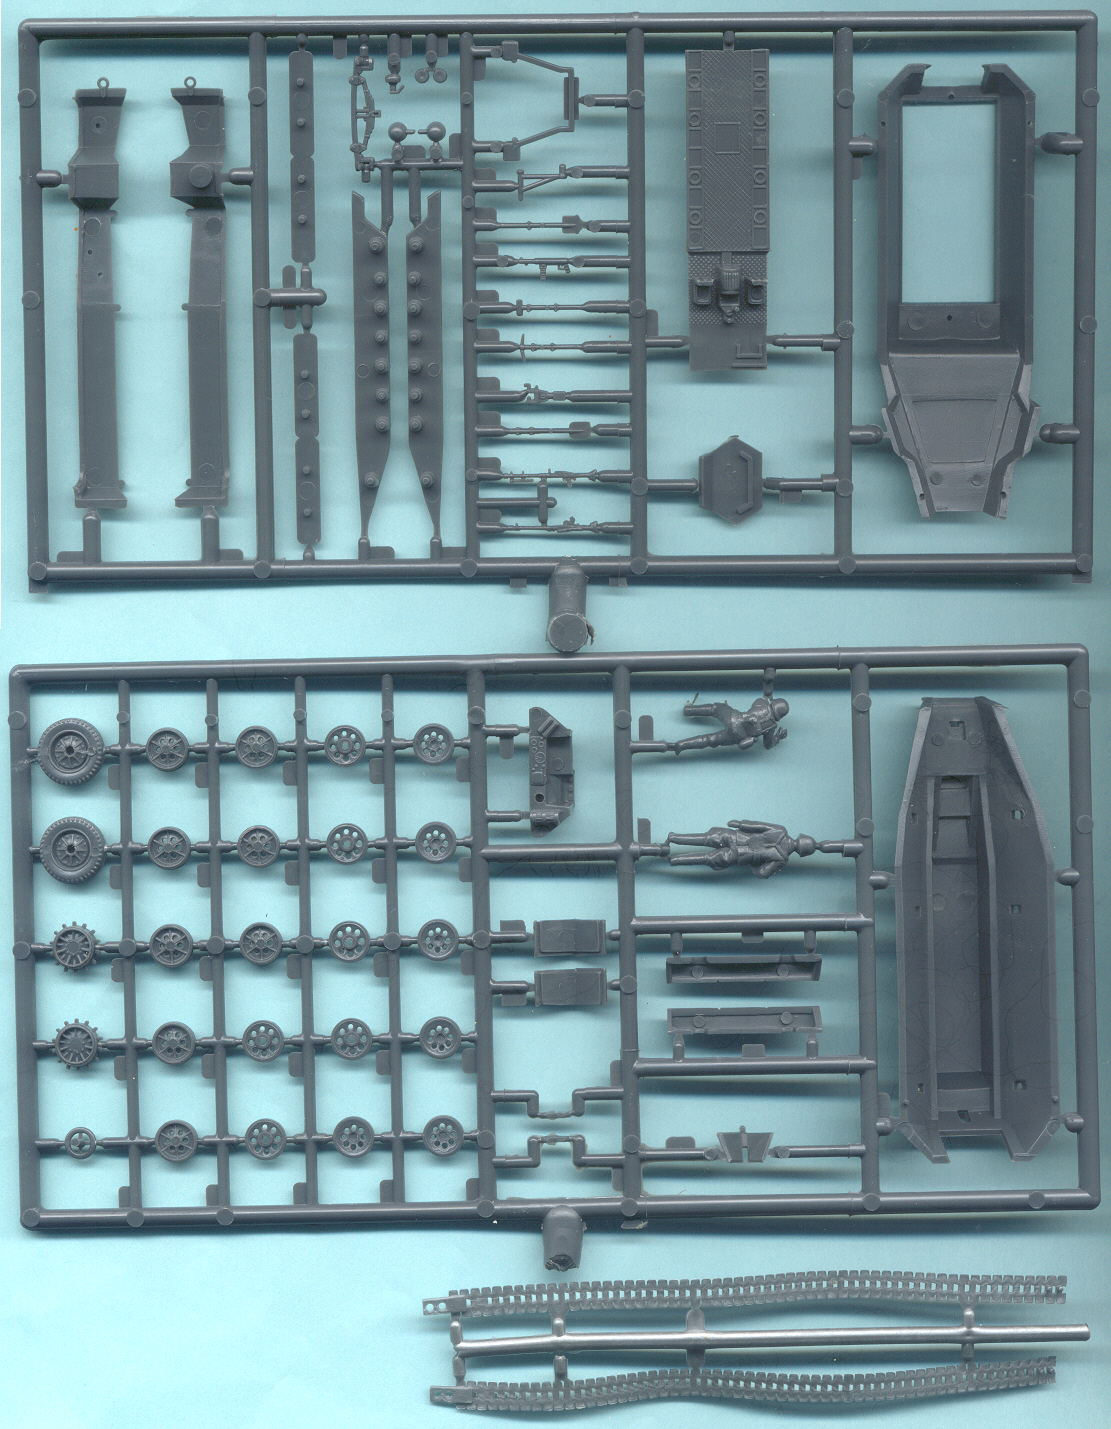
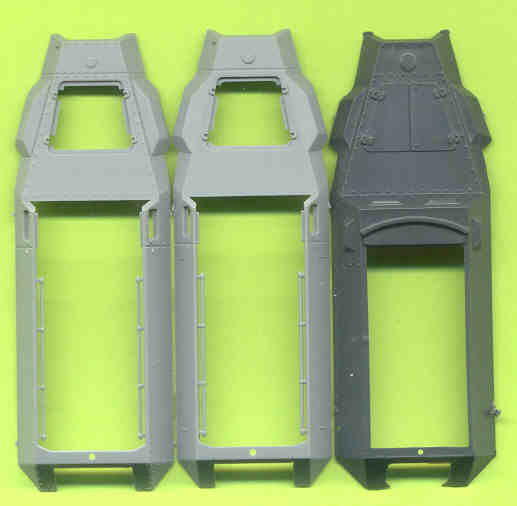
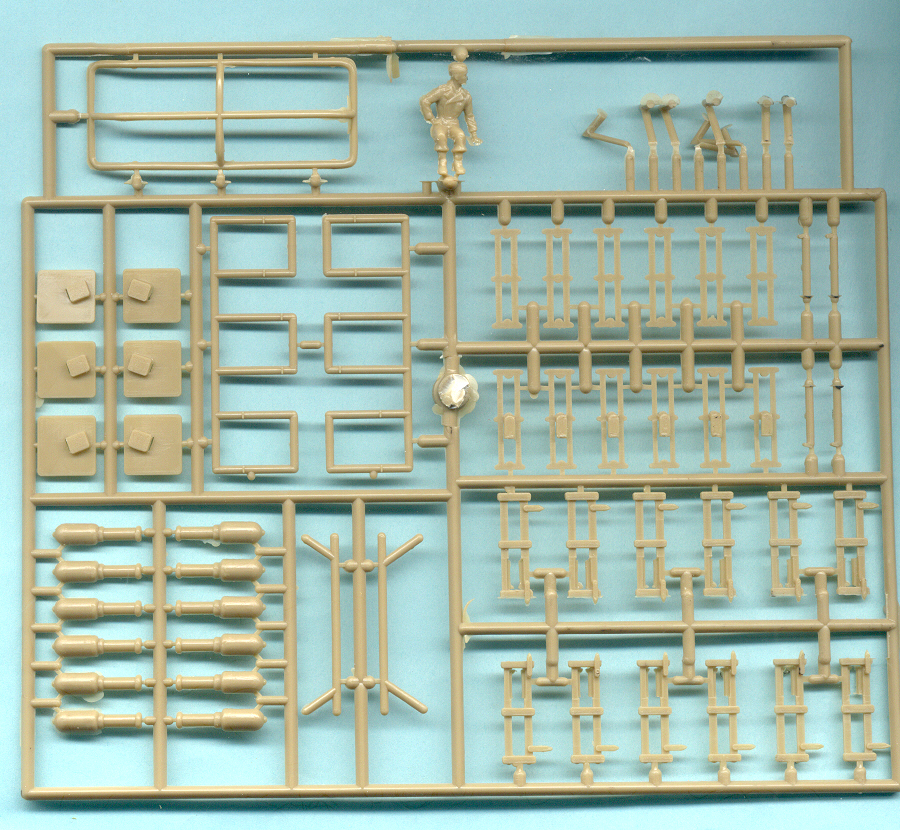
| These are the two sprues that come with every ESCI and Italeri Sd.Kfz.251 Ausf. C kit. Many kits will come with a sprue of hard link & length tracks, older kits will have these stiff polyethylene plastic band tracks at the bottom. For the kits of the Sd.Kfz.251 Ausf. C variants I will just portray the additional sprues supplied to model the particular variant. On the upper hull section (part 38) all the rivets are evident. The left top sprue holds the upper hull, fenders, nose plate, bench seats and floor. In the center is a collection of separate hand tools (parts 43, 45, 48 etc.), two MG34 machine guns (parts 49 & 50), headlights (parts 52, 53 &54)) and an ammunition magazine (part 51) for the MG34. The left bottom sprue holds the lower hull, rear doors, exterior storage lockers, front wheels and wheels for the tracks. Left of center are two crew figures: one in the process of manning the machine gun (part 34) and the other a commander/officer figure (part 35). I find the figures to be in good proportions and reasonably detailed. The MG34 gun in the kit will need some altering to fit into the gunner figure's shoulder. The right
scan shows the reverse side of the kit sprues allowing a view of the
hull interior and the vehicle floor. |
|
|
Modelers have appreciated that ESCI did not simply mold the tools onto the fenders. The Dragon handtools and other small parts are more delicately replicated in 1/72 than the 20-year old ESCI molding. |
 |
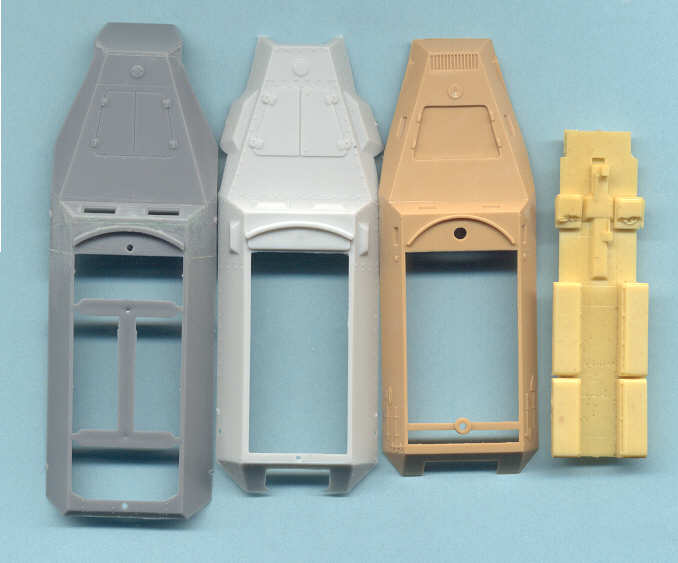 |
To display a difference between the Sd.Kfz.251 Ausf. D, the Sd.Kfz.251 Ausf C and the Sd.Kfz.251 Ausf. B hulls, this scan shows a comparison with the gray plastic Sd.Kfz.251 Ausf. D upper hull from Hasegawa at far left, with the ESCI/Italeri Sd.Kfz.251 Ausf. C part in the center, and the 1/76-scale Sd.Kfz.251 Ausf. A or B hull from Fujimi at right. This line-up gives us a good idea of the evolution of the Sd.Kfz.251 Ausf A through Ausf. D At
far right in amber-colored resin, is a copy of the Hasegawa kit floor
and seating that I cast. The Hasegawa interior is notably more accurate
than ESCI's. This Hasegawa floor drops right into the ESCI lower hull
(part) for almost a perfect fit, very nice. |
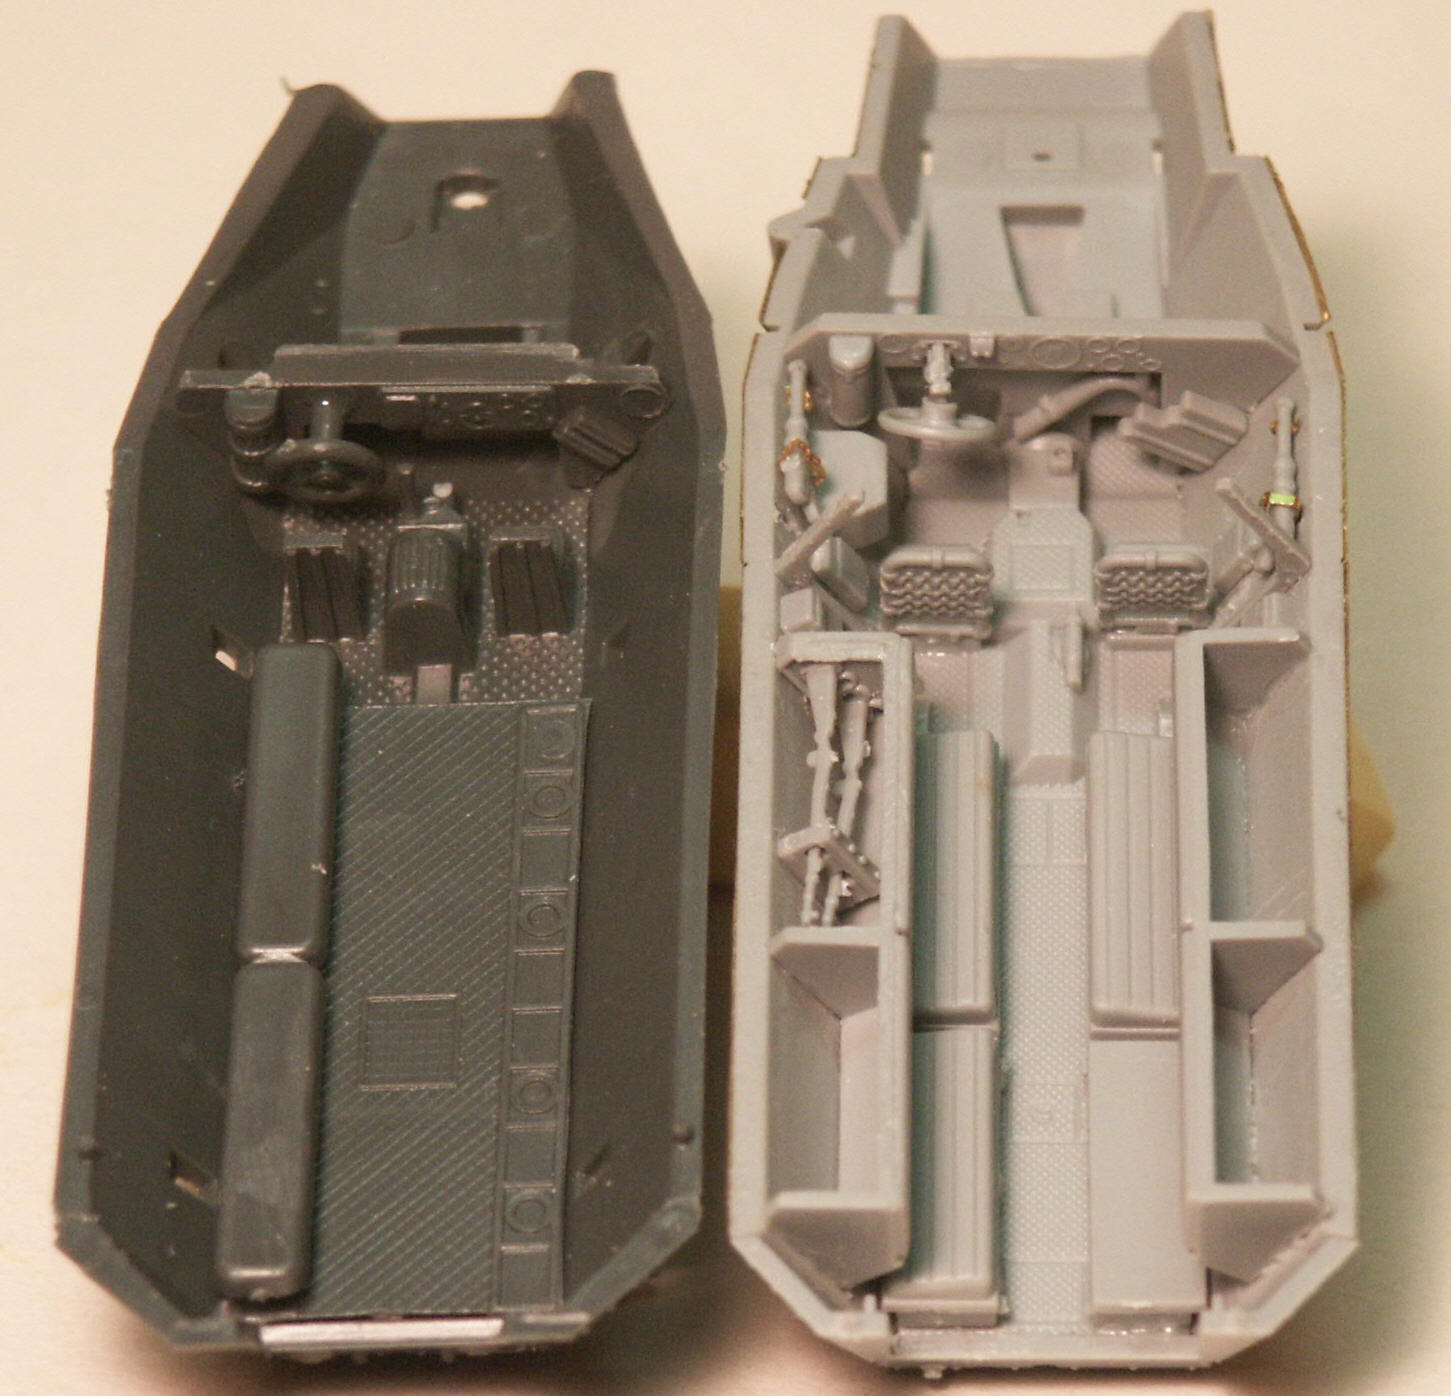
| Examining
this photo we understand the difference between the sparsely detailed
ESCI/Italeri Sd.Kfz.251 Ausf C interior at left and the wonderful Ausf.
C interior in the Dragon Sd.Kfz.251 kit. The ESCI kit suffers from a
greatly simplified driver's area.
In the DML kit notice that the rear bench seats are correctly shorter than the center bench seats. ESCI's bench seats are the same size and have no cushion texture. The ESCI kit is also missing the backrest storage bins. In between the driver's seats of the ESCI/Italeri interior is a rounded bulge which is supposed to represent a water drum that was used in the Sd.Kfz.251/8. |
 |
 |
Left is a comparison of the Sd.Kfz.251 Ausf. C upper hull from Revell at far right, with ESCI's Sd.Kfz.251 Ausf. C hull to its right. Both are reasonably accurate scale representations and about the same dimensions. We can make out some slight differences between the Revell welded-construction upper hull and the ESCI (Italeri) upper hull of riveted-construction. For example the riveted hull as portrayed by ESCI has the engine hoods mounted lower on the sides. See some good references and pay particular attention to these differences if you wish to convert the ESCI hull to a welded construction. |
Here we have a comparison of the more recently released Sd.Kfz.251 Ausf. C upper hull from Dragon. At far left is Dragon's release of a riveted Ausf. C hull, in the center is Dragon's welded Ausf. C hull. The Sd.Kfz.251 Ausf. C was the only medium SPW with the armored hoods protruding from the sides of the engine compartment. |
 |
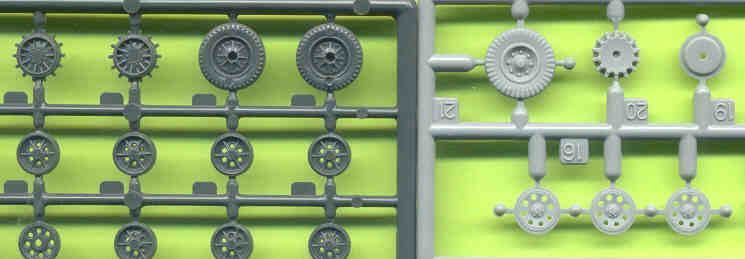
Right is a comparison of (on the left) the ESCI sprocket wheels (parts 2 & 3), roadwheels, the front wheels with tires (parts 4 & 5) and (on the right) the more recently released DML Sd.Kfz.251 wheel parts. DML and Revell kits come with a greater number of roadwheels as ESCI molds the center paired wheels as one wheel (parts 10 through 13, and 15). I notice some ejector pin marks on the ESCI tires but fortunately there are none on the inside face. |
 |
 |
|
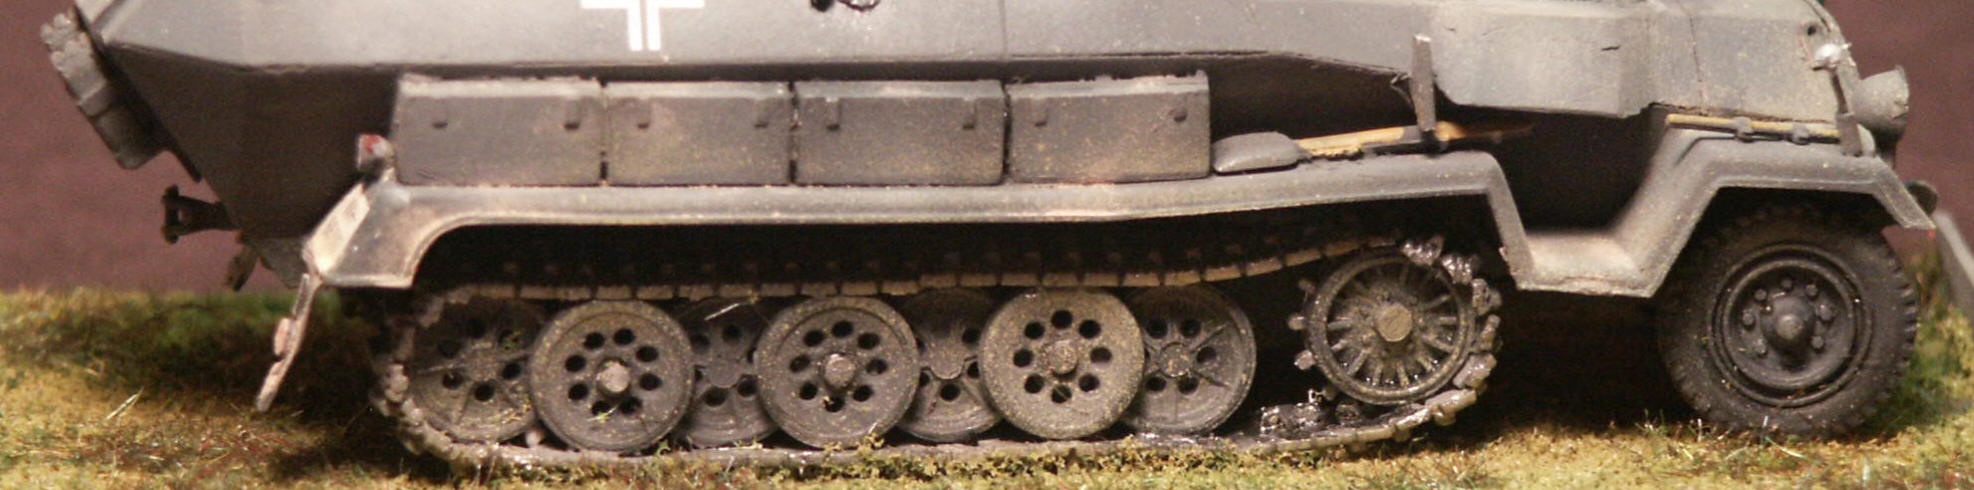
Here is a comparison of two Sd.Kfz.251 suspensions as portrayed by ESCI/Italeri above, and by DML below. The DML wheels in the photo below have greater detail but neither got the wheels right. According to my reference photos and diagrams, the holes going around roadwheels are significantly too small in both kit maker's wheels (The Revell Sd.Kfz.251 Ausf. C kit got these roadwheels more correct). The ESCI/Italeri sprocket wheel is missing a hub in the center which I have fabricated with a short piece of rod on this model. Ed note: not only the holes in the ESCI/Italeri roadwheels, but also the wheels themselves are too small. Incidentally, the wheels in ESCI/Italeri's SdKfz11 are much better. Also note that the rear roadwheel in the ESCI/Italeri kit touches the ground while it should be raised a little. On the ESCI model notice a small gap above the shovel
where the upper and lower hulls join; I have seen this problem in
other modeler's assembly of this kit also so I suspect this is a fit
problem of the kit. (Please ignore the fourth, extra, storage locker
on the fender). |
|
 |
|
|
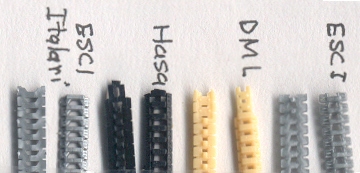
Comparing ESCI's styrene link & length Sd.Kfz.251 tracks at far left with Hasegawa's black soft plastic track, with DML's amber color band track, and ESCI's stiff band track. I find all have acceptable outer surface detail. Hasegawa and DML both have center guide teeth while the ESCI/Italeri track have no guide teeth, also known as track horns. Guide teeth can be scratchbuilt from a strip of styrene and glued to the ESCI link & length track, but not easily to the polyethylene band track. ACE makes
nice band tracks for their Sd.Kfz. 250 and Sd.Kfz. 10 kits and though
short, I think that they can be bought separately and modified to
use with the ESCI/Italeri kits. Rob Haelterman reported to me that
Revell's Sd.Kfz.251 kit tracks are too narrow, and the MPK (MK72)
Sd.Kfz.250 tracks are wide for the kit and suitable for the Sd.Kfz.251.
(Ed. Note: the new MK72 kits come with two sets of tracks, so
you’ll have one spare.) |
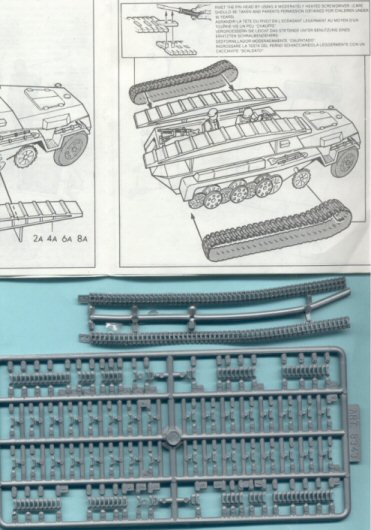 |
This scan shows a better comparison of the two track types in the ESCI kits with instructions on how they are to be put together. Good luck with the stiff band track; they seem to defy all common glues. I recommend heating the track in hot water and wrapping it around something round, like a wood dowel, to keep its curve. These articles may also help: http://www.onthewaymodels.com/articles/SBrezinski_Tracks.htm and http://www.onthewaymodels.com/articles/SLawTrackSag.htm . |
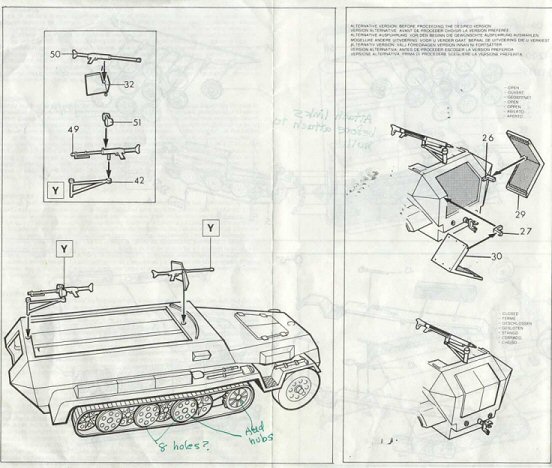
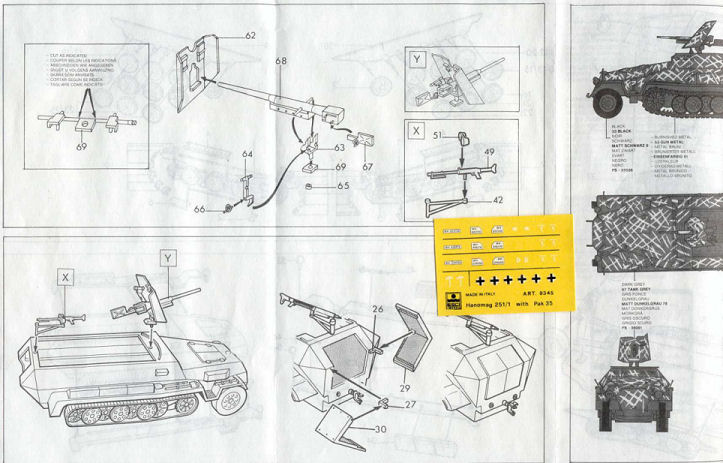
| I
included this part of ESCI's instructions as it shows assembly of the
link & length track sections. I understand that this is the track
type we get in Italeri's re-release of the ESCI kit. Notice no turn
signal parts are included with the model but fortunately these are easy
to make from plastic sheet.
The left side of the instructions show assembly of the kit interior which is pretty basic, Spartan in features. The ESCI/Italeri kit roadwheels (parts 10-13 and 15) should be a pair of wheels not one thick wheel. ESCI's method cuts down on the number of parts to assemble, but makes it difficult to fit track guide teeth around the wheels. Perhaps this is why ESCI left guide teeth off their track, or perhaps the lack of guide teeth on the track compelled ESCI to mold these center wheels as one thick wheel? |
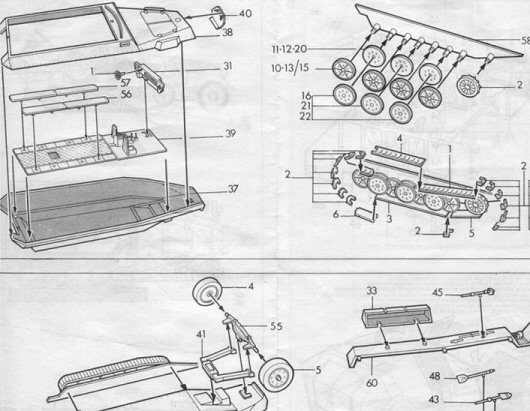 |
The end of ESCI's assembly instructions show addition of the two nicely rendered MG34 machine guns and the rear door in either open or closed positions. The real Sd.Kfz.251 Ausf. C door hinges are quite complicated affairs and here they are modeled quite simplified. |
 |
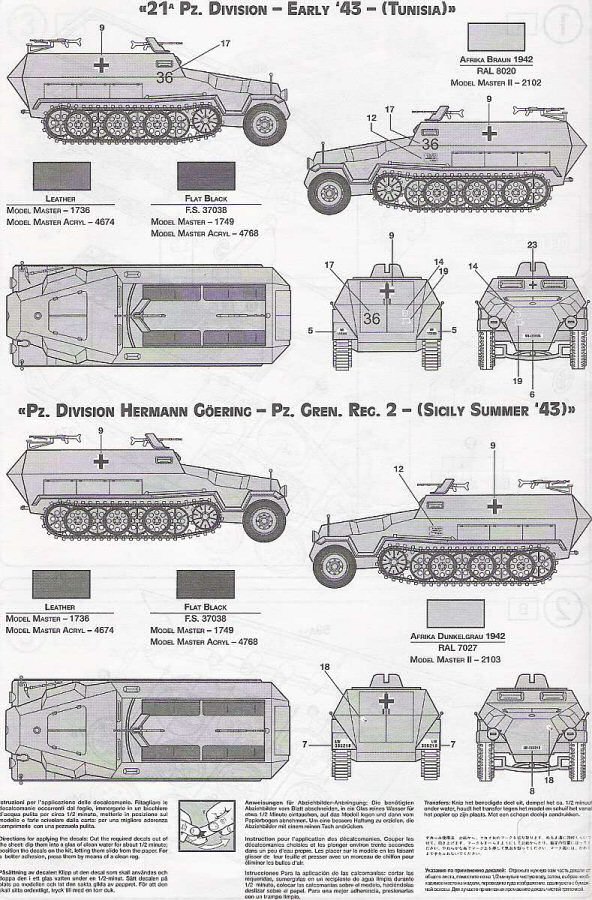 |
Here
are Italeri's black and white 5-view diagrams for painting and markings
for their re-release of the ESCI kit. There are water slide decal
markings for four vehicles. These Italeri instructions are improved
over the original ESCI instructions.
|
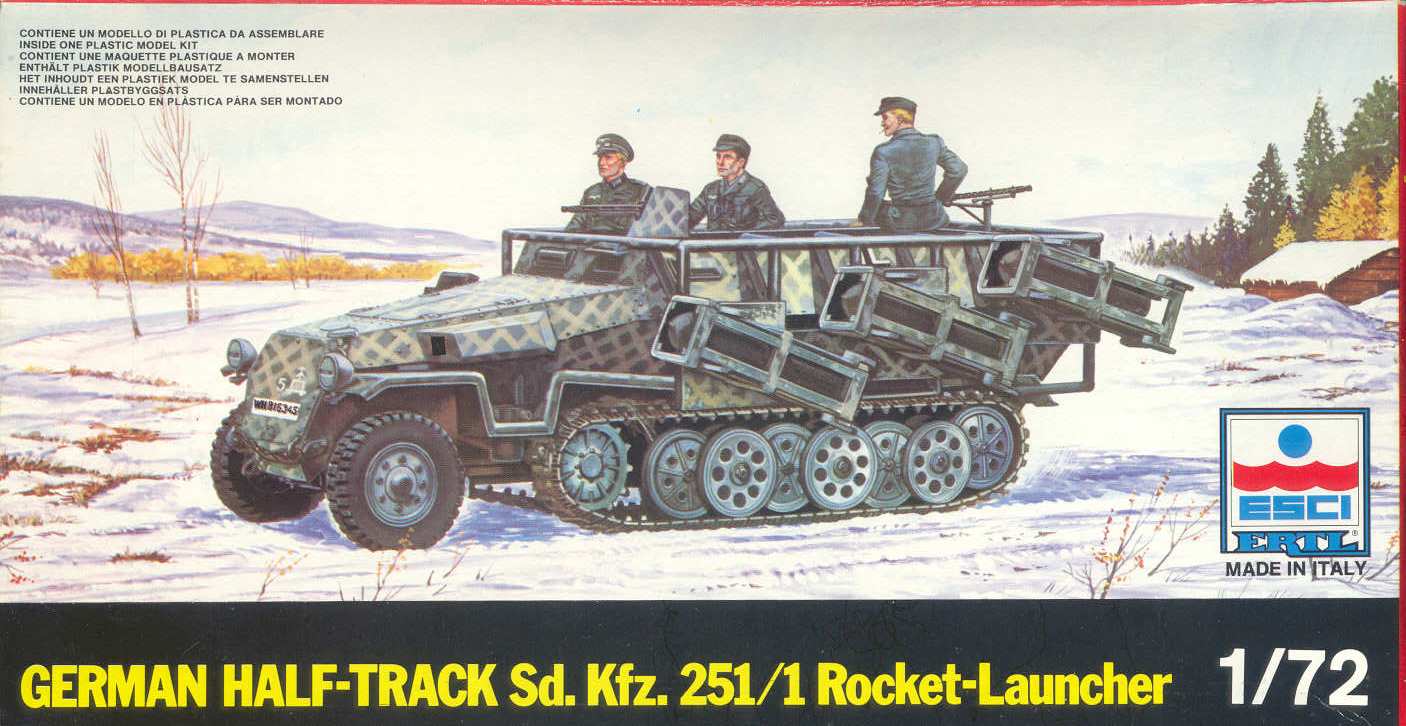
Sd.Kfz.251/1
Schützenpanzerwagen (SPW) Stuka zu Fuss Rocket Launcher variant. This is not a true variant but appears to be a modification of the Sd.Kfz.251/1 Schützenpanzerwagen to carry six bulbous shaped Wurfrahmen 40 launchers for 30-cm high explosive rockets, 28-cm HE and 32-cm incendiary rockets (see http://en.wikipedia.org/wiki/Wurfrahmen_40). This vehicle was given nicknames of Heulende Kuh (Bellowing Cow) and Stuka zu Fuss (Stuka on Foot or Walking Stuka). This is quite an imposing vehicle and one of my favorite versions of this halftrack. |
|
| Looking
at the box art of one of the initial ESCI releases we see a Sd.Kfz.251
Ausf. C in panzer gray color and a cross-hatch pattern of what looks
to me to be mud.
On the open top halftrack we see the tubular frame for the launchers. The launcher mounts are staggered: the ones in the rear being higher so the rockets can be fired over the ones in the front. The rockets are shipped in and fired from wood or steel frame crates which attach to the vehicle launcher. The
rearmost crew figure above is included with the model though the other
two figures in this box art do not match the poses of the two crewmen
in the kit. |
 |
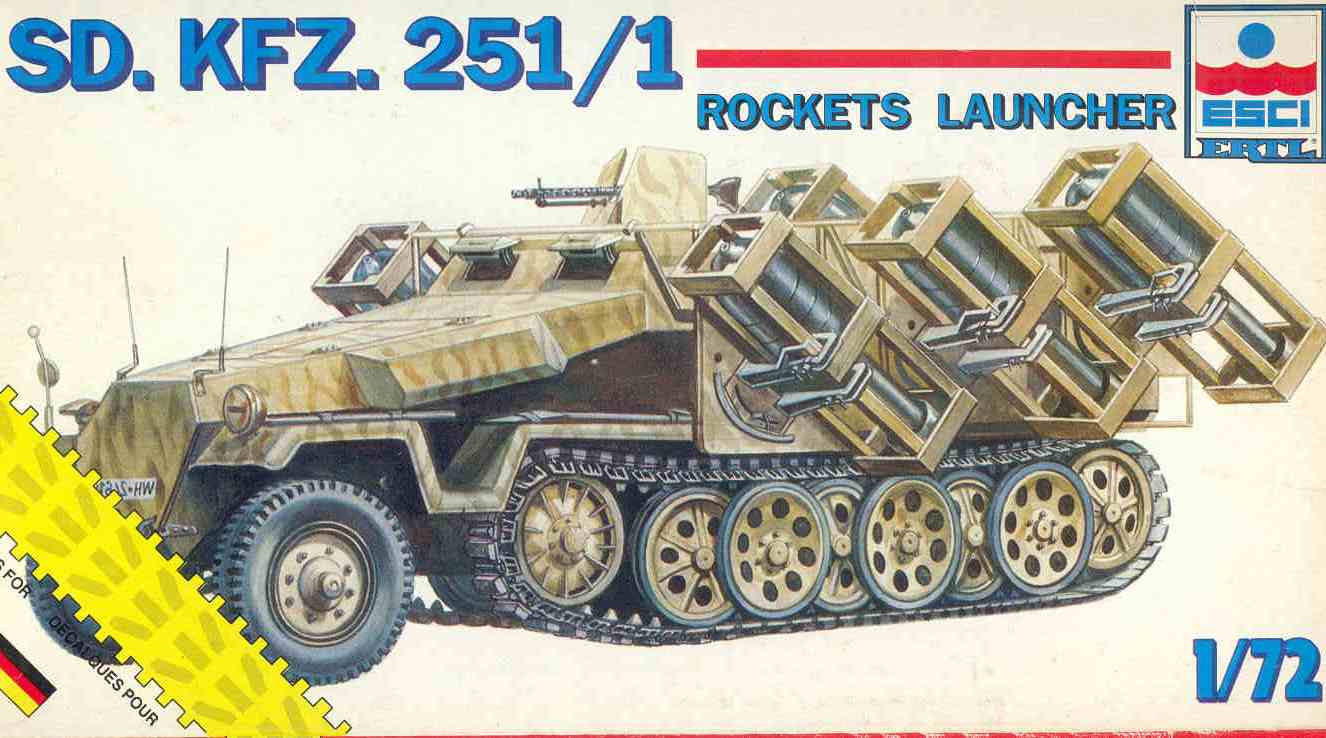 |
This is another release of the Sd.Kfz.251/1 Stuka zu Fuss kit by ESCI/ERTL. The artwork is not as dramatic as the above boxart but it shows the detail of the launcher frames well. The rockets are painted in dark gray though I have read they also were painted dark green. I understand that the yellow track symbol at lower left of the box art indicates that this kit comes with hard plastic link & length track parts |
| This
is the sprue added for the parts to make the the Sd.Kfz.251/1 Stuka
zu Fuss model. At right are the parts 73, 75 81 and 82 representing
the wooden shipping and firing crates for the rockets. At lower left
are the rockets. Above and to the immediate right of the of the rockets
are the launcher frame parts, molded a little thick but typical of the
time period this model was released. Based on historical photos the
wood launcher frames should be a natural wood color. At top center is
a crew figure in the pose as seen in the box art above. Something
of particular interest to me are parts 62 at upper left, and parts
74 and 76 at far right. These are frame antenna parts for an the Sd.Kfz.251/3
or Sd.Kfz.251/6 command and communications halftrack vehicles. These
Sd.Kfz.251 variants using these parts were never released as individual
kits by ESCI to my knowledge. In order to use these parts we will
need to come up with a radio set and other appropriate interior details. |
 |
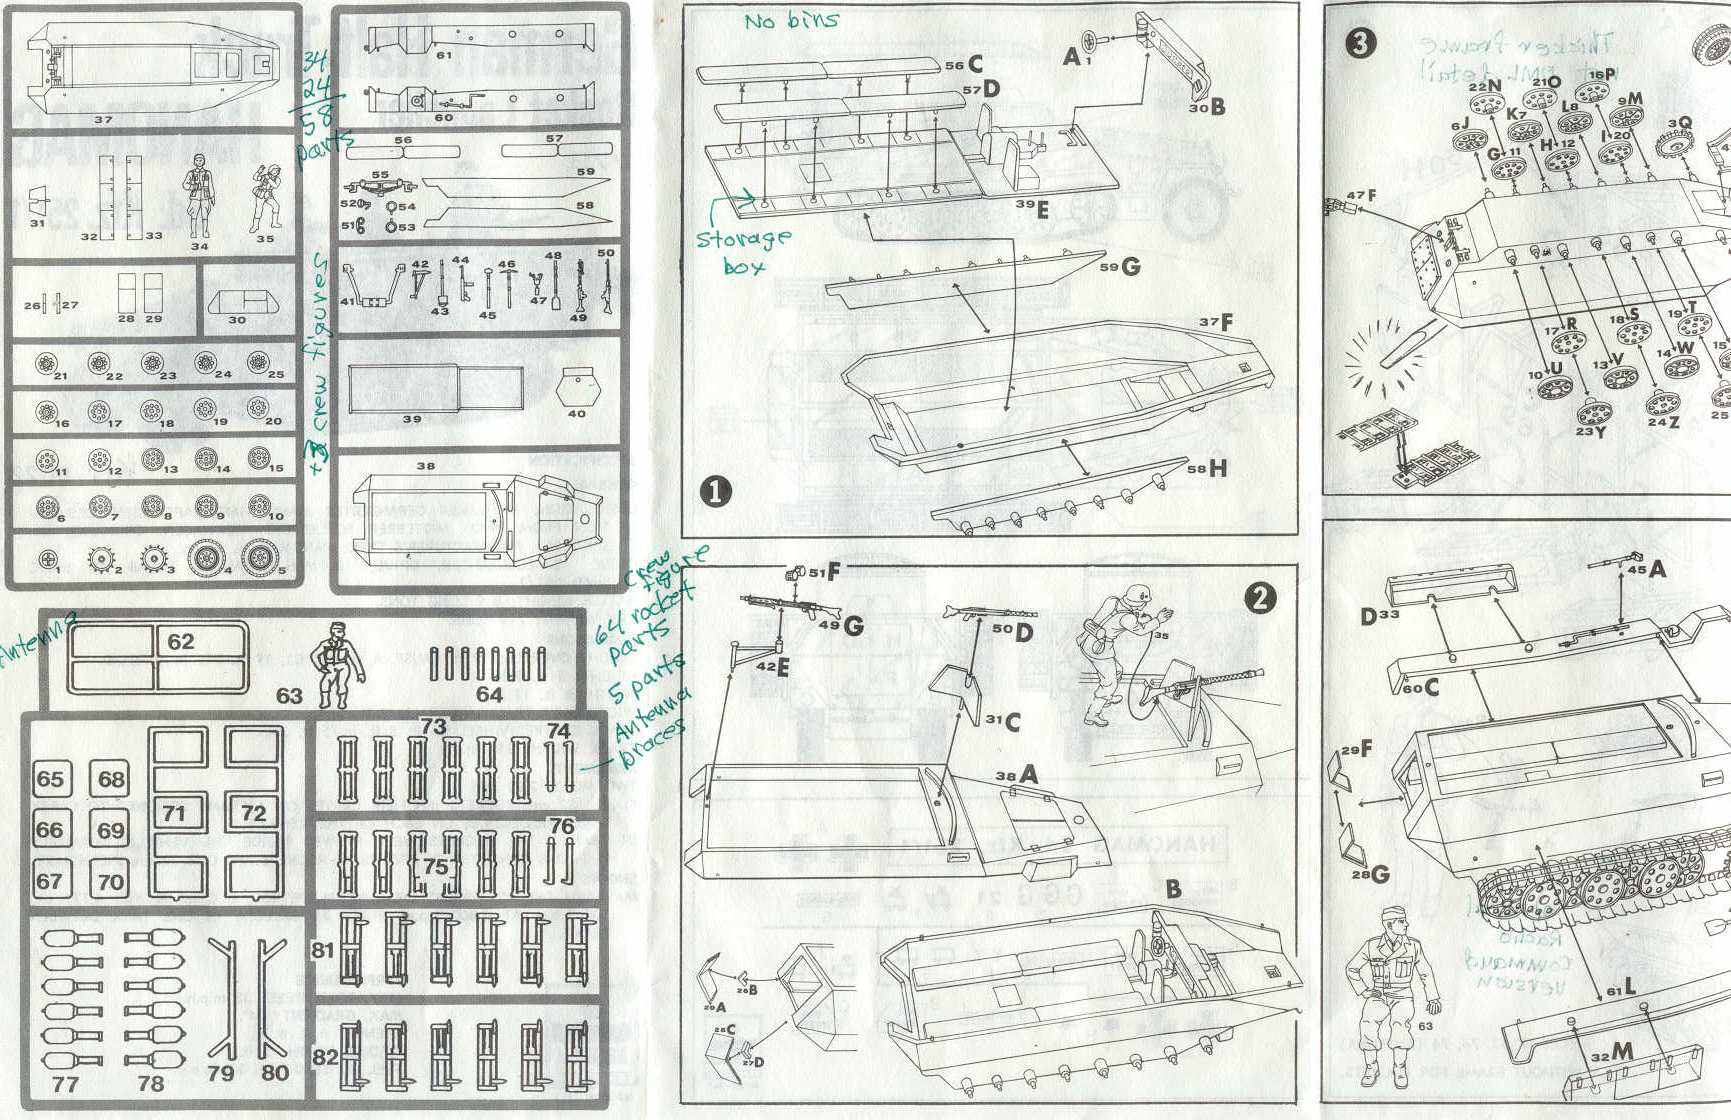 |
Left
are the pages from ESCI's Sd.Kfz.251/1 Stuka zu Fuss model kit. It basically
shows the assembly of the personnel carrier version with the addition
of the rockets and launcher frame.
Both interesting and confusing to me are the instructions to assemble and install the frame radio antenna parts along with the rocket launchers. In all my references I have never seen frame antenna mounted on the rocket carrying Sd.Kfz.251, however Rob Haelterman showed me a photo of an Sd.Kfz.251 Stuka zu Fuss, on what appears to be an Sd.Kfz. 251/3 version of the 11 Panzer Division, October 1941. This 1941 photo shows an Sd.Kfz.251 Ausf. A or Ausf. B hull so technically does not match this ESCI kit. The Sd.Kfz.251 with Wurfrahmen 40 launchers was a fire support vehicle while the frame antenna denotes a radio communications and command vehicle. The
ESCI instructions come with water slide decals for three different
vehicles but there is only one 3-view painting and marking diagram.
The ESCI water slide decals have always applied well for me. even
though some of mine are 20-years old. |
 |
|
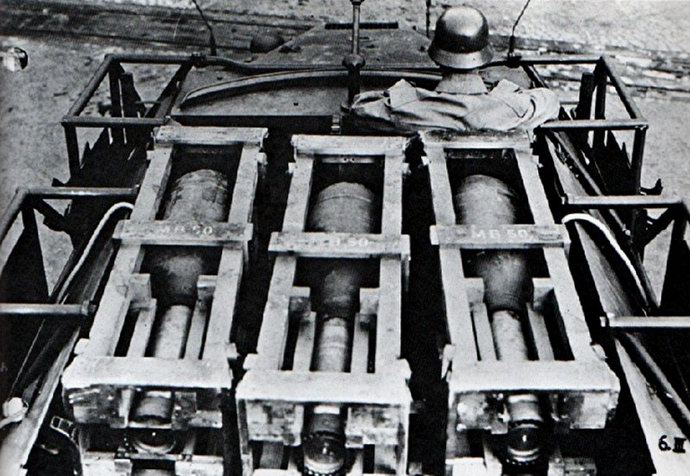
| This
historical photo I have found at several web pages shows a Sd.Kfz.251/1
Stuka zu Fuss with the six bulbous rockets in their wood transport and
firing crates. The storage crates were also produced from steel and
I understand these steel frame crates were re-usable. On each side we
have the tubular launching frame. There are two cables, one on each
side, going over the side of the halftrack; I presume these are the
electrical wires to ignite and fire the six rockets. This is a good view of the rear end of the rocket; if we look close were can see a ring of small holes going around the base of the rockets. The ignited rocket fuel comes out these small holes causing the rockets to spin which annuls the need for fins to stabilize the rocket. Up next to the commander is an antiaircraft machine gun mount normally found at the rear of the Sd.Kfz.251 halftrack. |
 |
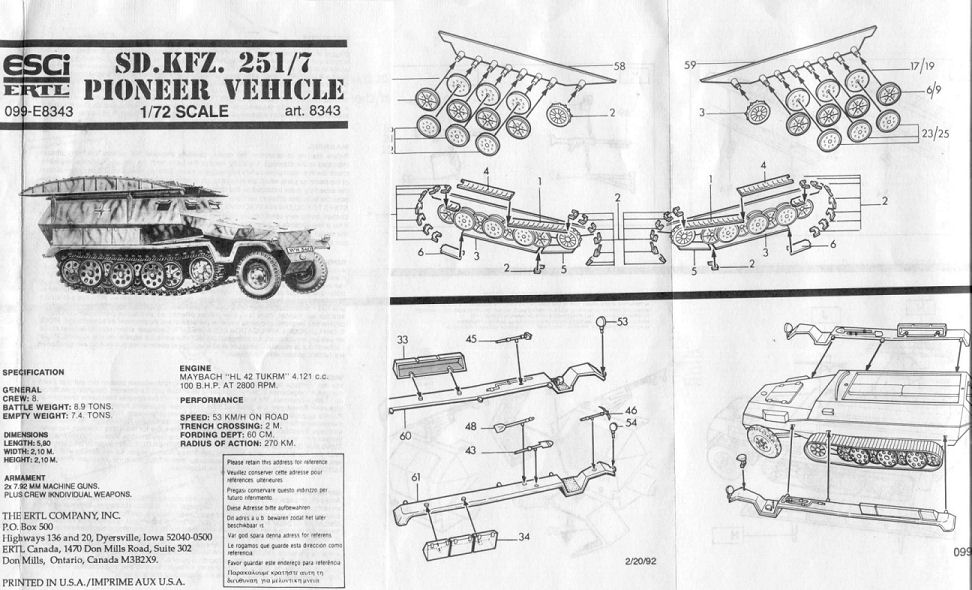
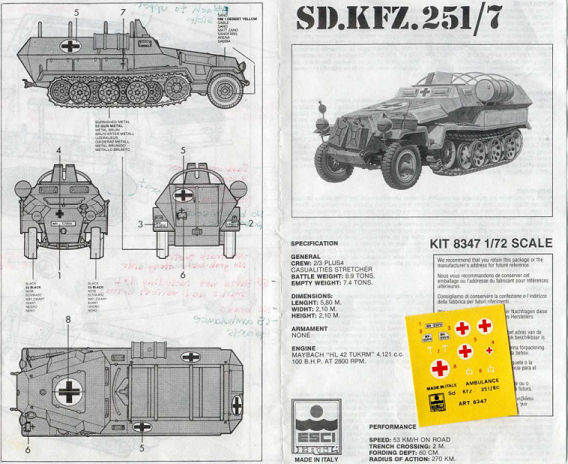
| Sd.Kfz.251/7
Ausf. C Pionerpanzerwagen (Combat Engineer Vehicle) Sd.Kfz.251/7 fuer Panzer-Pionier-Bataillon "mittler Pionierpanzerwagen |
|
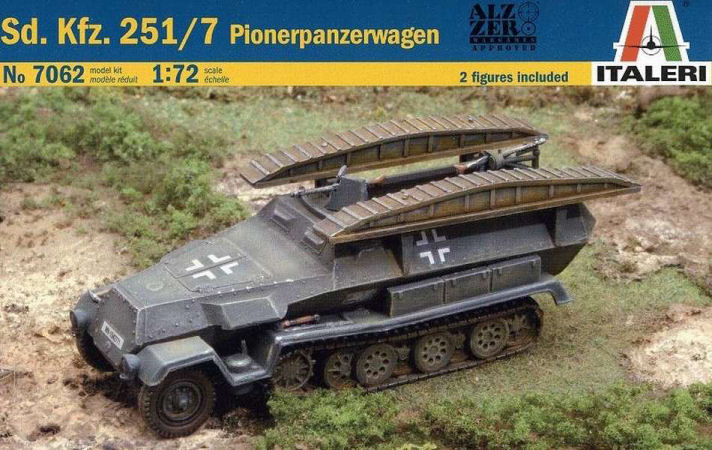
| Italeri's
kit 7062 box art for the Sd.Kfz.251/7 here shows an actual assembled
model kit. The first thing I notice are the two bridging sections mounted
on braces on the hull superstructure. The bridges were for crossing
trenches and streams and I've seen them in use for loading and unloading
rail flat cars. In historical photos we can see a wood board set between
the braces and the space behind overflowing with gear. On the front
fenders we see the headlights but no Notek light and no vehicle width
indicators.
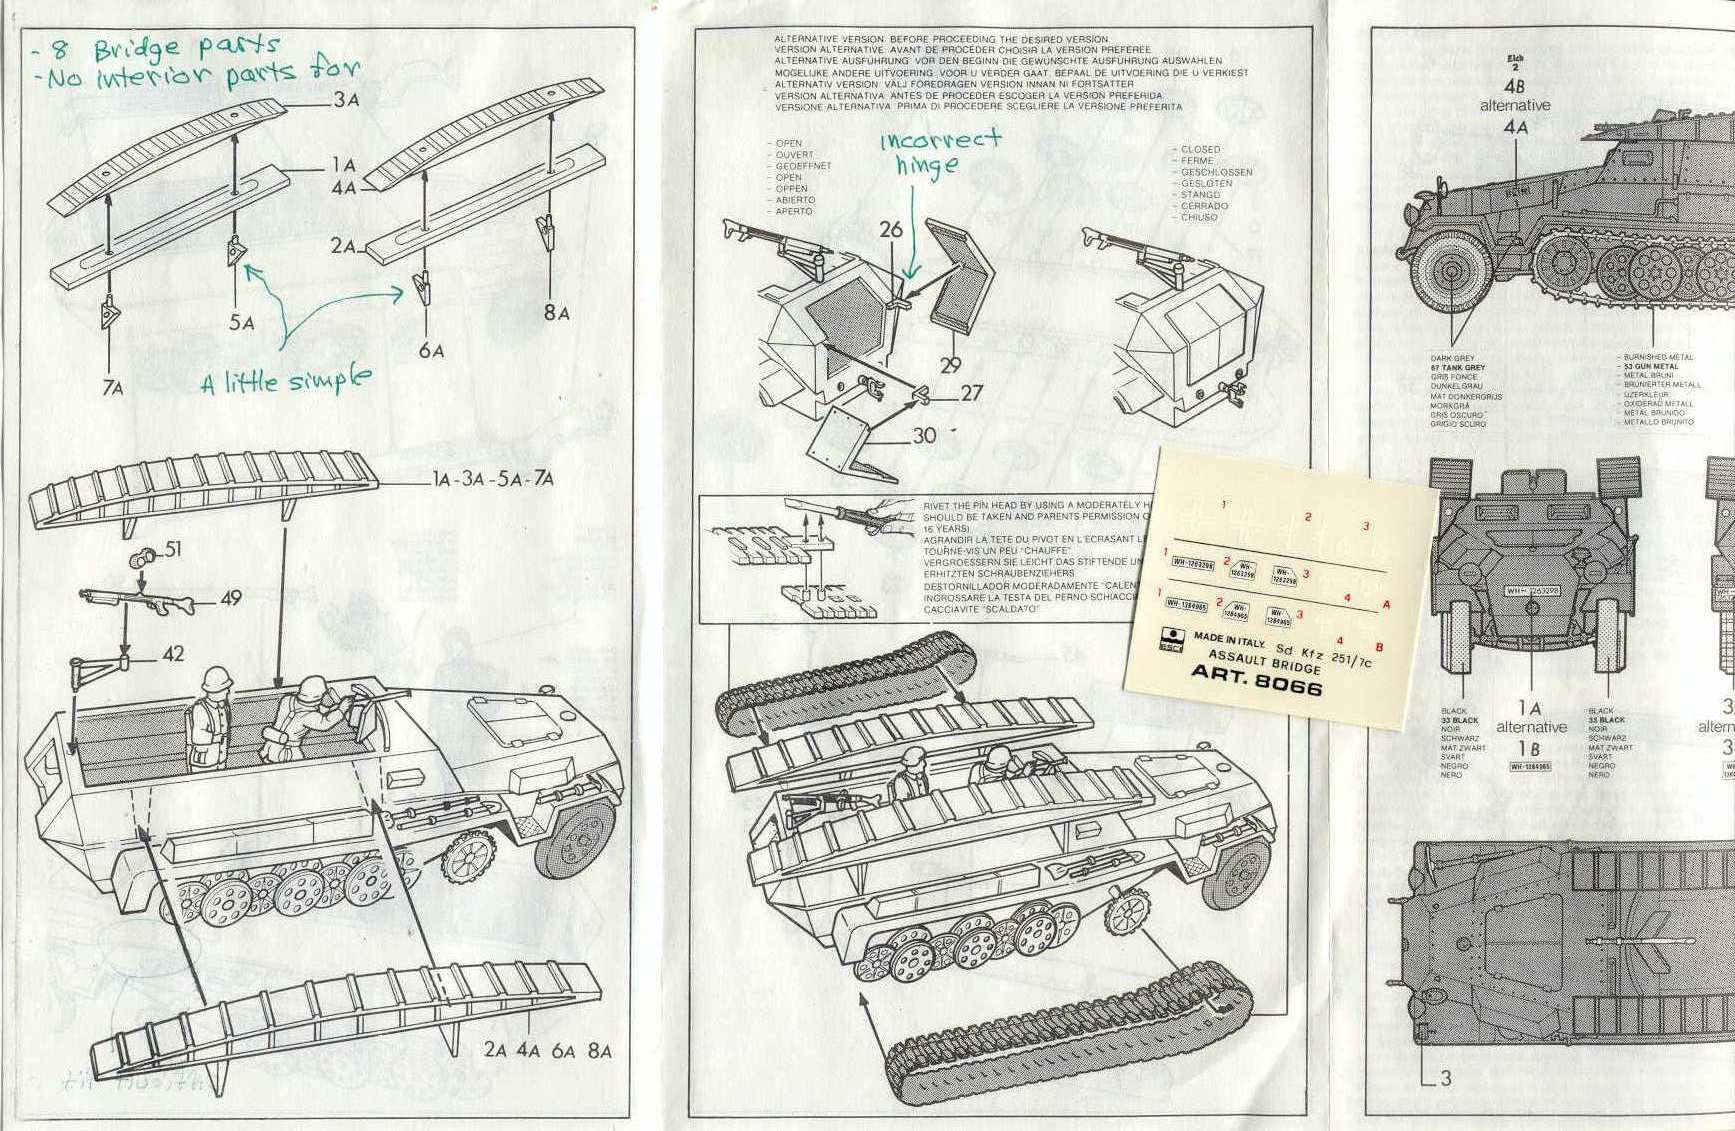
A thing to take note of that you may wish to correct is the engine muffler mounted through the fender between the front wheels and the tracks. The muffler is too low and the engine exhaust pipe does not go all the way up into the engine compartment. The vehicle is finished in a dark gray color with white crosses and painted on license plate. Italeri's spelling of "Pionerpanzerwagen" does not match the spelling used by ESCI/Ertl (Pioneer) and in Panzer Tracts (Pioniere). |
 |
 |
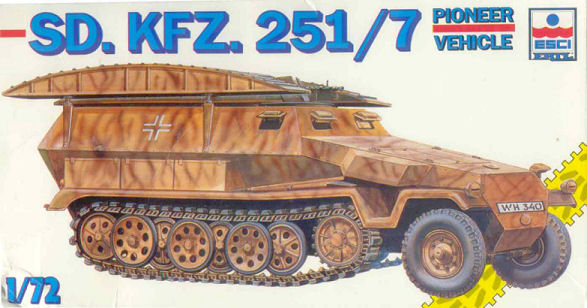
In
the old box art for an ESCI release we see an artist's rendition of
the assault bridges with the levers protruding up through the deck of
the bridge to affix them to the braces. If you look carefully you can
make out two horizontal lines on the side of the bridges, these should
represent carrying handles. What
we cannot see in this boxart is the interior. According to Panzer
Tracts 15.2 the Sd.Kfz.251/7 Ausf. C had storage lockers and metal
frames for holding engineering equipment in place of the rearmost
bench seats. This kit could also be made to represent a Sd.Kfz. 251/5
fuer die Pionierzuege der Schuetzeneinheiten combat engineer vehicle,
which is another combat engineer vehicle but with a different internal
layout. |
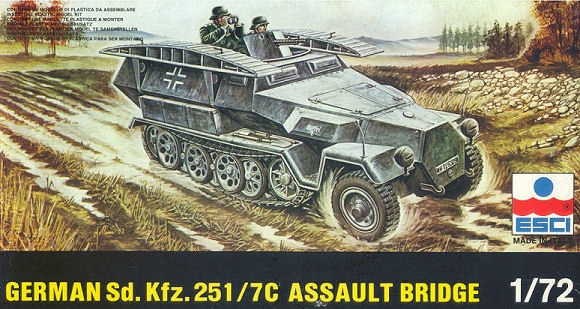
This
box art shows a later release of the Sd.Kfz.251/7, with a post 1942
panzer yellow base color. Though the front and side view ports are
depicted open, they are molded closed on the actual model. The yellow
track across the lower right corner indicates that this model comes
with the hard plastic link & length tracks. The carrying handles
I have seen on the actual assault bridges, and the vehicle width indicators
on the front fenders are not portrayed in this artwork.
|
 |
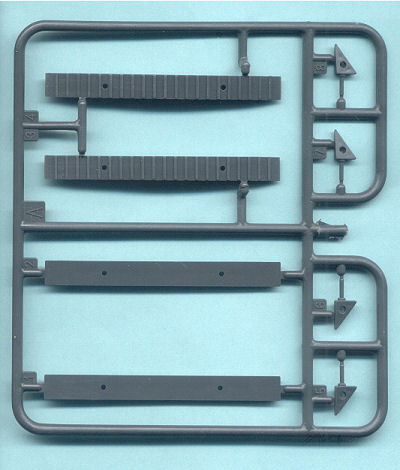 |
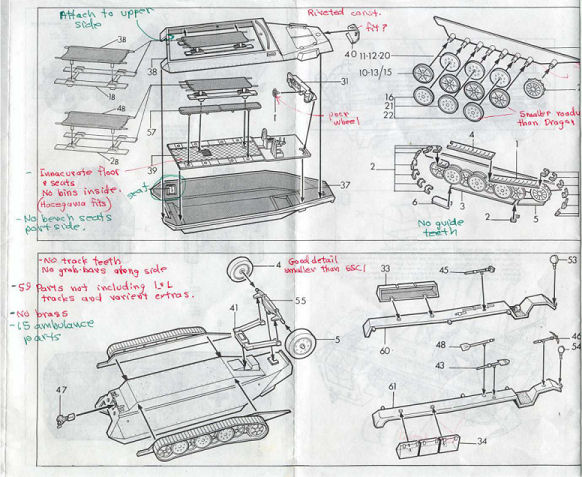
This sprue is what makes this kit an Sd.Kfz.251/7 Pioneerpanzerwagen halftrack, the eight parts (parts 1A through 7A) for the two assault bridges and their brackets for carrying them on the halftrack. The bridge parts are thick for the scale. The holes on top are for the locks holding them onto the brackets. The side handles for the bridges can to be made from bent wire after drilling holes. From my references, particularly Panzer Tracts 15-2 and Panzer Tracts 15-3 , the interior of the Sd.Kfz.251/7 Ausf. C also had storage bins and racks in place of the rear seats, though later production Sd.Kfz.251/7 Ausf. D and perhaps some late Ausf. C, had the rear seats and no racks. |
These
instruction sheets richt are basically the same black & white
exploded-view type for the other ESCI Sd.Kfz.251/1 models except for
the addition of the assault bridges and the decal markings for three
Sd.Kfz.251/7 Pionierpanzerwagen models. |
 |
 |
|
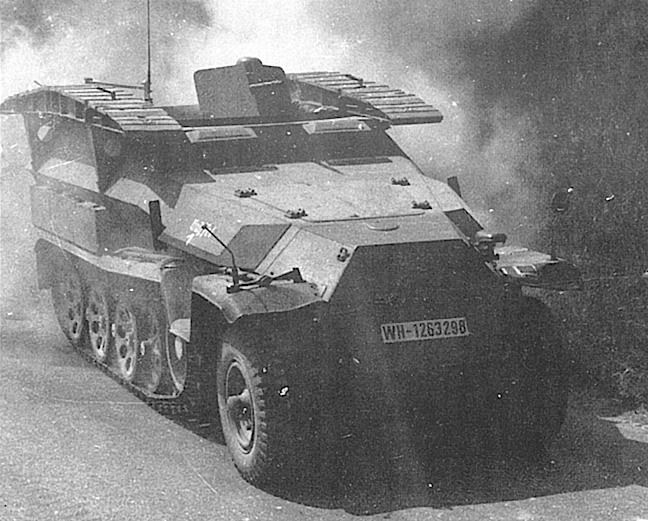 |
Here
is a historical photo of a welded-hull Sd.Kfz.251/7 Ausf. C Pionierpanzerwagen
taken from one of several web pages. This is the Sd.Kfz.251/7 Pionierpanzerwagen
portrayed in ESCI's decal markings. In good view are the locks for holding
the bridges onto the supports. The front driver's visors are open. The
radio antenna is visible on the starboard side of the hull. At the corners
of the front fenders are the vehicle width indicators topped by small
white balls. There is an MG34 mounted behind the front shield though
there appears to be no AA machine gun mounted on the rear. Notice
the large holes in the track roadwheels, something not exactly copied
in the ESCI or the DML kits. Behind the engine vent hoods we see the
turn signals. |
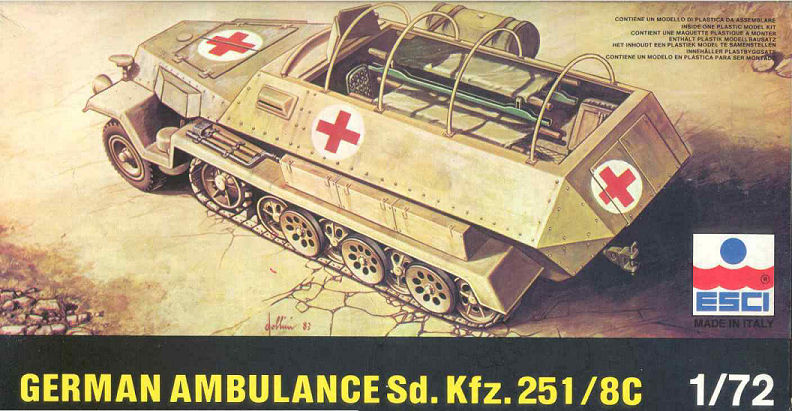
Sd.Kfz.251/8
Ausf. C Armored Ambulance The
Sd.Kfz.251/8 Ausf. C was an armored battlefield ambulance built on
the Sd.Kfz.251 Ausf. C and Ausf. D variants. The
Sd.Kfz.251/8 had two bench seats in the rear for walking wounded or
three stretchers, of a combination of the two. |
|
This
box art displays the riveted construction of the ESCI model kit and
some of the ambulance interior. We can make out the upper and lower
stretchers mounted on the starboard side of the hull in place of the
bench seats and storage bins. Behind the stretchers is what looks
like a box but is actually a fold down seat.
On
the starboard exterior we see a large drum or barrel mounted on the
exterior side with straps; In a photograph I have only seen this exterior
drum on an Sd.Kfz.251/8 Ausf. C used in North Africa. Though this
halftrack in this artwork has the front machine gun shield, no weapons
are mounted here, though I have heard it was common for medic units
to be common targets and armed on Germany's Eastern Front. |
 |
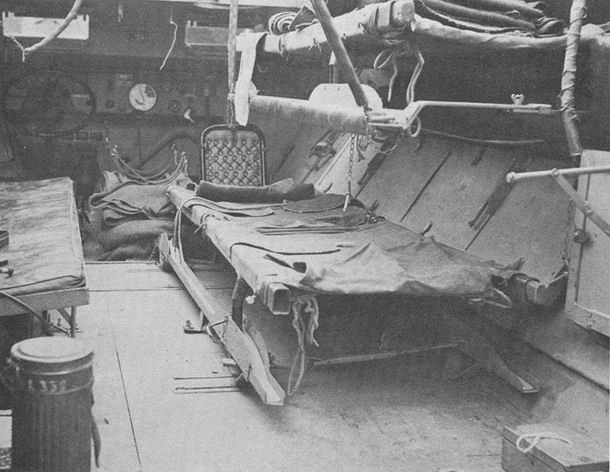 |
In
this common photo of an Sd.Kfz.251/8 interior borrowed from one of a
number of websites we see from front to back of the commander's seat,
the dashboard and dials, and the steering wheel off to the left. On
the left of the crew compartment is a bench seat but not the bench seat
normally seen in the Sd.Kfz.251. This bench seat can fold up against
the interior wall like we see to the right under the stretcher. This
Sd.Kfz.251/8 is set up with a bench seat on the port side and two stretchers
on the starboard side. To the rear of the seats and stretchers are folding
seats; we see one of them at far right folded up against the hull.
Not seen
in the photos are horizontal cross braces going across the hull top
to support the stretchers by what appear to be chains covered in canvas
socks. We can see these chains going up from the supporting frame
of the upper stretcher. The stretchers appear to slide into troughs
of the supporting metal frame (see parts 1 and 2 on the sprue of parts). |
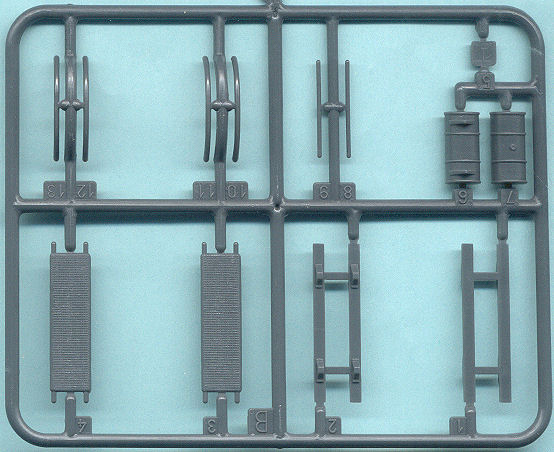
This is the sprue of 13 parts that make this kit a Sd.Kfz.251/8 ambulance. The arched parts 10 through 13 are supports for a canvas weather cover, something I believe that all Sd.Kfz.251 halftracks came with. Part-5 at upper right is the folding attendant seat and below that are the two parts for the water drum mounted on the exterior. Parts 1 and 2 at lower right are the support frames for under the stretchers. At lower left are the patient stretchers (parts 3 & 4). |
 |
 |
ESCI's Sd.Kfz.251/8 instructions are the standard black & white exploded-view type similar to other ESCI Sd.Kfz.251 kits. The
bench seat (part 57) does not match that seen in the vehicle photo
above. The attendant seat seen in the above photo (ESCI's part 5)
is not numbered in these instructions but is visible on the port side
of the lower hull. |
Though
the title of this instruction sheet states a "Sd.Kfz.251/7",
this is incorrect; it is clearly a Sd.Kfz.251/8 ambulance not a combat
engineer vehicle. |
 |
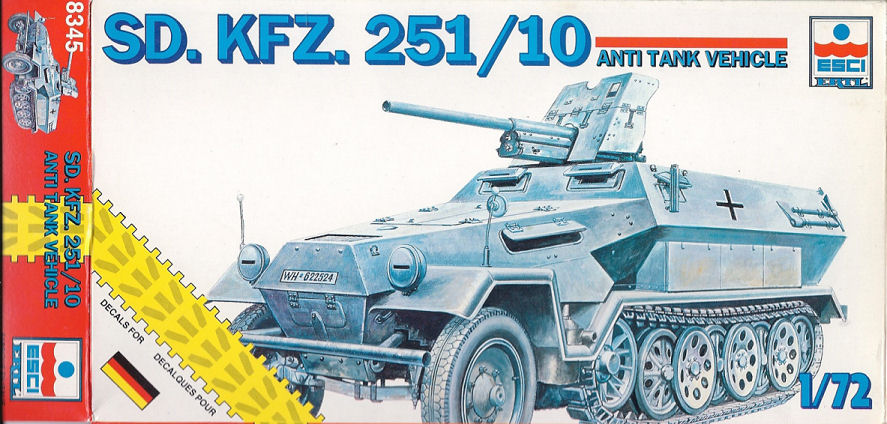
Sd.Kfz.251/10
Ausf. C Anti Tank Vehicle The Sd.Kfz.251/10 mounted a 3.7-cm Pak 36 anti tank gun atop the roof over the driver's area though after 1940 its ability to destroy opposing tanks was limited, though it could still be quite useful against field fortifications, softskins and lightly armored vehicles. The first models appear to have mounted the towed Pak 36 gun minus its carriage and wheels. Later versions of the Sd.Kfz.251/10 had a new gun mount with a lower shield that was only on the left (port) side. |
|
| Here
we have ESCI's box art for their kit of the Sd.Kfz.251/10. Starting
at the top we see the Pak 36 gun and standard shield used by the towed
gun. The top of the shield could fold down to make for a lower profile,
though I have rarely seen a photo of the shield folded down. The yellow
track mark at the lower left of the box indicates this model comes with
hard styrene link & length track parts. An
odd thing about this box art is that it portrays a Sd.Kfz.251 Ausf.
A or Ausf. B halftrack, not the Sd.Kfz.251 Ausf. C variant within
the box. Note the 2-part nose with ventilation flap, and the side
vent flap, the tubular front bumper, and the vent grill atop the engine
deck. The fender over the track is flat and the storage lockers are
mounted more forward than on the Sd.Kfz.251 Ausf. C variant. These
are all features particular to the Sd.Kfz.251 Ausf. A or Ausf. B halftracks.
Though incorrect for this model, it is still nice box art and shows
us what the Sd.Kfz.251/10 looks like, and to compare the differences
|
 |
This
sprue is what makes this model kit a Sd.Kfz.251/10 kit and is the
same sprue as in ESCI's anti tank gun kit. It still includes the trails
and wheels for the towed gun and two crew figures. One crew figure
is kneeling, and the other lying for an MG34 machine gun. The figures
are respectable but not as nice as Preiser figures.
Detail
of the 3.7-cm Pak 36 gun is not great for a display model, some of
fine detail's are missing, simplified, or too thick. However I like
the surface detail of the gun shield (part 62). |
|
Instructions
for modifying the Pak 36 gun mount and attaching it to the roof of
the Sd.Kfz.251/10 is simple. There are no modifications to the vehicle
interior included such as ammunition racks.
|
 |
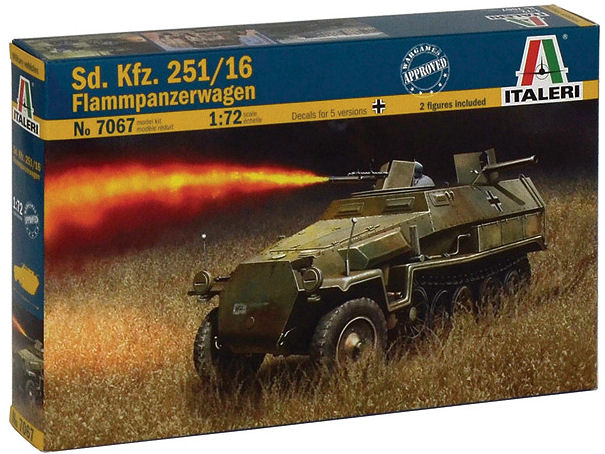
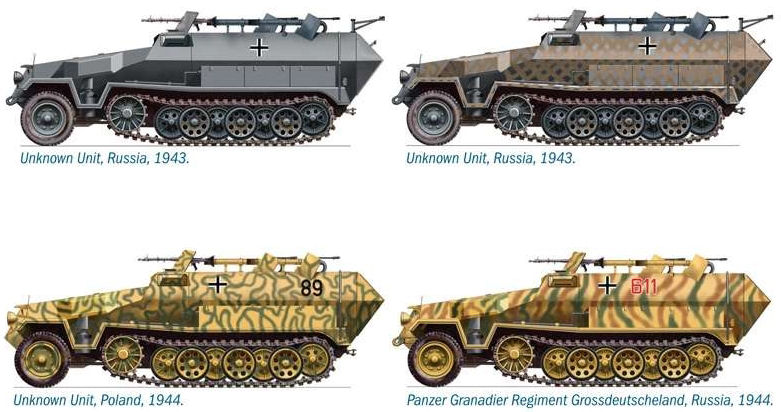
Sd.Kfz.251/16 Ausf. C Mittlere Flammpanzerwagen Flamethrower halftrack This model is reviewed in detail in the in-box comparison article where we can examine a scan of the parts found here The Italeri release of this model comes with new box art, new decal markings, and new assembly instructions. I like the color painting guide on the back of the box (below) displaying four vehicles. |
|
 |
 |
| The ESCI/ERTL release shows a reasonably accurate representation of the Sd.Kfz.251/16 Ausf. C halftrack. | 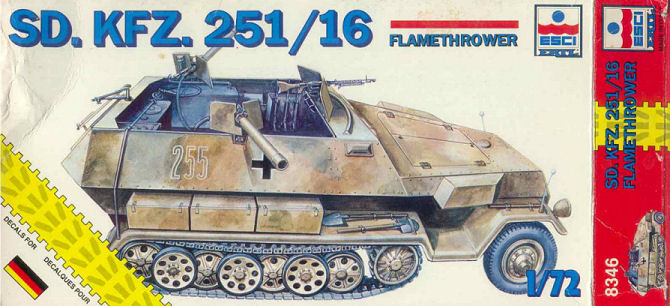 |
| Extra Detailing | |
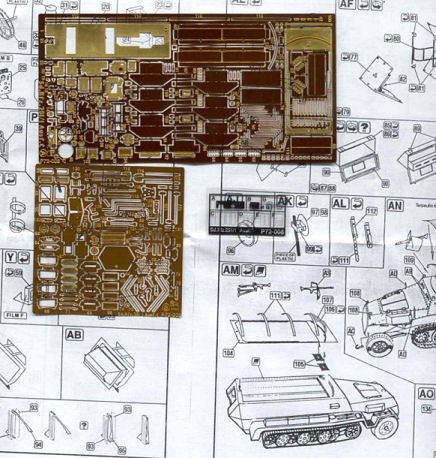 |
The
etched brass set P72-08 from Part company is designed for the 1/72-scale
ESCI and Italeri Sd.Kfz.251 model though it should easily be helpful
with the Dragon and the Revell the Sd.Kfz.251 Ausf. C models. Many
parts will also be beneficial in detailing a Hasegawa or Dragon Sd.Kfz.251
Ausf. D kit.
Examining the parts and the instructions in detail we can see the two etched metal frets include a new floor with a tread pattern, working turn signals (parts 93-95), hoops for the canvas cover (parts 111), new seats, interior storage bins, new exterior storage lockers, and interior viewport details, etc. |
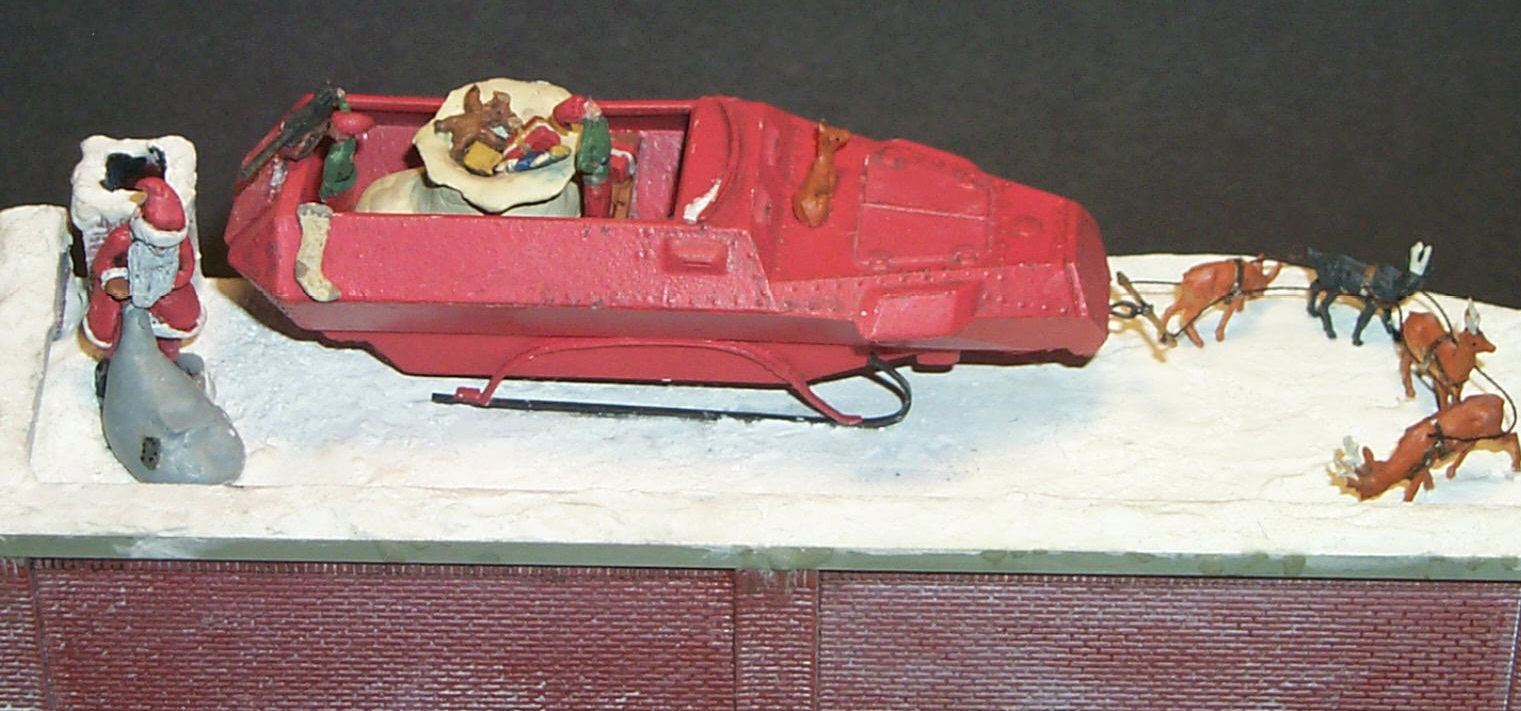
Conclusions In my opinion the ESCI, now Italeri, Sd.Kfz.251 halftrack kits were admirable in their day but like other ESCI kits they have been surpassed as display kits in detail and number of the parts. To Italeri's and ESCI's advantage, many of these Sd.Kfz.251 Ausf. C variants are unavailable by any other manufacturer in 1/72-scale, such as the Sd.Kfz.251/8 ambulance vehicle. For wargaming
where detail and fine delicate parts are maybe not as important, I
think the ESCI/Italeri kits are more than adequate. Below are some
fun what-if, fictitious projects that were fun to build. |
|
15-cm
Panzerwerfer 42 auf. Selbstfahrlafette Sd.Kfz. 251 Ausf. C |
 |
a
Sd.Kfz. 251 Ausf. C Weihnachtsmann-Schlitten |
 |
Modeling and Historical References Panzer Tracts No.15.3 mittlerer Schuetzenpanzerwagen (Sd.Kfz.251) Ausf.C & D, Thomas Jentz and Hilary Doyle (2006). ISBN 0-9771643-5-7. My personal favorite reference with period photos and accurate scale drawings. www.panzertracts.com Panzer Tracts No.15.2 mittlerer Schuetzenpanzerwagen (Sd.Kfz.251) by Thomas Jentz and Hilary Doyle (2005). ISBN 0-9771643-1-4. My personal favorite reference with period photos and accurate scale drawings. Panzer Tracts No. 14 Gepanzerte Pionier -Fahrzeuge (Armored Combat Engineer Vehicles)…by Thomas Jentz and Hilary Doyle Darlington Productions (1998). ISBN 1-892848-00-7 Flammpanzer German Flamethrowers 1941-1945, New Vanguard 15, by Tom Jentz, Hilary Doyle and Peter Sarson, Osprey Military (1995). ISBN 1 85532 547 0 Panzernet website http://www.panzernet.net/panzernet/stranky/polopasy/251.php Achtung Panzer website : SdKfz 251 In Action, by Charles Kliment and Don Greer, Squadron Signal Publications Armor series No. 21. ISBN 0-89747-124-5. A good but old reference book with a single page on the Sd.Kfz 251/16. Sd Kfz 251, by Januz Ledwoch, Wydawnictwo Militaria Warszawa (1994) ISBN 83-86209-06-2. A Polish softcover with both English and Polish text.
|
|
Back to |
Back to Home Page |
Article Last Updated: 28 June 2014 |
 &
&