Managing those Old Stiff |
www.onthewaymodels.com |
by
Stephen ‘Tank Track Whisperer’ Brezinski |
Managing those Old Stiff |
www.onthewaymodels.com |
by
Stephen ‘Tank Track Whisperer’ Brezinski |
The Problem Anyone into small scale for several years will eventually run into a an old ESCI model or other manufacturer with that stiff silver colored band track material; if you haven’t yet seen it just go to a model club meeting and listen for the cursing. Or you will need aftermarket tracks only available in resin or get an all resin kit with multiple lengths of hard resin track that we are supposed to bend to shape. The
track material used by ESCI and a few other kit makers is something
that looks to be more like polyethylene, not polyurethane as it is
sometime called. Polyethylene is the plastic used on ski bottoms,
because things don’t stick well to it, it is slippery. If you
have tried to glue this track material you’ll find that you
are unsuccessful, unless you use an uncommon special glue. |
||
|
|
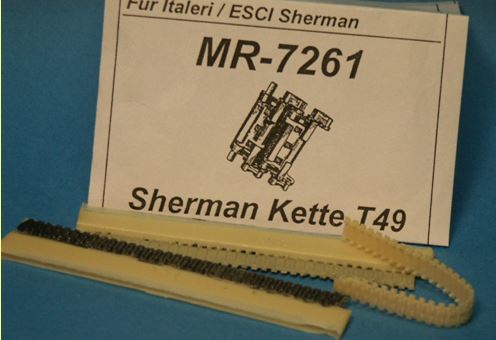
The
photo at left shows some 1/72 scale cast resin track I needed for
a resin Sherman kit. The track lengths come in medium length strips,
about 2½ strips per side of the Sherman. Trying to bend them
around the idler and sprocket wheels at room temperature invariably
will make the tracks lengths break. |
 |
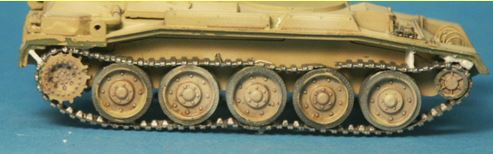
| The photo above shows a set of polyethylene band track from a small-scale Airfix Crusader kit. We cannot easily glue the track ends together; they have to be melted together or joined with staples or sewing thread. | ||
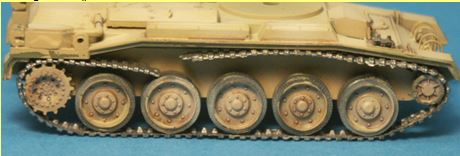 |
The
stiff Airfix tracks do not realistically bend around the idler and
sprocket wheels and the track fit is so tight that if I connected
the ends, the tightness and stress could break off an idler or sprocket
wheel. |
|
A solution, but maybe not the best solution |
||
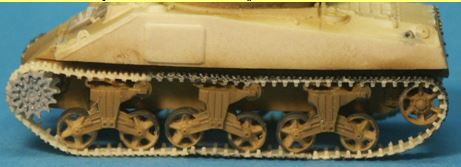 |
What
was done on this MR resin Sherman model was to immerse the length
of MR’s resin track in hot, near boiling, water and bend the
track around a wood dowel before the track cools and becomes stiff
again. Seeing the result I think it was passable but left too much
sagging track and curves not tight enough around the sprocket and
idler wheels, and curves not exactly in the correct places. A real
M4 Sherman has “live” track so should have little to no
sag. |
|
A
Better Solution #1 |
||
|
With my experience on the resin Sherman model above
I finally concluded that if I wished a good realistic fit around the
wheels I would have to bend the warmed track around the exact shape
of the entire suspension. We cannot immerse a whole plastic model
in near boiling water though?!
A good solution was to make a pattern of the suspension that you can bend the tracks around and them immerse the track and pattern safely into the hot water. After tracing the pattern of the wheels onto paper and double checking the fit I transferred the shape to thin plywood and cut the shape out with a jig saw. |
||
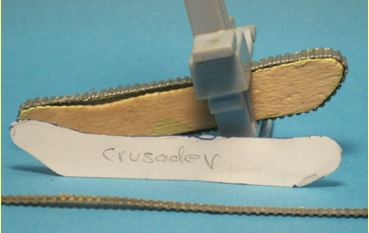 |
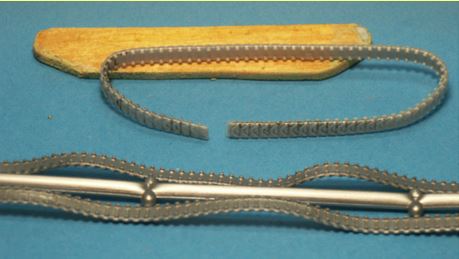
Example 1 In this photo we see the stiff band track from an Airfix Crusader model in the foreground, the paper pattern, and then the plywood pattern with the Airfix track wrapped around it and clamped in-place. A groove was saw cut in the plywood to accommodate the track teeth. With the track clamped in place this whole thing was dipped in hot water, about 80 to 90 degrees Celsius, for 4 to 8 seconds, (4 to 8 metric seconds) then quickly immersed in cold water. Immersing in cold water may not really be needed. I think this is the overall best technique for bending resin track like the above track from MR Models.
|
|
Continuing with the Airfix Crusader, in addition to immersing and bending it in hot water, three other techniques for taming the hard-to-work-with-track have been used. The Crusader has “dead” track so will have prominent sag. The advantage of this tank is that it has a sand skirt which will cover and hide the upper run of track. Solution #2: |
||
 |
Blocks of styrene sheet have been wedged between the track and fenders to hold them down against the wheels. This can work well, is easy, but cannot be hidden on a tank without side skirts. It is good for holding the top track down to sag between the roadwheels. It might also push up and deform the fenders.
|
|
Solution #3: A sewing needle and thread pierced the track from the bottom around the center roadwheel through the upper run of track then back down though the bottom and knotted tight. This technique is obviously good in holding the track down to the wheels. Solution #4: To create track sag between the roadwheels a common technique is to drill holes through both hull side plates just lower than the tops of the wheels where an inserted rod or pin will hold the track down. This technique is good for when you don’t want the thing holding the track down to be to obvious. On the model above we can barely make out the metal rod between the 3rd and 4th roadwheels. A straightened paper clip makes a good metal rod. |
||
Example
2 |
||
 |
This
is another example of the technique using a wooden form. This example
is for a set of ESCI’s stiff Sherman tracks for the VVSS bogies.
The VVSS tracks have two sets of guide teeth, on each side of the
roadwheel. The wooden form will have to be thin enough to fit between
the guide teeth. For this form a one-piece suspension from a wargaming
kit was used, then the thickness of the molded-on track subtracted
when cutting the wooden form. |
|
 |
This
will be a great solution to handling resin track lengths. I agree
that cutting a template can be much extra work and requires additional
tools to buy such as a jig saw and clamps.
|
|
| Conclusions It seems like a very well rendered track can slightly enhance a display model, but a lousy, inaccurate track can ruin an otherwise excellent display model. For me, I have felt it is less the type of track (i.e. long flexible band track, or hard plastic and resin individual links and lengths, or etched brass track) than how well the tracks are portrayed that is important; so I am open to any model tank track done well. Sometimes we don’t have a choice in the track if we wish to model a particular AFV so must do as best we can with a mediocre track.
|
||