| While
Dragon's Sd.Kfz.251 series
contains a large selection of halftrack variants, one variant that
is lacking is the Sd.Kfz.251/9
(the one armed with the short 75mm L/24 "Stummel" gun).
Revell comes to the rescue, but only partially, offering the Sd.Kfz.251/9
Ausf.C, while Hasegawa has an Sd.Kfz.251/9
Ausf.D in its range; the version in the Hasegawa kit being the
late one, where the gun mount was installed on top of the roof.
So, this leaves us with one version of the Sd.Kfz.251/9 that isn't
available in plastic (as far as I know of): the Sd.Kfz.251/9 Ausf.D
early. As this version had a floor-mounted gun, with a cut-out roof,
very much like the Sd.Kfz.251/9 Ausf.C, a logical option is to mix
and match the Revell Sd.Kfz.251/9 Ausf.C with any Dragon Sd.Kfz.251
kit that you have lying around.
(Note
that Stephen
Brezinski converted a Dragon Sd.Kfz.251 Ausf.C kit to a /9, which
upon the release of the Revell
kit has become a redundant conversion, unless you prefer Dragon's
detail.)
The conversion
process is relatively easy to explain:
- Build
the Dragon kit without the roof and driver's visor and remove part
of the interior (more about that below).
- Adapt
the Revell roof/visor part to the Dragon kit.
- Install
Revell's gun with its mount inside the Dragon hull.
The vehicle
I wanted to represent was the one captured by the 153rd Field Regiment,
Royal Artillery, Guards Armoured Division in Germany, 1945 as illustrated
in [4] and found here.
Building
the Dragon kit
I started
from Dragon kit 7317 (Sd.Kfz.251/7 Ausf.D with 2.8cm sPzB 41), because
I had quite a few of these kits lying around and because I believe
this is a very rare variant, to say the least. Most of the remarks
in this section will be applicable to any Dragon kit of the Sd.Kfz
251 Ausf.D, however.
_t.jpg) _t.jpg) _t.jpg)
From
Henk
of Holland website, used with permission.
- It
is best to leave the suspension off until the end, to avoid damage,
whatever the instructions tell you.
- While
the concept of interlinked roadwheels is nice, I decided to cut
off the individual wheels of parts B4 and B5, as this allowed me
to position them all with the holes in a slightly different position
(the inner wheels won't line up in this way, but this is almost
impossible to see), whereas the kit parts "as such" all
have them in the same position.
- The
tracks (which are type D1 in this kit) were a tad short in my kit
and the position of the drive sprocket made them touch the front
of the fenders. Moving the drive sprocket slightly backward solved
both issues. Note that the drive sprocket was fitted with rubber
pads, which need to be painted dark grey/black. I also removed the
thin overlapping end of the DS tracks as it would have made the
tracks too thick in the overlapping area. I am still not 100% happy
with the result and will probably build a small diorama for the
vehicle so it can be hidden. (To that end, it's better to have the
ends of the track connect on the bottom.)
The teeth were salvaged and glued back in place. Note that DS tracks
can be glued with ordinary glue, but that they easily snap when
glue is applied to tracks that are under tension.
- My
kit had the old instructions for the front suspension. Unfortunately,
I forgot that we already mentioned this in the preview,
and built it as per the instructions as well as I could (as they
are somewhat contradictory).
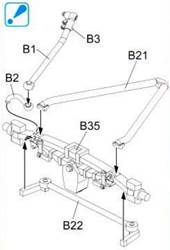
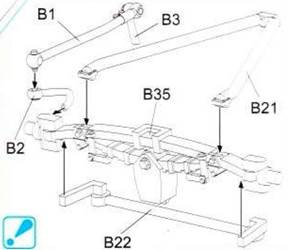
Correct installation of parts B2, B3 and B22 in some instructions
(picture on the right), confusing and wrong in others (picture on
the left), as in my kit.
(Pictures by Timothy Lau.)
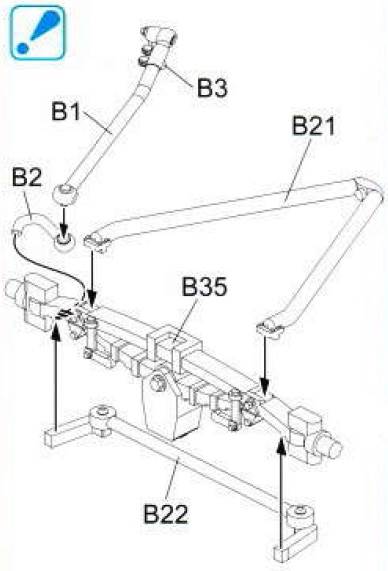
I
believe that the corrected instructions are still confusing. A comparison
with the instructions from AFV Club kit 35251, might help.
_t.jpg)
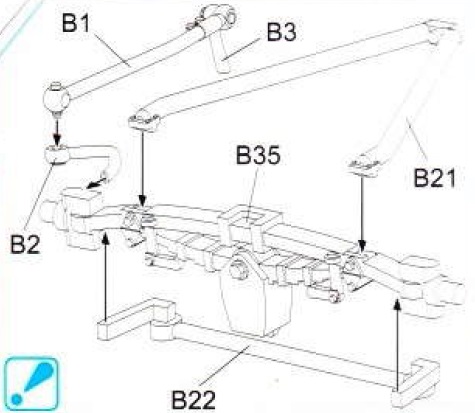
(Picture
by Timothy Lau.)
A
useful picture can also be found here.
This is how decided to assemble the parts in the construction
of kit 7310.
_t.jpg)
- The
floor plate (A8) is a bit too narrow, although most of this will
be hidden behind the lateral seats in versions where these are installed.
They weren't in mine, so I added thin plastic strips.
- There
is interference between the dashboard (A17) and the upper hull (A1),
if the former is not lowered a bit. (Removing material from the
top will damage the nice dials, so better work from the bottom.)
- While
the upper hull should hang over the lower hull, this is overdone
in the kit. It actually seems as if the lower hull is too narrow
for the upper hull and rear plate.
_t.jpg)
Picture from the construction
of kit 7310.
- I
chose to install the flanges (C9) to the lower hull before adding
the upper hull. If you bend them outwards slightly, this will ensure
a tight fit when the upper hull is added. Otherwise you will have
to fiddle around with clamps.
- There
are sink marks on the rear hull plate (A16) that will remain visible
after construction, if not filled in.
- The
attachment of the rear Notek (B8) is very (!) weak.
- If
the rear doors are left open, the handle (A23) should be put in
the horizontal position, something Dragon overlooked.
- While
both tracks are marked "D" in the instructions and "D1"
and "D2" on the rubber sprue, one (D2) is actually one
link longer than the other (D1) and should go on the right. (On
the real vehicle the tracks had 56 links on the right and 55 on
the left [3].)
- The
Sd.Kfz.251 had its front licence plate painted on. Part MA1 is thus
redundant.
- I
replaced the width indicators with a combination of butterfly
pins and brass tubing. The picture of the vehicle shows no sign
of width indicators, though. I left of the rear view mirror, which
was typically mounted to the left width indicator, as I thought
that this would have been visible in the picture, while the width
indicators might just be invisible due to the quality of the picture.
- I
left off (forgot) the small reflector below the rear left mudguard;
this would have been very fragile.
_t.jpg) _t.jpg) _t.jpg)
 _t.jpg)
 _t.jpg) _t.jpg)
Modifications
to the Dragon kit to turn it into a /9
- In
the interior I omitted the following parts from the Dragon kit:
- A9,
A10, A11, A12, A21, A22, A27
- B33,
B34
- C2,
C3, C4, C5, C6, C8, C10, C11, C13
- MA4
(These are the holders for the MP40 and an example of the incoherence
of Dragon's PE sets, as they are not included in every variant,
even though they all have the MP40.)
- A25
was lost and scratchbuilt.
- Parts
A18, B14, B15 and C12 (driver's visor) and G16 (roof) were replaced
with the corresponding Revell part
(E92), which only required a little
bit of sanding where the parts meet. Note that parts B14 and B15
represent armored glass and should be transparent (which would be
most obvious if the driver's visors are left open).
- I
shortened the backrest of the driver's seat (C14). The co-driver's
seat (C14 + C15) was removed. This is typical of these early /9,
due to the cramped driver's compartment.
- The
Dragon radio (B18) was omitted and replaced with the Revell
radio (C36), which was installed on
the right side of the interior.
- Everything
related to the sPzB 41 and pontoon bridges was left off. Note that
this kit has very faint location markers for the pontoons that need
to be sanded down.
- The
remaining benches and box came from the Revell
kit (parts C25, C27 E94).
- The
complete gun mount was taken from the Revell
kit and dropped into place. It needed to be lowered a bit, which
I did in parts E85 and E86.
Further
modifications to turn it into the captured
vehicle I had chosen are
- The
rear gun mount (B17) was not present in the vehicle. It was left
off and the hole plugged.
- The
vehicle did not show an antenna mount.
- A
gun mount for a .50 MG and the MG itself needs to be added. This
was done with bits from the spares box and some scratchbuilt items.
- If
you want to represent the vehicle exactly as in the picture,
a trailer needs to be added.
Decals
and Markings
The vehicle
was painted in a mixed green (representing SCC 15) over Dunkelgelb.
The latter remains visible in the interior and on parts of the chassis.
[4] does not show a picture of the real vehicle, only an illustration
(which is the case for all the vehicles in the book), which I consider
a weakness. The book mentions that the nose decals are speculative
(because probably only one picture is known). While the decals are
well printed by Cartograf, I believe the blue in the decals is too
light. (Actually, almost all blue colors on the decal sheet are represented
by the same light blue.) Furthermore, the scribbling on the rear doors
(which is illustrated in the book and seen in the pictures) is lacking.
After giving it some thought, I decided to paint the pale blue areas
with a darker blue, freehand. This is, obviously, a trade-off between
keeping the finely printed detail and matching the right color. Better
would be to just replace all the decals that contain the wrong color
with new ones.
_t.jpg) _t.jpg)
 _t.jpg)
 _t.jpg)
 _t.jpg)
Accuracy
A discussion
about the dimensional accuracy of the Dragon Sd.Kfz.251 Ausf. D can
be found here.
References
[1] Panzer
Tracts 15-2 Mittlere Schuetzenpanzerwagen (Sd.Kfz.251), T.L. Jentz
& H.L. Doyle
[2] Panzer
Tracts 15-3 Mittlere Schuetzenpanzerwagen (Sd.Kfz.251) Ausf.C &
D, T.L. Jentz & H.L. Doyle
[3] Kanonenwagen
Sd.Kfz.251/9 "Stummel", Nuts & Bolts 21, H.F. Duske,
T. Greenland, D. Terlisten
[4] Captured
Panzers, German vehicles in Allied Service, M. Jaszczolt, A. Wrobel,
Kagero Mini Topcolors 39
Dragon
kits can be purchased from

|
.JPG)
.jpg)
.jpg)
.jpg)
.jpg)
.JPG)
.JPG)
.JPG)
.JPG)
.JPG)
.JPG)
.JPG)
.JPG)
.JPG)
.JPG)
.JPG)
.JPG)
.JPG)
.JPG)
.JPG)
.JPG)
.JPG)
.JPG)