    As you all will see, each one of these Pumas has characteristics that are different than the others. Some are better, others are not. But each one has features that I find quite appealing. (Click on the box tops above to go to individual previews of each kit.) As I have made mention many times in the past, the Puma has long been my favorite AFV of World War II. The sleek, predatory lines of this armored car I find most appealing, and having built a 1/35th scale model of this vehicle many years ago, I have long desired to build one in my favorite scale. In 2003 (I think) MarS came to my rescue with a gorgeous resin kit of the Puma, and keeping in line with their previous models, this kit was extremely detailed and complex. I never had the time to devote to building it (which I hope will now change), which was fortuitous, so that I could include it in this review. Over the past year, three additional models of the Puma have been marketed, all in plastic. First on the shelves was Roden. The Puma was the first in their new series of Sd.Kfz 234 8-rad armored cars. When I reviewed their kit upon its release, I had no decent references for this vehicle, and hence gave it a glowing review. As we will see in the following comparisons, this kit does in fact have some minor dimensional errors. In what seemed to me to be a deliberate attempt to undermine Roden's initiative, Hasegawa soon announced their own series of the 234 armored cars (why duplicate effort, when there are so many other worthy subjects?), and their Puma entered the market within weeks of the Roden kit. The Hasegawa kit is superior to the Roden model in almost every way, and is probably the best all-around kit in this review. And finally, Italeri jumped on the Puma bandwagon just last month, probably because they saw the rising popularity of this vehicle, and wanted to offer their own take on it as well. It was quite easy for them to do so, since they already had the results of their research conducted for their 1/35th scale version of the Puma. Hull
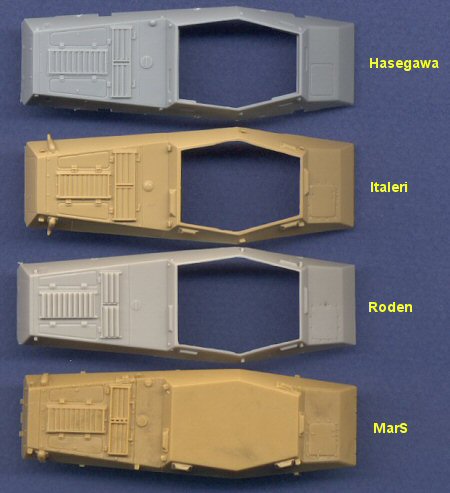
All of the kit hulls are very close to each other in size and shape, with the exception of the Roden kit being about 2mm longer than the others. According to the scale plans and dimensions included in the Kagero Photosniper book on the Sd.Kfz. 234 series, the Roden kit is too long, and the other kits are accurate. For the molded-on detail, all of the kits have very nicely scribed panel lines, and the engine vents are sculpted with excellent relief. The detail on the Roden engine deck is a bit stretched, due to its lengthened rear hull, but it still looks pretty good. Of the other three, I would give highest marks to the Hasegawa kit, followed by the MarS kit, and finally Italeri. However, they are all very good, so saying that Italeri is the poorest does not mean that it is bad. The armored visor covers are molded in the best relief on the MarS kit, but the Hasegawa visors are almost as good, and they have the advantage of being molded as separate parts, so they can be posed open, if the builder so desires (though holes would need to be cut into the hull). The visors on the Roden and Italeri kits are not bad at all, though not as fine as the other two. Other details on the hull, such as lift rings, weld lines along the armor plates, and the side crew hatches beneath the fenders, are all best represented in the resin MarS kit. The rear engine access hatch (on the sloped rear plate) is also best done on the resin kit, though the Hasegawa kit is also pretty good. However, the slope of the rear plate that holds this hatch is a little too steep on the MarS kit, as can be seen in the scan. Fenders
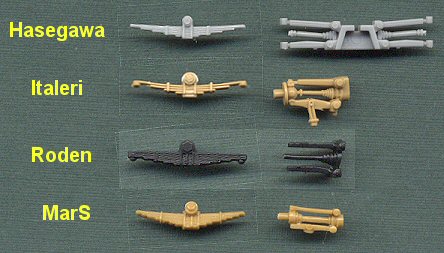
The fenders are all very similar, with minor differences in size and shape of the storage bins. Once again, Roden has them slightly wrong, though it also has the unique advantage of several open bins, which all the other kits lack. This is the primary strength of the Roden kit. You can barely see that the Hasegawa fender has pioneer tools molded onto it, which I believe should be considered an archaic molding technique. Get in the 21st century, Hasegawa, and start molding your tools as separate parts. One other thing I noticed about the Hasegawa kit is that the upper and lower hull halves do not fit together perfectly, in that the upper hull is slightly wider than the lower hull, resulting in a small overhang. However, the fenders completely hide this feature once mounted. Wheels
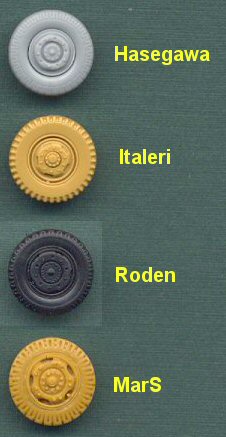
The wheels in all four kits are very different, as are the tires. If you follow the link listed at the bottom of this article, you will see that the author of that article has done a very good job of documenting the different wheel and tire styles seen on Pumas, as evidenced through wartime photographs. There were two primary types of tires, neither of which match any of the tires seen on these kits. First of all, only the resin wheel from the MarS kit includes any tread along the road surface of the tire, for obvious reasons. But that tread is not an accurate pattern. It resembles the early style, so if weathered with a bit of sandpaper and dirt, it will look pretty good. Your best bet with the other tires it to weather the hell out of them to make them look old and in need of replacement. (Calling all aftermarket companies: excellent product opportunity here!) The wheel rims and hubs are all also slightly different, but they are all supposed to represent the late style hub; they just do it with differing degrees of accuracy. Once again, the resin wheel from MarS has the best relief, though Italeri's wheel is pretty good too. However, the hub on the Italeri wheel isn't quite accurate. The Hasegawa wheel has nice bolt detail and relief, but the five cooling holes around the rim should be more pronounced. One can just barely make out the slight depression in the plastic that are supposed to represent these holes, but if you look closely, they are there. The Roden wheel is very good, but again, could use deeper cooling holes. It's better than the Hasegawa wheel, though not as good as the other two. It should also be noted here that the Hasegawa wheel rims and tires are molded as separate parts, which simplifies painting of them (unless of course, you cut them off the sprue before painting, for use in a model review).
One final point about the wheels: as can be seen in the above scan (from the Italeri box), the wheels toe inward a little bit at the bottom edge, resulting in them not being perpendicular to the ground. None of the tires in any of the kits are molded with an angle on the tread, so we will have to take some sandpaper to them, in order to prevent them from riding along one edge of the tire. But . . . I have not checked whether or not the wheels even mount like this in any of the kits. It's possible that they mount perpendicular to the ground, which to be honest, may not even be noticable in something this small. That angle looks pretty minor. However, to be totally accurate, you should try to replicate the angle. Suspension
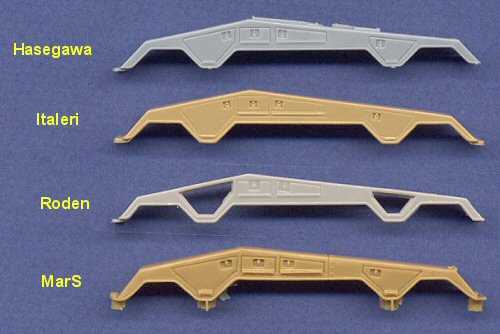
None of these look alike. I feel that here the Italeri suspension units are most accurate, but I like the springs in the MarS and Roden kits best. The Italeri and Hasegawa springs are a bit too delicate. Note how Hasegawa molds two suspension units together for ease of construction. What this actually does is only decrease options for articulating the wheels. It still can be done with this kit, but it would be more difficult. However, if your primary concern is to make sure that all eight wheels sit perfectly flat on the ground, then the Hasegawa system is probably best. Not shown here are about a million smaller parts from the MarS kit (OK, maybe half a dozen) for each suspension unit, which will result in them being just as detailed as on the Italeri kit, though still too small. In all likelihood, the Italeri kit will probably be the easiest to assemble, and still be very detailed. Turret
The turrets are all approximately the same shape and size, with the Roden turret once again being the exception. Its cheeks bulge outwards just a little bit too much, and it is a hair longer than the others. Not visible in this scan is the fact that it is also substantially taller than the other turrets. Based on the drawing in the Photosniper book, the turret should be about 7mm tall. I measured the kit turrets as follows: Hasegawa: 6.8mm, MarS: 7.0mm, Italeri: 7.5mm, and Roden: 8.4mm. Although only the MarS matches the drawing, the Hasegawa and Italeri turrets are close enough to look right (especially considering that the drawing itself may not be 100% accurate). But based on some nice profile wartime photographs, it is obvious that the Roden turret is far too tall. As is perfectly obvious in the scan, the Hasegawa turret it the only piece that has open crew hatches. If PART ever releases a brass detail set for any of these kits, it would be easy to open and replace the hatches for the Italeri and Roden kits, but not so much for the MarS kit. That one is best left buttoned up. The MarS kit gives the best representation of the shell ejection port on the rear wall of the turret, though the Hasegawa piece is molded separate, and also looks pretty good. On the Roden kit is it represented by a scribed circle, and on the Italeri kit it is an indistinct lump. Lift hooks are molded onto the MarS kit, and not included with any of the others. The gun on the MarS kit must be glued in place, but it can elevate on any of the three plastic kits. And finally, there is a small ventilation hole with mesh screening on the rear edge of the turret roof. It is best replicated by both the Italeri and Hasegawa kits. Gun
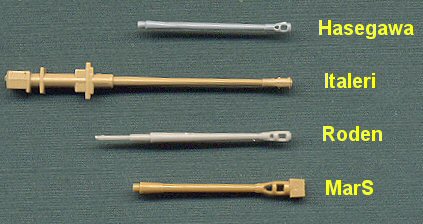
Once again, none of these pieces even vaguely resembles each other. Despite their apparent size differences, once mounted in their respective mantlets, each one of these guns measures to within a millimeter of correct length. Hasegawa's and Roden's are the most accurate, and the Roden piece also has my favorite muzzle brake. Although the Italeri muzzle can't be seen here, it too is very good. The barrel diameter of the Hasegawa gun seems a bit too narrow, and the MarS diameter is just a bit too large (especially its muzzle brake), but in reality, unless you have each of these built and sitting next to each other, I think that any one of these guns will look good on the final models. Mantlet
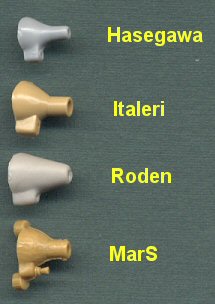
The Hasegawa and MarS mantlets are the most detailed peices here, both with the prominent mold seam along the edge of the cast mantlet. The MarS mantlet has a nice cast texture to it, which the plastic kits lack. The Italeri mantlet has a very large opening for the gun, because the muzzle brake has to be able to slide through it from the rear, so that the opening is too large, and does not close around the gun barrel as it should. The sharp edge of the tip also is reminiscent of the prototype mantlet. One thing that is obvious in this scan is the very different shape of the Roden mantlet. It is very easy to dismiss it as being horribly wrong, but I wouldn't be so quick to do so. Yes, I think that it has too smooth of a slope from the rear to the front, however, I also think that the other kits exaggerate the pinched look of the mantlet halfway to the barrel. Both the Hasegawa and MarS pieces match all the drawings I have seen of the mantlet, but . . . based on photographs I have seen, I also feel that the drawings are incorrect. The reason is because I think that the contrast between the vehicle and the background in all of the perfect side-profile photographs is too great to really show the mantlet's shape. More specifically, it's the glare of the sunlight on the mantlet that I think exaggerates this "pinched" look. I am not saying that the Roden kit is correct with its shape, but rather I think that the actual shape of the real mantlet is somewhere between what we see on the Roden kit and the others. Out of the box, I like the Hasegawa mantlet the best. If I was to use the Italeri mantlet, I would add a little putty, and round off the gun opening a bit. Some serious carving would need to be done on the Roden piece to make it look proper. Conclusion So as always with these comparison reviews, I would say that the "best" Puma kit still does not exist. Each one of these kits has something going for it. I think that to get the most accurate and detailed Puma possible, one would have to use parts from each of these kits. But . . . who wants to do that? Out of the box, I would say that the Hasegawa kit is the best, especially if you want open turret hatches. Both the Italeri and MarS kits are also very well done, though the Italeri kit will be much easier to build than the resin kit. As much as I really want to like the Roden kit, because I like the company a lot, it is difficult to recommend this kit in light of the other options. Yes, the open side storage bins are a nice touch, but is that enough reason alone to buy it? Since I already own one, what I plan to do is to discard the turret, and combine the hull with the 2.0cm Hängelafette turret I have from Modelltrans, in order to make a Sd.Kfz. 234/1, without actually having to buy another kit. References:
|