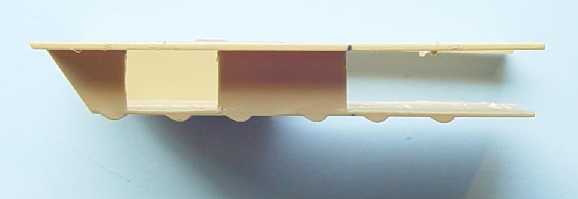
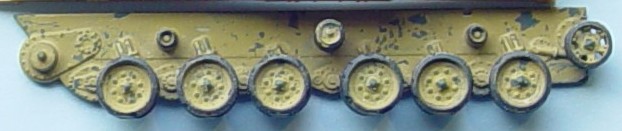
With the release of the Revell Warrior and later the Uparmoured version, there was finally something to go with the Revell Challenger 1 and the later Dragon and Trumpeter Challenger 2 vehicles. Whilst the Revell Warrior is very good in terms of moulding and fit, there are a few details that could be made better. The aim of this article is to show how to bring the Revell kit up to spec, I will also show some of the various upgrades available from CMSC and PDI models, and the Extratech PE set, along with their faults, as well as the faults in the original Revell kit and how to correct these and what needs to be added. I daresay that some are pleased with the Warrior as it is, if so this article is no meant to de-ride anyone as it always depends on your area of interest as to what you find acceptable in a model, the more a model encroaches on your area of interest the more faults you find. For me I find that with WW2 and earlier I am prepared to accept faults easier than with Modern British and Russian vehicles, for others it will be the other way round and there will be those with a completely different point of view. For those that are interested you can incorporate as many or as few, of the changes as you wish, as some will be time consuming and (for the want of a better word) fiddley. What is wrong with the kit ? Well actually quite a bit, some of it is due to the moulding process(i.e to be able to release the model from the mould) and some of it is due to research error, there are other parts that are entirely cosmetic but add to the model as a whole. Moulding process errors 1. Most of the access hatch hinges on the upper hull are vertical, where as the should be at 90 degrees to whichever plate they are on, most noticeable of these are the front plate hinges and the drivers side plate. 2. The rear troop compartment hatches have solid hinges, instead of a bar. 3. The rear troop compartment periscopes have the incorrect profile, as does the one between the commander and gunner in the turret roof. Research error (missing or incorrect details) 1. Rear stowage bins are two short. 2. LHS access panel just behind the driver is too deep. 3. Turret periscopes are the incorrect shape. 4. Raven sights for the main gun are incorrect in shape and height. 5. Armoured deflector for the engine louvers is too small. 6. Smoke discharges (need I say more?) these seem to be the one thing that Revell constantly mess up on british vehicles (Challenger 1). 7. gun mantlet too narrow. 8. Lip missing from front of turret. 9. Final drive housings too wide. 10. Air intake cowl too shallow. 11. Incorrect mesh alignment shown on turret and Hull baskets. 12. Missing or poorly depicted smaller lifting eyes on turret and hull. 13. Incorrectly placed fire extinguisher on the rear door. 14. Incorrectly shaped roof vent Uparmoured Warrior As above with the following additions. 1. Side armour panels too thin, also the armour stands too far away from the hull sides. (interestingly the stand off distance and the thickness of the panel would be the correct depth for the real panels, thus by adding plastic to the rear to cover the rear of the panels, the correct thickness can be achieved, although, by doing this you will need to reshape the front and rear portions of the panels but more on this later). 2. The front glacis armour is totally wrong, firstly the top armour block is the wrong shape and doesn't extend up the glacis far enough. The bottom part is compounded by the fact that the final drives are too large, this makes both the front bin and the armour too narrow. 3. No mounting brackets for the armour depicted. CMSC Parts 1. The side armour provided by the CMSC set is the wrong size, the individual panels are too big (wide) and although the correct number of panels are depicted, because of the size the RHS is about 1 complete panel too long, this pushes the front too far forward on the RHS obscuring the drivers view. The LHS panel is also too long but not as extreme. Also the individual panels in each side are all different sizes (whereas most should be the same size, except for the obvious panels that are of a different shape and size) Here the Revell kit has the correct size of panel (if not depth). 2. The frontal armour, although of the correct size for the top the lower armour suffers from the same fate as the Revell kit due to the oversize of the Final drives, Also the frontal armour is at an incorrect angle and should be at a much sharper angle. 3. No mounting brackets for the armour depicted. The Corrections and build Lower hull The lower hull can be built as per the instructions,the only thing needed is to drill out the holes in the sprockets, this will improve the overall look of the vehicle, also it would be worth painting and weathering the track units before, they are fitted to the hull,this stage provides an easier access to a lot of the running gear. The overall weathering can be done once the kit is built, to bring it all together. The following pictures show weathered wheels and track units before being attached to the hull.
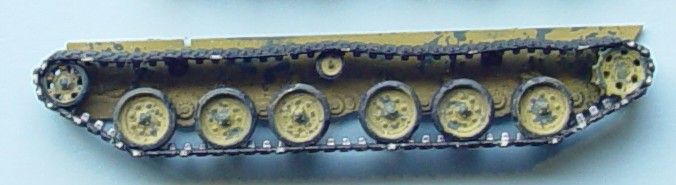
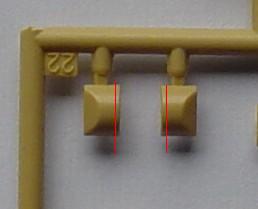
The only change that needs to be made to the lower hull are the final drives, which need to be cut down in size, this is a fairly easy process, done by removing approx 1mm of plastic from the inner edge of the final drive housing where they meet the track assembly, this way none of the detail of the final drive housing will be lost. The end of the housing should extend along the lower plate as far as the end of the towing eye mounts. The following pictures show where the plastic needs to be removed from and how far the drives should reach.
One thing to note for the more adventurous of you, is that if you plan to build an interior, and there are many good photo's on the web to help you achieve this, you will need to remove some plastic from the hull tub before attaching the track units, this is because the hull tub takes up internal space, which would make the interior too narrow. this is one of the problems with the PDI interior, to try and regain the illusion of space, PDI have made the seats very narrow, for anyone but a midget to sit on. The following photo show where the plastic needs to be removed from, the forward portion is for the driver.
|
 Cuts to the final drives
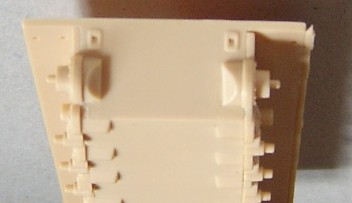 Postion of Final Drives on the model