|
My
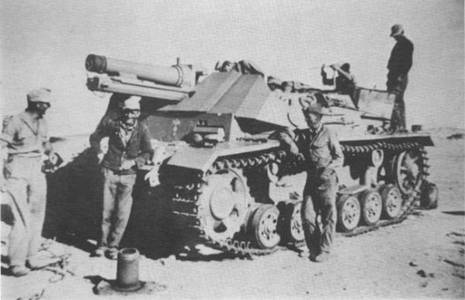
interest in this one of a kind field conversion came from the one
picture I have ever seen of it. I saw this picture for the 1st time
in Tom Jentz's book "Rommel's Funnies". (See below.) The
only text I have read about this conversion is found on the inside
cover and this is it: I have based my conversion/correction project therefore on the one photo in existence and the above text (verbatim). These are the books I have used for this project:
These are the kits I have used:
First I sanded off the details from the engine hatches and then filled them with Squadron Green Putty. I also cut away the upper hull area to open it up for the conversion tub that drops in there. This will need to be cut from the front, sides and to the 1st bend in the armor on the rear engine deck. Be careful not to take too much off at once, keep test fitting with the conversion tub as you go. The resin 'tub' will need to be sanded to fit the Revell Germany Pz III kit. I sanded the right side of the tub to allow the powder charge boxes to fit against the inner right side wall of the Revell kit. Next is sanding to fit the bottom (large plug) and also the front bottom of the final drive housings to fit the angle of the Revell kit. I did a little at a time and kept test fitting the tub until I had it just right. It should end up flush with the inner side walls of the Revell kit. I also had to sand a little more off the rear engine deck so that it is flush with the rear tub's firewall. I super glued the tub in place and noticed that the sides of the tub do not reach out as far as the insides of the kit's hull. I added Plastruct sheets (cut to fit) in between the resin tub and the kit to fill in these 2 gaps. Then I trimmed off the excess Plastruct & sanded flush. I primed the resin 'tub' at this point because there is so much detail in there it will be easier to paint the details first before gluing gun and mounts and the upper hull on. I added bits and pieces to the upper hull. You will need to fill in the headlight holes on both fenders. The vehicle does not have any right side headlight, and has the horn and Notek light mounted on the left fender. The Notek light has to be mounted on the front left corner of the fender. In the vehicle's picture I can see the brackets for the fire extinguisher and the mounts for the track jack. Although neither of them are in place on the picture, I have mounted the track jack but I am reversing the mounting of it so the side shield will fit. I am also relocating the fire extinguisher to the right fender in between the shovel & the intake. There is no known picture of the right side of this vehicle and I think this is a logical choice. In a drawing of an Ausf H it does not show any spare roadwheels. I decided to leave the mount from the Ausf L in place at the left rear and have relocated the wooden block to the right rear fender. Again, neither are present in the photo, but they both are standard issue items for the vehicles. You will have to sand off the Kugelblende and then fit the Attack armored front plate in place & add the hull MG. I added hinges to the Engine Deck hatches I made using linked ammo from 1/87 scale .50 cal MG. On the Final Drive hatches I used the same (take note of the 'half-hinge' on front left) & also made the handles from sheet styrene. Also sand off the Final Drive vents as you will be gluing on the Attack bolt-on armor next. I added an MG & mount
to the inside wall for the gunner/radio operator and I added the inside
side windows & armored cover levers. After gluing on the upper
superstructure, primer paint the rest of the model being careful to
tape off the resin 'tub' details. In order for the front gun shields to fit properly and be correct, you will need to separate them. I cut out the inner portion first then sanded flat the excess that is molded onto it. This is necessary so the larger Front Armored Shield sits behind the front armor plate and on top of the upper hull area properly. The Gun Shield is bolted to the Front Armored Plate and sits in front of the vehicle's upper chasis armored plate. I glued this in plate using spacers between the two armored shields. Next is to create the inner support arms for the armored plates.
|
|
.JPG)
.JPG)
.jpg)
.JPG)
.JPG)
.jpg)
.JPG)
.JPG)
.jpg)

.JPG)
.JPG)
.JPG)

.JPG)
.JPG)
.JPG)
.JPG)