|
Plastic Soldier
|
www.onthewaymodels.com |
Churchill Mk IV, Mk IV 75mm, Mk V, Mk VI and AVRE |
|||
| Kit #: WW2V20017 | Article
by Danilo Carli - 172normandyafv(at)gmail(dot)com
Edited by Marc Mercier |
||||
|
Plastic Soldier
|
www.onthewaymodels.com |
Churchill Mk IV, Mk IV 75mm, Mk V, Mk VI and AVRE |
|||
| Kit #: WW2V20017 | Article
by Danilo Carli - 172normandyafv(at)gmail(dot)com
Edited by Marc Mercier |
||||
 |
I
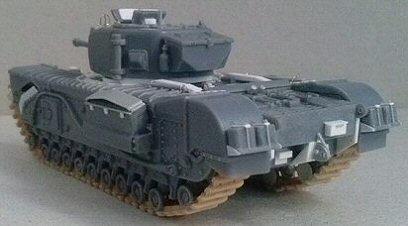
didn’t plan to make one of these simplified Churchill. Anyway,
after speaking with a modeller who had a box of them, my curiosity
grew and he kindly shared with me one of his. The kit is for designed
for wargames, so I didn’t expect quality or fine details. |
|
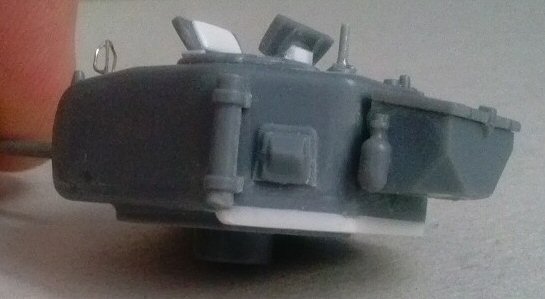
Turret |
 |
Changes to the hull I’ll list under either those on the central body or those on the sides (aka as sponsons). |
|
Central
body |
 |
| •
Most of the rear details are oversized. The rear upper panel height
was lowered and thinned from the inside. The huge sides were erased
and replaced with 0.50 mm plastic sheet pieces, shaped in place. • I made the telephone box with plastic pieces. The Tamiya album says it was on the right side on a Mk IV, while the Mk V and VI had it on the opposite side. • The central rectangular blob was filed off and a new hook support was made with plastic. The hook itself was scratch built. • The smoke dischargers were made with plastic pieces. • The belly received its maintenance hatches set. |
|
|
 |
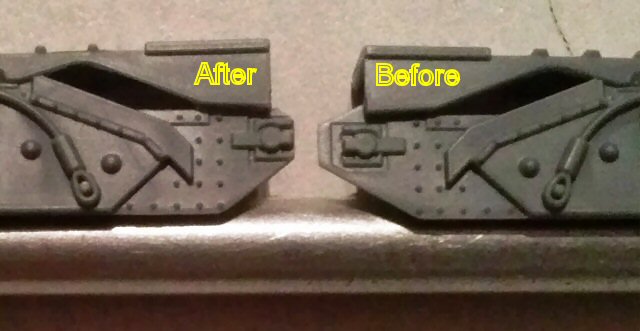
| Hull
sides • The hatches have their details too much raised. These were sanded down. • The right side has the three central bolt heads in the same layout as the left side. Photographic evidence says on the right side there were two in the lower position and only one in the upper, I carefully shaved off the wrong bolt head and glued it in the correct place. • I made my tank without the forward fenders, a common occurrence. This leaves the idler horns visible. Anyway their lower edges have the wrong inclination: this inclination is correct if the fenders are in place and a stretched triangle (missing in the kit) was applied on the lower horns edge. When these were removed, the triangular parts were removed too. Having the incorrect slope, the kit idler horns look stretched and the front hull with the track tensioner bolt is too much forward. See image right. To correct the horn length and shape, I filed off the front until the forward track tensioner edge. Then the upper and lower edges were corrected. If the fenders were kept, I’d add the triangular reliefs. • The inner horns were corrected too. The lower edge step was filed straight as in the original part. The inner forward idler horns were glued to the hull instead to the sides to avoid gaps. • The track tensioners were detailed with plastic stripes and four resin bolt heads. • The visible catwalk forward edge was thinned as well as the flexible rear fender pieces. • The upper thickness of the mud discharger hole forward edge was thinned. • The dischargers itself were replaced by thin plastic. • The last catwalk stiffener ribs need to be removed. • The ribs overhang a little on the sides. They were sanded flush. • The turret rotation area is undersized. If my tank had the later type turret I’d never see the problem, but I did an early Mk IV turret. This enhanced the problem because the rear turret overhang jammed in the narrow ring and forced me to correct the area. I removed some plastic after having marked the new circumference (33.50 mm diameter) and then I replaced it with thin plastic sheet. If I’d made my tank with a late turret type I’d ignore this correction. |
 |
| •
The air intakes are 2.50 mm too long and their lower side is opened.
They were shortened, the hinges were replaced. The hull interlocks were
erased. During dry fitting a little problem arose: there is a little
discrepancy between the catwalks ribbing and the bolted plate where
a single track link was usually stowed. If correctly placed the intakes
are at the right place, but the alignment with the ribs is wrong and
the space rearward them is too narrow (look here: http://www.militarymodelling.com/forums/postings.asp?th=90038
), if correctly aligned they will be a millimetre too much forward,
a thing noticeable when the hull is compared with a Dragon kit. It looks
still worse when compared with an Italeri hull, which had the intakes
a millimetre shorter. I choose to place them correctly with the catwalk
ribs alignment, because if not seen side by side with the other kits
it looks better. • Their raised mesh is really oversized too (also for a 1/35 model!). I planned to replace them; anyway I had two covers from the Dragon in my spare parts box, so I used them after having sanded down the mesh raised ribs. • The rear oil cans are really oversized. I filed them down to the 1/72 dimensions. The shelves sides were made with thin plastic as well as the holders. • With stretched sprue and tiny metallic wire I made the rods (I suppose the gun barrel cleaning set) fastened to the catwalks. • The backward panels miss the huge hinges; I made them with stretched sprue short segments. • After having glued the sides to the hull body, I made the turret ring with plastic rod. |
 |
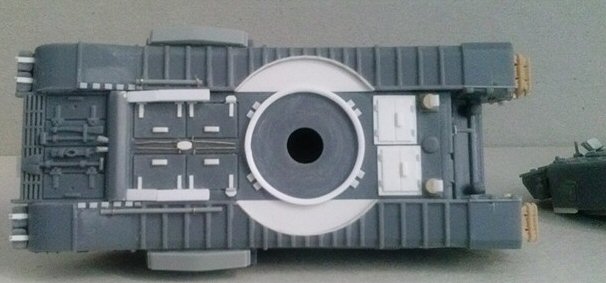
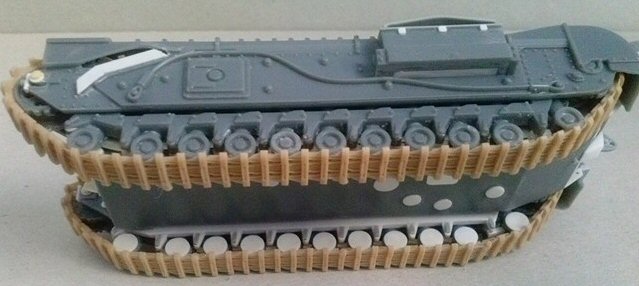
Wheels
and tracks Here, I think, PSC missed an easy target: the Churchill tank was one of the few WW2 tanks which had a smooth track link type: the “heavy” one. If they’d made this type, the flat face of the links (sprocket teeth holes apart) wouldn’t have been a big problem. Every wheel couple is depicted as a single solid cylinders, the suspension springs are smooth and the central arms are missing as well as the inner part of the bogies. This is the point where a aftermarket “bogies & wheels” set would be highly desirable. I’m not so skilful (or patient) to make a full scratchbuilt set and I didn’t wanted buy a kit just to have this area, so I modified the PSC one. The result is not as good as the set visible on the Italeri or Hasegawa kit, anyway is not particularly more worse than the Dragon one. I’d have a bigger problem with the tracks if I couldn’t replace them. I used a couple of Dragon ones.
|
 |
•
The springs are smooth. It would have been visually a better solution
to replace them with metallic wire, but the job would weaken the set
too much. In the end I kept them as they are. • The wheels are attached to the hull only by the springs and the thing looks very strange. The inner arms were added with plastic rod segments. • The inner bogie sides are absent. From a wargamer's perspective this is not a problem and other fast assembly kit has the same errors. I made the missing sides in plastic. They aren’t very detailed and if I were more apt with homemade resin castings, I’d duplicate the outer part to ease the job. • I glued the Dragon tracks. Because of the track guide rail width I had to adapt the wheel sets cutting off the lower edge of the inner row wheels, to restore them I glued a punched plastic diskette set. With the Italeri tracks, it would have been more easy to adapt the rail. --------- |
 |
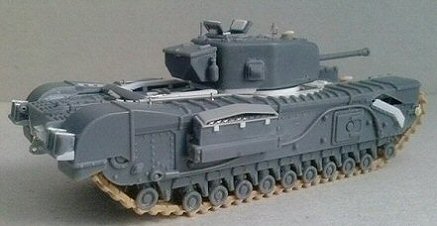
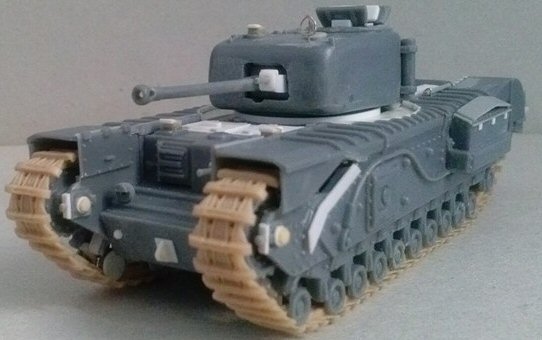
Conclusions For
wargaming I think this is a good kit. To make a display model, you
have the Dragon Mk IV kit, which is better detailed and easy to make,
but also not error free. Anyway a price comparison reveals that a
single PSC Churchill costs 1/3 of a Dragon kit (at least in my country)
which needs some correction jobs (some of them are shared with the
PSC kit), has an unusable decal set and has the suspension springs
moulded only on the outer side. The PSC kit can be used, as the review
has proven, but isn’t an easy solution. To finish it as acceptable
display model it needs a lot of work, some plastic rods and sheets
and a couple of spare tracks. The kit is not compromise free, but
no one it is. Two further pieces could have been easily moulded by
PSC to make the inner bogies and wheels, like in the Dragon kit, but
then again this is only a display modeller speaking and the kit is
not aimed at them. |
|
| A special thanks goes to Gianluca Trivero who gave me the kit and the opportunity to build it.
This
model can be purchased from
|
|
| Back to Plastic Soldier Kit List | Back to Home Page |
Article Last Updated: 23 September 2015 |