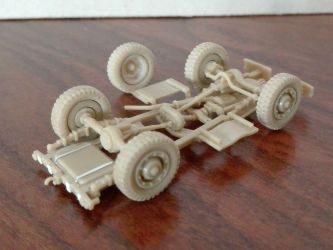
The
Italeri kit is the release of the older 1976 ESCI kit. It is composed
of two moulds, sand yellow in my case but I've also seen olive green
moulds; one has the common pieces shared by the M6 37mm GMC (aka WC-55)
Italeri kit # 7025 and the other has the flat bed and the tarpaulin.
The decal set and the instructions complete the kit. No transparent
parts are given.
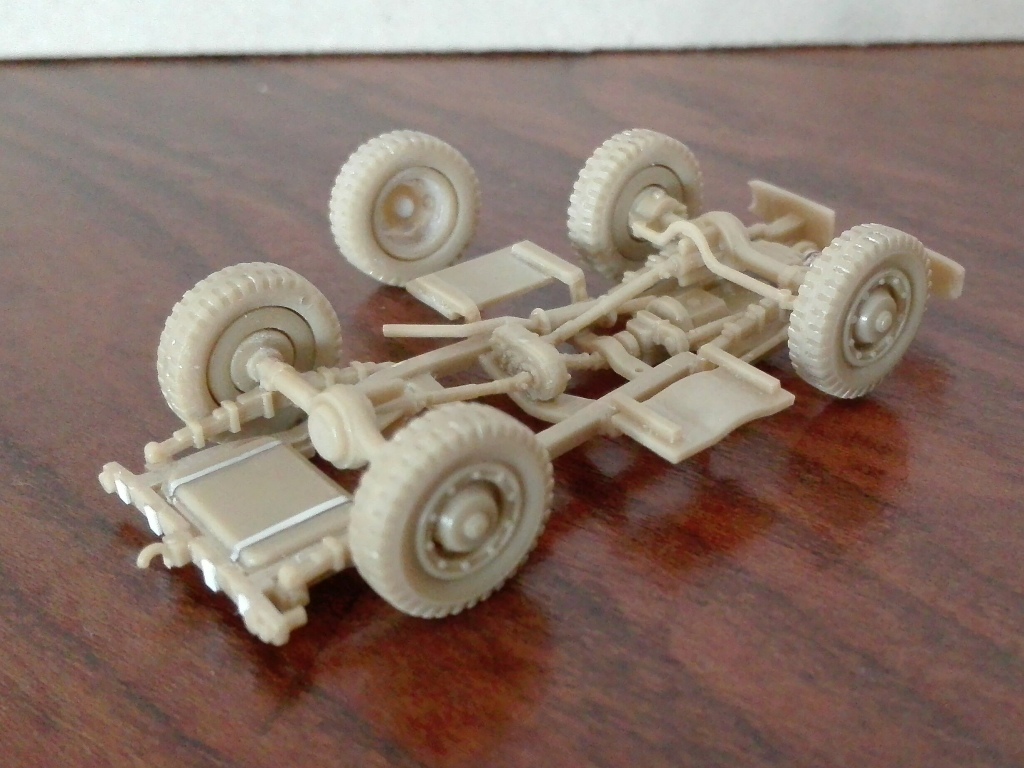
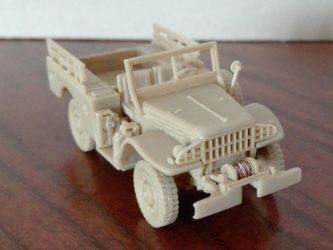
Close observation reveals this apparently is a good kit. The pieces
are finely sculpted (see for example the leaf springs or the surface
of the steps). There are some pieces nicely moulded separately, such
as the tools. A thing immediately perceptible is that there are a
lot of ejector pin marks to be erased. Cleaning confirms some pieces
are as fragile as they look. The kit also has two seated figures,
a driver and a passenger. They wear the battle dress, the helmet and
the boots (without the leggings); no accoutrements or weapons. Details
are soft and both need a bit of reshaping. If available in the spare
box, a replacement head would be a good idea. Despite this, a crew
is always a welcome bonus.
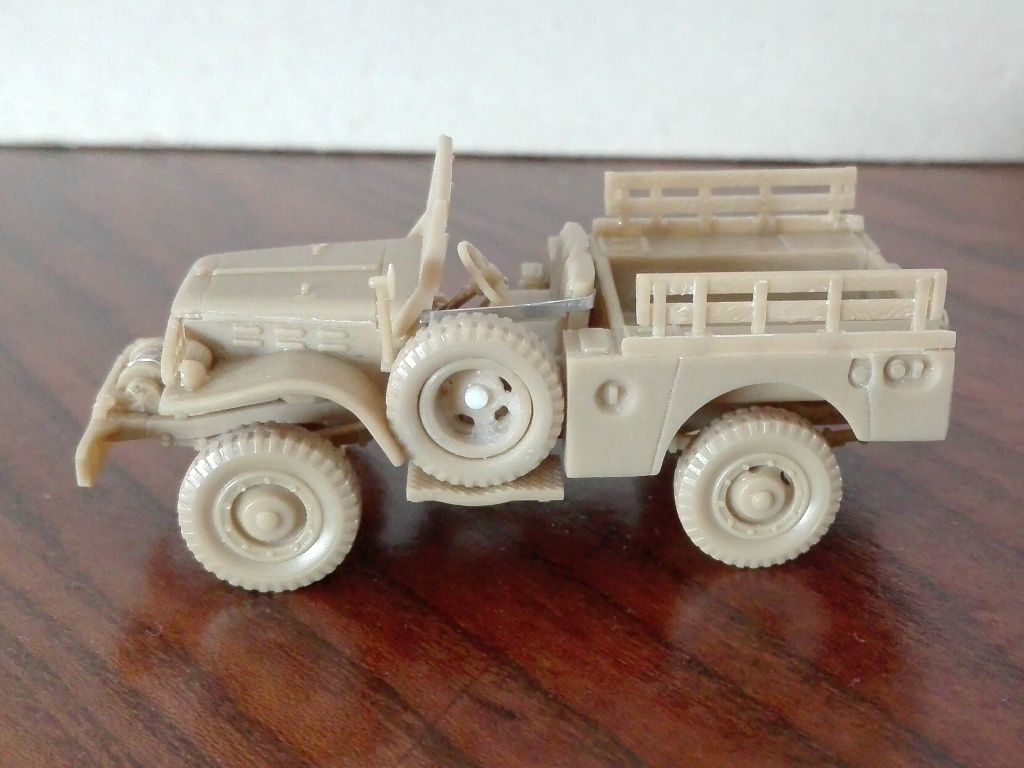
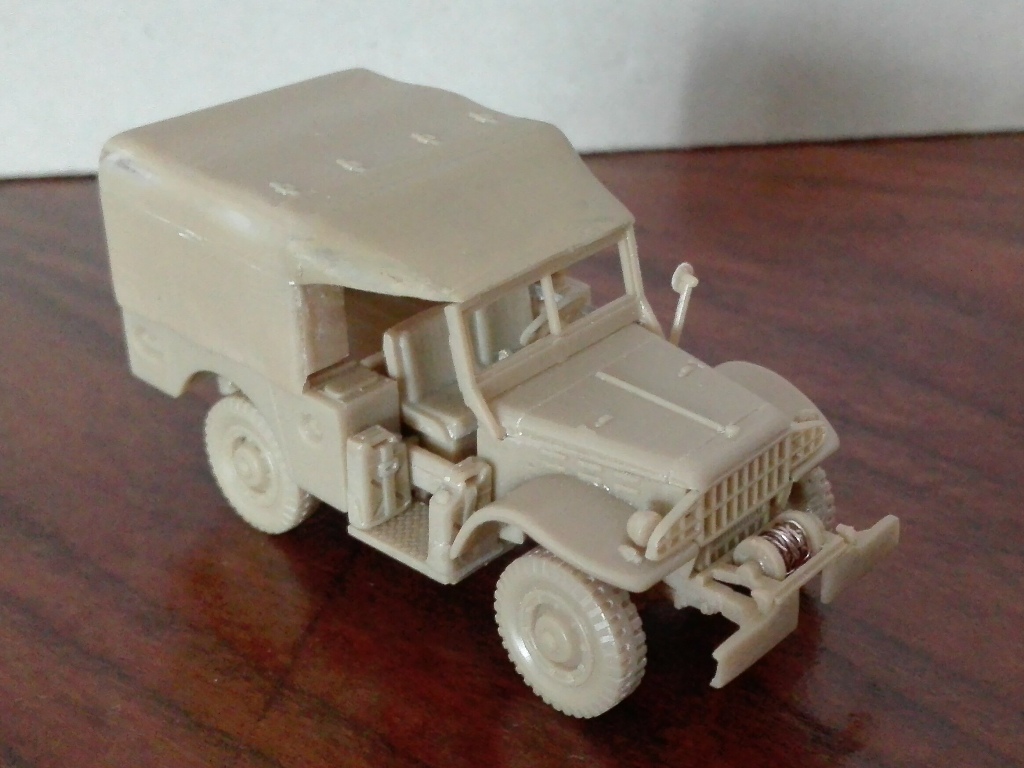
Strangely enough, the name of the kit, reported in every release since
the original ESCI boxing, is incorrect: the model doesn’t depict
the WC-51 as written on the box and on the instruction. The model
depicted by the kit is the WC-52, as can be seen by the presence of
the winch (the only difference between the two models). Officially
known as G-502, "Truck, Cargo, 3/4 ton, 4x4, Weapons Carrier",
it was the American equivalent of the British 15-cwt truck.
Registration numbers of the WC-52 were in the following batches: W245845-246394;
W289213-291384; 291993-292512; 2160419-2179292; 2180276-2199555. As
said, the WC-51 was very similar, being the same vehicle without the
winch. Clearly, the conversion is very easy and for the modeller interested
in such a job these are the registration numbers for the WC-51 batches:
W252293-254792; W259135-289212; 291210-291992; 293685-294209; 2110000-2125113.
I also have to say something about the WC-55 / M6 GMC. When they became
obsolete, most of them were converted to the WC-52 standard (they
had the winch), removing the 37mm gun and its support. I haven’t
seen a photo of these reconverted trucks, so I I’m not sure
about other modification to the body in the magazines area. However
the WC-55 batches had these registration numbers: W6016072-6021066,
W6022453-6022837.
After having identified the variant, let’s go to check the general
dimensions:
| |
Real
|
1/72
|
Kit |
Length
|
14’
9” |
62.4
|
62.0 |
Width
|
6’
11” |
29.2
|
28.8 |
Height
|
5’
2” |
21.9
|
See
text |
Height
|
6’
10” |
28.9
|
See
text |
Wheelbase
|
98”
|
34.6
|
35.0 |
Axle
track
|
64”
¾ |
22.8
|
23.4 |
| Wheels
|
9.00x16
|
12.4x3.6
|
12.2x3.6 |
Height
apart, dimensions are quite well respected. As can also be seen in
other reviews, the chassis is too high over the wheels. I chose my
way to solve the problem, as correction is compulsive. I made the
variant proposed by the kit. A very useful walkaround is here.
Production
changes
As far as I've found, the WC51 and the WC52 had few details changed
during production. In a 1/72 perspective, what we could consider are
related to the body differences and the reservoir caps.
Body
- Early
type: since the start of production (1942) to early 1943.
The lower edges of the sides (forward and rearward of the wheelbays)
weren't at the same level. The forward lower edge reached the step
level while the rearward edge was placed higher. The front touched
the spare wheel.
- Mid
type: until late 1944.
The early type body forward lower edge was raised to the same as
the rearward one.
- Late
type: until end production.
The mid type body was shortened: the front was pushed rearward and
didn't touch the spare wheel. The shortening is clearly visible
around rounded depression for the tarpaulin fastening point(pushed
rearward). Its surrounding area was made smaller.
Reservoir
cap
- Early
type: until 1943.
The cap was fixed, centred in its depression.
- Late
type: until end production.
The cap became larger and could be extracted to ease the filling.
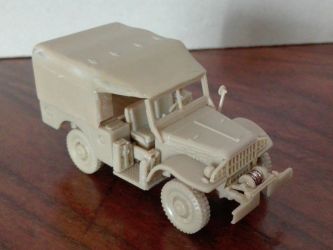
Clearly
the Italeri kit depicts an early type WC52. Anyway the conversion to
a mid type is very easy to do.
As
already told in other reviews, attention must be paid using photos of
restored vehicles, because the owner could have used non original spares
or could have added modern details to respect the current road rules.
Construction
Here
is what I made:
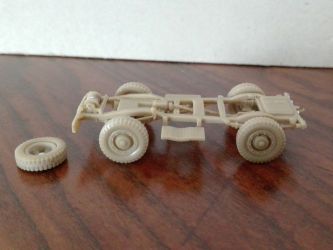
Chassis
As correctly noted by other modellers, the model built out of the
box sits high on its wheels. This is due to three facts. First,
there are squared shims over the axles, which interlock in the leaf
springs. Second, the shackles are a bit too high. Third, the rear
bumpers hit the lower edge of the rear. To correct this, I made
the following changes:
-
I cut off the shim on the axles and the interlocks on the leaf
springs. I also thinned them removing the lower leaf of the springs
with sand paper.
-
I glued the leaf springs in place. When the glue was dry I carefully
cut them off each front shackle and reduced its height by sanding.
I glued them in the new position and repeated the job to the rear
shackles.
-
I carefully removed the rear bumpers. The bumpers were then glued
on the body’s lower rear edge, after being thinned on the
lower edge.
-
Pay attention to the drive shafts. Contrary to the instruction
the longer 47A goes forward and the mid one 46A goes rearward.
-
The front bumpers outer endings were filed to depict a C section.
Their inner ending front edges were rounded with sand paper.
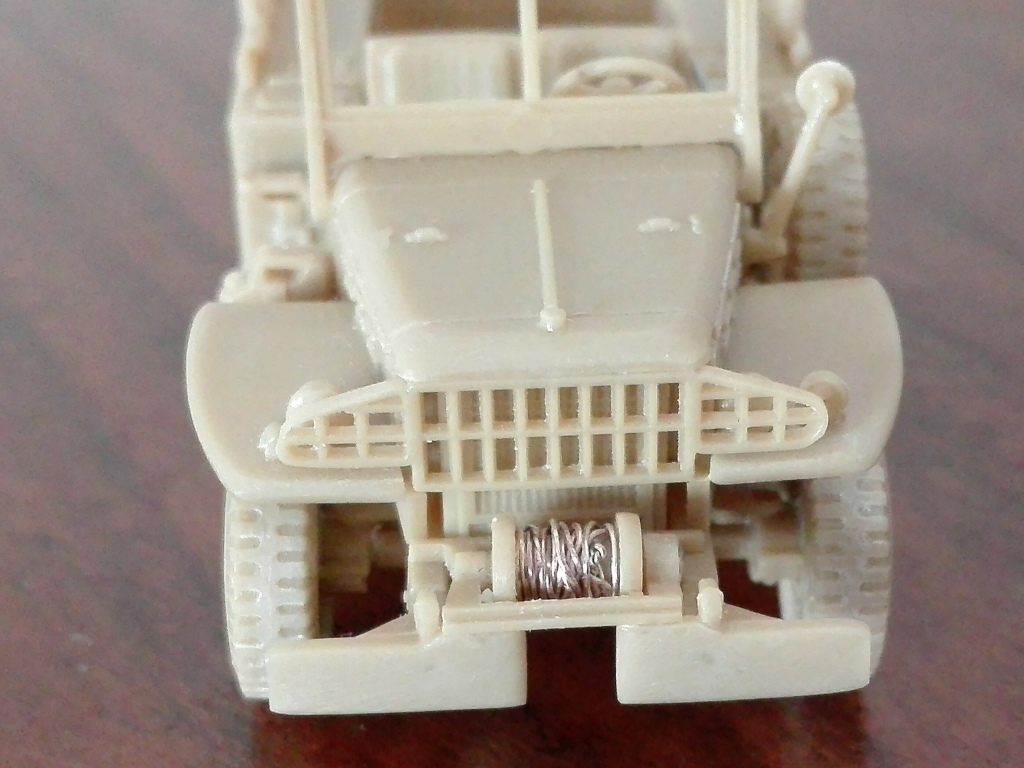
-
Attention must be paid to correctly place the winch subassembly
to the chassis (check using a photo). Around the winch I wrapped
a wire.
-
Particular attention is needed to correctly glue piece 3A in place,
to which I thinned the thickness on the points of contact to the
chassis and to the radiator bottom.
-
I added two belts from metallic sheet to the tank bottom.
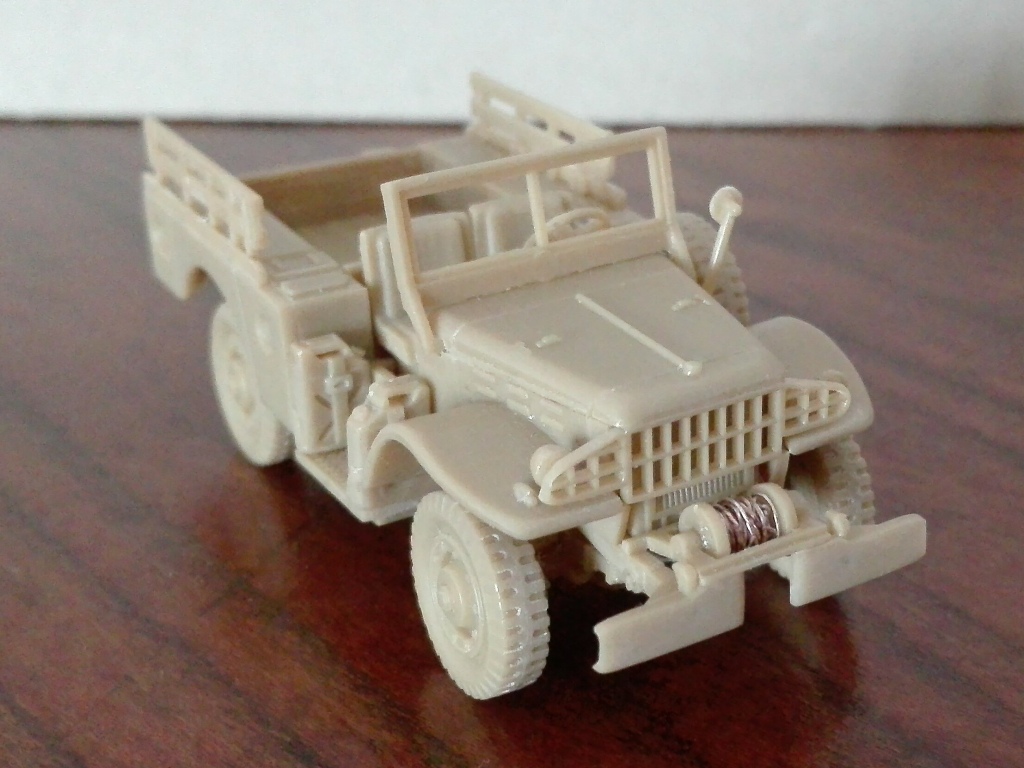
Bonnet,
cab and body
I
didn’t follow the instruction sequence and, as usual to me,
I glued the three parts together to have just two subassemblies
and ease the paint job.
-
The upper edge of the bonnet top 20A needs to be rounded, being
too much squared. I had to replace the radiator cap by stretched
sprue.
-
I rounded the mudguards outer upper edge with sand paper, the
originals not being squared. I also thinned the inner lower edge
to avoid the bonnet louvers interference during the assembly.
-
The brush guards were asymmetrical. Using sand paper I shaped
the two correct shapes.
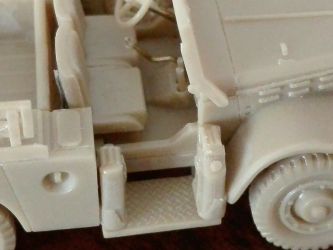
-
I added the missing gear levers from stretched sprue.
-
In front of the passenger, barely visible, there was the fire
extinguisher. I made it from plastic rod and stretched sprue.
-
The steering wheel rod is placed too much vertical giving an unnatural
look. I replaced the rod with metallic wire (it looked a bit fragile
to me) and drilled a hole on the floor bent line, just above the
pedals, restoring a more natural position.
-
The spare wheel was mounted inside out with respect to the others.
Unfortunately the inside is not well depicted. I carved its inner
side with a motor tool.
-
The jerrycans are too much squared and look like boxes. After
having sanded the corners, I added the caps and the triple handles
to the jerrycans. They are moulded identical and not symmetrical,
in this way the one which is placed to the body have to be glued
with the cap inside.
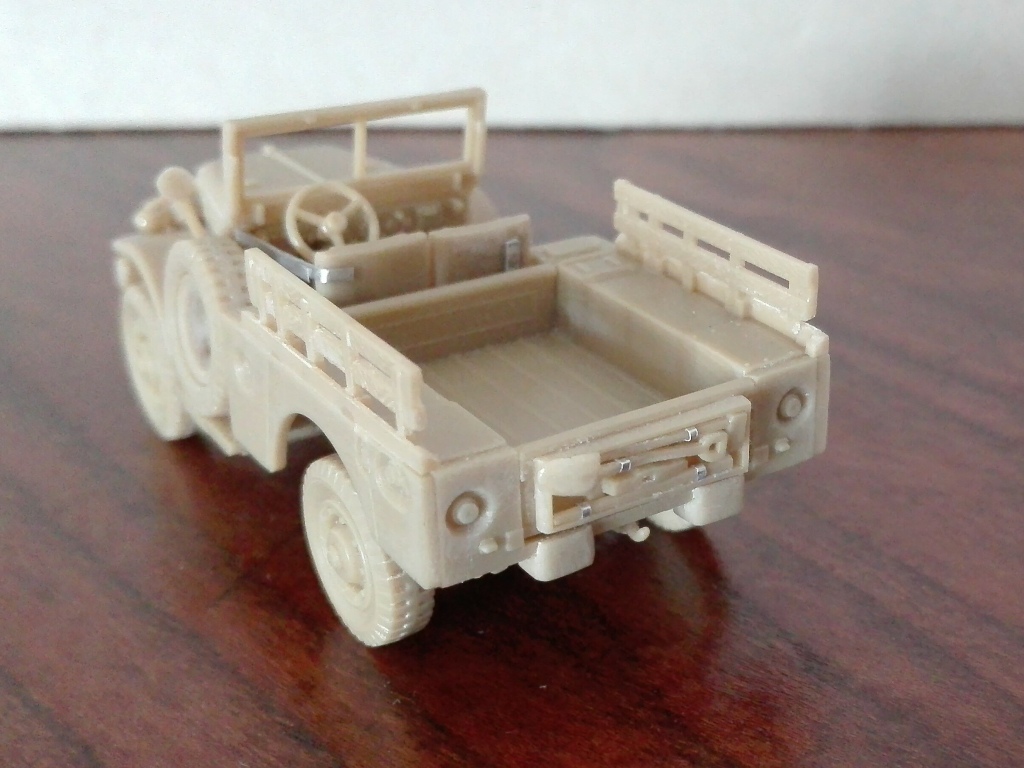
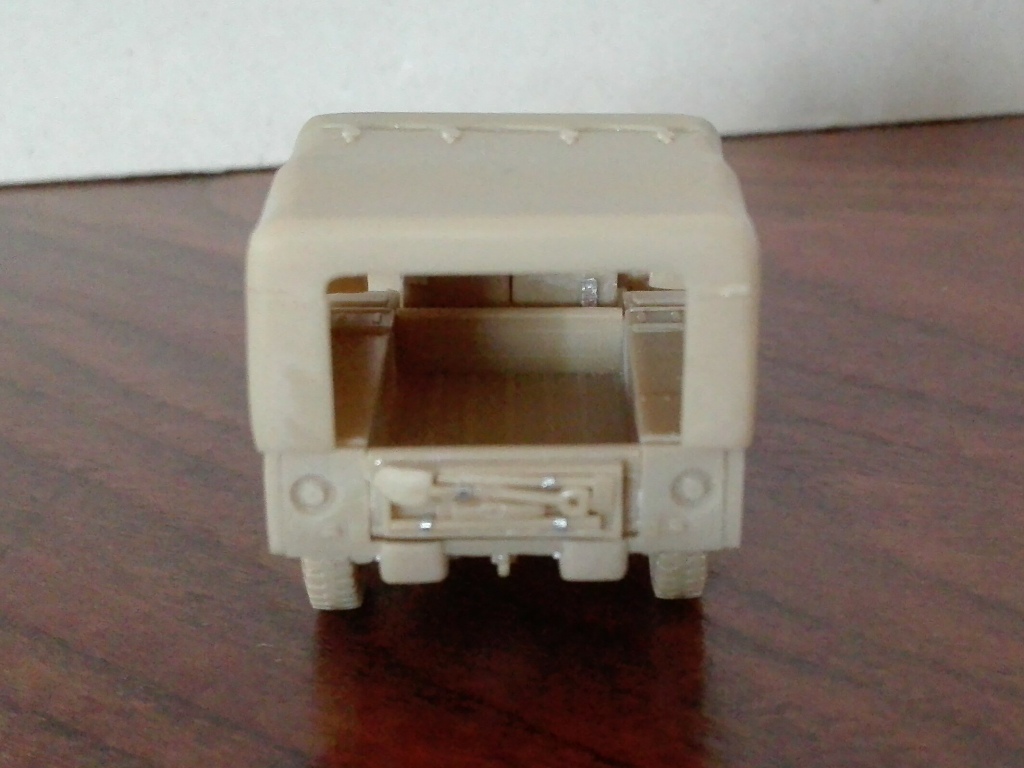
-
There weren’t side doors. In their place there were two
belts which I made from plastic strips. Two others were placed
over the tailgate.
-
The flatbed vertical interlocks for the tailgate 21A and the front
side 22A were cut off being absent in the original.
-
The backrest bases 108B and 109B were thinned. I inverted their
sub assemblies (backrest + base) placement with respect to the
instructions. The central position of the tarpaulin frame pushed
forward the central support position and in this way the wider
distance between the vertical rods was rearward. It must be noted
that the backrests and their base are smartly moulded separately.
The backrest could be folded down inward, an easy way to differentiate
the model.
-
The rear lights are a bit too far from the corner. I left them
as they were. The correction is not impossible anyway. I carefully
filled the join between the sides and the rear side.
-
The tool rack 120B edges were thinned, being huge.
-
The tools need their belts. I made them from metallic sheet.
-
On the left side of the rear plate an antenna bracket could be
present. I didn’t add mine; anyway it was a simple shelf,
very easy to do.
-
The tarpaulin is really too much wide. Partially because the top
is wide, partially because the sides are thick. After assembly
I filed its sides, thinning them to restore the correct width.
Then I filed the front trapezoidal part to the correct size and
shape. Being a canvas cover I rounded the corners and I tried
to give a bit of sagging by sand paper after having filled the
inner side by cyanoacrylate glue and plastic chips where required.
Unfortunately I lost the original engraved details. A thing to
be noted is that the body tarpaulin and the cab tarpaulin were
two separate pieces. The cab one could be erased, leaving just
the body one and have another way to depict a model with something
different. Inside I glued the three frames made from metallic
wire. My tarpaulin ended up a bit too smooth and I’m not
sure I’ll use it, however its correction is proven.
 
Decals
Three vehicles are depicted. None of them is drawn with the winch…
All the three variants are repeated in a kit since the first 1/35
Max kit was released, where the last two were associated with the
winch-less WC-51 and just the first with a WC-52. I didn’t find
their photos. Anyway...
- USA
218077, “MOHAWK”, 4-2R8 A-B16; the bumper codes look
strange to me while the registration number surely is part of a
4,628 WC-4 batch (which was a different truck).
- 2304853
Tn-10 B-15; the registration number is out of the WC-51/52 batches.
- USMC
59231 2D – C, “OLD CROW”
For
the generic bridge class disc, the background colour is white. It
should be yellow.
Conclusion
Despite the chassis problem about the height and the oversized tarpaulin,
the kit is still amazing. It is more than 40 years old and is still
a good kit. If one compares it to the only other Dodge WC class plastic
kit, the Academy WC-54, which was released in 2005 (when the ESCI
kit was already 29 years older), the Italeri WC-52/55 still have some
parts which are better depicted and that can be used as replacement
for the Academy kit. A new decal set is wished for. Recommended.
|