Panzer IV Ausf. F2
Manufacturer: Hasegawa with Photoetched tracks by PART
by Augusto Versiani
Few times I had so many problems when assembling a model as with this one. However, the truth is that they were caused by factors that had nothing to do with the quality of model kit itself.
I started assembling the tracks, replacing the originals with PART. The article that deals with assembling this nice photoetch can be found elsewhere in this site.
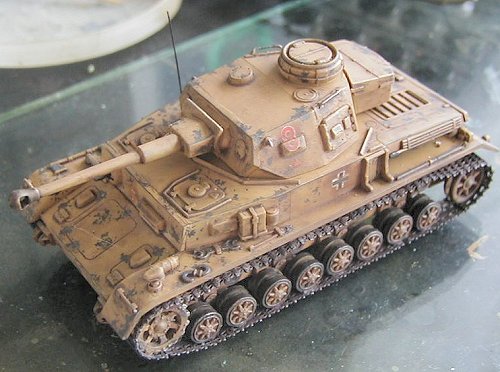
The work was resumed only some months after that, which is not normal for my way of working. When I resumed the job, I couldn’t take my eyes off the horrible sprockets that come with the kit. The size and the shape of the teeth had nothing to do with the real thing. I decided to substitute them by using the ones from the ESCI Hummel. To do this I had to open the PART tracks that were already installed. It was a bad decision, since the wheels of the ESCI model are worse than the originals included on the kit. Definitely the best solution would be using the sprockets from Revell Pz IV. However, as this was not available, I decided to reinstall the original sprockets from Hasegawa, with reworked teeth, in order to improve its appearance.
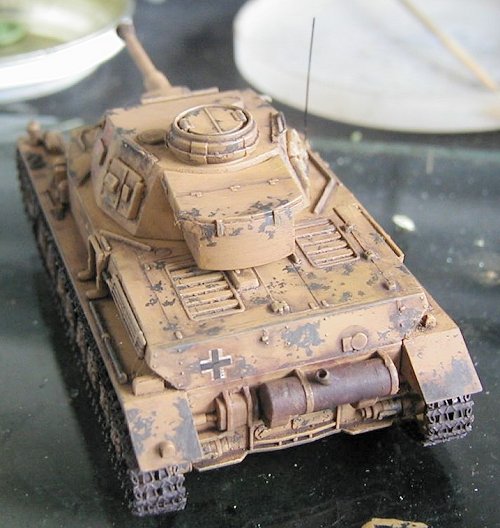
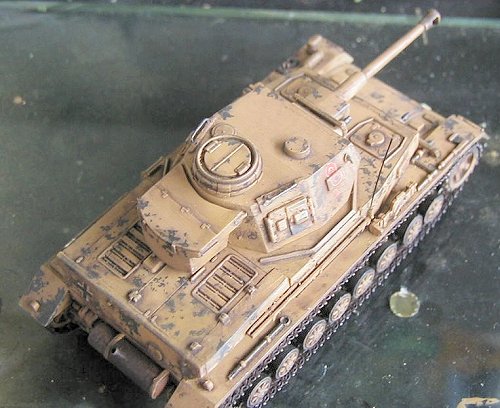
When mounting the stowage bin at the back of the turret, I noticed that the fit was poor due a little lump on it. I removed this "obstacle" and sanded it until getting what I imagined to be a perfect and flawless fit. After this, while taking a glance at some pages in order to search for references, I found out, to my dismay, that the stowage bin had a space from the turret as represented on the original kit. I removed the bin and remade the lump that already existed in the original turret with a small part of plastic . The remaining assembly occurred without problems. I made only some small alterations by adding the hooks in the turret made with plastic and scraps from my spare box, some details in the bin and the handles over the main access doors using steel wire.

![]()
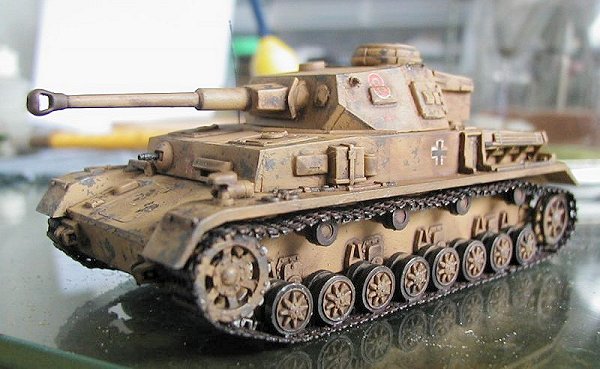
My idea was to represent a tank used by the Africa Korps with a good dose of weathering in the painting. During my first attempt, after I painted I used a pencil to apply the peeled effect manually. However, I found that I exaggerated it and the final result was not good. Once I had already applied oils, pastel chalks and varnish, I decided that the only way was to redo it from the beginning and applied a second layer of paint overall. Then I decided to try to apply the "salt technique".
To represent the apparent metal, I used the pencil again, scratching out the parts where it is supposed to appear as peeled ones. However, at this point I made a mistake. After using the pencil, I should have sealed the graphite with a coat of varnish. Instead, I applied directly the water and the salt on it. After that dried, I began to remove the salt. The graphite mixed with the water had formed a kind of mud and the more I stroke the brush to remove the salt, the more I ended up with mud spread all over the kit, destroying the finishing. At this point I almost quit the kit. However, I remembered that the PART tracks were already installed, and this was the drive that made me to go ahead.
There were two layers of paint on the kit, among other finishing materials. Then I decided that the only way was to remove all the paint and to start again. Happily I use only acrylic paints and applying alcohol carefully with cotton was possible to remove most of the paint.
In spite of all care, some small parts had broken, including one of the small hooks that I could not find anymore. I applied a new layer of paint.
After it dried, this time I applied the chipped effect with 4B of 0,5 mm pencil, drawing each peeled section individually. The result seemed reasonable.
Before applying the decals, I applied a small layer of future that prevented silvering and still helped them to conform to the irregular surfaces. The markings came from T.L. decals. Their line has fine decals, but the swastikas, even the smallest ones, as the ones found on the Africa Korps palm trees, are split, certainly a imposition by some legislation. But the fact is that it was impossible to me to mount the miniature swastikas. To disguise this defect, I applied pastel chalks on all the symbols aging them, turning what would be a flaw into a natural weathering.
The exhaust pipe was painted with black pastel chalk as base and some brown tones over until getting the desired effect. All over the kit was applied a wash with brown shade oils and matte varnish.
Conclusion: In spite all of the described problems, the Hasegawa kit is easy to assemble and offers a good representation of the original vehicle. The biggest flaws are the tracks and the sprockets that definitely need replacement. Recommended for every one.
![]()
![]()
Tanks to Ricardo Haddad for helping me with the English text and to Stephen Brezinski, Alan Caylor and Lawrence Goh for the advice on chipped paint.
| Back to Kit Reviews | Back to Home Page |
| Back to Hasegawa Kit List |