BUILDING
YOUR TIGER TWO’S…
Constructing, correcting and
detailing the 1/72 scale
ESCI Tiger
Ausf. B and the ESCI Jagdtiger.
By Stephen
Brezinski
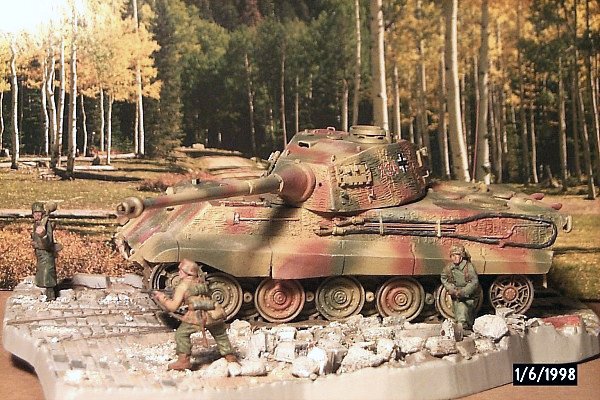
Photo 1.
Left side of the completed Tiger Ausf. B (Tiger 2) on its
Matchbox cobble street base, with accompanying Revell 1/72
figures. In this photo you can see the bent (battle damaged skirt
over the second road wheel. The tow cable & tools are scratch
built. I tried to find a suitable city scene as a backdrop but am
unsuccessful so far.
Introduction…
These two German vehicles
of World War 2 are fairly well known to many so I will not go
into detail on the vehicle’s development and action. As this
particular version of the Jagdtiger is a bit unusual I will pass
on what I do know about it. The SdKfz 186
Jagdtiger was developed from the Tiger 2
hull with a simple heavily armored box and mounting a 128 mm Kwk
gun developed from the German 128 mm Flak gun. The Jagdtiger
version I constructed, rather than the typical 128 mm gun armed
SdKfz 186, is the 88 mm Kwk 43 armed
SdKfz. 185 Jagdtiger.
This Jagdtiger version I constructed is suspected of being
produced in the spring of 1945 when there was a shortage of 128
mm tank guns. It is claimed that in 1999 one of these 88 mm armed
Jagdtigers, known to some as the "Simenides Jadgtiger, was
discovered in Poland (possibly in what used to be Eastern
Germany?). At the time I write this, little further information
or photos have been released to the public. Only 85 Jagdtigers
out of an order of 150 were produced, including maybe four to 12
of the 88 mm armed vehicles.
This article will be a
construction review of the two ESCI kits with some tips for
correcting or adding detail, as you chose to do.
The Models
The two kits are good
representations of the vehicles and even for today’s
standards are good models, though not up to current Revell
quality and accuracy. Basic shape and detail is good. The most
serious problems lie in the roadwheels, turret roof fixtures and
the engine deck. This will be covered in more detail below. The
lower hulls, engine deck, suspension, tracks and three figures
are common between the two kits. The Tiger 2 has a turret and 88
mm gun, while the Jagdtiger has the box superstructure molded
onto the top of the hull and an 128 mm gun and mantlet. Neither
model is currently in production though can still be found in
collections, on E-Bay and at model shows.
Overall fit was fine, not
superb, requiring filler around the hull sections. I am not into
measuring angles and scale inches so did not check this aspect of
either kit.
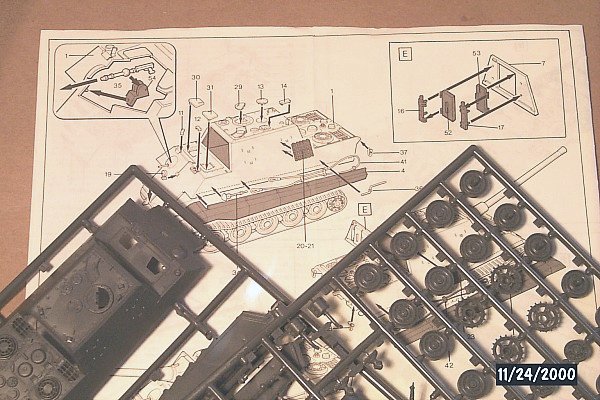
Photo 2.
This is the Jagdtiger sprues with kit instructions. The wheels at
right are common to both kits, as is the engine deck. Note the
details of the rear door construction, allowing the door to be
modeled open or closed.
Construction
& Detailing References
The first basic book I
recommend is Squadron’s Tiger In Action
book. It gives a decent representation of the Tiger and its
variants, a little history, line drawings & color plates, and
is inexpensive. To compliment this Schiffer offers several
inexpensive books on the Tiger series, and Osprey’s New
Vanguard #1 has some good, concise development & operational
history of the Tiger 2 as well as helpful color plates. For those
who do not mind spending the money I recommend the hardcover
books by J J Fedorowicz and by Schiffer Publication.
One of my preferred
sources for detailing are the sharp photos of the many superb
1/35 scale models at websites such as Missing Links, Track Links,
Panzernet and others. The models are large enough for good
close-up photos and the builders have usually done their homework
in the areas of details and paint schemes. (Otherwise I
don’t find too much use for 1/35 scale. On the other hand I
may let my daughter date 1/35 AFV modelers, though I draw the
line at plane modelers! (Just kidding!)).
A very good website for
historical and technical info on German AFV’s is George
Parada’s Achtung Panzer at www.achtungpanzer.com/pz5.htm. For another construction and
detailing review of the ESCI Tiger 2 kit check out http://digilander.iol.it/paolopmp/Military/veicoi_1_72/kingtiger/kingtiger.html. If you do not read Italian, the
photos will be worth the visit.
The Tiger 2
Turret
- ESCI’s turret
has a nicely done commander’s cupola with open
periscope guards, weld seams and overall shape. The hatch
can be made to open and close. As the cupola was not cast
into the roof, I scribed a groove where the two join as
seen in photos of the real tank.
- For a reason
unbeknownst to me, ESCI positioned the turret
roof-ventilator and roof smoke-discharger in the wrong
places! With a razor, these should be shaved off and
reglued in their proper positions if you wish. This is
where the line drawings in Squadron’s book come in
handy.
- To add a light cast
texture to the gun mantlet, try spreading a coating of
slow-drying Testor’s cement over the mantlet and
dabble it with a stiff toothbrush. After drying it should
have a nice cast texture.
- The commander’s
and the rear turret hatch can be modeled open; though if
you do you should add interior detail, including all the
rounds held on each side of the rear door.
- The kit comes with
spare tracks to mount on the turret sides of the Tiger
(superstructure sides of the Jagdtiger) though the
directions tell you to mount them backwards with the
outside face (the part that faces the ground) facing out.
This is incorrect. To mount them properly you’ll
have to add track teeth. The easiest way is to leave the
spare tracks off. I added the brackets [made from brass
strip] to the turret sides where I did not mount spare
tracks (remember these spare tracks were not held there
by gravity, and the brackets appear to have been welded
on at the factory). The locations for these brackets are
represented by little nubs on the models. Shave the nubs
off before adding brass brackets.
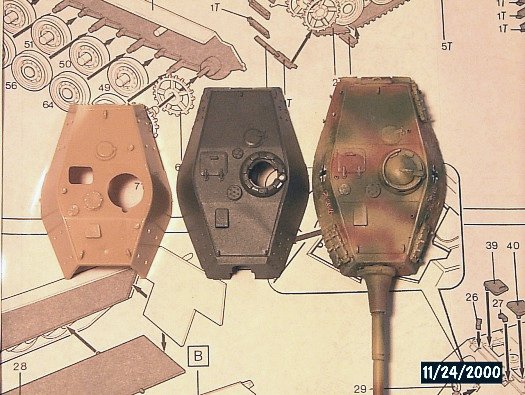
Photo 3.
At the left is a 1/76 Fujimi turret for comparison purposes,
followed by an unbuilt ESCI Tiger 2 turret, and then my completed
turret at the far right. Here you can see that the Fujimi turret
has the locations for the smoke discharger, shell-ejection port,
and the jib-crane mounting points correct.
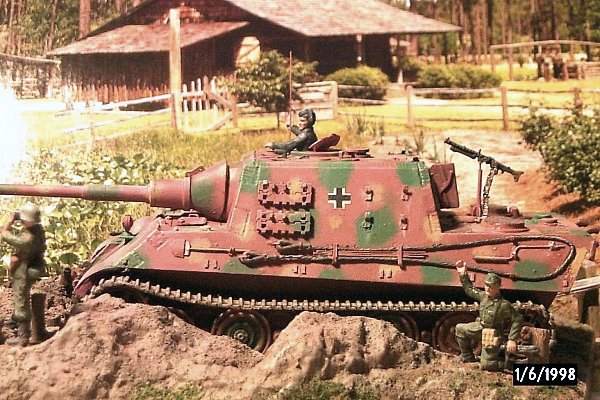
Photo 4.
Left side of the completed Jagdtiger on its modified-Matchbox
base, with ESCI and Revell figures. The primer red-brown base
color is a little too red in the photo. The green and dunkelgelb
camouflage over the factory primer represents a hasty field
application by the crew, as described in my source material for
the vehicle {a friend and I refer to this as my "clown
camouflage". We are not fond of it on esthetic grounds but I
understand it is an accurate representation]. The AA machine gun
mounted on the engine deck did exist on some Jagdtigers though is
speculation for this vehicle. The mg ammunition belt is simulated
with flattened wire coil. Note the skirt mounting brackets (in
pairs below the cable) on the lower hull side, made from plastic
strip. Just in front of the commander’s arm is the gunsight
periscope.
- Three mounting points
for the turret-mounted winch frame were added to the roof
of the Tiger 2, made by inserting pieces of short brass
tube in through holes drilled in the turret roof (see
Photo 5 and references). I understand these
"pintel" points were common to late-war panzers
so the turret could be used to lift out an engine or
transmission for service. I also added lifting lugs/rings
made from bent copper wire and inserted in drilled holes.
Machine gun and gunsite holes will need to be drilled in
the turret front. Details like this are well seen in the
line drawings and website models I noted above.
- Where the 88 mm gun
barrel of the Tiger 2 mounts to the cast mantlet, there
are five bolts around the front of the mantlet [see Photo
1]. I added these bolts with stretched sprue (a small
detail that helps). The mantlet for the Jagdtiger was
different than the Tiger 2 and I do not believe it had
these bolts.
The Jagdtiger
& Tiger 2 Hulls
- The ESCI hulls are
basically good, with accurate shapes and, other than
filling in gaps, I made no changes. The weld seams are
very nice.
- I opted to dispense
with the kit-supplied tools. They looked good, but to me
didn’t look in-scale. The hand tools I made from
wire, aluminum sheet, and styrene. All the tools and
cables were held down by brackets simulated by strips of
aluminum sheet. A fire extinguisher was scratch-made from
rod and installed next to the right-rear engine fan.
These details were done for both kits.
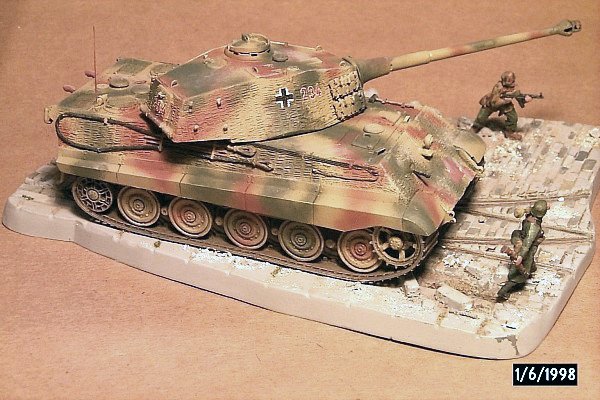
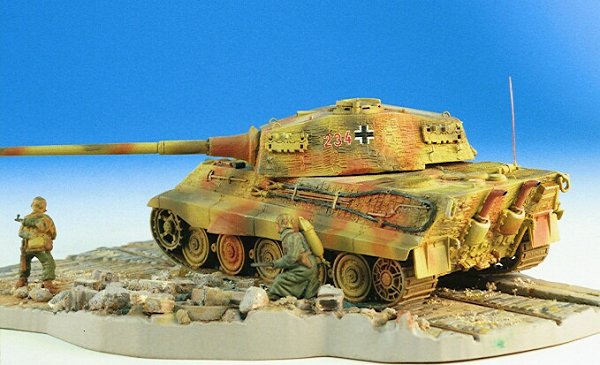
Photo 5.
Right side of the Tiger B. This is a good view of the zimmerit
pattern I applied. I real life the model’s engine screens
are more transparent than in this photo. On the left
(driver’s) side of the glacis is the chipped zimmerit and
two AT shell impacts barely visible. A dark oil wash accents the
wheels well. Note the antenna on the engine deck located in its
corrected position next to the fire extinguisher.
- On the engine deck of
both kits, the antenna mount was cut off and moved to its
correct location for both vehicles. On the engine deck of
the Jagdtiger I used "artists license" to mount
an ESCI MG 34 AA mg on a brass rod [some 128mm armed
Jagdtigers had this though I have no idea if the 88 armed
vehicles had one… but it looks good!].
- On the rear plate I
added a scratchbuilt jack-block, tow-cable hooks, and a
jack copied in resin from another kit [see Photos 4 and
7].
- The real Jagdtiger
hull was actually about 300 mm longer than the Tiger 2
hull though this is not represented in ESCI’s
Jagdtiger kit. This is about 4.2 mm in 1/72 scale and I
did not bother to correct it.
- The tow cables from
the kit are very nice, though I felt some scratchbuilt
ones were needed. With the kit’s cables you may
either leave a molding seam running its length or live
with a flat area where you scraped it off. My cables I
made from cotton twine coated in white glue to hold down
the fuzz. Nylon twine the same size would do better.
- In Photo 5
you’ll note a finer cable forward of the heavy tow
cable on the right side. This is a track-pulling cable
not included with either kit. One end of this cable would
be attached to the sprocket and the other to the track
end… engaging the sprocket would then pull the track
up over the wheels.
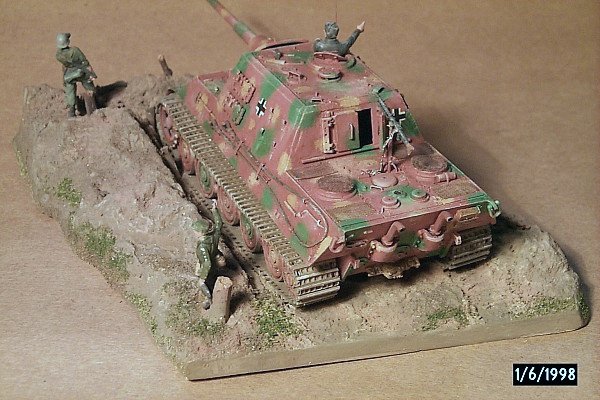
Photo 6.
Rear view of the late Jagdtiger. Being built in April 1945, no
zimmerit would have been applied. Note that the exhaust pipe
armor guards around the mufflers were scribed out. The
scratchbuilt tow cables and tools added on. The rear door is ajar
though I added no interior detail. On the right side of the rear
plate is a scratchbuilt jack-block that is not included in the
kit. The raised areas have been highlighted with artist oils.
Unit markings on the real vehicle, driven right out of the
factory would have been sparse of non-existent. More vegetation
will be added later; I left it off for now so as not to obscure
any details for the photo.
- The Tiger-2 I wished
to model needed zimmerit. This I made using Stucco
modeling putty (from Italy), a small jeweler’s
screwdriver to make the pattern, and a small T-square. Stucco
putty is I believe, the best modeling putty available,
though is hard to find. Modeling the zimmerit is tedious:
decide on the pattern, smear on a square cm of putty, and
stab in the pattern with the screwdriver tip before the
putty dries using the small T-square to insure the
pattern is vertical. The Jagdtiger I produced would have
been made after
the application of zimmerit had ceased in September of
1944.
- The 88-mm gun barrel
for this Jagdtiger I stole from a Jagdpanther kit, though
one from a Tiger 2 would do. My information on the
vehicle states that it was mounted through the regular
Jagdtiger mantlet but had no muzzle brake. Instead of a
muzzle break it had a cylindrical weight to help balance
the gun mount.
- Both vehicles got
engine vent screens from a fine nylon mesh found at a
fabric store. This mesh is finer than any etched brass
set for this scale, and easier to cut.
- While the Tiger 2 had
an armored exhaust fan cover located between the driver
& radio operator’s roof hatches, the Jagdtiger
had it located on the right froward corner to the right
of the r/o hatch. This roof vent is another item that
ESCI left out of the Jagdtiger kit. I duplicated it by
shaping a thick styrene disk and gluing it slightly
elevated off the roof. While on the subject of vents, it
is a good time to mention that you may wish to correct
the round engine deck vents by scribing under and around
them them. To get a better understanding of what I am
referring to see the mushroom-shaped fittings down the
centerline of the engine deck, between the fans [photos 5
and 6].
The Suspension
- The sprocket and
return wheel are superb. I feel the roadwheels could also
be superb except for a major problem. Each roadwheel in
the kit actually represents two roadwheels mounted
together side by side. Perhaps for lack of space and
cost, ESCI molded them as one thick wheel. To correct
this I carefully cut a groove down the center of the
wheel and then widened the groove with a wedge shaped
file to simulate two wheels. This is a very time
consuming and tedious though very necessary correction.
In your references you will note that the Tiger 2 had a
different interleaving of the wheels from the Panther and
Tiger 1. I understand that this system was less prone to
clogging with mud and ice and was intended for the
planned Panther II tank.
- The suspension is
supported by torsion bars that are reasonably represented
and not seen after construction if the model is affixed
to a base.
- There is a choice of
two different tracks for the kits. A very nice styrene
"link & length" type and the older
polyethylene "rubber band" type. The styrene
tracks looked the much better of the two though lack
track teeth and inside detail. As I planned no fenders on
the Jagdtiger I chose them for this vehicle. Fit was
great excepting around the sprocket, which required very
little work. With a little extra work you can glue track
teeth on the inside between the wheels.
- The rubber band type
tracks were used on the Tiger-2 where I could hide the
area they joined under the side skirts. [Remember to not
apply zimmerit under the skirts.] I particularly dislike
this track material used by ESCI. It is stiff, prone to
cracking, when bent it can strain & bend the wheel
axles, and resists all but one glue I have found: a two
part cyanoacrylate glue. To inhibit cracking when bent
around the wheels, I wrap this type of track around a
dowel, approximately the size of the sprocket or
roadwheel, and then soak it in hot (not boiling) water
till the track holds its shape (3 to 4 seconds). I then
glue the track to the wheels. This beats tying them down
with thread!
- The rear mudguard on
the Tiger 2 was taken from a Hasegawa Tiger 1 kit and
looks fairly accurate. The Jagdtiger was given no
fenders, as it would appear freshly transported by rail.
On all the Tiger tanks, they were so wide that the
fenders had to be removed and even narrower
transport-tracks fitted on in order to fit through many
tunnels. The fenders may also be ripped off and damaged
while bruising through the countryside. The fenders on
the Tiger-2 I understand to have been fairly heavy steel
and not prone to crumpling like a truck or lighter tank
fender.
Photo
7. rear and left side of the Tiger B. On the
turret side I added spare tracks, as I believe was added at the
factory. Track teeth were added. Below these tracks are brackets
that held the track links on. On the turret roof are the added
lifting rings and winch/crane sockets. The rear mud flaps were
stolen from a Hasegawa Tiger 1. Also visible is the jack below the exhaust pipe, not included with either
kit. [Ignore the date on the photos, the photos were taken in
Oct. 2000.]
Store-bought
Details
- I am not aware of any
etched brass detail sets for either kit, and being
out-of-production at this time, I do not expect any. Some
fittings from Eduard’s and ExtraTech’s brass
sets for the 1/72 Revell Panther kits can be used, such
as engine screens.
- There are resin cast
replacement turrets available with zimmerit molded in, or
cast as the early Porsche turret. I have not seen these
so cannot give any opinion.
Painting &
Markings
- My Tiger I patterned
after a tank of sPzAbt 503 (Heavy Tank Battalion 503)
attached to the Feldherrnhalle Panzergrenadier Div. in
Budapest, Hungary in the spring of 1945. This was a Heer
(army) unit, not SS. [See Panzer
Colors II, pg. 61; and Osprey’s
New vanguard 1,
pg. 21-26 for details].
- The Tiger was given a
base-coat of Poly-S Depot Buff
acrylic paint applied with an Iwata airbrush. A pattern
of brown and green Poly-Scale acrylic was applied
matching the vehicles in my references as best possible.
- As explained above,
the information for the Jagdtiger paint scheme and
markings was from a long description I got from George
Bradford’s AFV News Discussion Forum. Whether it was
accurate or not, time will tell. It may have not had any
balkencruz though I added one on each side to dress the
model up a little more.
- On the Jagdtiger I
applied a base of Poly-S red brown acrylic. The
base-color of red primer was quite common at the time of
the war (early 1945) due to paint shortages. Its a widely
accepted evaluation at this time that the many late-war
vehicles thought to be painted in dark panzer gray are
actually in primer red or all olive green. The yellow and
green is described as being hastily slopped on with
brushes and rags (also common in this period).
The panzer-yellow and
green splotches I created using artists’ oil paints
and a soft brush. Artist’s oils are very good for
this purpose and are my favorite for
highlighting/drybrushing.
- The markings are
decals I got from my parts box. Prior to application I
added acrylic floor wax to the areas to insure a smooth
surface. After applying the decals onto the Tiger,
several coatings of decal solvent/setting solution were
applied over two days to help them snuggle down into the
zimmerit.
The Bases &
Figures
- Since I had a
favorite model stolen at a show in Maryland last year I
always mount my kits on a base in order to make them
harder to "pocket".
- The Tiger 2 base is
from Matchbox’s 1/76 Monty’s Caravan kit and is
pretty convincing (with a little work) as a 1940’s
European city street [in this case Budapest, Hungary].
Using acrylics, I started out a light gray, and then
painted a number of the cobbles varying shades of darker
gray and gray-tan. The trolley tracks were painted a
rusty steel and black wash. Building debris was simulated
with broken plaster sheetrock and chunks of broken
Polyester resin [the stuff you cut off the resin kits
before assembly].
- The Jagdtiger base
was made from a Matchbox dio-base that I cut up and
built-up with Celuclay. Based on my reference for this
vehicle, it is supposed to represent a hastily dug-in
vehicle on a "Pak Front".
- My figures are Revell
1/72 polyurethane figures. The uniforms are middle and
late war and are a mix of camouflage smocks and long
coats. At this period of the Eastern Front fighting it
was common to find an assortment of uniforms and units
brought together in ad-hoc battle groups. Represented are
Heer soldat’s (soldiers) with a Panzerfaust, an
MP-44 rifle, and a flame-thrower (all ideal city-combat
items). The figures were painted with acrylics, which
adheres better to soft plastic figures. I accented them
with a dark wash and artists oil to highlight.
Conclusion
Overall I am happy with
the kits and recommend them. Except for the look of the
camouflage of the Jagdtiger I am pleased with both models. With
ESCI’s disappearance these are great subjects for Revell or
Hasegawa to do in 1/72, but at today’s modeling standards.
Happy modeling.