|
A
LITTLE HISTORY FOR THE MODELLER
I will
not cover much about the history of the Firefly or the M4 Sherman
tank here, being covered well in many other books and articles, but
I will discuss a little on their service with the Polish Forces. During
the Second World War the British supplied both Sherman and Sherman
Firefly tanks to the Polish armoured forces serving in Italy and in
NW Europe. (It should be obvious that none served with Polish Forces
fighting under the Soviets in Eastern Europe.) After conversion from
a Sherman Mk I or Mk V to a Sherman Firefly Mk Ic or Vc, they were
accepted by the Polish units with the same major modifications as
used by UK and Czech Firefly tanks. Field modifications to the tanks
at the unit level were also evident.
The Polish
Firefly Ic RYCERZ I T-270012 is modelled here as it is very well
documented in photos and I have available two 1/72-scale models that
include the needed decal markings. RYCERZ I is Polish for Knight 1,
a tank belonging to the 2nd Squadron, 1st Krechowiecki Lancers of
the Polish 2nd Armoured Division that served in Italy.
Regarding
Sherman terminology, many unofficial terms have been common with the
M4 Medium, such as low-bustle turret, high-bustle turret and fancy
sprocket. Many of these actually have part numbers such as the D50878
turret. For my reviews I will continue to use the unofficial common
names. |
A
LOOK AT WHAT WE NEED TO BUILD
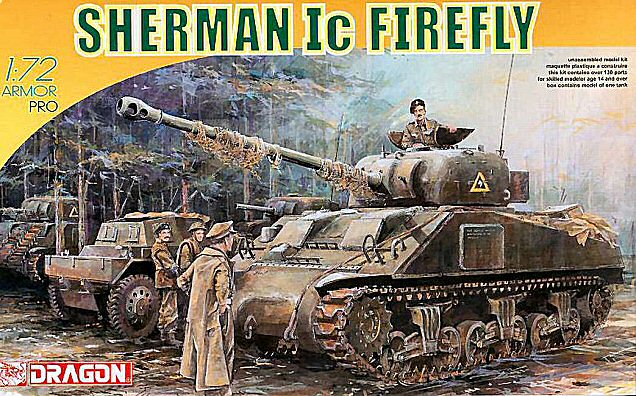
Above
is the box art for DML’s Firefly Ic kit, the easiest and most
accurate M4 (Sherman 1) kit for building RYCERZ I, though the UM M4
or the Trumpeter M4 kits are acceptable. The markings on the box art
are for a Firefly Ic of the 1st Squadron of the Polish 1st Krechowiecki
Lancers, but there is no large name on the side, as seen during the
post war Loreto parade. |
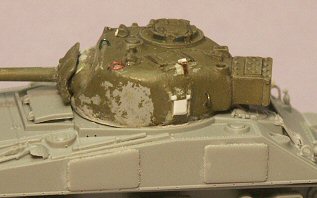
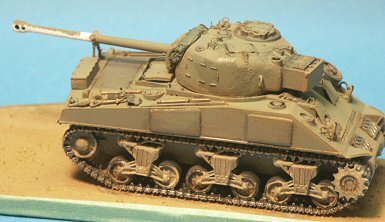
•
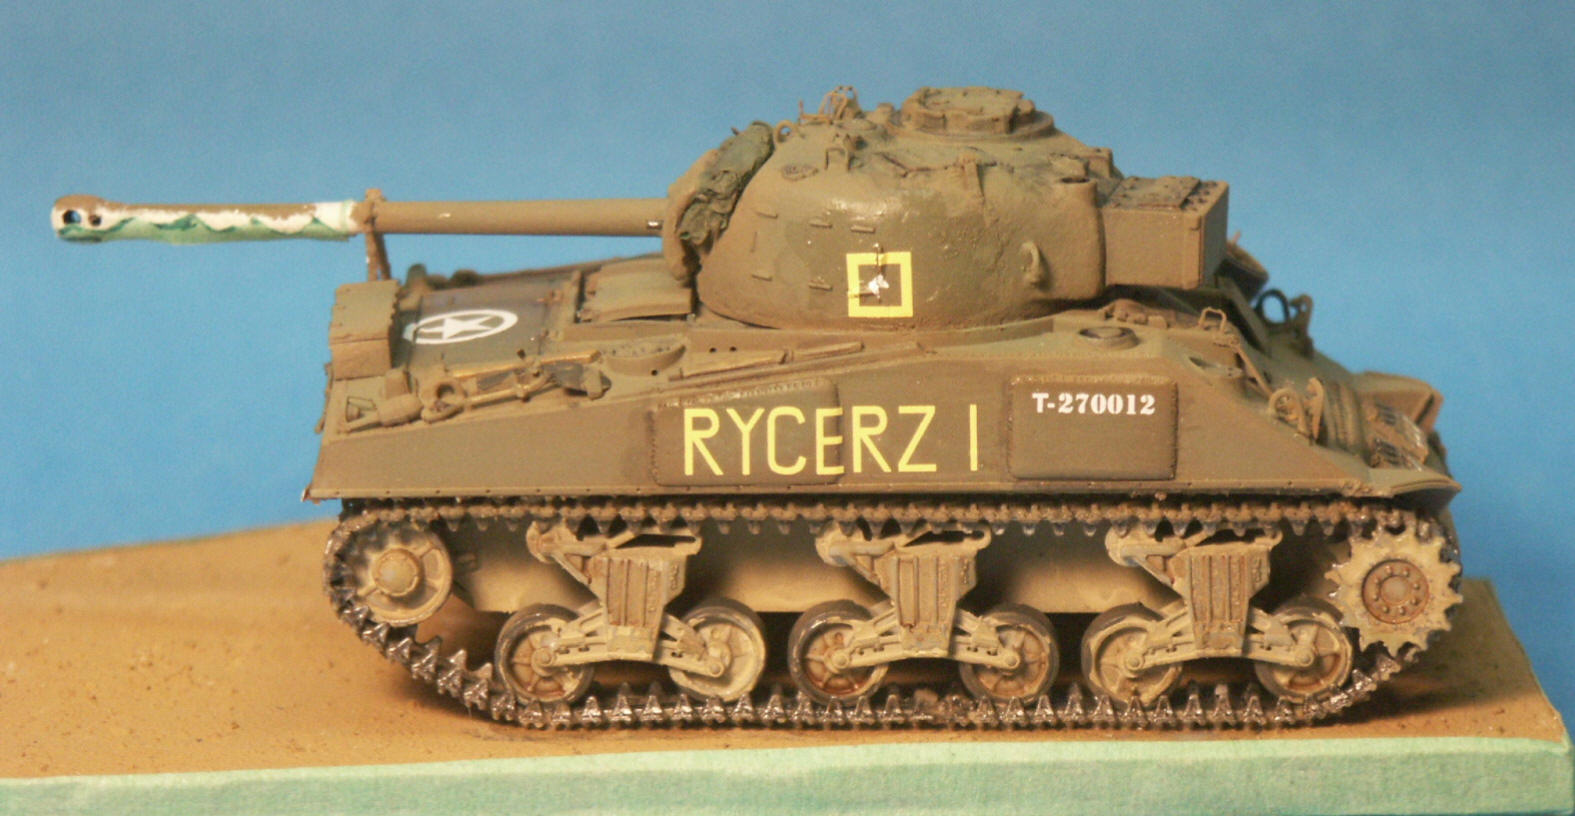
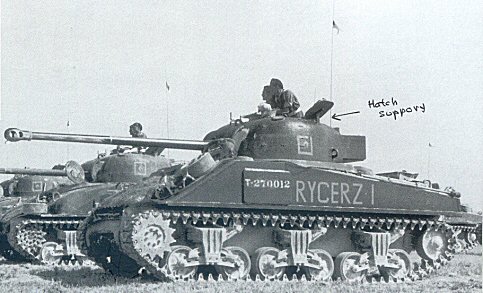
Left is a photo of RYCERZ I from the book Sherman Ic Firefly by Wojciech
J. Gawrych. Starting at the top I wish to point out a commonly missed
detail of this Firefly: the British all-round vision cupola! All models
of RYCERZ I that I have previously seen built mistakenly had the standard
Sherman split hatch cupola. The British all-round vision cupola (AR
cupola) was fitted to a relatively small number of Firefly tanks.
• Keep in mind that the prominent name (i.e. RYCERZ I) painted
in pale yellow was not applied to tanks in combat but specifically for
the post-war Loreto, Italy, parade in August 1945. The vehicle appears
painted in olive drab colour and with a heavy coat of light-coloured
dust over the lower hull and suspension.
• Continuing with the turret, we see the loader’s turret
open and resting on the hatch support. Off to the loader’s left
by the loader’s rotating periscope, we see the rim of the British
2” bomb thrower opening. A radio antenna with small pennant flag
is visible off the turret rear.
• On the right side of the turret roof is the alidade sight for
the commander, but no blade-shaped vane sight that was common on the
early Shermans. |
 |
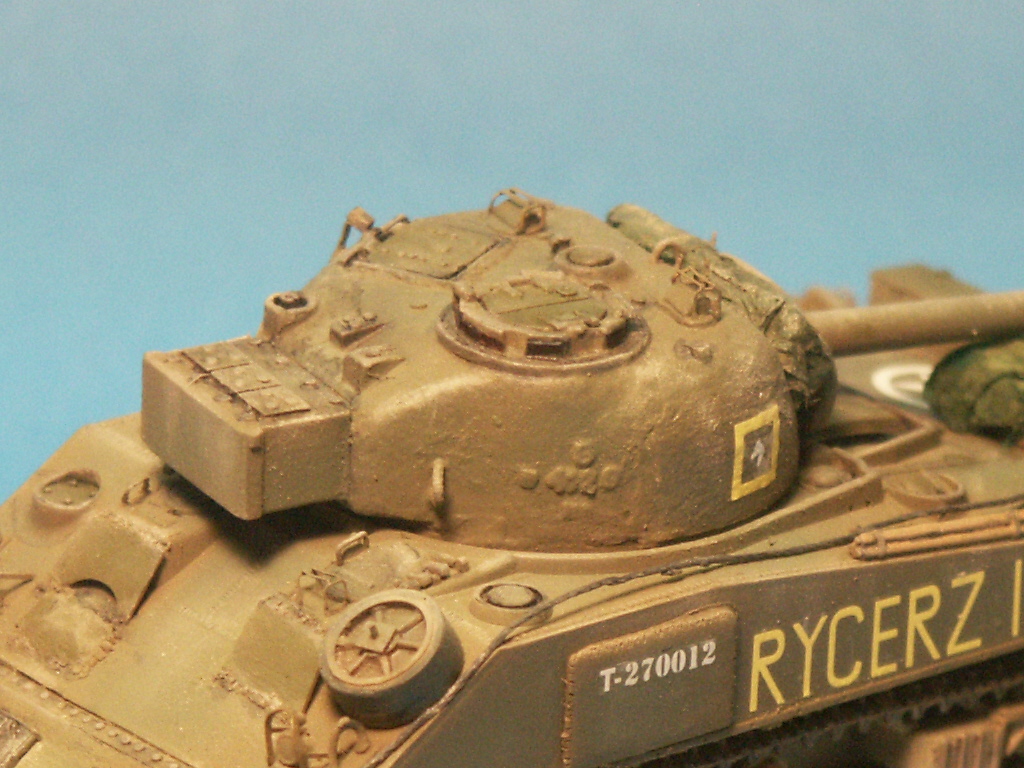
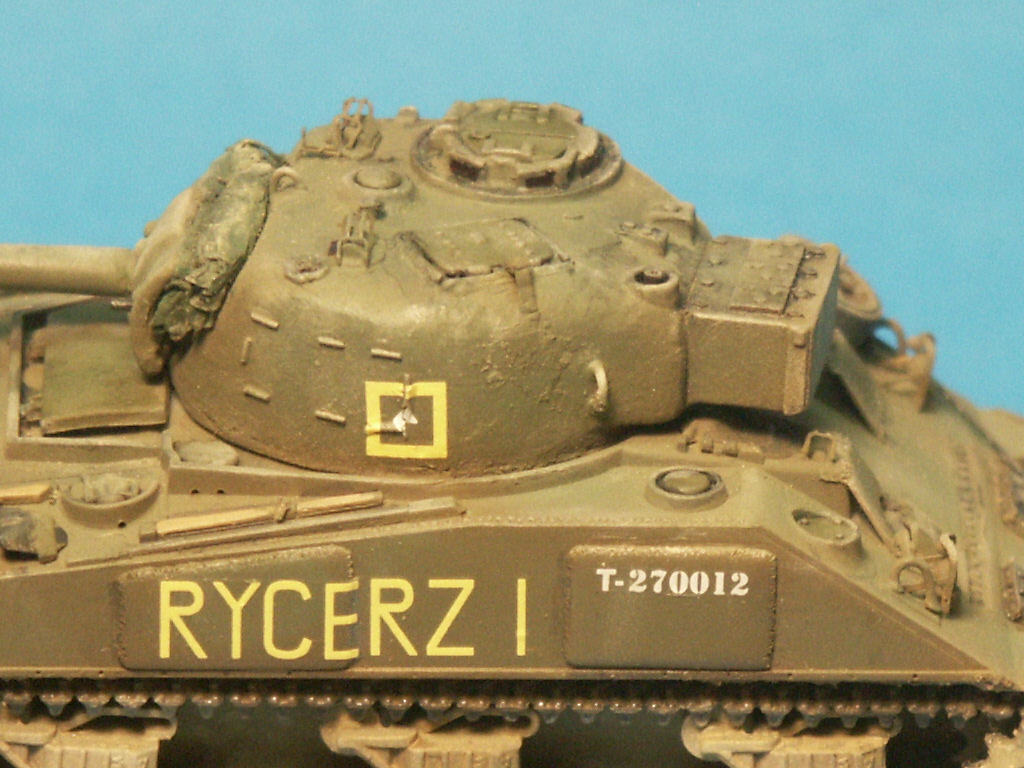
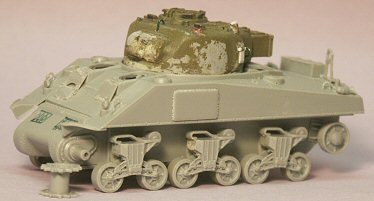
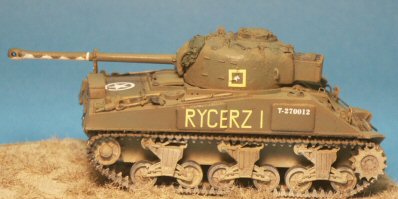
• The
gun tube protrudes through the special 17-Pdr gun mantlet, has white
counter-shading at the outer half and a small white ring. Within the
square marking on the turret I find it interesting that the horse head
is facing forward on RYCERZ I, but is facing the other way on the other
two Firefly’s! The horsehead and the square appear to me to be
the same shade and are commonly represented in yellow, as does the name
RYCERZ I. The vehicle T-number looks to be in white implying to me that
the vehicle name and tactical marking are indeed in yellow.
• At the rear turret side, you see a low-mounted turret lift rings
and then the armoured radio box welded to the low-bustle turret rear.
• Note that there is no pistol port mounted here on the left side
of RYCERZ I’s turret. On the right side of the turret, which we
cannot see from this view, I believe there would likely be cast-in cheek
armour rather than having an appliqué armour cheek plate welded on,
an educated guess.
• Up on the engine deck we can just see the top of the rear rectangular
storage box common to the Firefly Ic (The Firefly Vc based on the M4A4
typically had the trapezoid shaped storage box mounted on the rear hull
plate.)
• Running along the top of the hull is a tow cable, the gun cleaning
rods and the ventilation dome next to the driver’s hatch. Based
on the small driver hatch and the angle of the glacis plate, we know
this to be an early production Sherman glacis with 57 degree angle glacis.
This looks like it could also have a late "sharp nose" style
one-piece final drive assembly (a.k.a. differential cover or FDA), but
the photo is not clear enough for me to be sure.
• Below the side appliqué armour plate is a horizontal metal strip
with holes for mounting the side skirts.
• Considering the cast, single piece final drive (differential)
housing, the spacing of the roadwheels and the length of the hull, this
appears to be a Firefly Ic based on the M4 tank, rather than a Firefly
Vc based on the M4A4 tank.
• Because of the spare roadwheel stored on the glacis we cannot
see what type of driver’s hood is used on this Firefly but they
are most likely cast hoods, and likely not direct vision (DV) hoods.
The driver’s hoods likely have appliqué armour plates fitted on
the front of them. Because of what looks to be a thick mat or camouflage
net stored on the glacis, a lot of features (such as spare tracks) are
not visible.
• The solid six-spoke roadwheels are mounted on the VVSS bogies.
Here we can see that the T54E1 steel-chevron type track rests on the
return rollers, but does not quite rest on the lower track skid. Remember,
Sherman track is a “live” track so has little or no track
sag. The sprocket wheels are the simple style while we see the Sherman
Ic Hybrid tank behind RYCERZ I has the “fancy” style sprocket
wheels. |
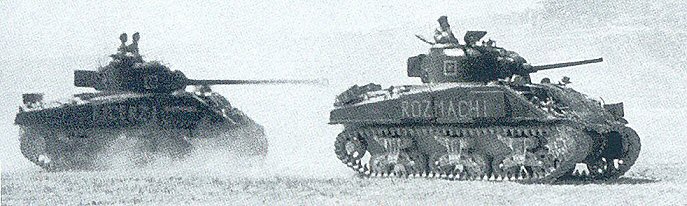 |
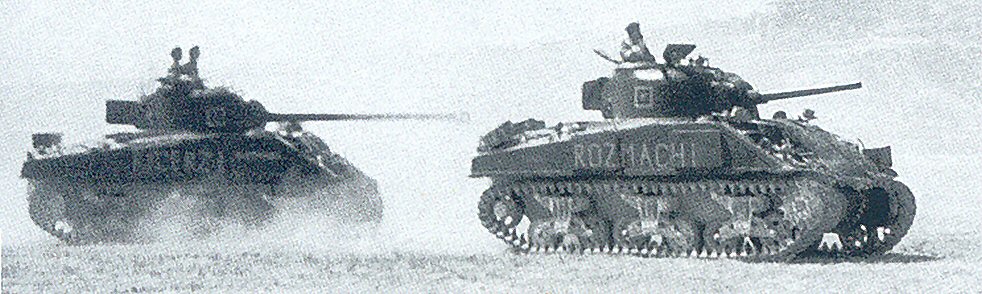
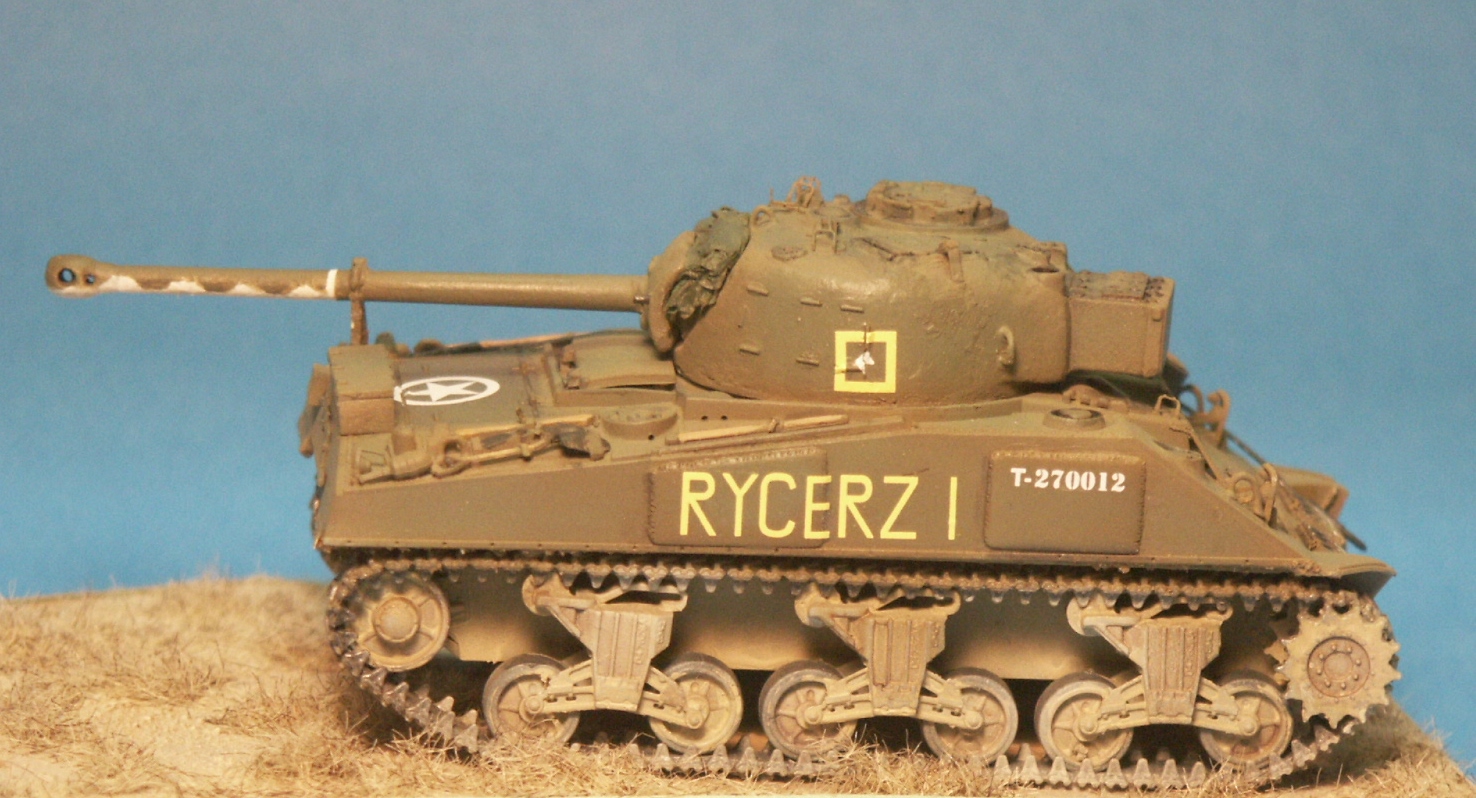
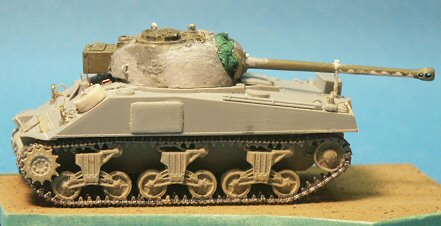
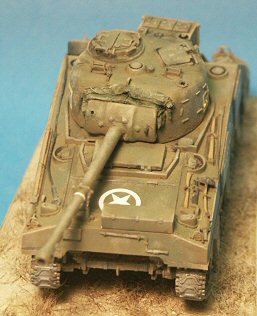
•
In this second parade photo, we see the right side of RYCERZ I. The
photo is pretty fuzzy but we can see the British all-round vision cupola
evident by the size and shape of the opened hatch, especially when compared
to the standard Sherman split-hatch cupola hatch on the Sherman III
(M4A2) ROZMACHI to the right.
• I see no indication of an appliqué armour plate on the
turret, but the photo is not clear enough to me to be sure. However,
this picture offers a better view of the rectangular storage box mounted
on the engine deck.
• The Sherman III at right, ROZMACHI, also appears to have a camouflage
net or matting on the glacis thereby obscuring much of the fittings
on the glacis.
|
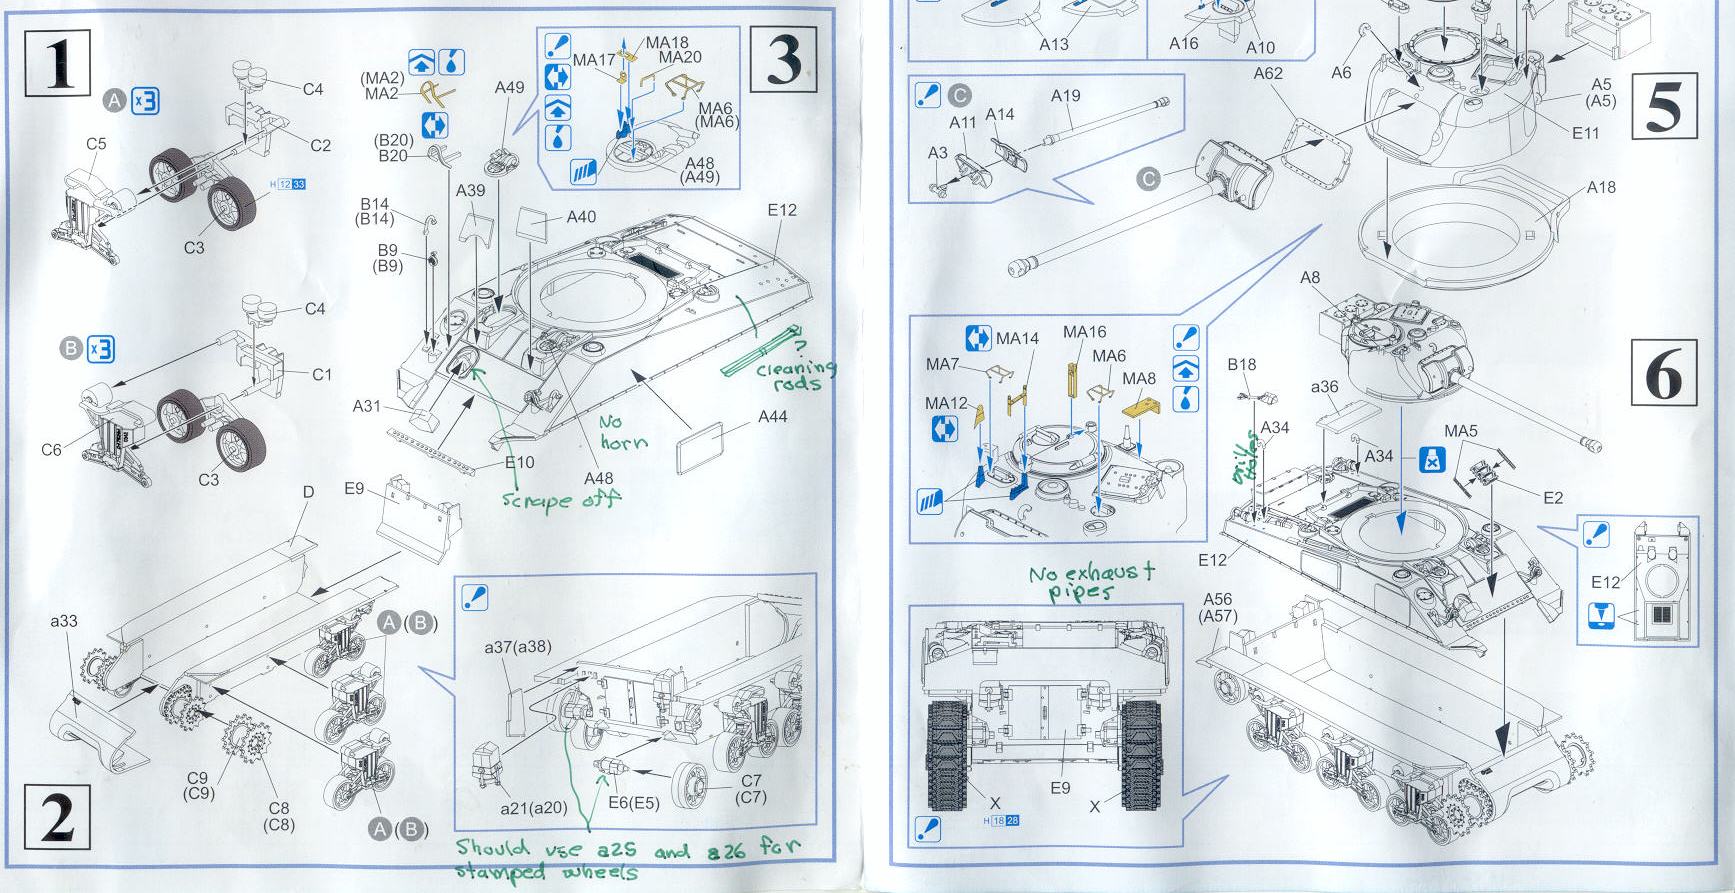
| ASSEMBLING
THE MODEL |
|
Though
the DML Firefly turret will not be used, assembly of M4 (Sherman Ic)
lower hull is as instructed in DML's assembly instructions, and some
of the etched brass turret fittings will be used.
The
location of the spare tracks (parts MA5 and E2) does not match my Firefly
reference and so will be relocated as per my references. |
The
lower hull is assembled as per the kit instructions. Except for field
modifications, the Firefly Ic was somewhat standard. Be careful when
applying the side appliqué armour plates, as there is no good guide
as to their exact placement. The upper hull is just loosely placed
on the lower hull so don’t worry about the bad fit and visible
gaps at this point. I prefer to affix the upper and lower hulls sections
together after attaching and painting all the bogies and tracks.
The
turret is the LEVA Productions Firefly turret with the British All-Round
Vision Cupola. LEVA's 17-Pounder gun barrel strikes me as overly thick,
which I suspect is to compensate for the fragility of the resin it
is cast in.
|
|
|
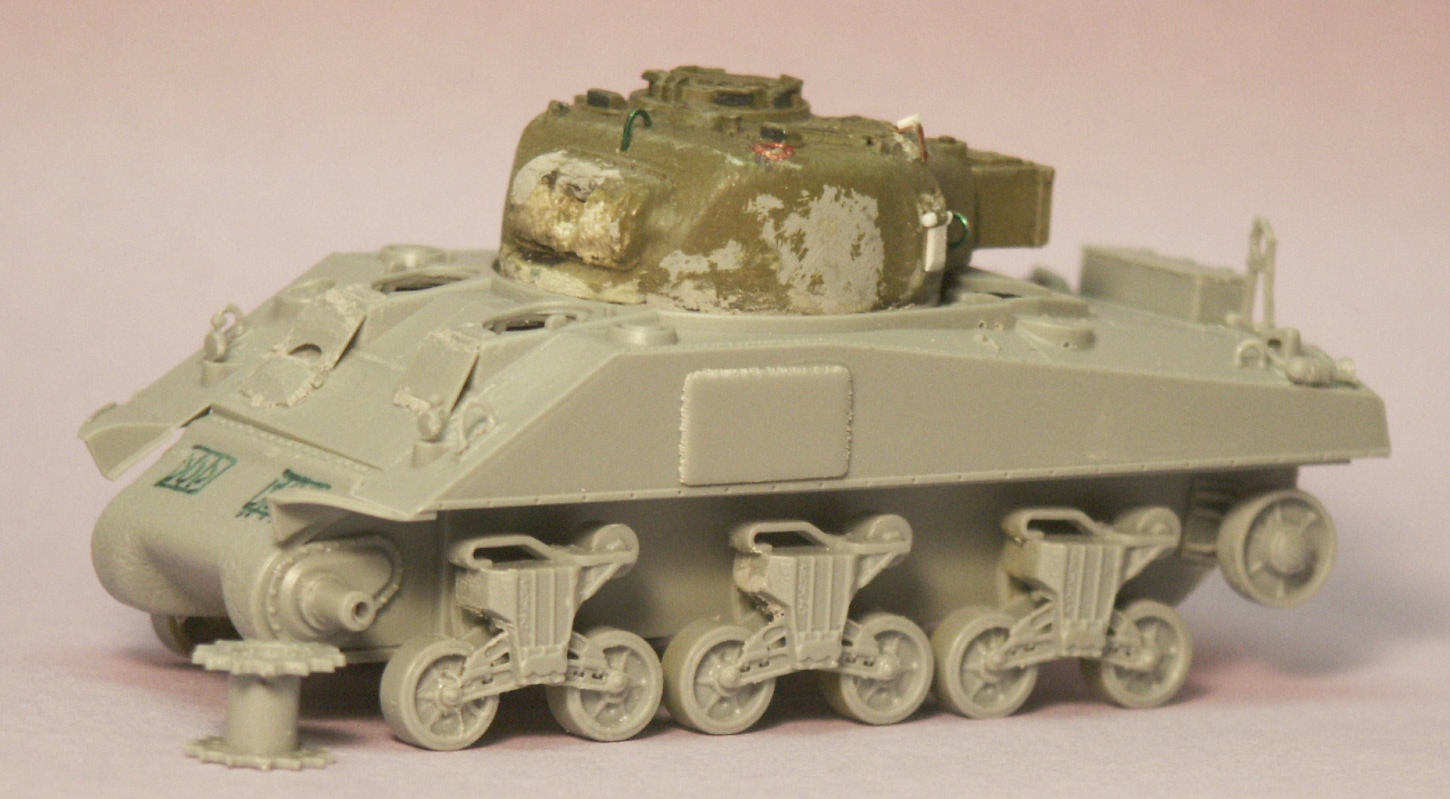
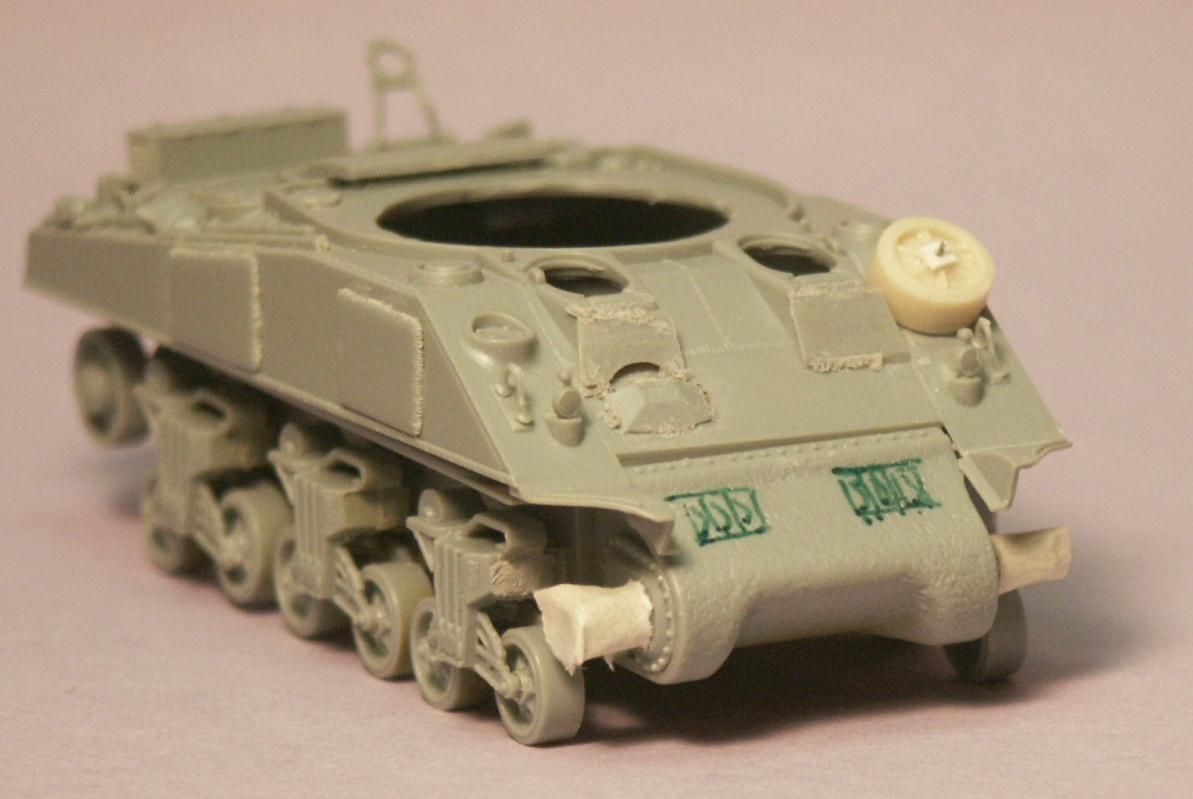
The
edges of the appliqué plates have been roughed with a sharp blade to
simulate a weld bead. A spare roadwheel has been added to the glacis
right of the driver’s hood. With model putty a weld bead has been
simulated on the front appliqué armour plates.
Here we can see the great cast texture on the one-piece
differential cover (part a33) and the bolt detail, the realistic weld
bead on the glacis plate (Yes, the glacis plate on the early welded
Shermans could be made up of five plates welded together, not including
the separate cast driver’s hoods!).
For
something different, the turret will be modeled in travel mode with
the long 17-Pounder barrel secured by the gun travel lock. On the
rear deck is the storage box common to many Firefly Ic tanks. On the
side of the engine deck we see the exterior bottle-shaped fire extinguisher
(parts A54) next to the very nice separate shovel Part-B18.
|
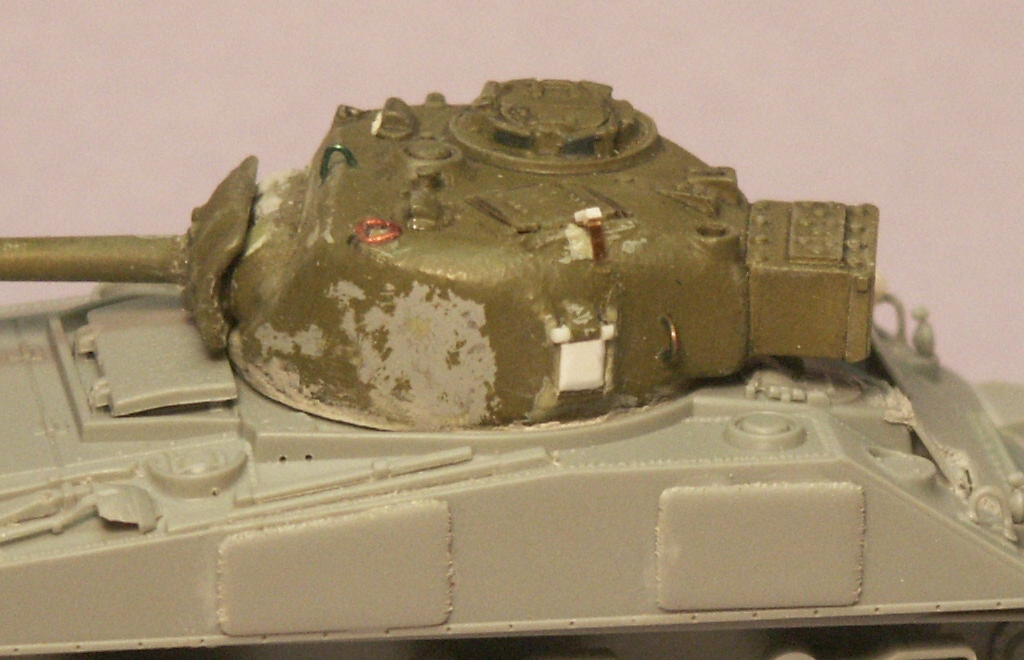
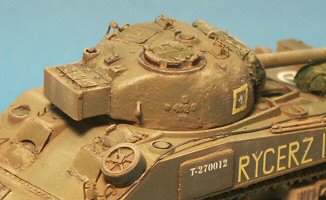
| In
this close-up view of the LEVA turret right we see some features of
the British all-round vision cupola that replaced the split-hatch cupola.
Yes, this turret had been previously painted years ago, so the paint
was partially stripped off, detailed, and re-primed with Mr. Surfacer.
The LEVA turrets is a millimetre or two low compared
to the DML turret. You might think that a millimetre would not be
noticeable but in this scale it is enough to make it look “off”,
out of proportion. To correct this, a circular piece of styrene sheet
has been glued to the base of the LEVA turret, then sanded and blended
in with model putty and Mr. Surfacer.
I am disappointed with the gun mantlet: it is too
thick and sits too far out from the turret, even after sanding down
the rear of the mantlet and the gun mount.
|
 |
|
A small rest for the opened loader’s hatch is fabricated
with brass and a small block of styrene. The lifting rings are made
from copper wire, with the side ones mounted low (some turrets were
manufactured with the side rings mounted higher). The LEVA resin turret
has small dimples to indicate where we need to drill the holes for the
lifting rings. At the front left corner of the roof is a ring of fine
copper wire around the 2” bomb thrower.
The turret pistol port appeared too flat, so a small
piece of bevelled styrene was glued on to make the door thicker. Soon
after doing this I reviewed my notes and photos and remembered that
RYCERZ I did not have a pistol port in its turret! My next project
was then to saw and sand the pistol port off flat and re-texture the
cast steel with Mr. Surfacer 500.
In
this close-up photo we see the wonderful weld bead texture along the
Dragon M4 hull. Towards the rear of the M4 are visible several drain
holes in the turret and fuel cap splashguards. Use the finest drill
bits you have for these. |
|
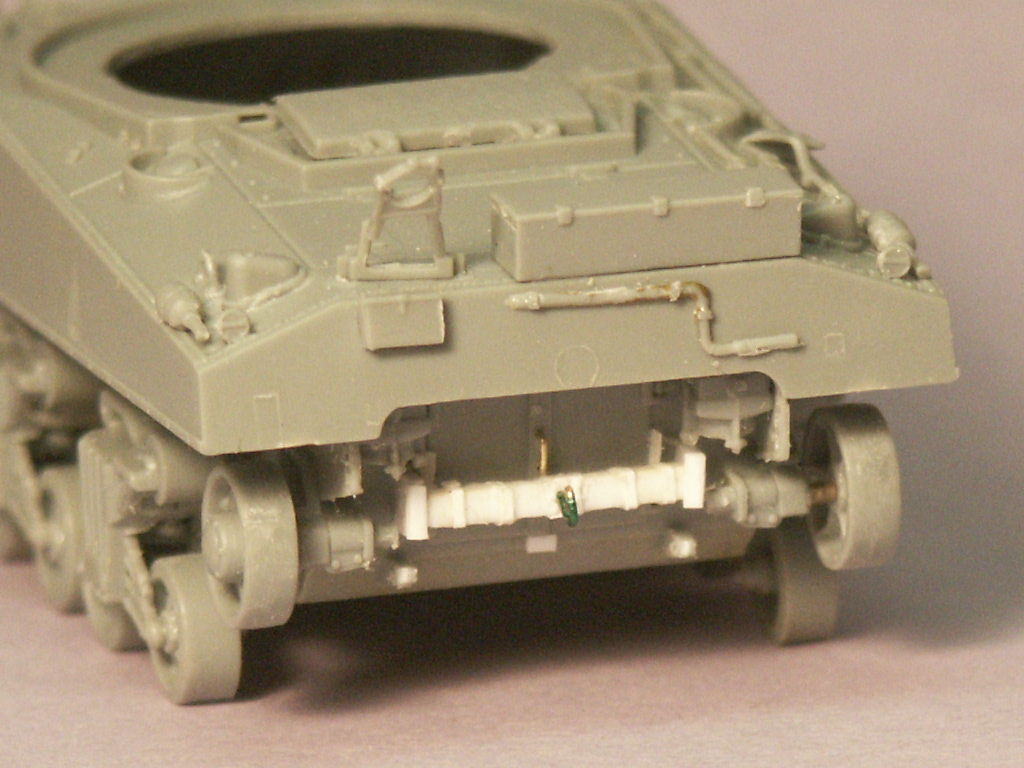
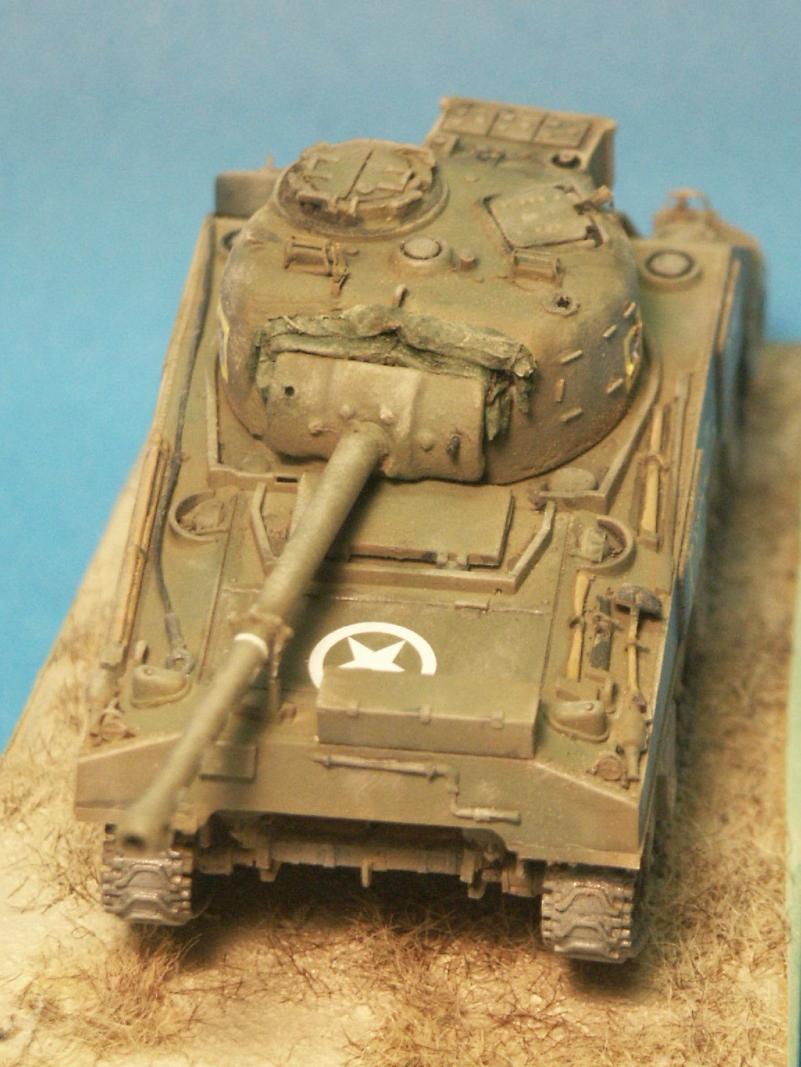
This
rear view photo above displays many features of the Firefly. Up on the
rear engine deck is the Firefly storage box and to its left you’ll
find, the 17-Pounder gun travel lock (unfortunately broken during clumsy
handling). At the left and right corners of the engine deck are the
bottle-shaped fire extinguishers.
Looking to the rear plate is the small first aid box
and the engine crank (there should be a small hole in the center of
the rear plate for this crank). Note that the M4 rear hull plate here
is sloped at 10 degrees from the vertical. Some M4 Mediums (Sherman
1) had vertical rear plates and both are historically accurate. On
the rear plate of this model, we still see subtle circles and rectangles.
Being location marks for the kit’s separate tools, these need
to be sanded smooth.
|
| On
the rear engine compartment there is a small brass wire handle for the
double doors and below that is a scratchbuilt “British-style leaf
spring towing hook” as found in my reference book. I’ve
read that the British preferred this style of rear towing fixture so
their M4s were delivered to the UK with no factory installed tow pintle.
These details of the rear of the tank are often not visible in historical
photos due to shadow. Additionally, this feature appears to be missing
from museum displays, so it was a challenge to find what they looked
like, so as to replicate with styrene. |
In
the historical photo above there is an opaque coat of dust over the
lower hull and the suspension; this dust coating was replicated with
pale tan paint prior to adding the tracks and later touched up after
final assembly.
I
like to glue the track onto the sprocket wheel before attaching it
to the hull so I can align the track up straight with the roadwheels.
The DML DS track material adhered well with cyanoacrylate (Super)
glue and, I have read, will also glue with styrene cement. (The tracks
from a Trumpeter Sherman I was building at the same time as this model
resisted both glue and acrylic paints. The paint even separated and
flaked off when the track was flexed. Very frustrating.)
|
 |
|
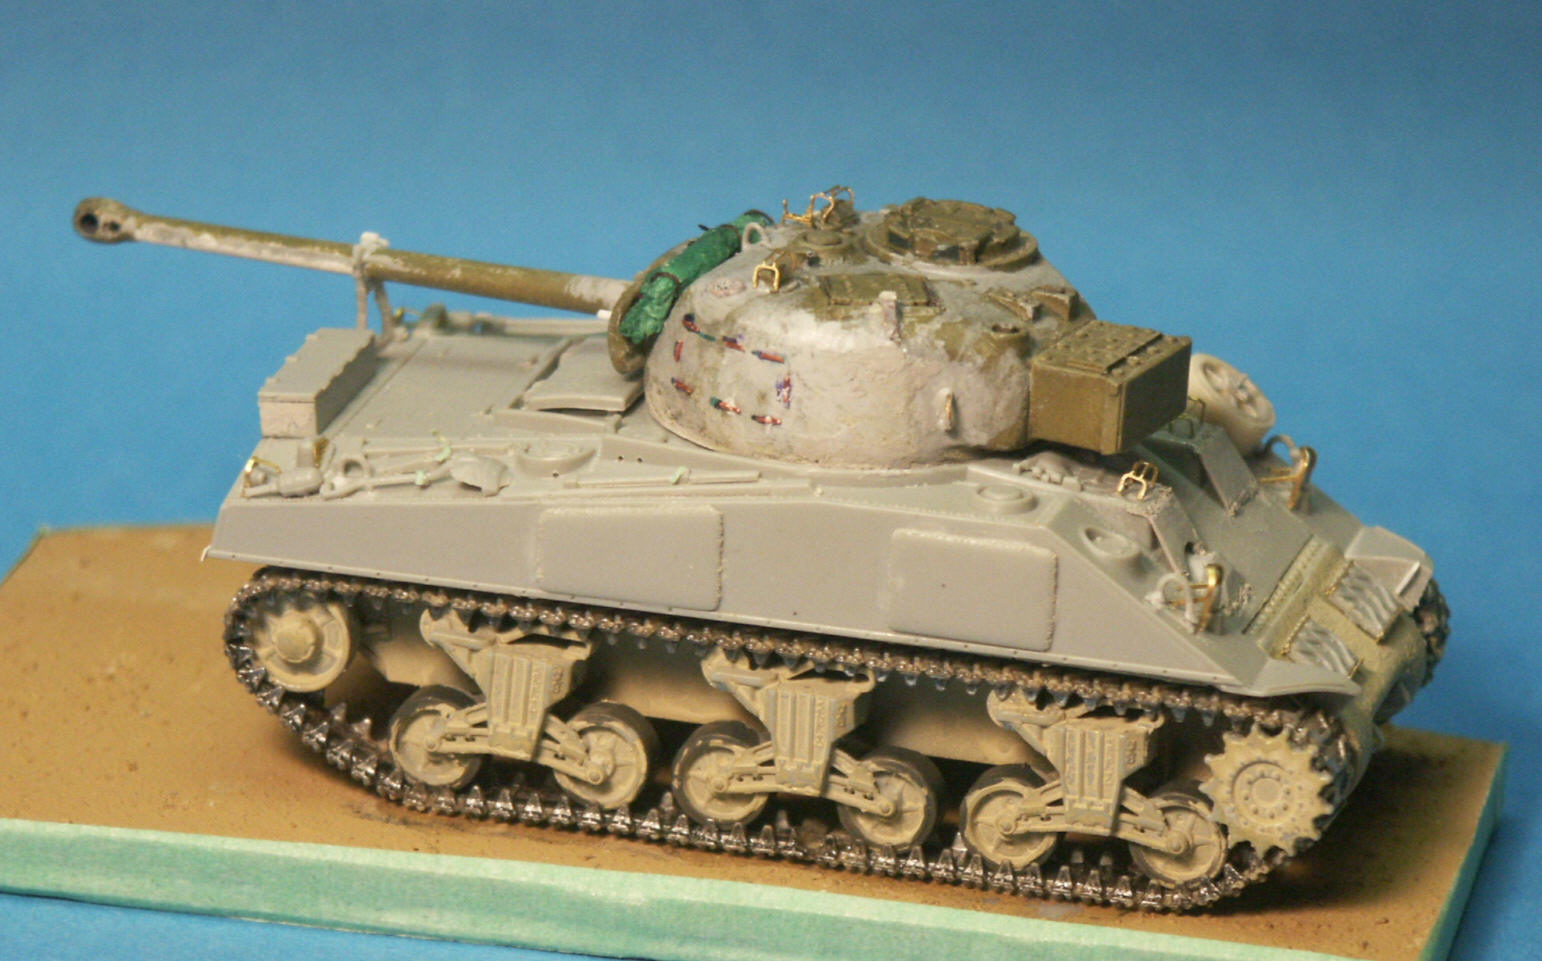
Prior
to final painting the upper and lower hulls were joined, the model glued
down to a base, the fine brass parts, like the brush guards, added and
the turret fixed in the travel model. Small pieces of fine copper wire
were glued onto the turret side to represent lashing points for gear.
Notice that the pistol port hatch has been sanded down and the area
re-textured with Mr. Surfacer.
Except for the commander’s cupola, the features of this turret
match the one included within the DML Firefly Ic kit in having no pistol
port but having the cast-in cheek armour.
|
|
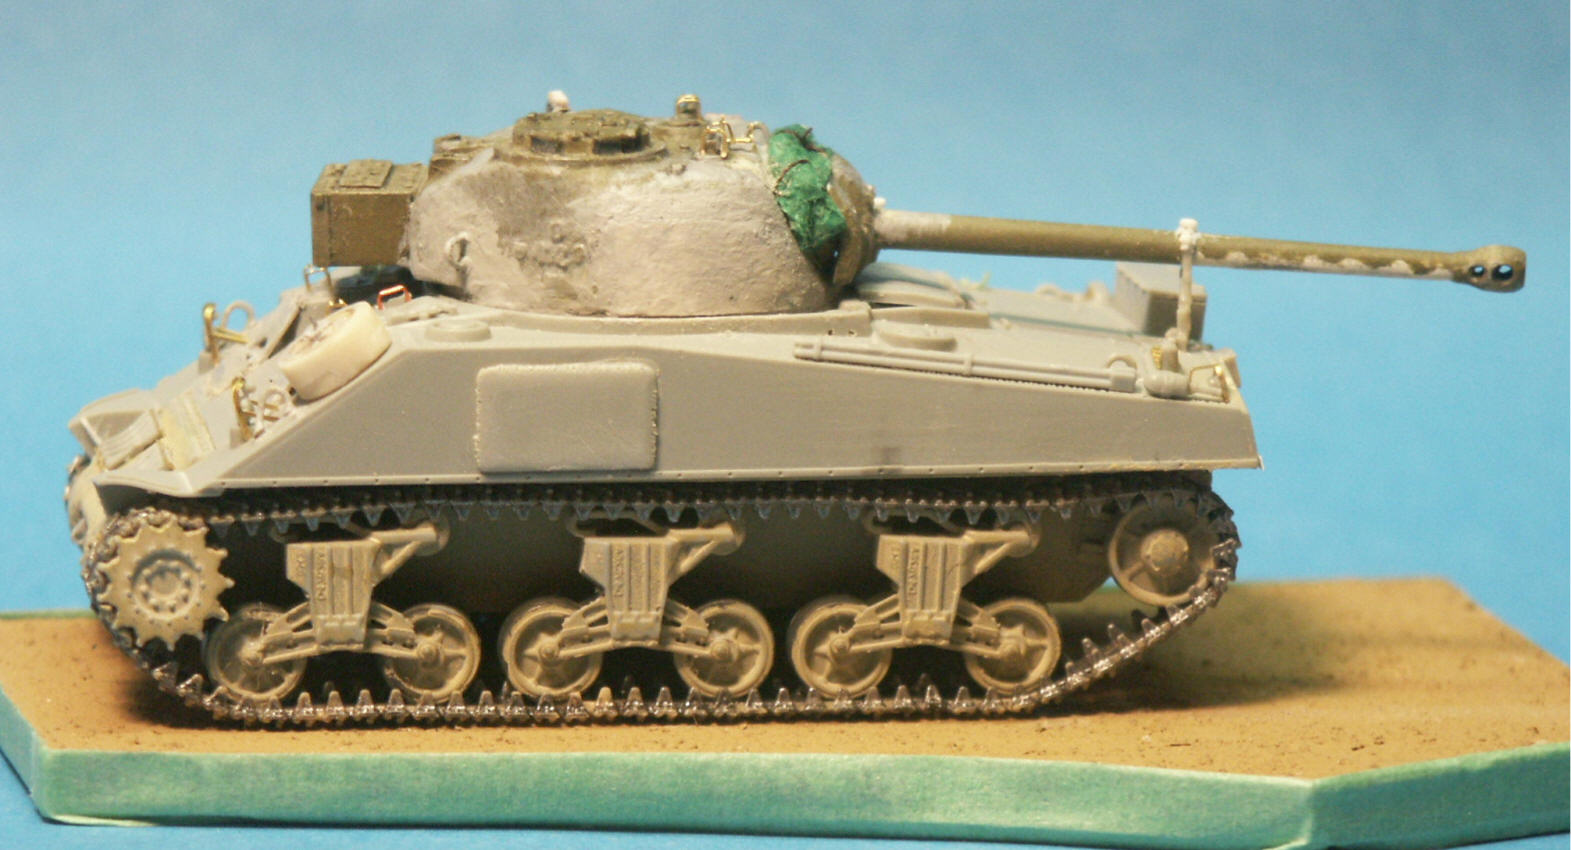
A rolled tarp has been draped behind the 17-Pdr
mantlet to mask the large gap between the mantlet and the turret.
Since the tank is in travel mode, a certain amount of stowage lashed
to the exterior makes sense.
A
turret of this period should have the cast-in turret check armour
on the right side; the DML kit turret has this moulded-in armour but
the LEVA turret does not. A one-millimetre thick piece of styrene
sheet and model putty fixed this.
The
kit doesn’t include the gun cleaning roads on the left rear
hull, but RYCERZ I has these, so the rods (part-A33) were taken from
another DML Sherman kit.
|
 |
| PAINTING
& MARKINGS |
 |
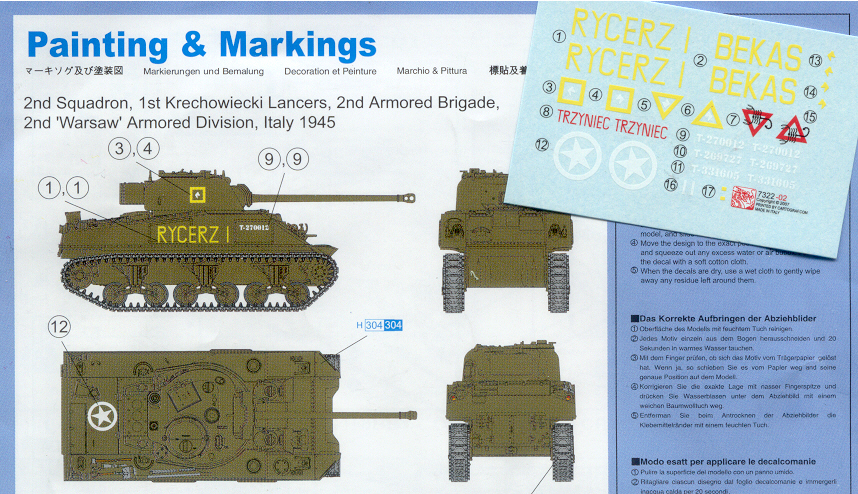
DML’s
Painting & Markings guide (see left) depicts the tank in olive drab
colour and with the vehicle number, vehicle name and the unit marking
on the turret side. On the above photos I did not notice any bow markings
and we don’t have a view of the tank rear to know if there were
any markings on the back. The white star on the engine deck may be pure
guesswork or based on a photo I have not yet seen. I believe that if
we leave off the prominent yellow vehicle name we would depict this
Polish operated Firefly during wartime.
The white horse head within the yellow square Dragon provided I think
is incorrect. It appears in the photo to be the same shade (yellow)
as the square. It is depicted facing forward as is shown in the photo.
On this painting guide, the gun tube (gun barrel) is missing the white
counter-shading on the underside and the white ring.
The wood tool handles are shown as natural wood colour. I understand
that US Army supplied tools could have either natural wood handles or
painted the same colour as the vehicle (natural wood is easier on the
hands when using: fewer blisters). Oddly, the wood pick handle below
the cupola hatch is portrayed as steel-grey colour. On the drawings
left engine deck no gun-cleaning rods are depicted, but they appear
in the photo of RYCERZ I.
|
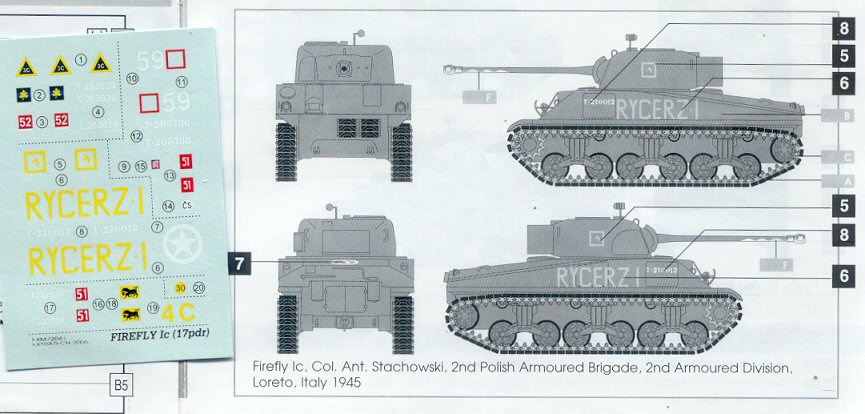 |
Left
are the markings for RYCERZ I in the Extra Tech 1/72-scale Firefly
Ic kit and these markings size and placement agree with Dragon’s
markings and instructions. The horse head here is different in that
it is depicted as yellow (which I think is correct) and both heads
face in the same direction (which I think is incorrect). A spotlight
is depicted atop the turret and there is no alidade sight. Welded-on
cheek appliqué armour is depicted on the turret. |
We
have skipped ahead a few steps with the application of a base coat
of olive drab, then a point wash of dark brown or black and finally
a light coat of paler green-olive to represent some sun fading.
Clear acrylic gloss is applied in areas expecting the decal markings.
The end of the gun barrel is painted white before masking of the counter-shading.
|
 |
|
The
DML’s water slide decals applied excellently; they did not crack
or break, snuggled down perfectly to the acrylic paint and contours
of the model (with some mild decal solvent) and have very clear decal
film. Here, I regret to point out a screw-up on my part with the yellow
square tactical markings. As mentioned above, the horse head should
be facing forward but I switched the markings and put the left turret
marking on the right side, oops. This does match the orientation of
the horse heads of the two other Firefly turrets in the photo above,
but not RYCERZ I. Dammm! Learn from my mistake. No, I am not going to
scrape the markings off and replace them. The
small drain holes in the hull’s splashguards are visible in
the above two photos. The wooden tool handles are painted a natural
wood colour.
|
|
At this stage, the olive-drab paint was touched
up on the gun barrel and the masking tape removed. Next, the Firefly
got an overall light spray of Microscale Micro Flat clear flat. This
is my first time using Microscale “Micro Flat” flat acrylic
and I am very pleased with it. It is less glossy than the Model Master
clear dullcoat I normally used and was easy to apply straight from
its plastic bottle.
A
light tan paint was sprayed over the base and up onto the lower hull,
after which I attached browned static grass to the base with white
glue to represent a dry late summer field in Italy.
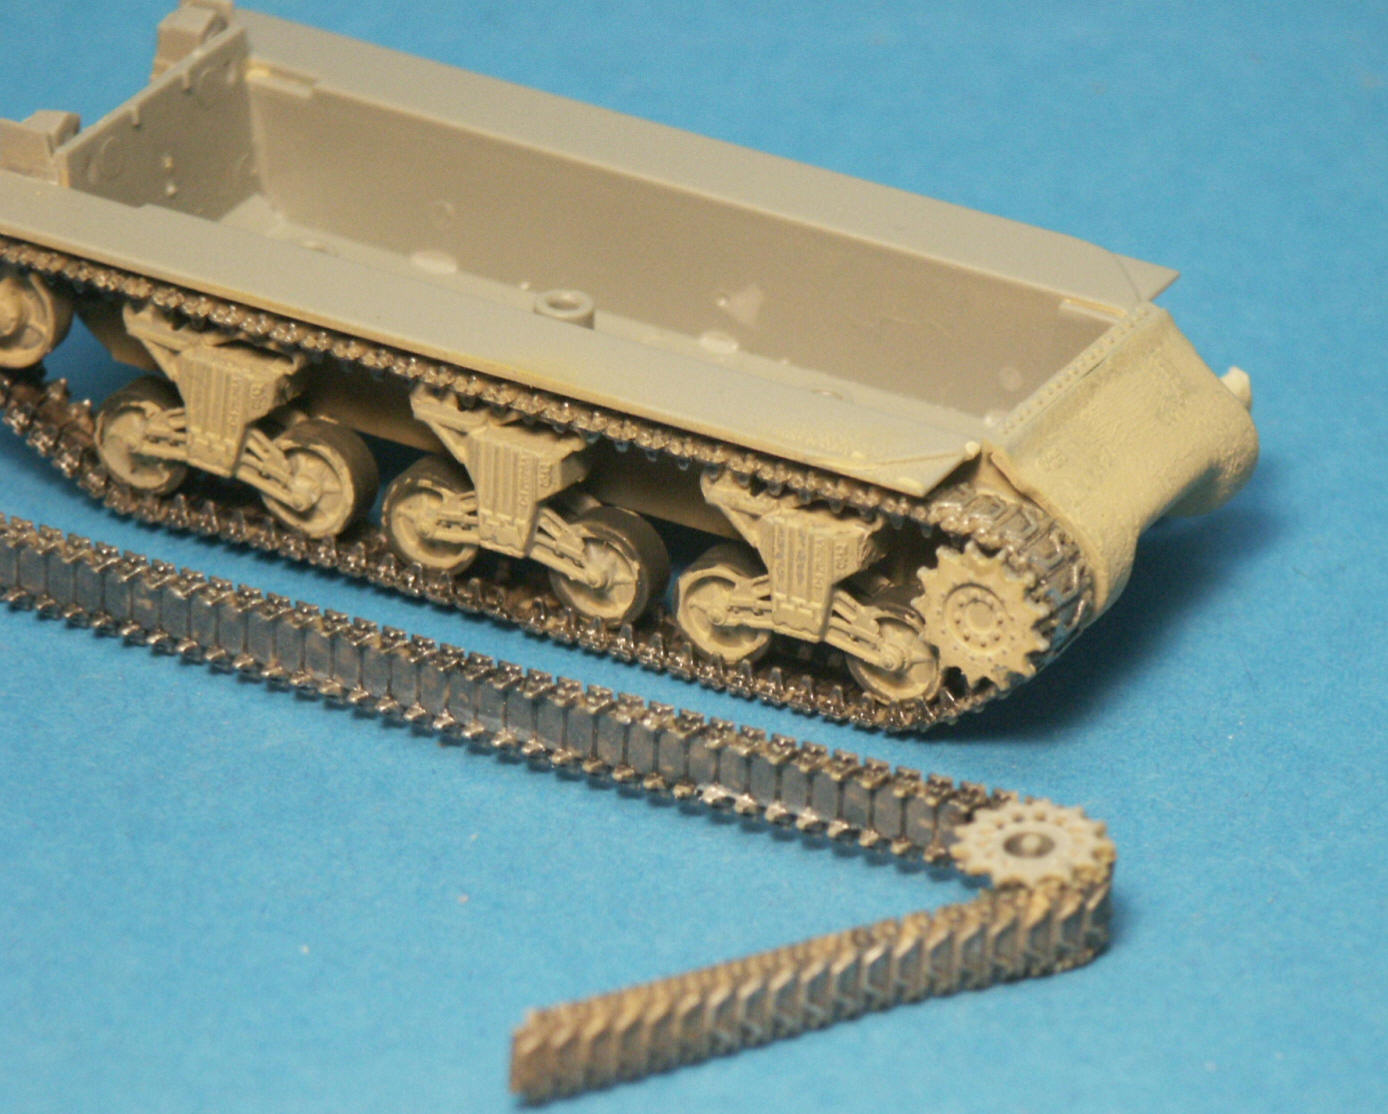
Looking
at the vertical volute spring suspension (VVSS) bogies makes me think
how the detail of the bogies are so often ignored during assembly
and reviews, I have done it too. We'll make sure there are exactly
24 bolts around a certain roadwheel and that the kit is exactly 1/72
scale, but it seems like Sherman bogies are just ignored in resignation.
For example, take these DML VVSS bogies here, the nice looking stamped
type roadwheels are moulded rigid onto the rocker arms and on all
the wheels the grease plugs are located in the same orientation of
about 12 o'clock. The bracket holding the return roller appears to
be an intermediate style with a straight bracket and no raised roller,
but the bracket looks significantly too short in the horizontal direction.
The bogies just look too big in relation to the size of the sprocket
wheel.
|
 |
|
Left
:
A
single tow cable was produced using the DML supplied cable loops and
teabag string coated in white glue. After some paint, it was affixed
to the port side of the Firefly.
The T54E1 steel-chevron type track around the suspension is well rendered.
If you look closely at the spare track links on the glacis, you'll
notice they are the T62 steel track type with the three bolts on each
link, a nice detail.
The glacis
of RYCERZ I in my reference photo carries thick mesh matting also
seen on other Polish Shermans, I presume this is camouflage. I did
not know exactly how to replicate this so I left it off; therefore
the front of this model is best guess speculation. The spare track
links, for example, were mounted in several different ways on Firefly's.
Right
:
Edges and high spots have been highlighted with different shades of
Tamiya Weathering Master rather than drybrushing with paint as I often
used in the past. Weathering Master is similar to cake makeup.
|
|
 |
|
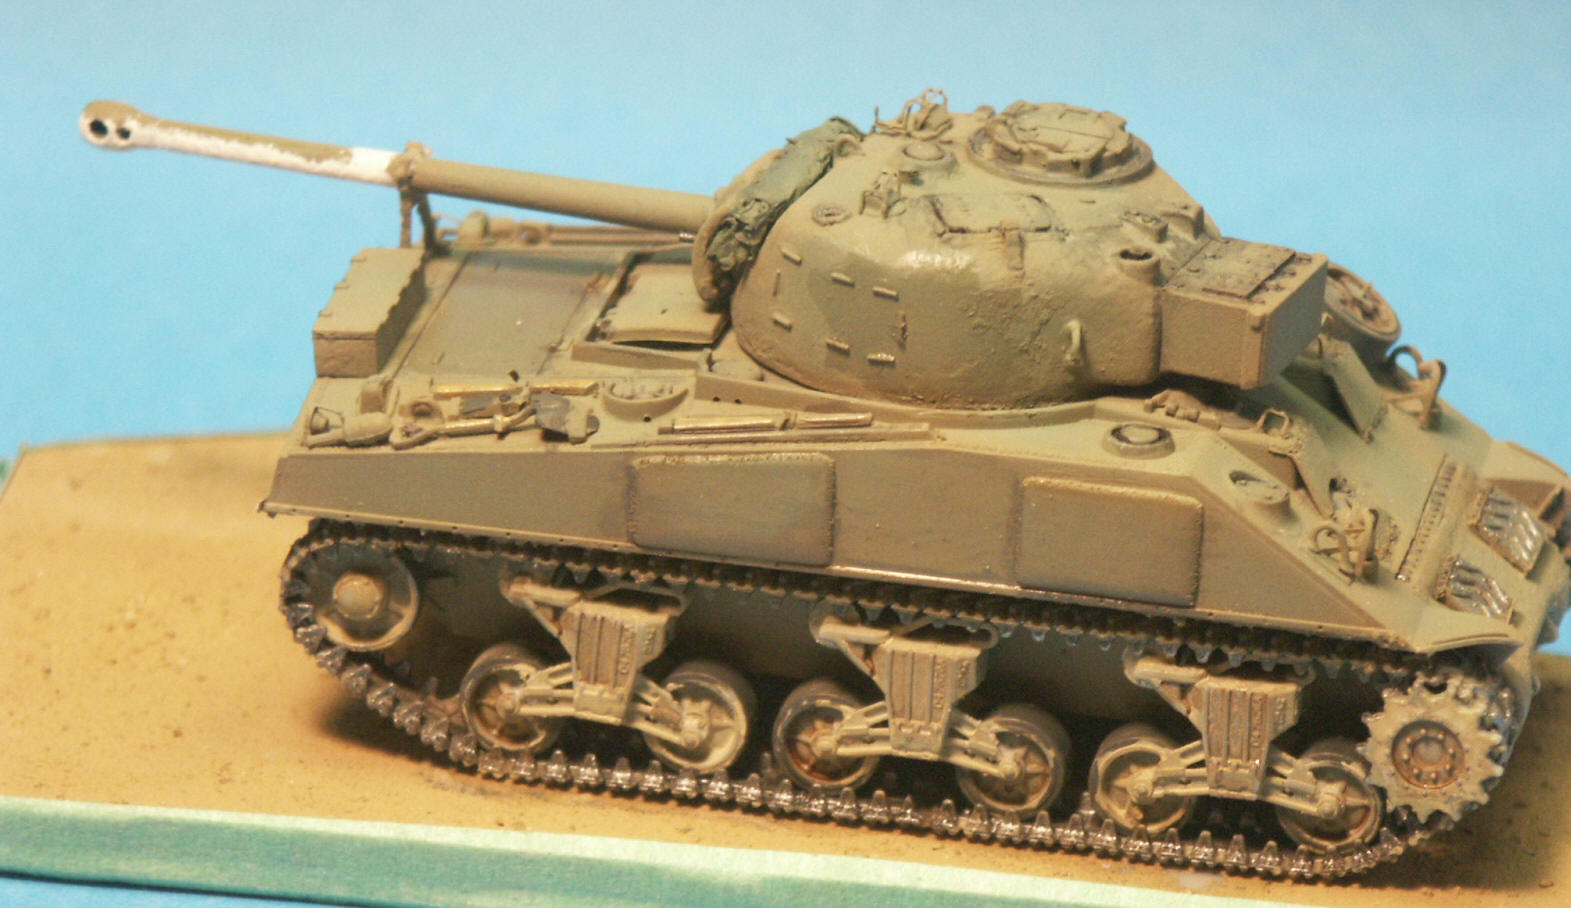
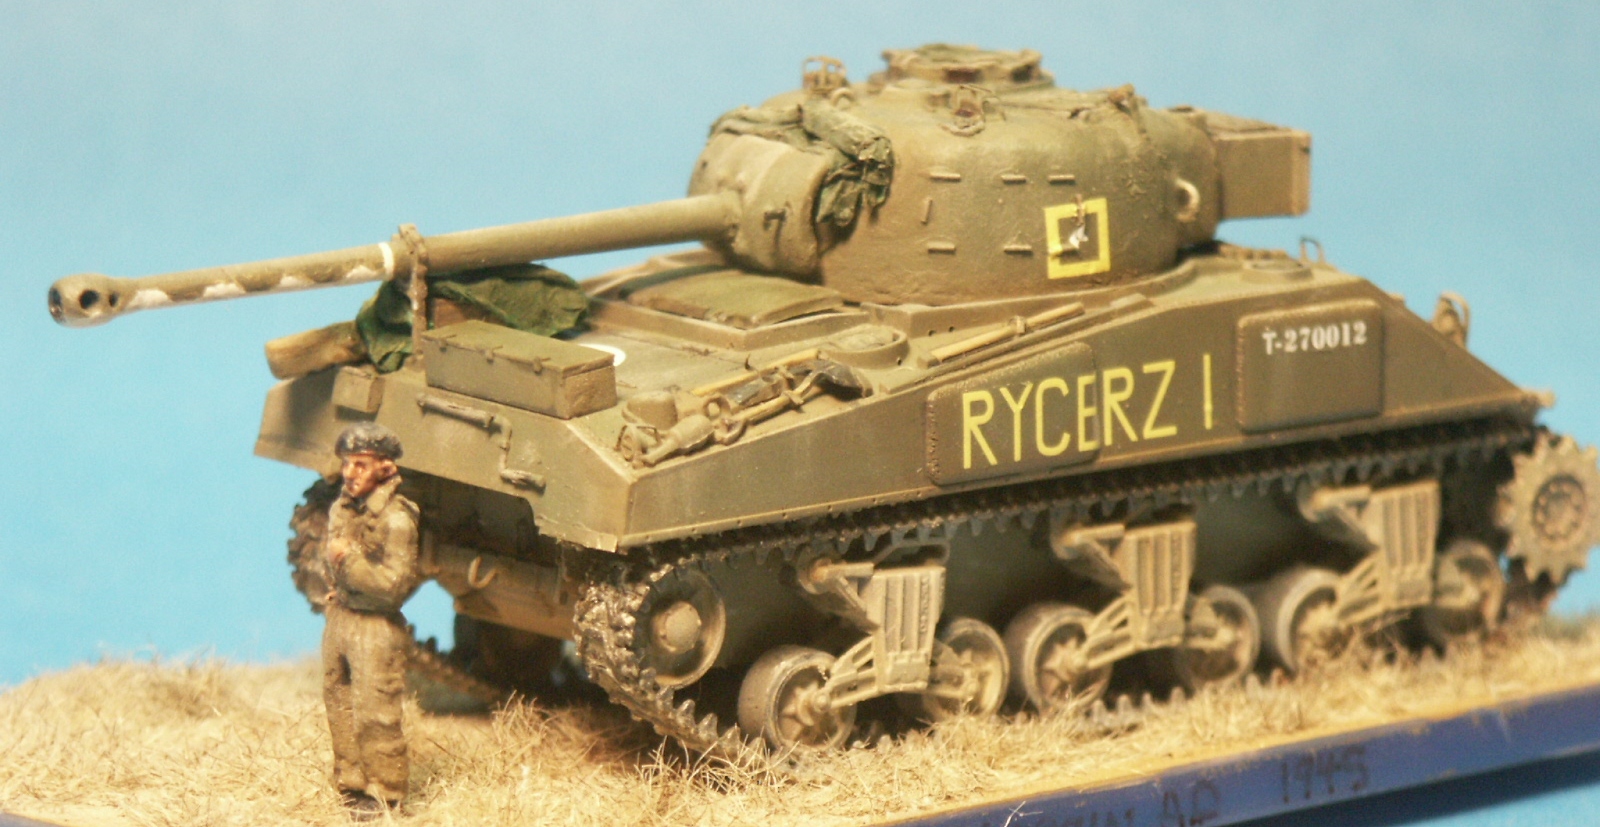
Vollendet!
Zakonczony! (Ed : "Finished! Completed!" ) A white metal figure
is added to represent a Polish tank crewmember. This figure is sold
as a British tanker, but the Brits and Poles wore the same uniform in
Europe and Italy except for the uniform insignia. Additional
static grass has been added. Boxes and tarps stowed on the engine
deck give the impression that the Firefly is about to go on a march
(perhaps to the post-war parade grounds at Loreto, Italy, in August
1945). I left off significant dusting of the upper hull to represent
that the upper hull was cleaned and the tank name RYCERZ I recently
painted on for the parade.
|
Dark
exposed camera film has been cut up and glued in with white glue to
represent the periscope lenses around the cupola and the other periscopes. |
 |
|
Good
view of the drain holes in the splash guard. |
CONCLUSIONS
- The
DML parts of the model assembled very well. Dragon’s range
of Sherman kits are among the company’s finest model releases
in 1/72-scale.
- The
LEVA Firefly turret has great surface texture and detail though
is a little squat (low) but supplied me the all-round vision cupola
needed to portray this Polish Firefly RYCERZ I. The LEVA mantlet
and the barrel appear too thick; I could have replaced them, but
decided to try and stick with the LEVA conversion parts to see how
the final result looked.
- Too
bad about my wrong orientation of the horse headsmarkings, otherwise
this could have been a more accurate representation of RYCERZ I
in small scale.
|
SUMMARY
OF FEATURES FOR YOUR RYCERZ 1 FIREFLY:
1. We
need a Firefly Ic kit, based on the M4 Sherman with cast driver's
hoods.
2. Small hatch M4 hull with 57-degree glacis,
3. Appliqué armour on hull sides and presumably on the driver's
hoods,
4. We'll need to buy or convert a Sherman turret with the British
all-round vision cupola. At this time an AR cupola in small scale
appears to be rare.
5. Low-bustle turret with Firefly's bustle radio box,
6. No pistol port on the turret,
7. With no pistol port there is likelihood that the turret had cast-in
cheek armour on the right side.
8. Smoke projector on the turret roof with rim around the opening,
9. Low mounted lifting rings on turret side,
10. Alidade sight in front of commander's hatch but no vane sight.
11. Gun cleaning rods on the rear port (left) side,
12. Simple sprocket, solid spoke idler wheel, and cast solid 6-spoke
roadwheels on heavy duty vertical volute spring suspension (VVSS),
13. Steel chevron T54 or T74 tracks,
14. The final drive assembly is the single piece cast FDA, though
my reference photos are not detailed enough to tell if it is the early
rounded style or later wedge shaped style.
15. Spare roadwheel mounted on the glacis and the Firefly Ic storage
box on the engine deck. |
References
Sherman
Ic Firefly Armour Photo gallery #21, by Wojciech J. Gawrych, from
Model Centrum Progress, (2009) ISBN 978-83-60672-10-5. This and the
companion book covering the Firefly Vc, are the best Firefly references
I have yet found.
Sherman
Minutia website…http://the.shadock.free.fr/sherman_minutia/index.html
Sherman
in 1/72-Scale website…www.172shermans.com/sherman_Firefly_list.htm
Son of
Sherman, The Sherman Design & Development, Ampersand Group Inc.,
publisher (2013) ISBN 978-0-9773781-1-1. A good reference on the M4
Sherman features and production, but not so much on the Firefly.
|