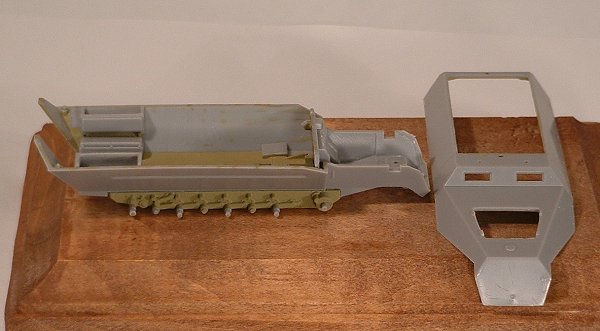
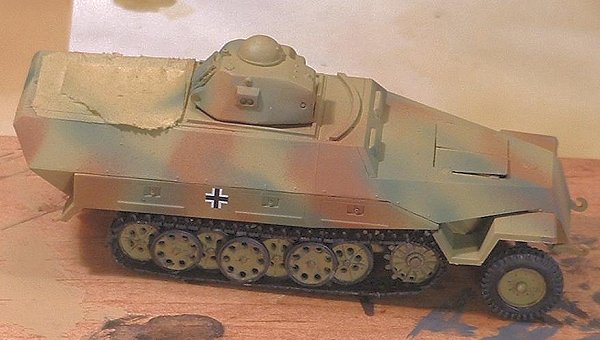
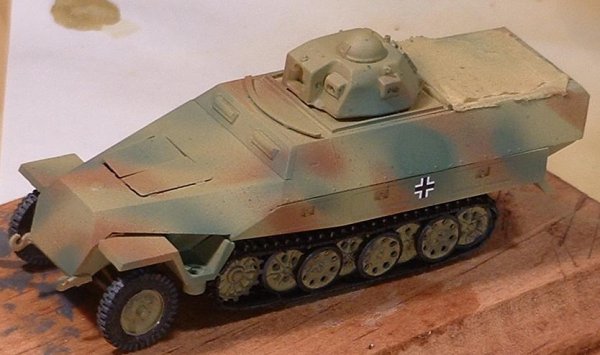
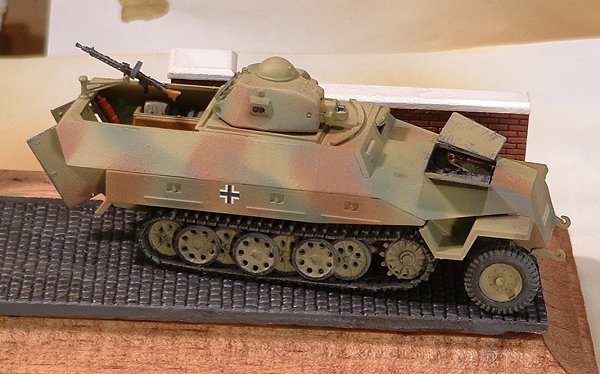
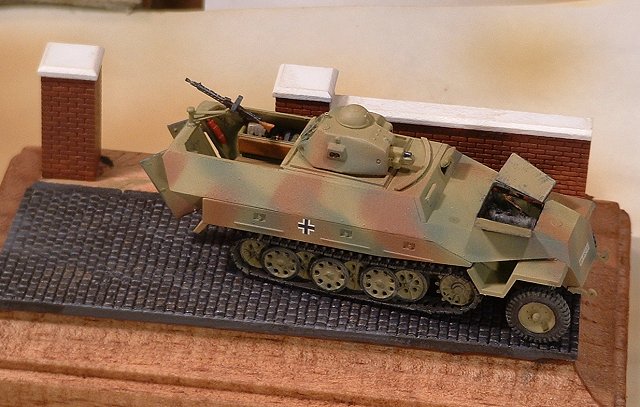
 The Sd.Kfz 251 armoured halftrack (often referred to as the "Hanomag", although Hannoversche Maschinenbau-Anstalt und Eisengiesserei was only one of the firms involved in its production) was first issued to German troops in the spring of 1939 and first employed operationally in Poland. The 251 design was quite innovative, and probably deserves at least part of the credit for the success of the "Blitzkreig" strategy which served the Whermacht so well in the first half of the war. It allowed German troops to accompany the fast moving panzer columns while affording them some measure of protection. This made the halftrack superior to trucks but cheaper and faster than fully tracked personnel carriers. During the war, approximately 16,000 251s of all marks (A, B, C and D) were built, with production continuing in Czechoslovakia for some time following the end of the war. The majority of the vehicles built were model "D", comprising more than 10,500 of the total 16,000. The 251 served with panzer grenadier, reconnaissance, artillery, and specialist units on all fronts in a variety of configurations. The basic design was adaptable to wide range of functions, including anti-aircraft, engineer and communication/command. In addition to the more than 20 factory built versions, there are also a number of known field modifications, which reflect specific needs or the availability of local resources at the time. The vehicle I have chosen to model is one of those field modifications, with the turret of a Renault R35 light infantry tank mounted over the passenger compartment. The Hasagawa Sd.Kfz 251 D Hasagawa's 251 D is a very nice kit on its own. The moulding is sharp and the dimensions seem quite good. It is also, of course, the first small-scale version of this important vehicle produced in plastic. It is available in three major versions, the 251/1 armoured personnel carrier, the 251/9 heavy support vehicle (with short 75mm gun), and the 251/22 late war self-propelled anti tank gun.
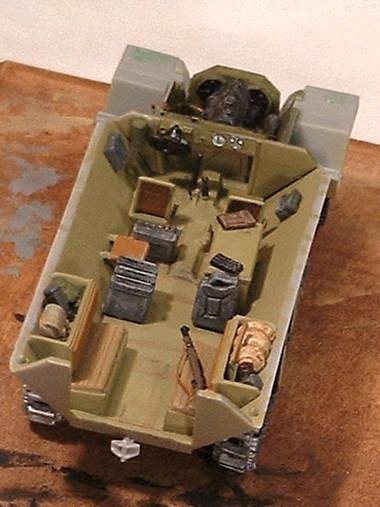
The build itself is quite straightforward. There is a reasonably detailed interior provided in the original kit, with an instrument panel, seats, a radio and the steering wheel mounted above the driver’s seat, angled downward, as on the real vehicle. I painted the entire interior dark yellow before adding anything. After assembling the basic detail, I first added the Extratech engine compartment detail, which I will describe below. In the driver’s compartment I used the Osprey Sd. Kfz book as a guide to add some more detail, mostly gear added to the side walls. To take advantage of the spring details on the back of the seats, I recommend some drybrushing - I used a gun metal silver gray after painting the frames of the seats dark yellow and the cushions reddish brown. The radio was painted olive green (according to Osprey) with the details picked out in white and black. I added three gear shift selectors (or maybe two shifts and a parking brake?) to the floor between the two seats and painted them black. The steering wheel was also painted a medium gloss black.
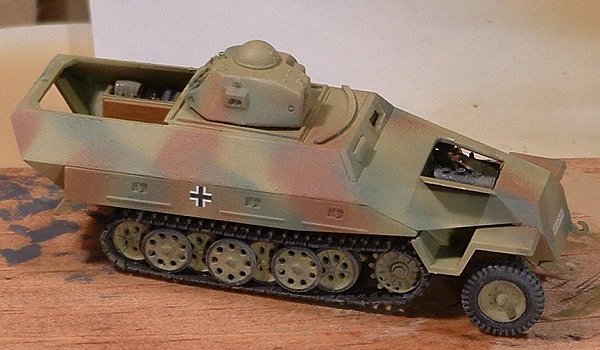
It was at this point I realized that, with the Renault turret modification, the detail I was adding to the driver’s compartment would be very difficult to see. I could choose to leave it out (which, having done most of the work already didn’t appeal to me) or do a few things that would make it more visible. I chose to 1) build the vehicle with the armoured vision port open (requiring something to simulate the armoured glass inserts) and 2) open up the rear doors so a viewer could look through the back right through to the forward compartment.
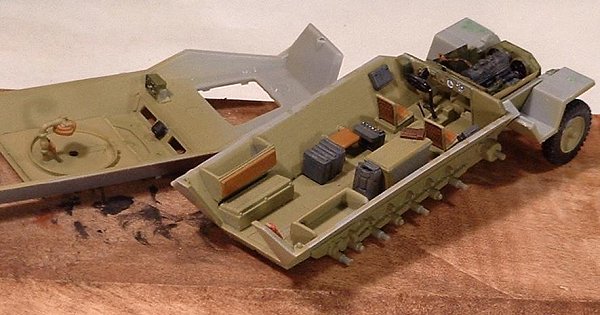
With that decision taken, I began adding more detail to the interior, which became a mini model in itself. With the turret, I assumed that there wouldn’t be enough room inside for the forward seats. I therefore left them off, replacing them on the starboard side with the ammunition bin from the Sd. Kfz 251/9 kit and on the left with a folding jump seat, as was found in the /22 according to Osprey. I also added a few cases of ammo (from the old Fujimi Sd. Kfz 222 kit) one opened with the small shells showing. I also added a jerry can (one of the beautiful resin ones produced by Mars) beside the ammo bin and some miscellaneous gear.
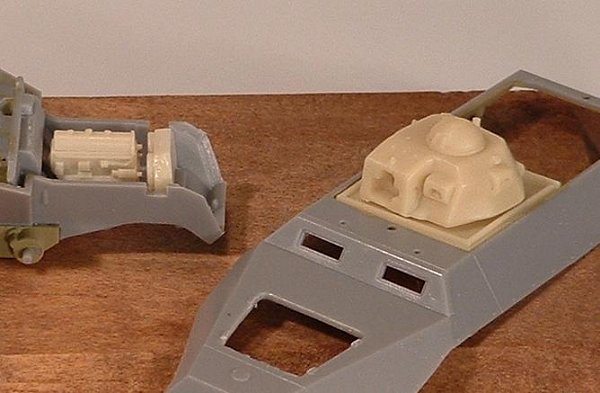
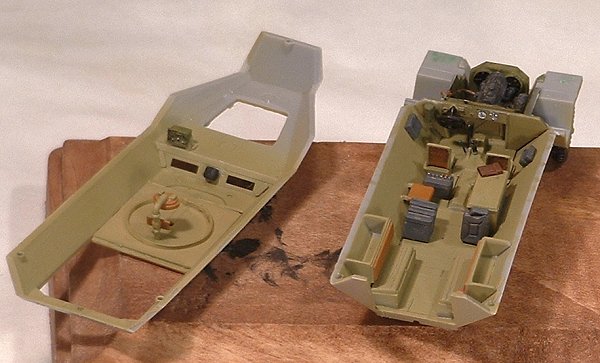
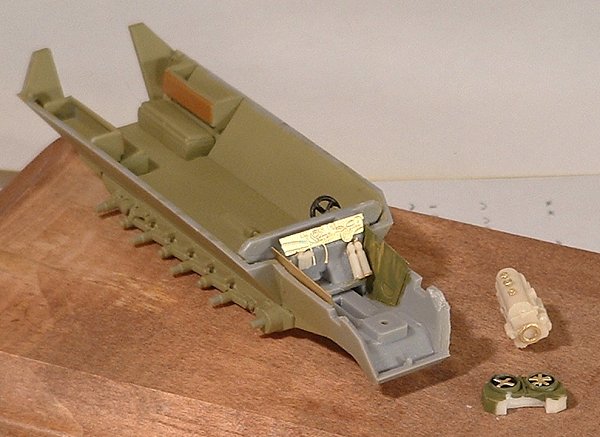
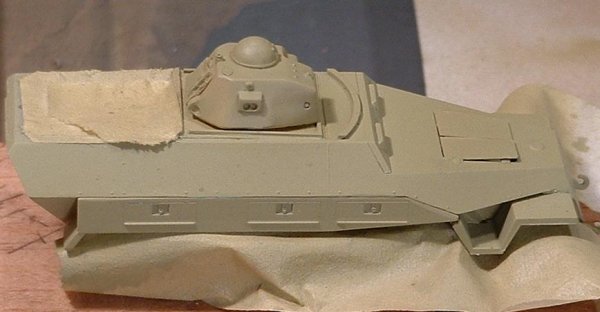
The two rear seats I think I added before I painted the interior. I found they are a bit thick around the storage bins in the upper part, so I thinned them a bit with an exacto. Early 251s seem to have had very nice leather covers on the passenger seats, while later in the war these were replaced with simple wooden slats to simplify production. The Hasagawa lower seats are kind of a mix of both seats. They are shaped like the early seats (sort of puffed up) but look more like the later seats, which should sort of "concave" – higher at the front, low in the middle and bit higher at the back. The later ones should also show the slats. I compromised by simply scribing lines onto to the existing seats, and giving them a light wash to pick out the lines. The upper parts of the seats, the back rests, seem to have been padded in the later 251s, so I left them as is and painted them reddish brown. Finished, for the time being, with the lower hull, I super glued the resin plate over the opening in the upper half of the hull and painted it dark yellow as well. After adding the radio and a piece of kit between the two vision ports (a Prieser German mess tin), I considered what I wanted to do about the turret. The ModellTrans turret is moulded solid, with a shallow hollow area behind the hatch where you could place a figure. As such, there was no point making a hole for the turret. Instead, using a piece of plastic strip, I roughly outlined the circle where the turret would attach to the plate, so it wouldn’t look quite so blank on the bottom of the mounting plate. Finally, although I have no source or historical justification for this, I assumed that there would be a hanging seat beneath the turret for the gunner. I built up a hanging seat from the spares box and added it to the plate.
Before gluing the top and bottom hull together, I added an ESCI fire extinguisher, painted red with dark yellow straps, to the bottom hull beside the access doors. The ExtraTech Engine Compartment
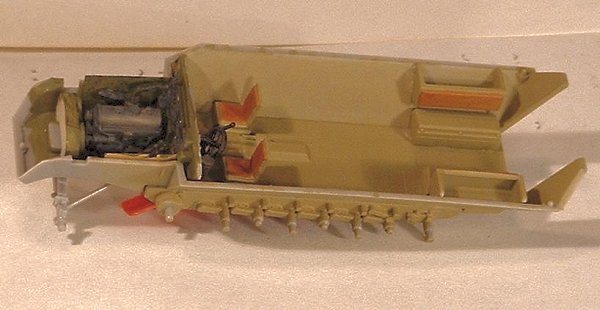
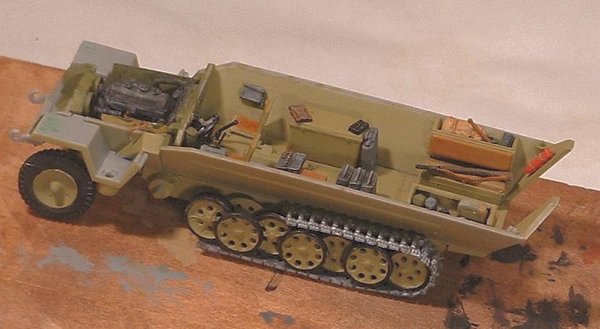
A few months ago, Doug Chaltry dropped me an e-mail offering me the opportunity to do a build review of the resin and etched brass Sd. Kfz 251 engine compartment produced and graciously provided by ExtraTech. Since I already had the elements of the Renault turreted 251 project, I was happy to incorporate the engine. The engine set is a really beautiful little set with several resin pieces and a sheet of etched brass. The main components are the engine block and fan assembly, in resin. Highly detailed and well cast, there are no discernible bubbles or other blemishes. Both of these main parts drop-fit into the Hasagawa engine compartment. First, however, it is necessary to add the brass details to the engine (mostly fly wheels oil caps), the fan assembly (the fans themselves are cleverly divided into two etched brass crosses which glue on top of each other to create the fan), and pieces for the sides of the engine compartment itself. There is the back part of the instrument panel, with wires and a horn attachment, the assembly for the steering gear (two cylinders, possible hydraulic power assist?) and the compartment sides. The compartment sides I had some trouble positioning – the instructions (which are better than those of most small scale upgrade kits) were not completely clear about how they were placed. For painting I relied on the instructions, which called for olive for the structural parts, gray for the engine parts and black for others. Once it was assembled, I gave it a good drybrushing of black to simulate grease and exhaust build-up.
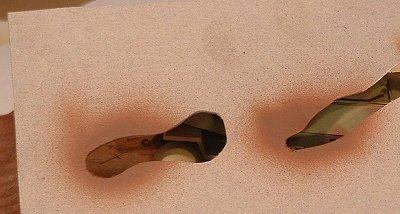
Once the main components were installed, I added the long thin conduit (it might be a heater for the driver’s compartment) which goes along the starboard side of the engine compartment. There is also a set of wires, in etched brass, which attaches to the port side of the engine block. Finally, the kit does not include the exhaust pipe which goes from the port side of the engine block out to the muffler on the lower port mud guard, but suggests the modeler use wire or tubing to represent it. I’m not certain why they have chosen not to provide it, other than perhaps you have to fiddle with it in terms of positioning. I used a piece of thin soldering rod (very flexible) to represent this part. I then drybrushed the assembled whole with black, gray and bit of gun metal (to pick out the detail). Oh, I almost forgot, you of course have to open up the engine hatches (which are replaced with brass hatches). This is a fairly delicate operation since the opening is an usual compound shape and you want smooth edges – and you definitely don’t want to make the hole too big! I did it by carving a hole in the middle of the hatches on the kit (moulded in place, of course) and then carefully working my way outwards. Once I was within a few millimetres of the edges, I switched to a flat file using long strokes to keep the edges straight. In the corners, I recommend a round file to keep the appropriate profile. Like I say, you have to take your time with this part of the process. I left the original plastic hinges in place after removing the hatches, since I was going to build the engine compartment open and I wasn’t certain if the supplied brass hinges, designed to go on flat, would look right. Back to Our Regularly Scheduled Model…
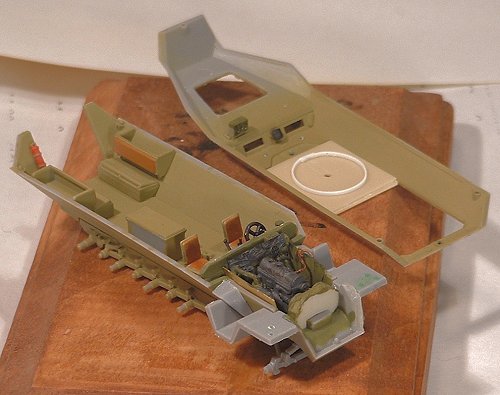
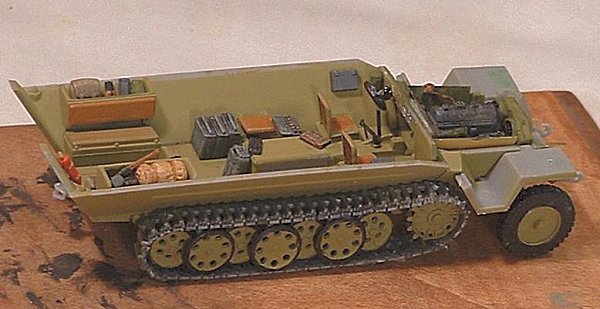
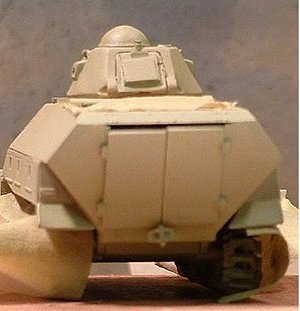
Before gluing the upper half of the hull to the lower, I had one more task to carry out. The back rests of the seats in the 251 were also storage bins – it was necessary, therefore, to fill them with gear. It would be very difficult to do this once the top part of the hull is in place, so I recommend doing it first. I began by painting and the adding some larger pieces such as a rolled tarp from a Leva extra gear set, and a knapsack from a Mars resin set. These took up a good amount of space. I then filled in a round these larger bits with some of the extra gear provided with Preiser German figure sets, such as mess tins, gas mask cases, canteens and bread bags. I also added a folding shovel, still in its canvas cover. These Prieser sets are excellent for this sort of detail. With all this detail in place, I cut and added two small squares of thin clear plastic over the inside of the vision ports. Rather than try to make the frames for these pieces, I carefully painted the over edges in dark yellow to simulate the frames. Finally I added an Armo resin Mauser Kar98 rifle, with a sling made from a thin piece of masking tape, to one of the rear seats. Once that was done, I decided to add the tracks before continuing. The Hasagawa tracks are, for me, one of the downfalls of the kit. They are one-piece rubber tracks (which some people prefer) with excellent detail but I always suspect their ability to "sit" properly over the bogies. Instead of the kit-supplied tracks, I decided to use the hard plastic ones originally made by ESCI, now provided in the Italeri re-release of the Sd. Kfz 251C. These lack good detail on the inner sides, but at least I know I can bend them to fit tightly to the bogies. Once they were in place, I painted the track dark gray. The last step before closing this baby up was a modification required for the turret. ModelTrans sensibly provides two I-beams (in resin) to support the mounting plate for the turret. This makes sense, since the mounting plate would otherwise simply be welded to the top edges of the hull, an approach which would likely not support the weight of the turret. I placed these at the rear sides of the plate, checking them for size by dry fitting the top hull to the lower. I left a very small gap between the floor of the halftrack and the I-beams so they wouldn’t break off when I pressed the upper and lower hull together. Okay, I was finally ready to glue the hull halves together. These two parts fit together quite well, with a bit of care. In particular, you have to careful with how the flat front plate attaches to the lower hull. I used a clamp here to make certain of a close fit. I used some (but not enough) Green Stuff to fill some of the gaps on the nose and around the storage bins. The ModelTrans Turret The ModelTrans R-35 turret (I think this turret was also used on other French tanks, such as the Hotchkiss 39) is really an amazing moulding. The detail is exquisite. I wonder if ModelTrans will, at some point, follow up with a full kit of an R-35, a model I would certainly welcome. The kit includes the turret (cast as a solid piece as I’ve already mentioned), the mounting plate, the two I-beam supports, the rear turret hatch and the gun. There are some questions about this particular field conversion of the 251, however. As far as I know, there is only one photo of this version. It is posted on the "Hanomag Sd. Kfz 251 site (http://www.geocities.com/MotorCity/Pit/3515/251/). It shows a vehicle in the hands of the Forces Francais d’Interieur (FFI) being used to round up German prisoners in LaRochelle. The owner of the site suggests that it is, therefore, a conversion made by the French after the 251 was captured. This theory is certainly possible, however, I think it is just as likely that this was a field modification engineered by the Germans between the French surrender in 1940 and the Allied invasion in 1944. The Germans certainly had access to a lot of unused French tank turrets! They also had a penchant for creating what the British would call "funnies" from available French equipment, particularly as more and more front line vehicles were transferred to the Eastern Front. Can I be certain it’s a German conversion? – no. Can anyone tell me definitively that it’s not? – not so far! I chose to build it in German colours. With the mounting plate already in place (with the detail underneath) I glued the rear access hatch on and positioned the turret. As is mentioned in the 251 site, it is not at all clear how the turret might have been mounted – would the guys who built it have bothered with a turret race to allow it to traverse? Probably not. I therefore placed it in a straight "fore-and-aft" orientation. Painting With the main body of the model together, and the interior, tracks and wheels already painted, I had to do some serious masking before painting. I began by taking the hatches, which I would be putting on later, and painting their interior sides in dark yellow. This included the rear access doors and the engine hatches. I then taped these doors together and taped them in place on the hull. I also added a piece of masking tape, cut to size, over the crew compartment. Finally, I used some white glue to attach the armoured view port covers so I could remove them later and fix them in the open position. As I will explain later, this approach didn’t work very well.
After covering the tracks and wheels with some tape, I got out my trusty Aztek airbrush for the base coat. I’m not a huge fan of the Aztek, but it is adequate for most purposes. In reality, however, it lacks the capability for fine work necessary for small scale. It also chose this moment to act up on me (or it could be that I thinned the Testors Modelmaster Acrylic paint too much) and I got a lot of splatters on the base coat. It wasn’t a huge problem, however, since I was adding a good coat of cammo over the base.
With the masking still in place I went on to the first coat of cammo – red brown. As I mentioned, the Aztek really doesn’t seem to be appropriate for detailed work in small scale. I find that the lines you can get are not thin enough (even with the fine nozzle) and for me at least the accuracy is not great (I never know exactly where the first shot of paint is going to hit). To get around this problem, I decided to try using a mask to help "focus" the paint. I took a piece of cardboard and cut irregular shapes in it. I then held it in front of the model, about half a centimetre from the kit and sprayed through it. With the mask a short distance from the subject, and by moving it around just a bit while I sprayed, I was still able to get the feathered edges on the cammo, while controlling the size and position of the "blotches". I did the same thing with the green. The red brown colour I used was a mix of Testors Modelmaster Acrylic Dark Earth and Burnt Sienna. The green was Modelmaster Panzer Olivgrun 1943.
Once the main painting was complete, I rushed ahead and added BalkanKreuzes (rub-on markings by Archer) on either side of the vehicle, then the license plates from an old ESCI kit. I then gave the kit a quick, light shot of desert sand to dust it up and tone down the cammo colours. With the painting pretty much finished, I removed the masking and hand painted the edges where the masking kept the plastic bare. This is one advantage that I have discovered of using acrylic paints – the shade does not change between airbrushing and hand brushing. This makes touch-ups easy.
I then added the doors and hatches. I found my idea for removing the vision port covers was a failure. The white glue pulled off a lot of the surrounding paint and left residue around the ports. Cleaning it was difficult since one touch of the paintbrush on the clea plastic would fog it up, ruining the glass effect. If that happened, there was no way fix it since I could no longer get into the driver’s compartment. After carefully fixing the driver’s port, I decided to leave the other port closed. Next I did some drybrushing of the hatches in gray, and an overall drybrushing of the hull in desert tan to pick out details. At the same time I painted the locks on the storage bin gray to make them stand out a bit more.
I then added an anti-aircraft machinegun in the rear compartment. The LaRochelle photo shows the mounting in place. I used the Hasagawa swivel mount (which is too thick) and a Mars Mg42, a beautiful moulding available in their Extra weapons pack. The set also comes with the ammunition magazine that fits on the gun. The last step was to add an antenna to the starboard side of the vehicle, just aft of the mounting plate. I borrowed the mounting from an ESCI Sd.Kfz. 250 kit. Finishing It Off
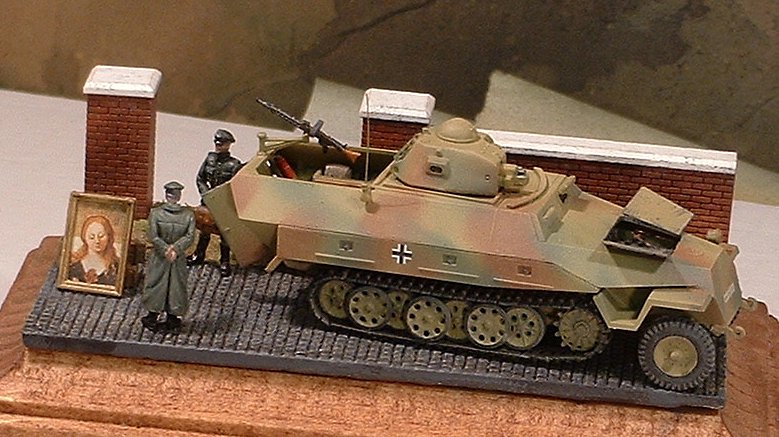
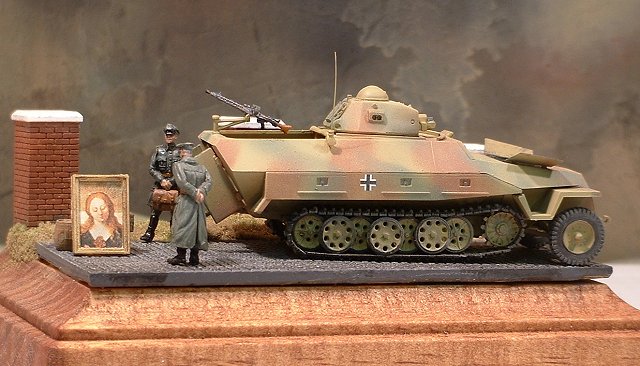
For the base, I used a wooden plaque picked up from the local Michael’s craft store for about 75 cents. I stained it and added a section of cobblestone street produced in 1/72nd scale by Custom Dioramics. I then built up the verge with plasticine and, after covering it with a preserving layer of white glue, painted and added the brick walls, produced by Bayardi. I then added flocking using brown earth as a base with a mixture of green and yellow to represent grass.
The figures are by Milicast, from their German command set (which comes with a binocular tripod). I am not quite finished painting them. The working title of the presentation is "Paris 1944: Time to Leave". It shows senior German officers packing up the loot (I may still add some more) they’ve accumulated after four years of occupation for their escape in the 251 through the dangerous streets of Paris. If you’ve seen the movies of the French sniping and throwing Molotov cocktails at the retreating Germans in Paris in 1944, you’ll know what I mean.
Thank you very much to ExtraTech for providing the engine set for review. |