BRDM
Manufacturer: ARMO (Kit #72001)
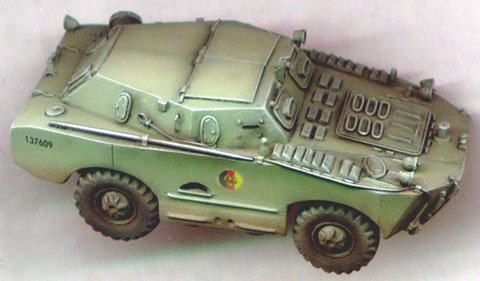
This was my first ARMO kit, and I am very impressed. It is not perfect, but it is a very fine kit nonetheless. The box has the kit labeled as a BRDM, which is the same as the BRDM-1. My references for this vehicle are very scarce. I was able to glean a couple of photos off the web (including one from the ARMO-JADAR website), and there are a couple of small photos and a side view drawing in Jane's Tank Recognition Guide. Unfortunately, good photos are a necessity, as ARMO's main weakness with all their kits is poor instructions.
Like many resin kits, this one was basically an exercise in painting, as the actual construction was very simple and straightforward. There were only about two dozen parts, a handful of which I did not use. The resin quality was very high. There was a single large pour block on the bottom of the hull that needed removal. The other parts were easily removed from their resin "sprues." There were no airbubbles, or other imperfections. The level of detail, as you can see in the photo, is outstanding. The details were superbly undercut, as you can see with the iron bar, and tow cable, attached to the right side of the hull (these were not separate parts, but were molded onto the hull). This same high level of detail is present on all ARMO kits.

ARMO has a good habit of pre-drilling location holes in the hull for the headlights, hand holds and other wire framework. So it was a simple matter to add the hand holds on each side of the superstructure, and on the front engine access panel. However, there were some holes drilled onto the rear of the hull, and because I have no photos showing this part of the vehicle, I was unsure of what went into the holes. Based on the skimpy line drawing in Jane's, I came up with something, but it's probably not correct. (I noticed after taking this photo, that the left rear tail light has been broken off the completed kit. Hopefully it's still in the model's storage box.
There was one construction problem, that being the location of the wheels and their axles. Each wheel glues to a wheel hub with axle, and this axle is then glued to the underside of the hull. But the axles are each bent at a different angle so care must be taken when attaching them. One method would be to attach all the axles to the hull first, and line them up appropriately, but then you must be sure to get all the wheels the correct depth in the wheel wells. The way I did it was to first glue the wheels to the axles, and then attach the axles to the hull, making sure that the wheels were all in proper alignment. Using this method, the wheels look great, but when you look at the bottom of the vehicle, the axles point in all different directions. Good thing you can't see that.

The kit comes with a machinegun to mount on the front of the superstructure. I believe it is supposed to be a 12.7mm DShKM, but if so, it is not molded very accurately. Additionally, the instructions are very poor showing the assembly of the gun and its mount. The other parts I left off were two metal guards for the headlights. These are molded on a flat backing of resin, and would be difficult to remove. It would be easier to scratchbuild your own. I have seen a photo of a vehicle without these headlight guards, so I left them off.

According to the measurements in Jane's, this kit scales very well in length and height, but is definately too wide. As I mentioned, this is the only reference I have, so I cannot confirm the measurements. I painted my kit in Polly Scale Soviet Green. No decals are included, so I swiped some East German markings from my ACE BRDM-2 kit. The decals are very thin, and printed beautifully, but silvered a slight bit, even with judicious use of MicroSol. I like the finished model a lot, and am looking forward to building my other ARMO kits.
| Back to Kit Reviews | Back to Home Page |
| Back to ARMO |