|
Ace
|
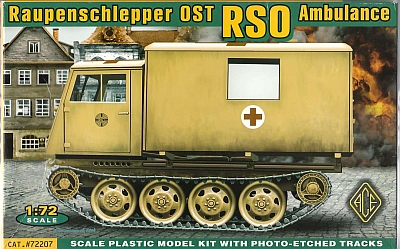
Raupenschlepper OST RSO Ambulance |
|||
| Kit # 72207 | Review by Neil Lyall - nlyall(at)bigpond.net.au | |||
|
Ace
|
Raupenschlepper OST RSO Ambulance |
|||
| Kit # 72207 | Review by Neil Lyall - nlyall(at)bigpond.net.au | |||
 |
|
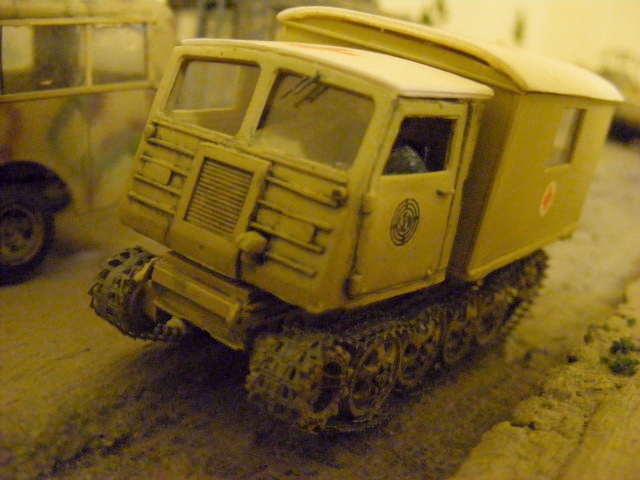
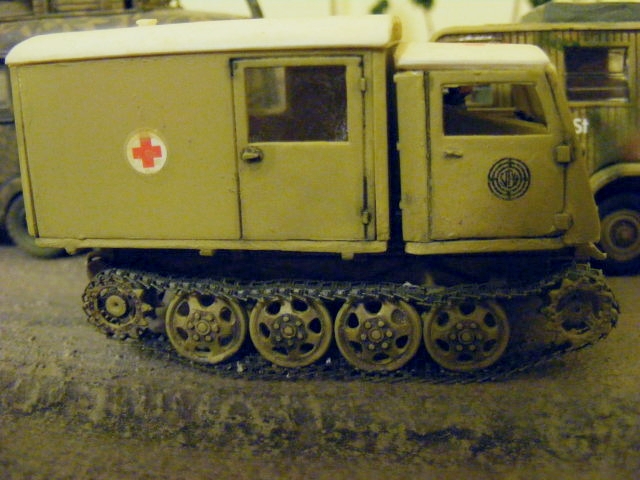
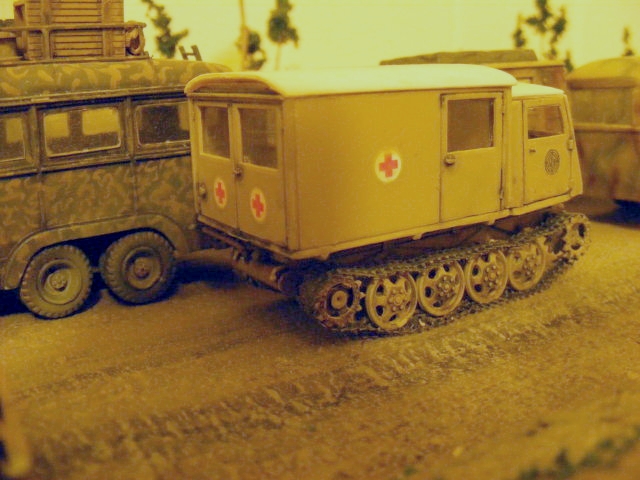
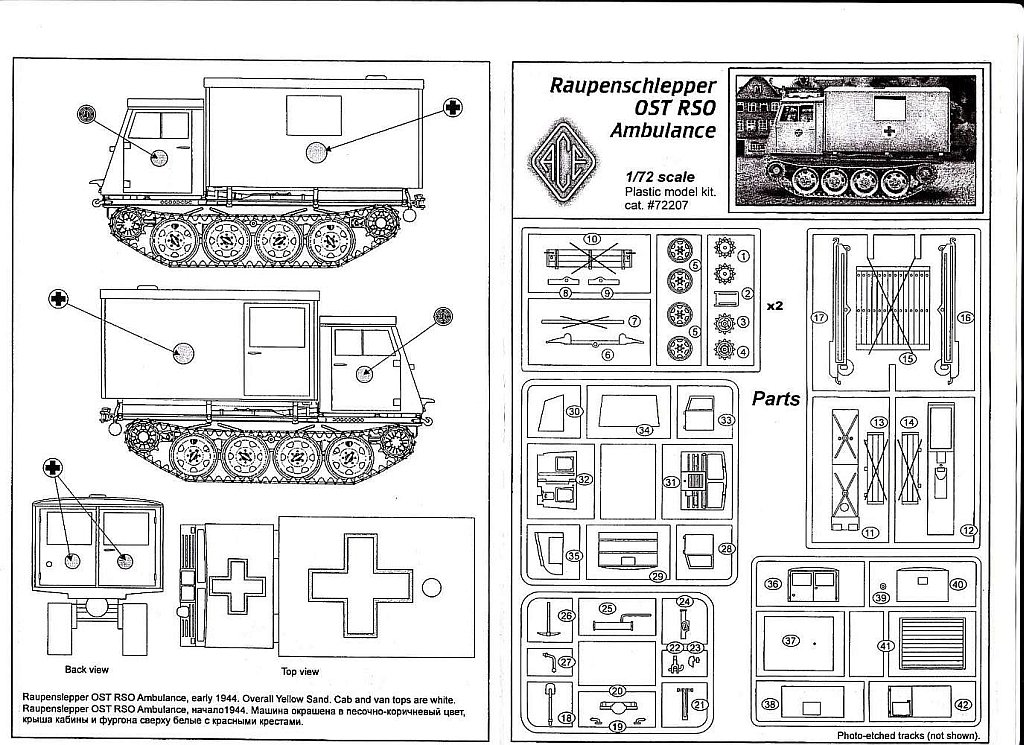
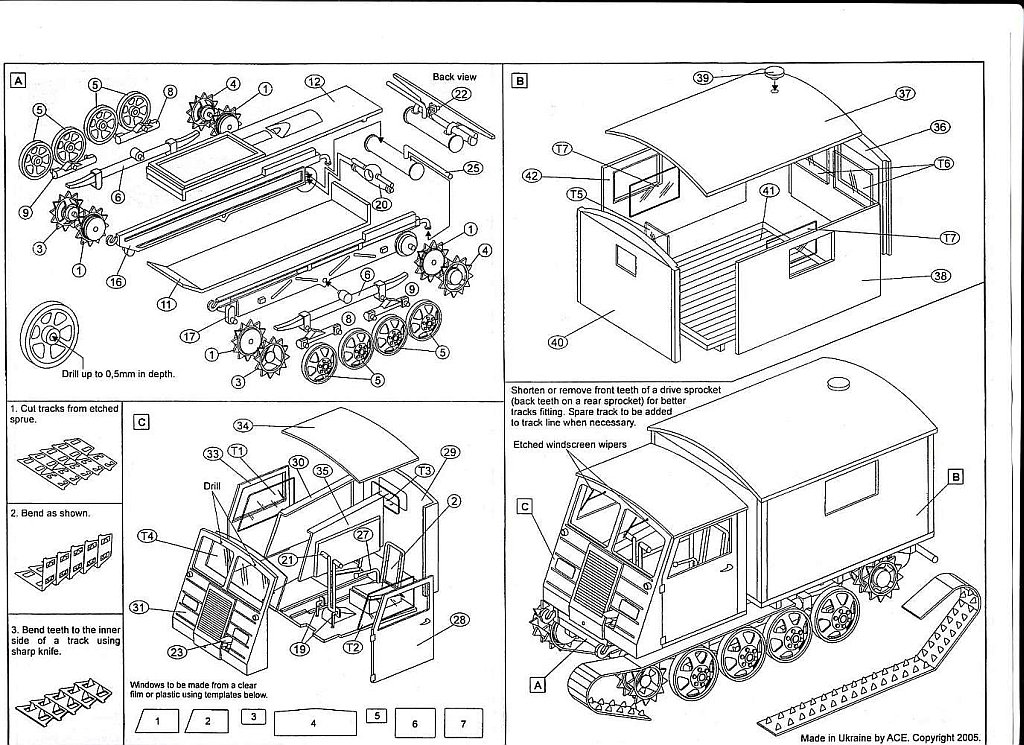
Brief Description of Contents This kit comprises of just 52 parts, one PE set of tracks and window wipers, one set of decals, and one instruction sheet. The parts are moulded in pale grey plastic, except for the ambulance body which was moulded in white. You also get the 5 standard pieces to make up the open tray cargo body, which is a handy addition to the spares box, or if you wanted to build a cargo version with this kit, you then have the ambulance body for another project. Construction The instructions are sufficiently detailed, and in fairly good English I assembled the cab, chassis and body as three separate builds, also leaving the roof off the cabin and body to allow painting and later installation of plastic for the windows. There were no real issues with puttting the drivers cab and chassis together. Almost no flash on any of the parts. A small amount of filing was needed with assembling the ambulance body. The drivers cab doors could be assembled opened. The side door of the ambulance and rear doors are moulded shut, but could be cut and opened up with very little trouble. No interior detail is supplied so I elected to leave all doors closed. Care does need to be taken when cutting or filing this plastic as it's quite soft, as you want to avoid taking off more plastic than intended. Also care needed when applying liquid cement due to the soft plastic. One advantage of this, is when the liquid cement is fully set, this plastic bonds very well. In all quite a straightforward build. The Tracks Each track is made up of two equal length pieces, a total of four being needed to complete the model. The photo etch copper track sprue comes with 8 lengths, as you fold it to 'double thickness'. I cut each track length out from the PE frame with a sharp Exacto blade. The instructions recommend heating each track piece to soften the metal, and I agree. I had assembled one of these Raupenschleppers before without heating the track and had a fair amount of trouble with the tracks, as they are quite firm, and tend to 'spring back' from the shape you bend them to. On the next Steyr build I followed the instructions and held each length over a ring on my gas stove with a pair of needle nose pliers till they glowed bright orange, for a count of 5 seconds, then let them cool naturally, and then found bending & affixing them to be quite easy. Before fitting the tracks, you need to stand up the two rows of guide teeth on the inside surface of the track. A fine pointed blade is necessary to 'stand up' the teeth, by putting the sharp pointed edge of the blade under the tooth and bending it upwards 90 degrees. This may sound difficult but after you do a few teeth, it becomes easier, if somewhat tedious, until you have done a few rows. I built up a rhythm and finished the job fairly quickly. (Note you don't need to heat the tracks before standing up the teeth, they are quite easy to bend up, and no resistance occurs). Fitting the Tracks The instructions recommend cutting off the guide teeth where the track wraps around the front sprocket, and I agree - the teeth don't mesh very well, so cut or file these back first. I then got a pen or other cylindrical object about the same diameter of the sprocket and wrapped a piece of the track around it, to 'pre-form' it before test fitting it to the model. After a test fit, I made some slight adjustments, then I used brush on Super Glue to hold the track in place in a few places. At this point I use a small bulldog clip to press down on the top of the track simultaneously so that it bonds to the top of the roadwheels, and the bottom, and so I could leave it for 10 minutes for the glue to harden. I used a small screwdriver to press down lightly on the top of the roadwheels so the track dips slightly between them. After the first piece has set, do the same process with the second piece of track. You will need to trim a few millimetres off, as you'll find a small overlap when you test fit the second piece. The above may sound a little laborious, as I've written it in some detail, but it is actually quite straightforward. Painting and Final Assembly I painted the chassis, cab, and ambulance body as three separate pieces, minus their roofs, in overall Humbol 83, lightened with a bit of white. The roofs were spray painted matt white as per box art, and the paint guide. After everything was dry, and the interior of the drivers cab was painted, and a driver was installed, I cut out & glued in clear plastic sheet for all the windows. Then I glued on the cab and body roofs. I painted the tracks a mix of gunmetal and dark grey, by hand with a fine brush. Then I affixed the cab and body to the chassis. I then mixed some burnt umber and lamp black oil paint with turps to highlight some of the detail, applied the decals, and sprayed the whole model with a very thinned brown mix, particularly on the roof, to tone down the colours. Conclusion I haven't checked the technical specifications against model measurements, so can't comment on the accuracy, but in my opinion this kit builds, with very little difficulty, into a very nice model of the Steyr Ost.
|
| Back to Ace Kit List | Back to Construction Reviews |
Article Last Updated: 27 March 2009 |
Back to Home Page |