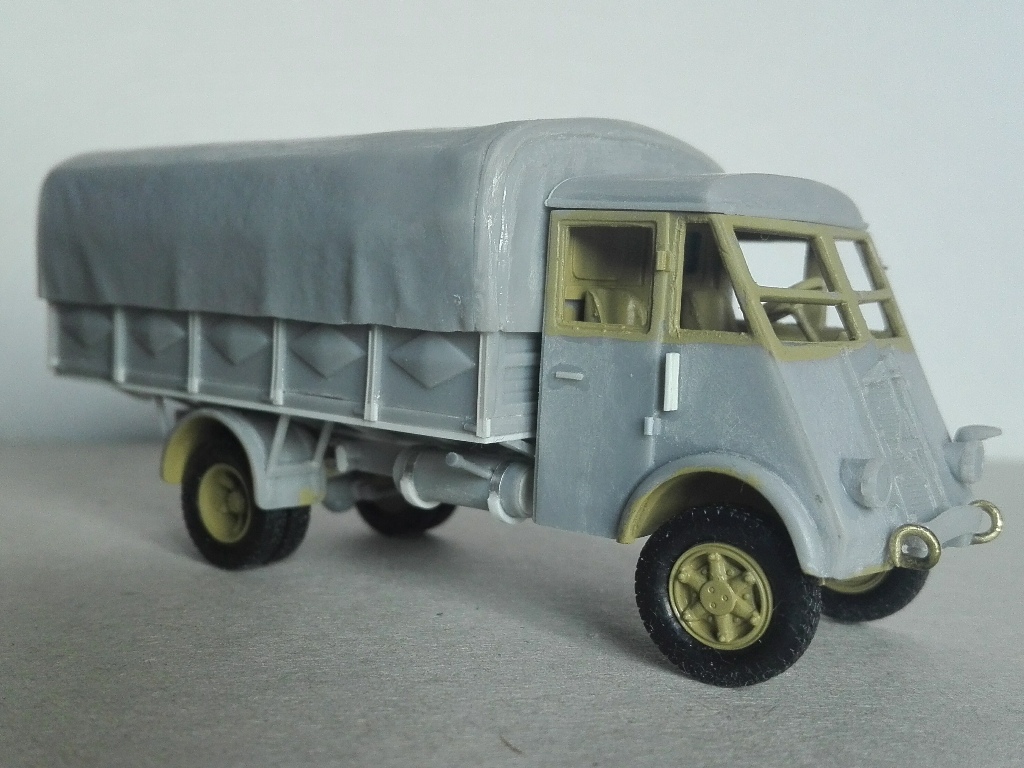
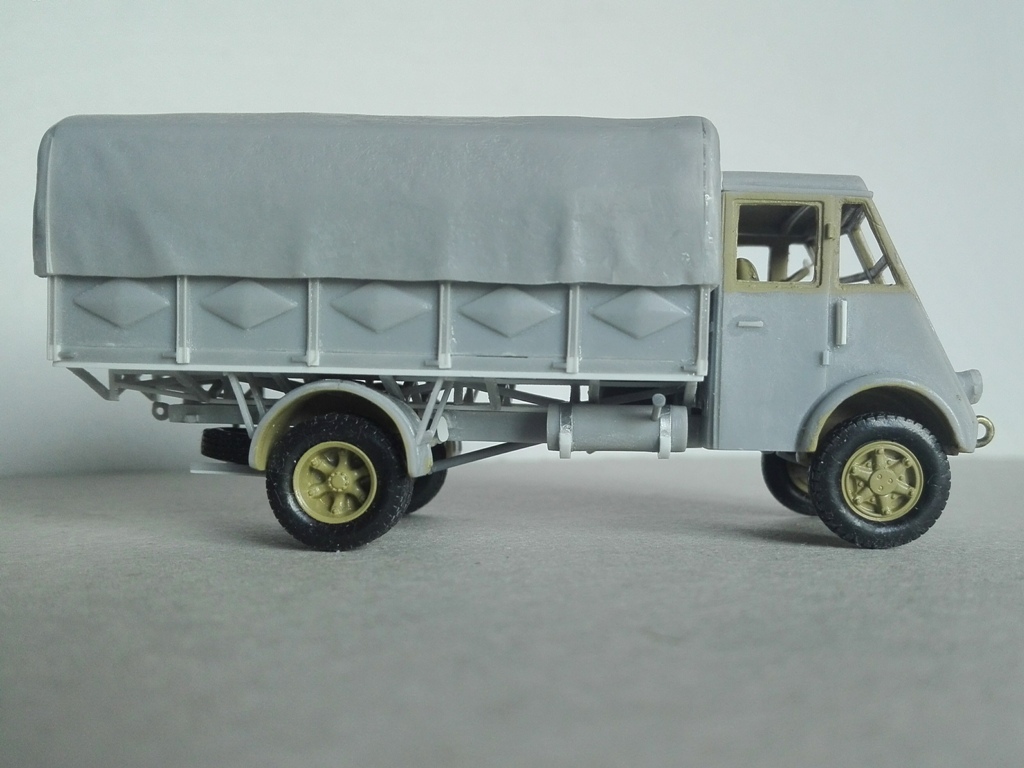
| Looking for a Beute truck to
place aside my German ones, I found the ACE Renault AHN kits. The
Renault AHN was a truck destined to the French Army which didn't arrive
in time for it, so its first production series (AHN1) went to serve
the Wehrmacht. The second series (AHN2) was produced during war time
after the liberation while the third series (AHN3) was post-war production.
Because of the difficult fuel supply, some were produced powered by
a wood gas generator. These had an H added to the model letters: AHN-H.
For my needs, I focused my attention on the AHN1 series.
The AHN was one of the three AH variants: the 2 ton AHS, the 3.5 ton
AHN and the 5 ton AHR. They had the same chassis made in three sizes,
respectively with the following wheelbase:
| Type |
1/1
|
1/72
|
AHS
|
3.125
mm |
43.4
mm |
AHN
|
3.730
mm |
51.8
mm |
AHR
|
4.440
mm |
61.7
mm |
ACE’s catalogue currently has
four kits, the AHN with flatbed body, the AHN with medical shelter,
the AHN-H with flatbed body, the AHR with flatbed body. Although at
a glance the differences between the three main variants could look
as if they just concerned the body dimensions, this wasn't so. The
AHS cab was smaller and a conversion job is more elaborated than strictly
to cut short the body and the chassis.
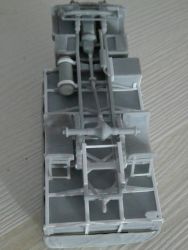
This said, the medical truck kit apart, each ACE kit allows the construction
of either AHN or AHR because they share the same five basic grey plastic
mouldings: chassis, wheel rims, cab with body bed and two identical
moulds for the cargo body. Each single tire is made of black rubber.
Instructions and the decal complete the kit. The transparent parts
are missing, but their templates are printed in the instructions.
The wood gas generator variant has its specific parts in a sixth mould.
To tell the truth, the AHR had larger tires (230x20 in place of 210x20),
however the difference in 1/72 is about 0.6 mm, which is quite negligible
in my opinion.
About the moulds, the pieces are strongly attached to the sprue; their
details are soft and have some flash to be cleaned. Here and there
some sink marks need to be filled. A careful cleaning is needed, sometimes
with poor results. Flat surfaces are not always smooth and forget
sharp corners. The better parts are the wheels. On the pieces the
references to correctly place themselves are rare and the instructions
are not clear about how positioning some pieces. A 1/35 instruction
could give a welcome help (one can be found here).
A very good info source where to find photos, drawings and data is
here
(and called "the site" in the text). Another useful site
is this
one.
Despite what I've written above, dimensions look to be quite well
respected when checked against the sketches of the site; the pieces
which have a real mistake are the fake chassis (see text).
Having found it at low price, I bought a wood gas generator truck
kit, but I chose to make it as a standard AHN1. On the basis of the
photos I've seen it looks that different types or ways to install
them were used and I didn't find exhaustive iconography to choose
one type or another.
When I'll call a piece number it will be referred to the kit instructions
(which can be found on ACE’s site).
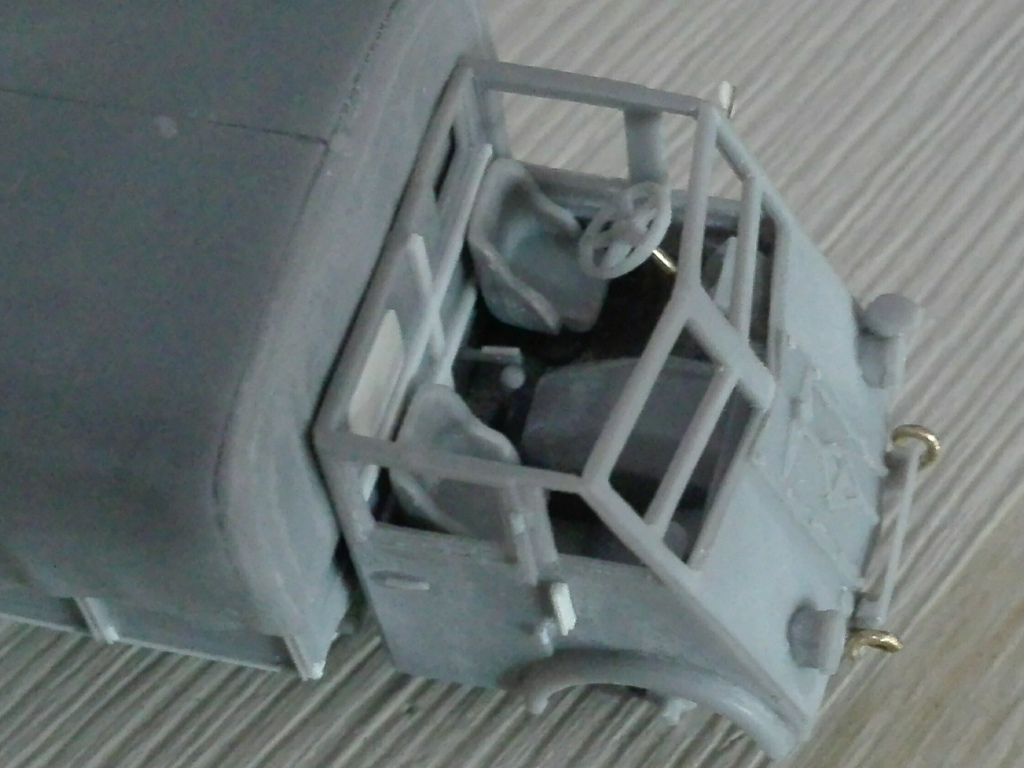
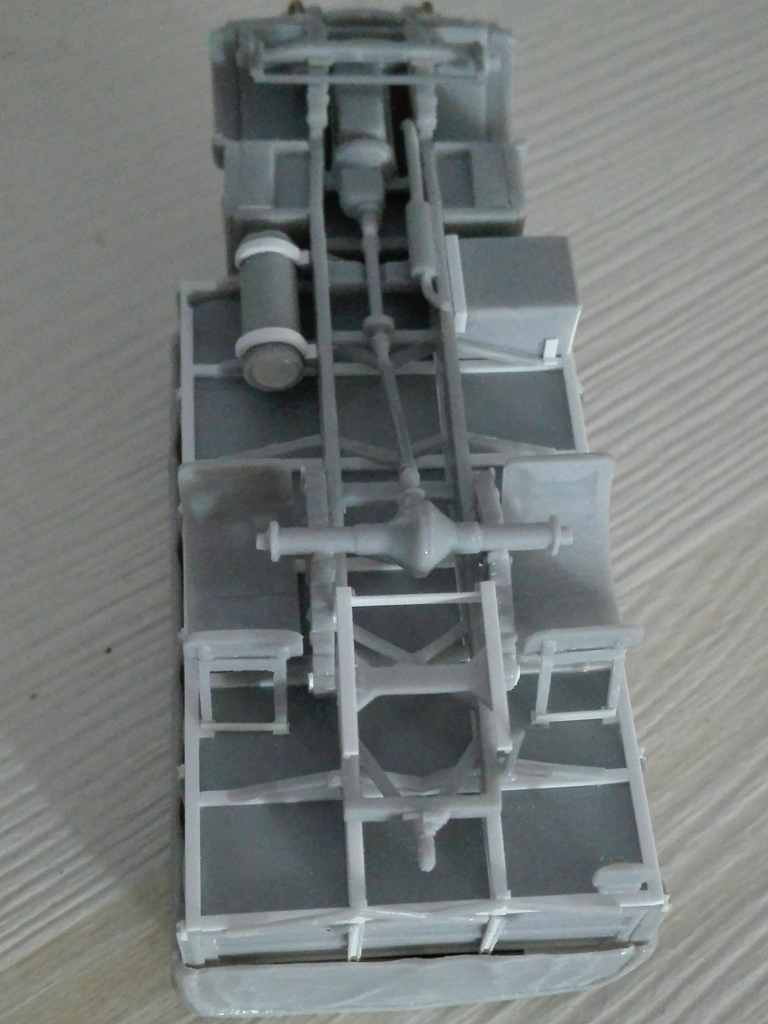
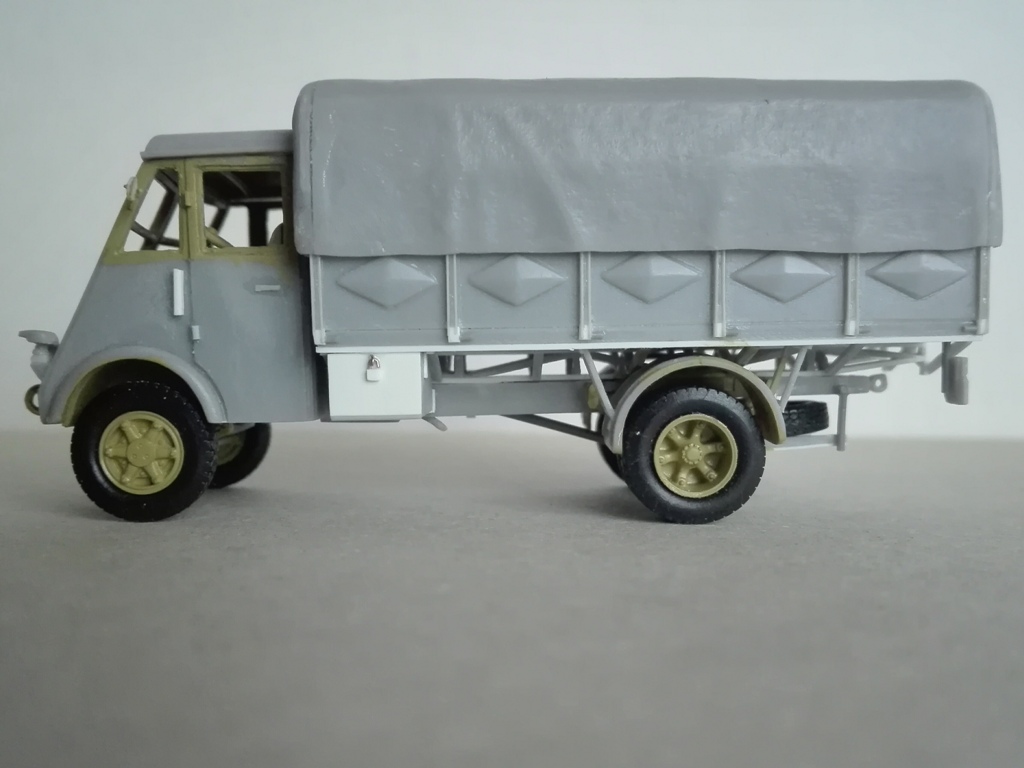
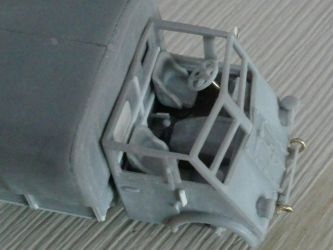
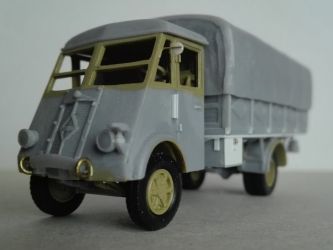
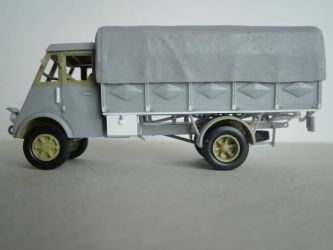
Cab
- The rear plate 34 received the
inner side of the frame and the punched space for a window, not
used on production. There were also other details, but the small
scale makes the engraving quite hard for not assured results. Also
the outer side had some details to be added, but the body and the
tarpaulin hide them and I considered adding them a futile exercise.
- The steering wheel position is
high and thus visible when installed. Its rod was replaced by metallic
wire placed more correctly.
- The gear lever has to be placed
in the middle. I made it from stretched sprue.
- Also the hand brake was added by
stretched sprue segments (one for the lever and a smaller one for
the handle), gluing it to the wall.
- The air filter (# 22) was resized
and placed with the lateral hose made by stretched sprue.
- The inner roof received a frame
rod and the outer side the little door of the air inlet.
- Particular attention is needed at
the vertical edges of the front plate 33. Without a careful adaptation
of the edges it will not fit correctly and it will leave some gaps.
I used cyanoacrylate glue to fill the joining line and sand paper
to sharpen it. The windshield frame was thinned.
- The lights to be used for an AHN1
truck are the integrated ones (# 50).
- The Notek light was reshaped and
placed on a shim to avoid interferences with the light.
- The front towing points were made
by two hooks shaped as a curl or a corkscrew. I made them from metallic
wire although they are a bit oversized.
- The turn indicators were replaced
by plastic strips.
- Also the door handles were replaced,
by stretched sprue, to allow the sanding of the door’s surface
which is not completely flat.
- The shallow moulded-on door hinges
were made from stretched sprue.
- A little punched diskette and a
thin metallic wire were used to make the rear view mirror.
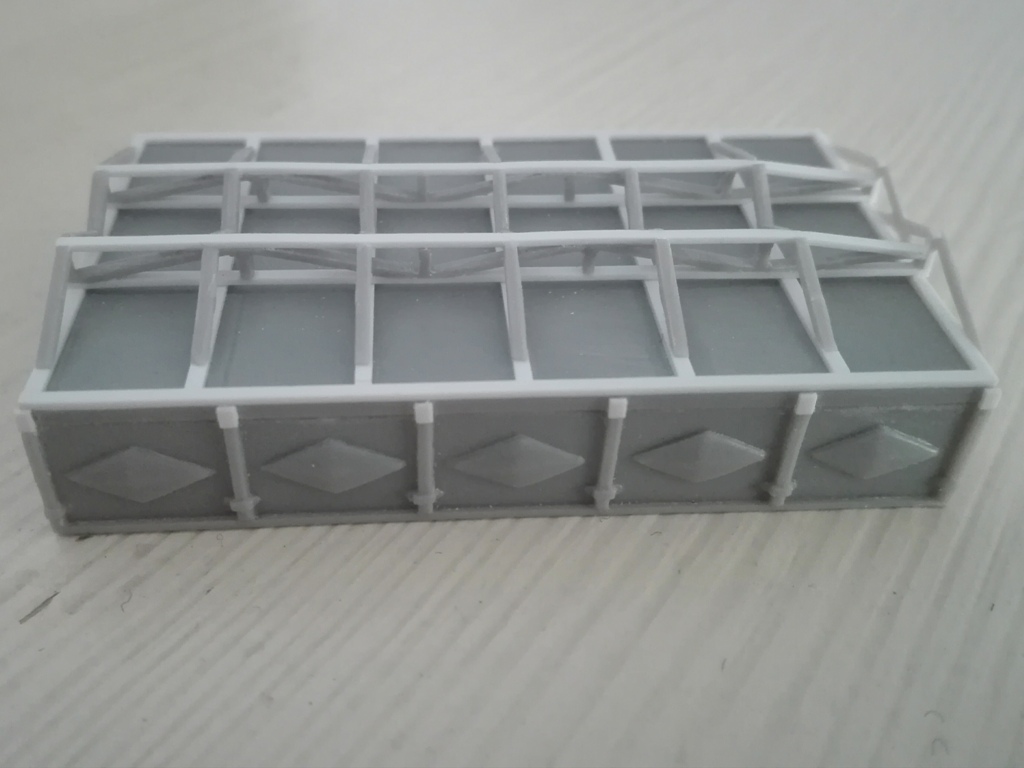
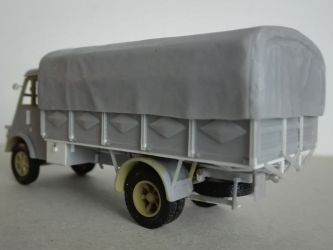
Body
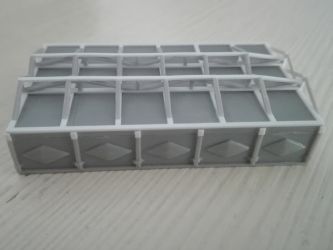
- The AHN1 flatbed was five side
frame panels long. For mine I shortened the body, the flatbed and
the sides, of one side segment length. The side panels have a diamond
pressed from inside to outside. They look too much pushed outward
on the inner side where there is a gap between the panel surface
and the diamond. The correction is almost impossible and I left
them as they are. The side hinges were cut off of as well, to be
made better by plastic strip segments and stretched sprue. Regarding
these, at least three types look to be used. One type overhangs
the flatbed under the edge while a second type had just the third
hinge from the front a bit longer. Anyway, on most photos I've seen
they don't at all. On each photo I've seen anyway, the hinges weren't
solid but "U" section rods. I used thin stretched sprue
to make them.
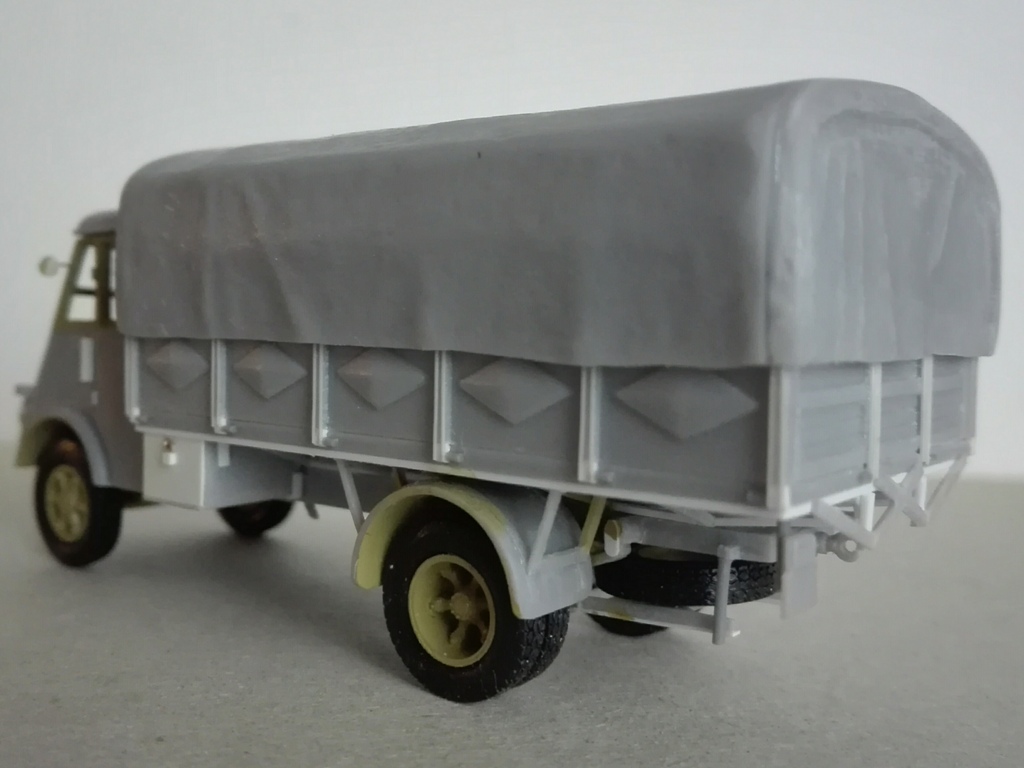
- The flatbed underside is flat;
I added the frame by 1x0.5 mm plastic strips.
- The tailgate received the hinges
made by plastic strips and stretched sprue. If glued in the opened
position or not hidden by the tarpaulin the folding step must be
added inside.
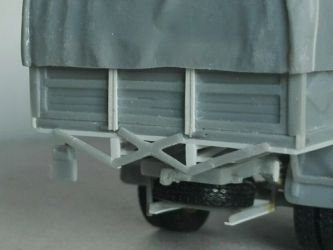
- Two frames (called fake chassis
on the site) raised the body from the chassis (pieces # 42). These
were shortened according to the new flatbed length and have ugly
flash which removal is compulsive in my opinion. To sand down the
plastic excess on the inner parts I chose to replace the longitudinal
rods by 1x0.5 mm plastic strips. Unfortunately, I didn't check the
number of the vertical rods, which were seven and not six. After
having placed them on the flatbed underside and glued the transversal
parts I realized that the vertical rods must be aligned to the flatbed
frame. Sadly mine weren't. After a hard pros and cons comparison
I chose to leave it so, but the reader is warned.
- Also the last transversal part
of the fake chassis (piece # 17) is wrong and its correction is
compulsive (again!) to avoid a very strange look of the rear. I
cut it and reshaped it following the drawing present on the site.
- The mudguards were modified on the
basis of photographic evidences. They have to be placed between
the 4th and the 5th transversal rod. ACE made the fake chassis wrong
and this explains why the instructions leave the area above the
rear wheel without the external transversal rods. Compulsive, this
time, is the use of photos to place the mudguards correctly. Some
variations can be seen, most probably because of a local repair
job.
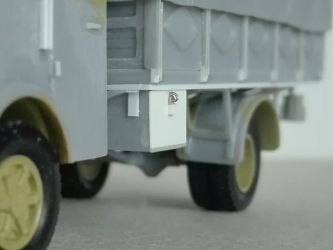
- The rear light and the plate were
fixed on a support made by stretched sprue.
- The tarpaulin is composed of four
pieces and has the references to be cut short. Assembled it looks
quite well and the bulbous transversal section is depicted correctly.
I just engraved the sheet lines. In some cases they were closed
by little belts. The frame is missing and if one wish to have it
uncovered it has to be scratchbuilt.
Chassis
- Also the chassis (# 11) was resized cutting off
the same length cut away from the body. The forward part of the
chassis is moulded on the cab floor. Particular attention must be
paid to have a correct alignment to the body. In this perspective
I chose to glue the chassis to the floor after having completed
the cab and the body.
- The axles huge wheel interlock pins were resized.
- The steering rods (# 5) were replaced by stretched
sprue according to photographic evidence. Its forward part (# 1)
was slightly shaped to be correctly placed.
- The pieces 18 and 19 don't reproduce correctly
the original parts and I had to modify them and place differently.
- The ugly cylindrical fuel tank needs heavy surgery.
After having it sanded down smooth, the circular sides were made
by punched plastic sheet. The “C” supports were made
by plastic strips and the belts replaced by metallic sheet. Also
the reservoir pipe was replaced, by stretched sprue.
- The leaf spring suspensions details are very soft
and correct placement not easy; on the rear ones I replaced the
shackles by plastic sheet.
- The longer drive shaft was replaced by stretched
sprue.
- Being poorly rendered, I detailed the spare wheel
housing by plastic strips and stretched sprue.
- The axle tracks give some problem. While the front
axle is quite correct for an AHN (and 1 mm narrow for an AHR), the
rear one is about 4 mm too wide. I resized the axle to have the
right width. Having the doubled wheels, the best way to make the
correct dimension is measuring the outer width instead of the axle
track.
| Type |
1/1
|
1/72
|
AHS
AHN front axle
|
1,717
mm |
23.8
mm |
| AHN rear axle |
1,610 mm |
22.4 mm |
| AHN rear axle outer width |
2,065 mm |
28.7 mm |
| AHR front axle |
1,790 mm |
24.8 mm |
AHR
rear axle
|
1,638
mm |
22.8
mm |
AHR
rear axle outer width
|
2,175
mm |
30.2
mm |
- The 210x20 wheels are correctly sized for an AHN,
the kit ones are 13.3x3.2 mm for 1/72 dimensions of about 13.6x3.4
mm. They are made by black rubber. I don't like this way of making
the tires, but I have to admit that the tread is amazing and together
with the wheel rims, these are the better pieces of the kit.
- The kit gives a wooden box to be attached opposite
the fuel tank about which I didn’t find evidence of its existence.
Anyway there is photographic evidence about non standard metallic
boxes mounted on some trucks. I used it to make one of them, closed
by a padlock.
Decal
About the decal, my wood gas generator kit # 72532 had markings just
for one truck: WH-659180, an anonymous dark gray truck camouflaged
by white stripes, which is visible here.
Anyway the plate in the photo is not clearly readable.
The true AHN kit (# 72525) has marking for three trucks. Two anonymous
dark gray trucks about which I didn't find photos, WH-931652 and WL-496854,
and WH-1170936, of the 336 Inf.Div., East Front, 1942; although I
can't say if the marking colour is correct, it look correctly depicted,
as can be seen here,
where it is identified as an AHR…
Conclusion
Well, it's hard to say. In some way this kit looks very poor and needs
a lot of work to have a decent result. Other kits needed a similar
amount of plastic and stretched sprue. Anyway, the sharpness of the
details of these other kits make these amount of corrections more
tolerable. Generally speaking, the detailing job and the corrections
summed up during assembly make this a kit which can't be considered
for beginners. However, the general dimensions are quite well respected
and the variant correctly depicted. On the positive side there is
surely the versatility that allows making indifferently one variant
or the other. Clearer instructions are strongly suggested. On the
other hand, currently, for an AHN in plastic kit, there is no other
choice.
Preview sample purchased by the
author.
Ace
products are available at

|