| This will be only a
very brief introduction to airbrushing. There are
numerous books available on basic and advanced
airbrushing techniques, and I recommend looking into
them. When picking an airbrush, there are many considerations which must be taken into account, such as the paint/air control, nozzle size, and method for paint/air mixing, to name a few. There are two basic styles of airbrush controls: single-action and dual-action (double-action). This refers to how many actions are governed by the main control lever on the airbrush. In single-action brushes, the lever (which is actually only a push button) only controls the airflow, but the paint flow is controlled by a separate knob or controller. For dual-action brushes, the same control lever governs both air and paint flow. While a little more difficult to learn in the beginning, once mastered, dual-action brushes give much finer control, and tend to be the preferred style of master modelers. Of course, this does not mean that you must buy a dual-action brush. Some modelers are very happy with single-action brushes, especially since they are cheaper in cost. Most brushes have changeable tips (nozzles) for adjusting the width of the line of sprayed paint. Fine tips allow you to spray a very thin, fine line, whereas coarse tips release more paint, and consequently cover a much wider area. Some brushes are specifically designed for painting fine lines, and come with very fine tips; other brushes are better suited for painting large objects. For paint mixing, there are two choices: internal and external mixing. Internal mixing refers to drawing paint into the body of the brush, and mixing it with the pressurized air in an internal mixing chamber. The paint/air mixture is then sprayed out of the brush through the nozzle. Most dual-action brushes are internal mix. External mixing means that the paint is mixed with air in the nozzle itself, and not inside the body of the brush. Most single-action brushes are external mix. Once again, convenience is at odds with control. Internal-mix brushes are easier to control the paint flow, but are more difficult to clean. External-mix brushes allow for ease of cleaning, but it is more difficult to control the paint flow. I cannot give a review of all available brushes since I have only used two types in all my time building models. I recommend that if you are in the market for a brush, you should ask for opinions on one of the many newsgroups or discussion boards for information on specific brand names.
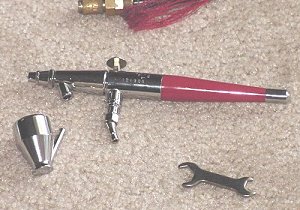
The first brush I use is the Paasche VL. I use this one for the broad application of base colors, because even the finest tip for this brush is not quite fine enough for some of the delicate camouflage patterns on this small of a scale. I have used it to paint camouflage on large tank and airplane models, but for 1/72nd tanks, it is best suited to applying only the base color and clear flat coats over the completed model. The VL is a dual-action, bottom feed brush, which means that it is an internal-mix brush, and draws paint from a reservoir cup inserted into the bottom of the brush to mix with the air in an internal mixing chamber. It has interchangeable tips, but again, even the finest nozzle still is not as fine as the next described brush.
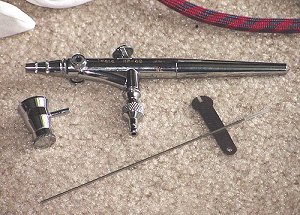
For painting the very fine lines of intricate camouflage schemes, I use an Iwata HP-SB. Again it is a dual-action, internal-mixing brush, but with a side-mounted cup. This brush came with only a single tip, and I do not believe that different nozzle sizes are available. This brush was originally designed for the art of fingernail painting, so as you can imagine, it is quite capable of painting incredibly fine lines, if you mix the paint properly. It is a very expensive brush, so I use it as rarely as possible. In the art of airbrushing, the paint you use is of equal importance to the brush. For me, it is a constant battle to get the paint just right. The reason I have so much difficulty is because of my choice of using only acrylic paints. Modelers have the basic choice of spraying either acrylic (water-based) paints, or enamel (oil-based) paints. Neither one is perfect. Enamels are easier to spray, but more difficult to clean. Acrylics are easier to clean, but more difficult to spray. The reason I do not spray enamels is that I have no dedicated work area in my apartment, and consequently, no spray booth. Spraying enamels requires abundant ventilation, because breathing the vapors of both the paint and the solvent used for cleaning the brush, is dangerous to your health. Brushes which spray acrylics are cleaned with alcohol or ammonia, which although they are not pleasant to smell, are not nearly as toxic as enamel solvents. Unfortunately, as I mentioned above, acrylics are more difficult to spray. This is because they dry faster, especially while being sprayed. The high air pressure required to spray the paint out through the brush nozzle can actually dry the paint as it leaves the brush, which often causes serious clogging problems with fine-nozzled brushes. I normally have no problem with my Paasche, but my Iwata often clogs when spraying acrylics. The solution to clogging is to thin the paint (I use a combination of water/alcohol to thin my paints), but there is a threshold between "just thin enough" and "too thin". If the paint is too thin, it will puddle and run when sprayed on the model. So obviously, it is a real trick getting the thinness just right. I have found that it is very important to use fresh paint. This is unfortunate, because for some colors, I only use them very rarely, and it is not real economical to buy a new jar of paint for each model I build. One other advantage to using acrylics is the lack of interaction between the paint used for the base color, and the wash. As described elsewhere, my wash is terpentine-based. Spreading terpentine on enamels can cause problems if the paint hasn't had enough time to dry (and also certain brands of enamels are susceptable to being eaten away by washes even when dry). By using acrylics for the base coat of paint, I can apply a terpentine wash almost immediately without fear of it ruining the paint. In this manner, a simple model can be completely painted in a single day, instead of having the long waiting periods for the paint to dry, as is often the case with enamels. One final consideration is the air source. For traveling, a compressed air bottle may be adequate, but at home, I prefer a compressor. The type I use is a SilentAire model, for a couple of reasons. First, I live in an apartment, so silence is golden; but just as important, is the fact that this compressor has a built-in air reservoir. This means that the air being pressurized from the compressor is not going straight to the brush, but rather into a small air tank, and the brush is then drawing air from this tank. This is important because when the brush is hooked up directly to the compressor, the air comes in pulses (from the internal diaphragm compressing the air), which can effect the air flow in the brush. When drawing air from a tank, the airflow is smooth and uninterrupted.
I understand that some people use old SCUBA tanks as their air supply. One filling of the tank can provide clean, smooth and silent air for a year. Perhaps someday I will have the space for one of these. In the final analysis, creating a nice smooth paint flow is a delicate balance between nozzle size, thinness of the paint, and the air pressure used to spray it (which will vary from brush to brush, and paint to paint). It is a constant struggle for me to consistently find the proper balance of all these elements, for each and every model. Many times I never do. |