| I.
M3 Lee History For The Modeler
Following
the defeat of France in 1940, the US government realized the need
to acquire a great number of medium tanks in a short period of time.
An entire new factory was produced from ground up especially for
the tanks being rushed through design. Loosely based on the M2 medium,
the new M3 medium tank was, incredibly, in full-scale production
in three plants by August of 1941. The tank was produced in six
variants with three different hull construction: with a riveted
hull (M3, M3A4, M3A5), cast hull (M3A1) or welded hull (M3A2 &
M3A3); a petrol/gasoline engine (M3, M3A1, M3A2, M3A4) or diesel
engine (M3A3 & M3A5). This does not include the ones with a
British designed turret designated the “Lee”.
The
Hasegawa M3 Medium Kit No. 31104 - MT4 model represents an early
riveted-hull M3 tank with a short M2 75-mm main gun. The Mirage
M3 Medium model kit No. 72806 offers the choice of an early or middle
riveted-hull M3 tank with both the M2 main gun and the longer M3
75-mm gun. The M2 gun was based on the French M1897 75-mm artillery
piece and intended to be primarily an infantry support gun with
an excellent high explosive shell. The 75-mm M3 gun had a longer
barrel and was also used in the M4 Sherman. In performance, these
weapons were similar to the Soviet 76-mm gun on the T-34. The turret
mounted 37-mm high velocity gun was comparable to the German 37-mm
and British 2-pounder gun. Available from Hasegawa and Mirage are
M3 “Lee” kits as shown in the box art below; and M3
“Grant” kits with a different turret designed for British
use [The British gave the names “Grant” & “Lee”
to the M3 Medium].
The
M3 Medium served as a battle tank in North Africa during 1942 and
1943 and then relegated to the roles of an ARV, training, M3CDL
and towing tractor in Europe. In Asia the M3 Medium served with
UK forces till the end of the war. (1)
M3
Medium Service in the Red Army: In the USSR, the M3 Lee
was transferred directly from the USA through the Lend Lease program
and took part in the Kursk battle and on the Don Front. Information
on the quantity of M3 Medium variants sent to the USSR is not clear.
A common number I see is 1,386 M3 Medium tanks. Russian Battlefield
website and Squadron’s M3 In Action book claim that all of
the 1,386 received by the Soviets were the M3A3 and the M3A5, both
powered by a diesel engine. Even today in 2012, Wikipedia states
that the USSR got all diesel-engine M3 Medium tanks. This cannot
be the case as there were only about 970 diesel-engine M3A3
and M3A5 mediums produced in all; and I understand that 234 diesel
M3 mediums were issued to UK forces and the US Army used 579. I
have seen multiple photos of diesel-engine M3 medium tanks in British
and Australian service. Based on the best online and book resources
I have found I think that at best, approximately 100 diesel-engine
M3A3 and M3A5 Lee Mediums were sent to the USSR; and out of the
1,386 M3 variants sent, perhaps only 1,200 M3 series tanks actually
arrived.
It is possible that the USSR received no diesel engine M3 mediums.
I’ll say it again “it is possible that the USSR received
no diesel engine M3 medium tanks, and if the USSR received any it
was very few”. The diesel-engine variants and gasoline-engine
variants have very distinctly different engine decks and rears,
similar to the diesel M4A2 tank. Photographic evidence of M3 Mediums
in the USSR clearly show most all of them to be the initial M3 gasoline-engine
variant (represented by the Hasegawa and Mirage models). If anyone
has further information on the Soviet use of the M3 Medium please
contact me.
II. Kit Descriptions
Both
kits come packed in paperboard boxes with nice box art and the parts
sealed in clear plastic bags. Both are molded in gray injection-molded
styrene plastic. Overall molding quality is good with little flash.
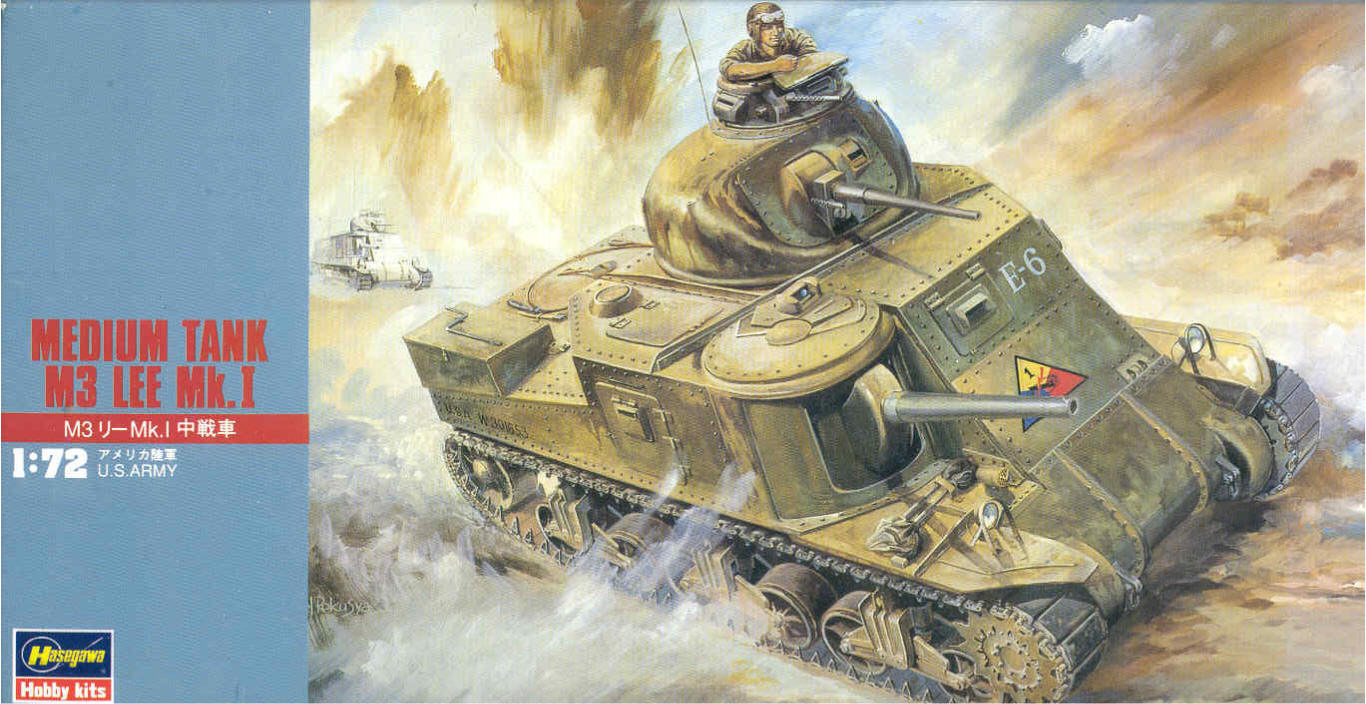
A.
The Box Art, what is supposed to be in the box

Hasegawa’s excellent box art depicts the starboard side of
a tank of the US 1st Armored Division. The tank looks to be in action
in North Afrika during 1942 or a VERY realistic training exercise.
This M3 would be typical of many of those shipped to the USSR. The
turret is the narrower cast-steel type with a cupola meaning this
is the M3 Lee version. Up on the turret we see the commander sticking
out of the rotating cupola which is armed with the 30-calibre machine
gun protruding out the front of the cupola. A co-axial machine gun
is to the left (gunner’s right) of the 37-mm M5 gun.
Down
below on the front is a short barrel 75-mm M2 main gun; to the right
of the gun we see the driver’s large visor. Atop the round
circular plate above the gun is the gunner’s sight periscope.
Behind the gunsight is a roof hatch and a mushroom ventilation dome
(the vent is not included with the model). Looking at the top and
sides of the hull superstructure are many rivets indicating this
is a riveted hull. To the rear of the gun on the side we see a side
door with visor. On the nose we see a three piece transmission (differential)
cover typical of the M3 Medium and common to early and mid M4 Shermans.
At the lower right side of the glacis plate we see two small holes
for fixed machine guns, but there are no protruding barrels indicating
the guns are not fitted.
The
tracks are the plain rubber block T-41 tracks and the early style
suspension bogies without track skids typical of M3s and many M4s.
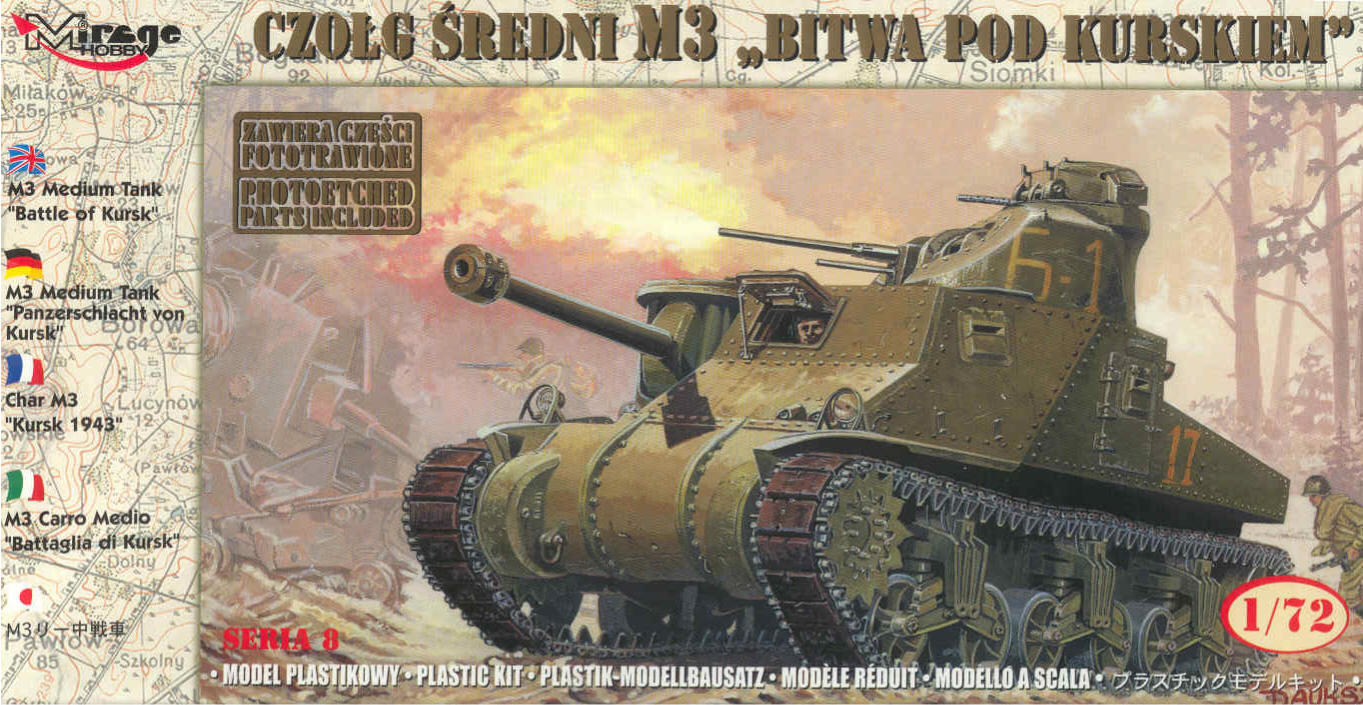
.
The Mirage box art portrays an M3 Lee variant just like the Hasegawa
box art above. Some differences from the Hasegawa box art include
the counterweight at the end of the M2 75-mm gun barrel which I
have read indicates that is has a gun stabilizer for theoretically
firing while on the move. The 37-mm gun up on the turret also has
a counterweight: that long rod directly below the gun barrel (no
this is not a machine gun barrel). The driver’s visor is open
and we can see the driver. Like the Hasegawa model the box art depicts
the T-41 rubber block track.
The
destroyed Panzer IV in the left background, a soviet infantryman
at far right and the tank markings show this to be an M3 in Soviet
service. The M3 is finished in olive drab and markings of a Soviet
Regiment.
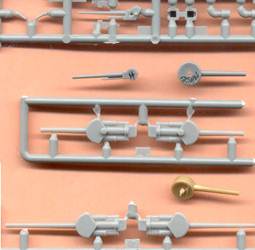
B. Mirage M3 Lee kit # 72806
-
The model has about 110 injection molded styrene parts, a small
etched-brass fret with eight parts and a sprue of soft band tracks
and single tow cable. Detail is great. A major faux pas is the
copious amount of annoying sinkholes in the superstructure sides,
storage boxes and fuel caps. These sinkholes are on both of my
Mirage M3 kits and the ones along the rivet detail will be difficult
to fix.
- Mirage
gives us three choices of main gun: the short 75-mm M2 main gun,
an M2 with counterweight signifying it is fitted with a stabilizer,
or the stabilized long M3 gun that did not need a counterweight.
The main gun can be traversed as well as elevated. A problem is
that the rooftop gunsight is supposed to traverse with the gun
barrel but cannot on the model. Both main guns have recoil cylinders
and a simple breach molded on, giving us something to see with
the side hatches open.
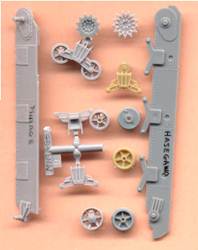
- The
Mirage roadwheels are the accurate, beautifully molded five-spoke
open wheels typical of the M3 and early M4 Medium tanks. The sprocket
wheel is an accurate fancy type, and the idler wheel looks great
as well.
- The
early HVSS bogie has twice the parts of the Hasegawa model and
looks more accurate in all aspects.
- The
rubber band type track is of the T-41 type rubber-block tracks
and has the interior link detail that the Hasegawa tracks are
missing. The track’s width, I understand, is accurate and
matches tracks in M4 kits with VVSS bogies. The Mirage tracks
can be attached with either regular model glue of super glue.
I opted for super glue in fear of accidentally melting too much
track rubber with solvent glue.
- Attached
to the track sprue is a separate soft rubber tow cable to glue
to the engine deck.
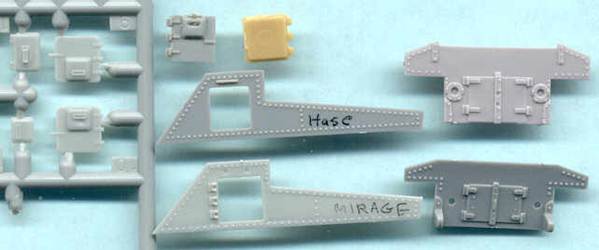
- The
Mirage tank has the choice of several rear ends, the early type
that also Hasegawa gives us or the late type rear with the air-cleaners.
The late rear plate and fittings strongly resemble the rear of
the M4 Sherman tank.
- Hand
tools are separate and look very good.
- Mirage’s
turret hatch and the two side hatches can be modeled opened though
the top hatch cannot without some cutting. The etched brass fret
has parts for the inside of the side doors and looks magnificent
when actualized.
- All
the lights look factual and the etched-brass headlight guard is
a major plus. Two styrene light guards are also offered if you
don’t like working with brass, or we can use the extra guards
to detail a Hasegawa M3 Medium.
- Model
assembly and parts fit was commendable. Pay close attention to
the assembly of the hull so there are no gaps between parts; we
want to avoid having to use and sand putty near the rivets.
C.
Hasegawa M3 Lee kit #31104/MT4 is composed of about 62
injection-molded styrene parts and two soft-plastic band tracks.
Many of the following points on the Hasegawa Lee also count toward
their M3 Grant model.
-
Hasegawa features the early engine exhaust & rear plate without
the exterior air cleaners typical of M4 mediums and late M3’s.
The visible exhaust pipes should be a larger diameter, like that
offered by Mirage.
- Overall
shape and dimensions look reasonable. The front driver’s
glacis plate looks like it should be at a greater angle from the
vertical.
- The
radio antenna pot on the left rear superstructure is incorrect
and should be more like a bowl like with Mirage’s model.
- Many
of the visors are separate but we’ll have to cut holes in
the hull in order to depict them open.
- The
side doors and the top hull hatches can be modeled open though
there is no interior detail on the doors or interior of the tank.
The top hatch is overly thick and may be replaced by a scratchbuilt
hatch.
- Hasegawa’s
hand tools and tow-cable are all molded into the engine deck,
toolboxes and fenders. They look good for molded on tools but
do not compare with well-done separate tools.
- The
Hasegawa sprocket wheels are the simple plate type, but are missing
the outer ring of bolts.
- The
roadwheels and idler wheels match no M3 or M4 medium wheels produced.
The kit instructions show five-spoke open roadwheels, which is
accurate. The kit actually gives us five-spoke solid roadwheels
instead, though the only solid roadwheels used by some late M3
mediums have six-spoke wheels. The roadwheels are too large in
diameter.
- The
all-steel idler wheels should also be solid six-spoke or open
five-spoke wheels. The idler and the rim are too thick, looking
more like rubber-tired wheels than steel idler wheels. [Revell,
Trumpeter, or Italeri five-spoke open roadwheels, sprocket &
idler wheels are reasonable replacements for the Hasegawa wheels.
Several after-market resin wheels are available also.]
- Rivet
detail is good and mostly complete.
- A
short, M2 75-mm main gun is offered, without an optional counterweight.
Shape is good and the muzzle will have to be drilled out. The
main gun can be elevated but it cannot traverse.
- The
Hasegawa kit tracks are a millimeter or two too narrow. These
T-41 type tracks have decent outside detail though no inside detail
and are a bit too narrow for the roadwheels (or the roadwheels
too wide?). [As my Mirage M3 Grant kit will have resin aftermarket
WE210 tracks I used the spare Mirage T-41 tracks on the Hasegawa
model.]
- Two
decent, but not great, American tanker figures are given.
- The
VVSS bogies are simplified and appear to be designed for easy
assembly rather than for the highest accuracy (not necessarily
a bad thing).
- There
are no taillights in the kit. The headlights are simplified so
I recommend they be redone for a display model. A headlight guard
can be taken from an M4 brass detail fret, or if you have a Mirage
M3 kit a plastic and etched brass light guard. Wiring for the
lights is also something to consider.
- Markings
for three US Army tanks are included.
- Sand
skirts and British-style M3 Grant fenders are included. I was
ready to state that I have never seen this style of fenders and
sand skirts on an M3 Lee in US Army use {It takes more than changing
the turret to make a British Grant into an American Lee.} In a
biography of the US 1st Armored Division I have, however, found
one 1942-period Time-Life photo of one US M3 Lee in North Africa
with this type of sand skirt! However its markings do not match
those of Hasegawa’s decals so I feel vindicated.
- No
photo-etched parts are included (as with the Mirage M3 kit) and
I am unaware of any aftermarket detailing sets for the 1/72 scale
M3 Medium at the time I wrote this review (too bad).
- The
M3 Lee turret is decently shaped. We have to add a gun-sight port
to the left of the 37-mm gun. Under the 37-mm gun is a rod for
a counterweight, this is not a machine gun. The machine-gun cupola
can be posed in 360-degree rotation and with the commander’s
hatch open. The machine-gun cupola will need a gun sight and is
missing several side fittings (see references for details).

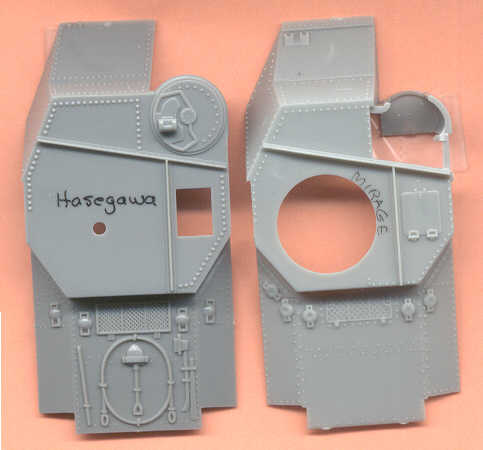
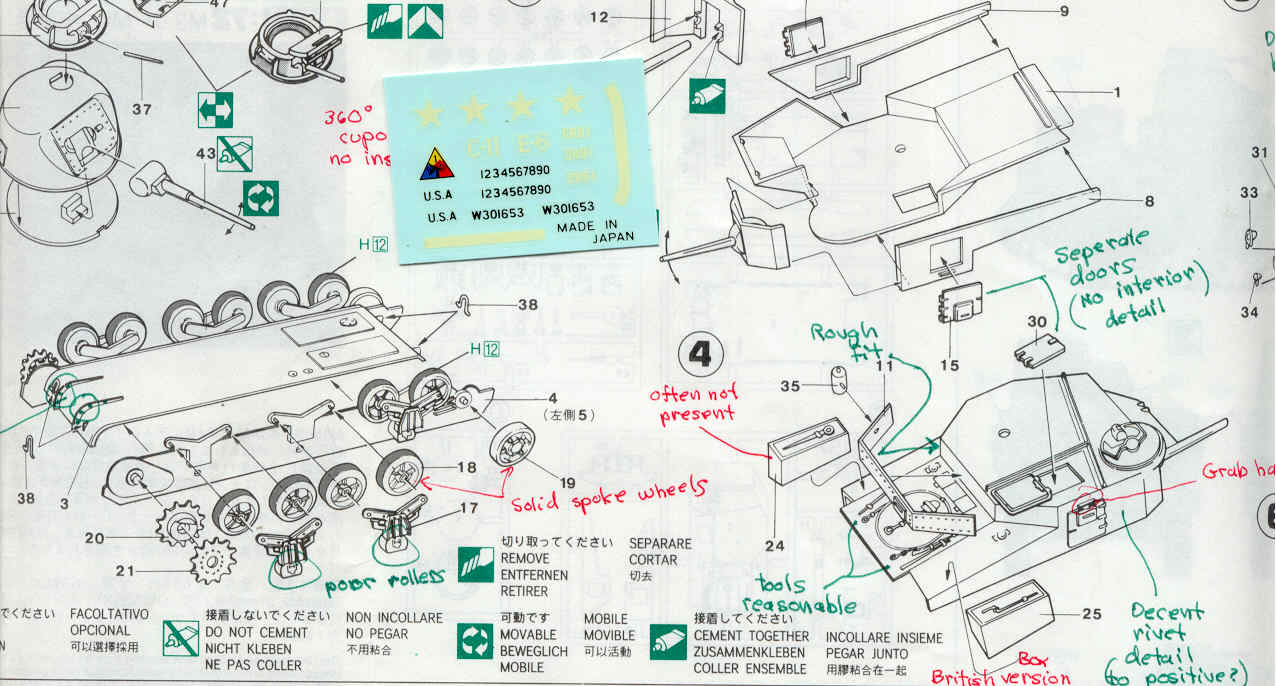
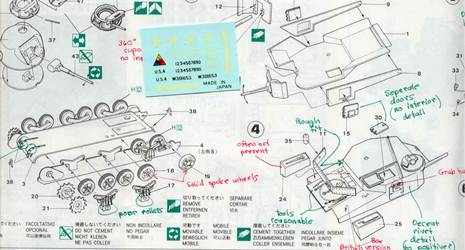
Above is a scan of the Hasegawa and Mirage M3 superstructures, with
the petrol-engine, deck common to both their Grant and Lee versions.
Both superstructures have similar dimensions and angles except for
the front upper glacis plate where the driver’s visor is:
Mirage offers a less vertical plate which looks more correct.
The roof hatch on the Hasegawa hull is open but the hatch underside
has no detail if you do model it opened. Mirage gives us more accurate
bow machine gun ports visible on the front left of the glacis. Notice
that the Hasegawa engine deck is missing one fuel filler cap on
the port side. Note also Mirage’s sink holes on the fuel fill
caps. Both hulls are missing the ventilation domes on the roof common
to late production M3 Mediums.
Both kits represent initial or early M3 Mediums as neither hull
includes the mushroom ventilation domes of the middle and late M3
Mediums nor the second roof hatch over the driver’s area which
replaces the deleted side doors.
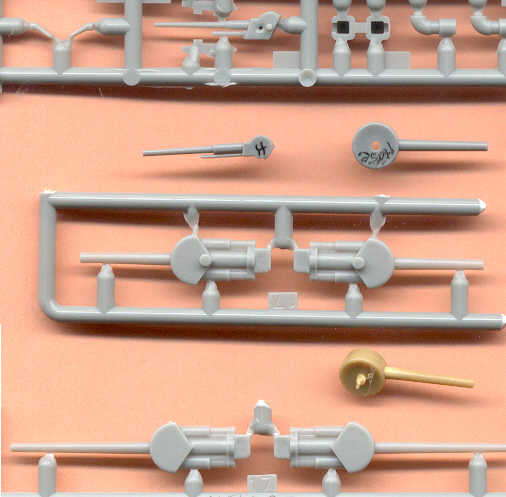
The Hasegawa main gun is the shorter M2 75-mm main gun without a
breach. Mirage offers a choice of long M3 or short M2 75-mm gun
with or without counterweight, both with the gun breach and recoil
cylinders.
Mirage’s superstructure sides, doors and rear are comparable.
Mirage gives us a more accurate rear plate (top) and side doors
(far left) though both the side plate and the door visors have vexatious
sink holes.
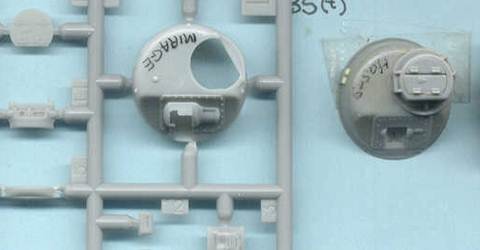
Above, Mirage offers us a more accurate Lee turret and gun mount.
Dimensions are about the same for the Lee turrets though the Mirage
gun mantlet is more correct.
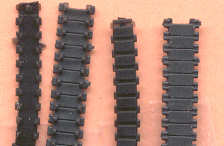
The Hasegawa T-41 type tracks have no inside link detail and are
too narrow but are one of the correct types for an American M3 Lee.
Additional aftermarket tracks are offered in resin from MR Models,
and as an etched brass conversion set from Mirage. For both my M3
Medium models I chose to use the Mirage track which was found to
fit better over the Hasegawa roadwheels but an ESCI sprocket was
needed because of the additional track width. A half of a link to
a whole link was cut off each track for better fit. Remember that
these are “live tracks” and would have little or no
sag.
Other
track styles used on Soviet M3 Mediums are the T51 flat rubber block
type which look like T41 but are thicker and non-reversible. I have
not seen any other types of track in photos of Lees in Soviet use,
but there is an M3 Lee on display at the Kubinka Museum wearing
the all steel T49 track but I am guessing this track was originally
from an M4A2 Sherman ‘Emcha’.
The Hasegawa VVSS bogies, at above right, have one of their four
parts molded onto the hull side. The five-spoke roadwheels are not
open and too large. At least one builder I know has substituted
spare roadwheels from a Trumpeter or Eduard M4 kit. Notice that
parts of Hasegawa’s bogies are molded onto the hull side (at
far right). Hasegawa’s M3 suspension was state of the art
when released years ago but its not up to today’s standard.
Mirages
M3 bogies consist of six well molded parts with correct, 5-spoke
open roadwheels. Mirage gives us a nice fancy cast sprocket while
Hasegawa gives us simplified, plain-style sprockets. Notice also
that the Hasegawa return roller has no detail on the back side.
Mid and Late M3 Mediums could have the 6-spoke solid roadwheels
but I’ve never seen these on WW2 period photos of Soviet M3s.
III.
Kit Instructions & Kit Markings
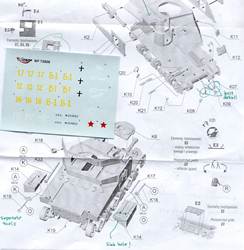
Above are instructions and decals for Hasegawa’s M3 Lee model.
Instructions are clear and sequential. Water slide decals are for
three US Army tanks and are sharp, and in register. I could not
locate the origin of any of these markings though I think two of
the markings are for US 1st Armored Division tanks in North Carolina.
Even though hatches can be modeled open there is no interior detail.
Above is a scan of Mirage’s decals from the Kursk issue of
their M3 kit, and part of the kit instructions. Mirage offers markings
for six M3 Medium tanks: four from the Soviet 193rd Independent
Tank regiment or 241st Tank Brigade, and two captured M3’s
in German markings, very nice!

Above are the Lend Lease water slide decals (sheet No. D72001) offered
by ACE Model Co. covering a wide assortment of British and American
AFV’s Lend Leased to the USSR, including four M3 Lee tanks.
I find it interesting and odd that the markings for the Soviet 193rd
Independent Tank Regiment in Ace’s decals are white, yet the
same markings on Mirage’s decal sheet are yellow. In the black
& white photos the markings look to be white which is very common
for Soviet WW2 markings.

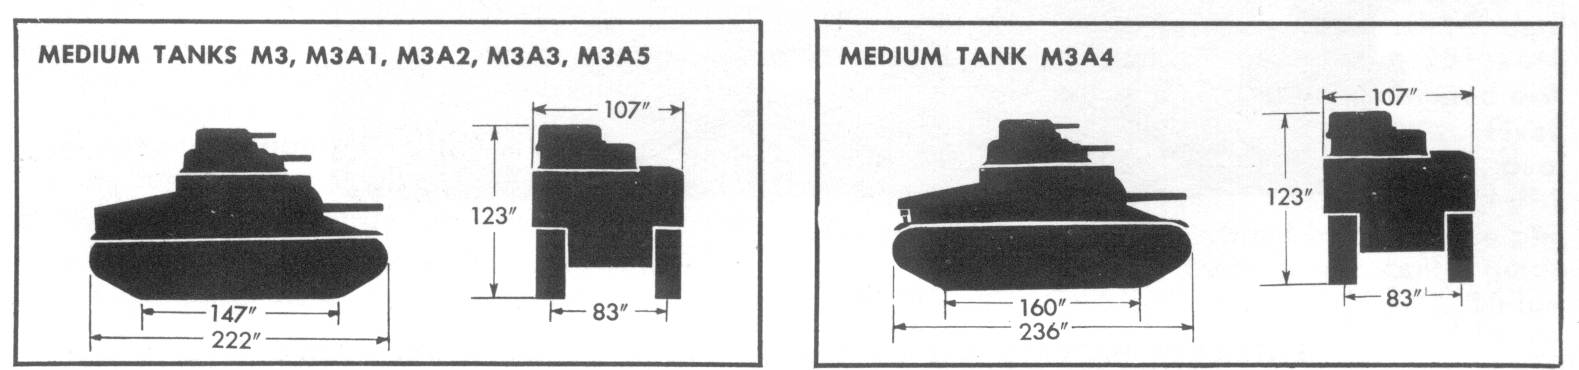
From a US Government publication I copied this profile of the M3
Lee Medium of tanks to help us in measuring the kit scale. To convert
these to a 1/72 scale M3 tank, divide by 72 and convert to millimeters
for convenience. For example: 222-inches/72=3.083-inches which converts
to 78.3158-mm. So the overall length of the M3 and M3A1 Medium with
the M2 gun in 1/72 scale is 78.8-mm. Then compare this with our
completed Mirage or Hasegawa model.
IV.
The Assembled Models
Despite
my conviction that few to none diesel-engine M3 Medium tanks were
received by the USSR, I opted to build one anyway, as a welded hull
M3A3; side by side with the more common M3 tank.

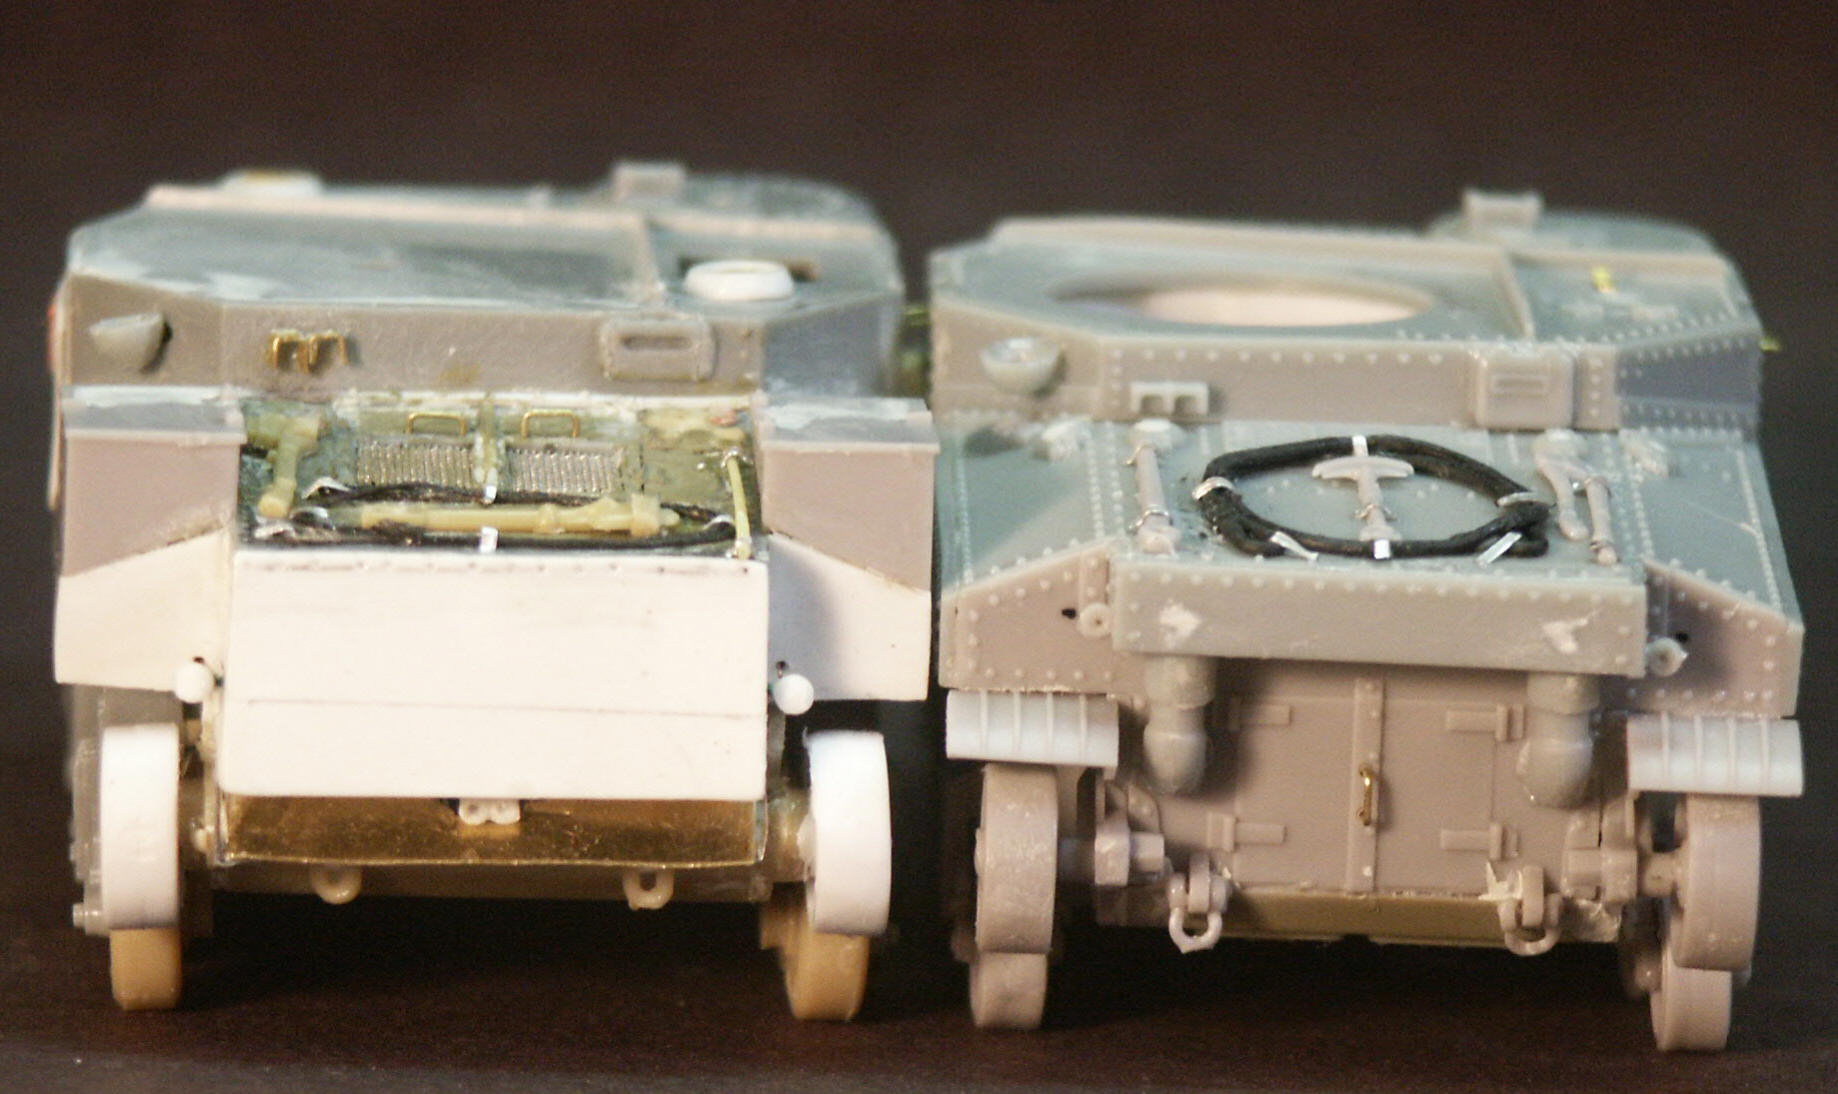
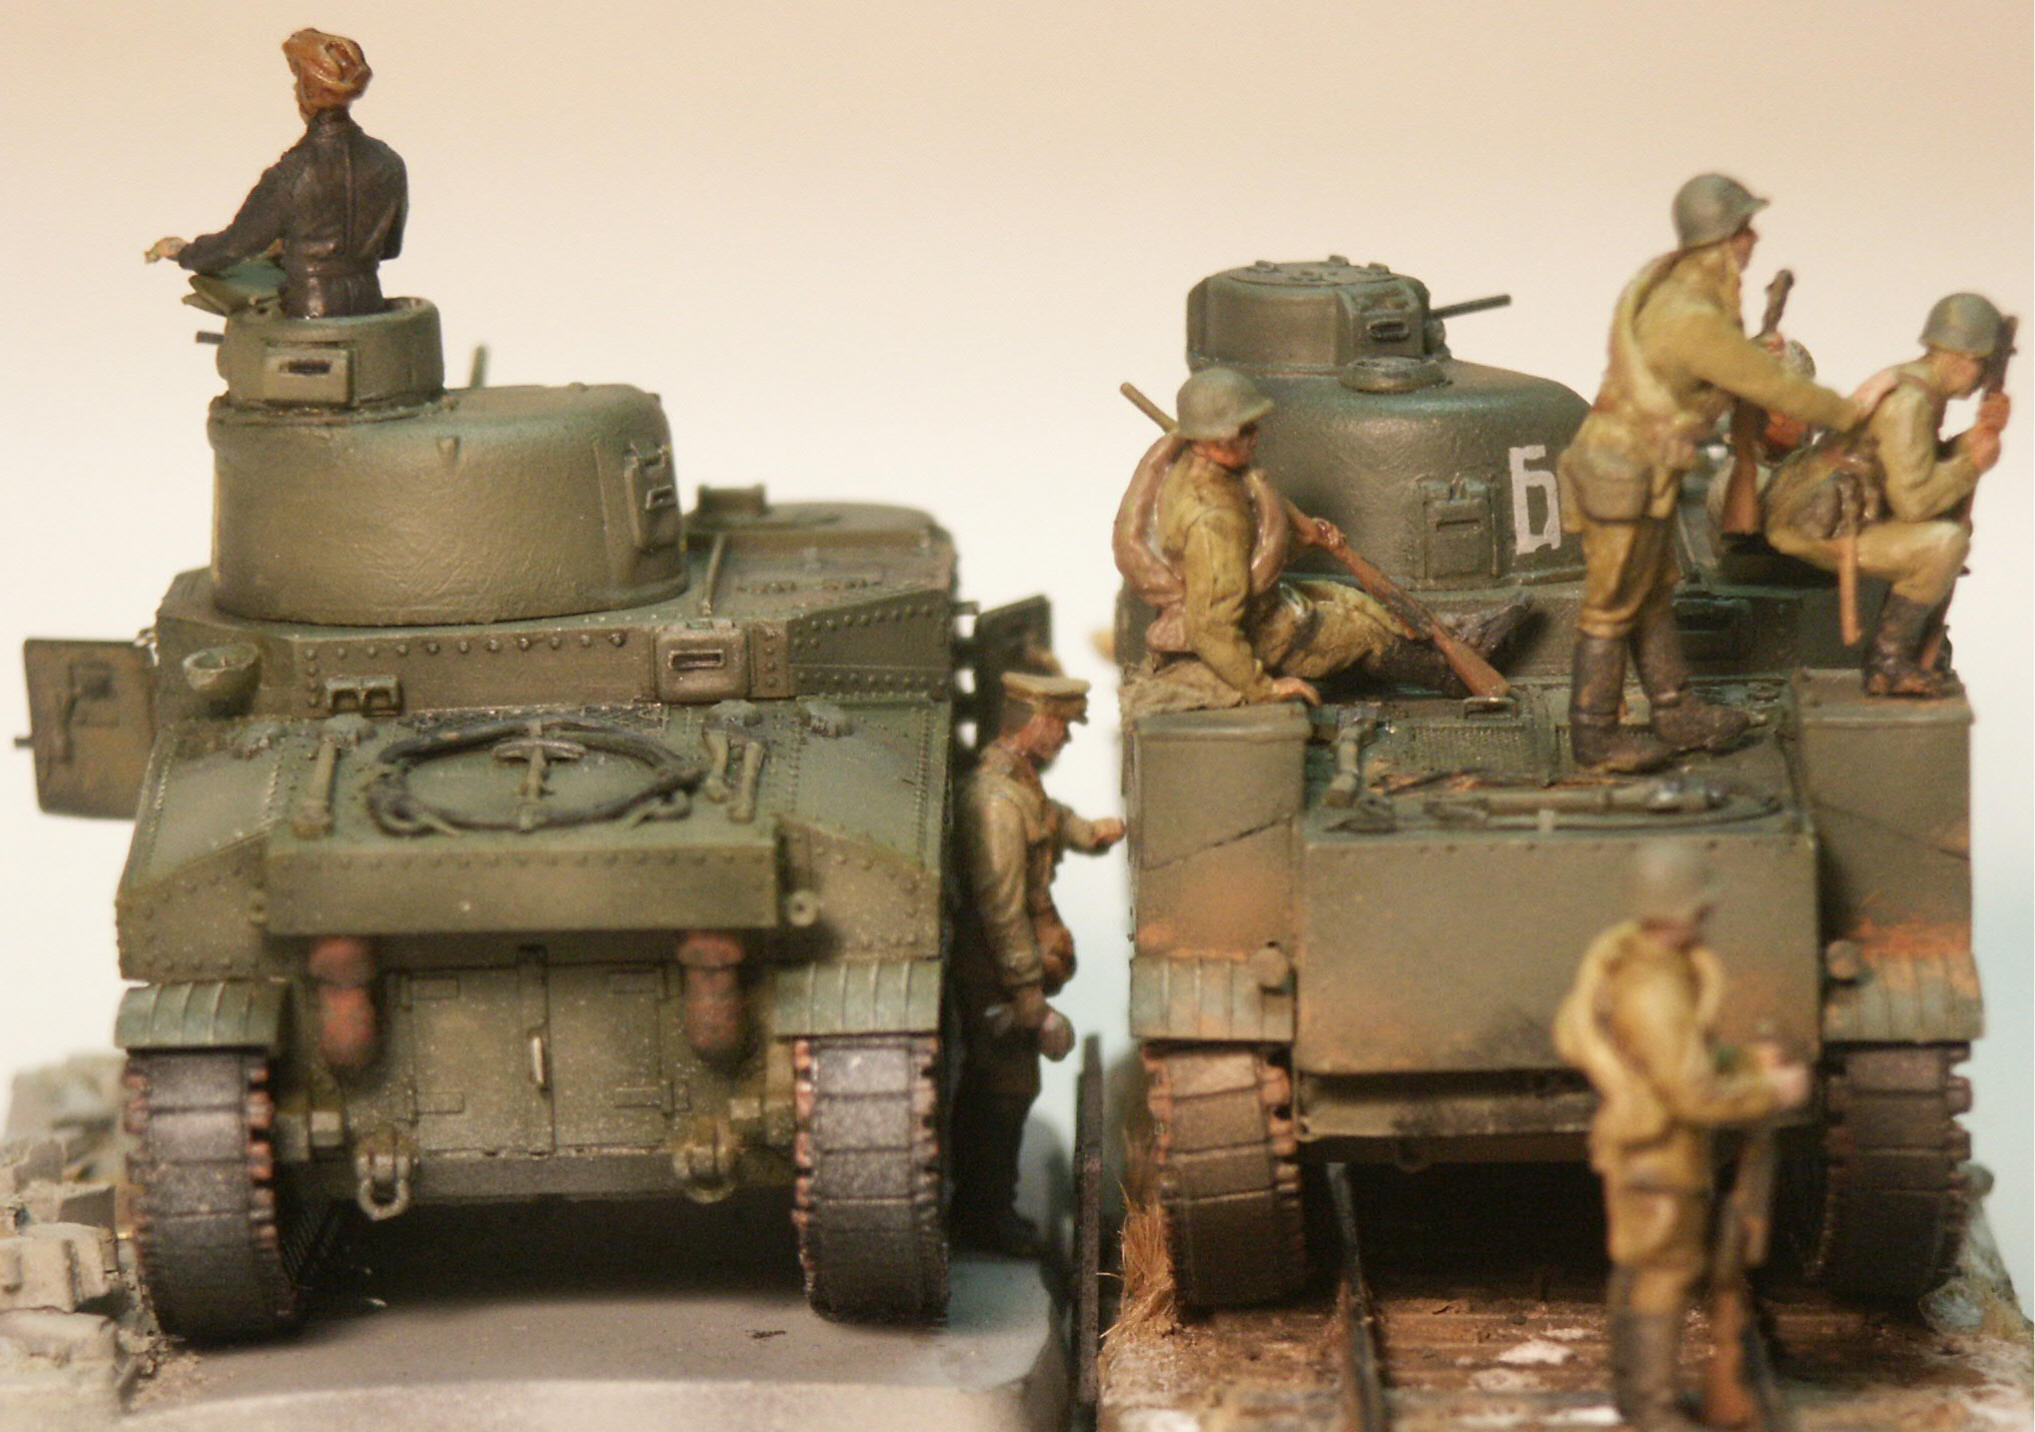
Above is the stern of both models which are a good representation
of the major differences between the diesel-engine and the gasoline-engine
M3 variants. At left is the Hasegawa M3 model altered into a diesel
engine & welded hull M3A3. Having the same engine and similar
engine deck to the M4A2 medium tank this scratchbuilt conversion
was made using references in Squadron’s book and from the
web. The rear plate was extended down, an exhaust-deflector made
from brass-sheet and a muffler replicated, taillights scratchbuilt,
the engine-deck’s surface detail was scraped off and a new
wire mesh grill fabricated and installed.
For a welded M3A3 most of the rivets were scraped off the Hasegawa
hull and weld seams were scribed in. The welded M3A3 still had some
rivets: on the engine deck, next to the driver’s visor, and
on the starboard side and on the roof of the superstructure. At
the top of the rear plate we can make out tiny holes for small bits
of copper wire to replicate rivets or screws. I suspect screws or
bolts as a photo I have shows an M3 engine under repair and this
rear plate appears to have been removed. The spare Mirage storage
boxes replaced the Hasegawa storage boxes on the engine deck.
At
above right is the Mirage M3 Medium built pretty much out of the
box. Some brackets were replicated with brass for the two cable
and hand tools on the engine deck. Brass-wire handles were attached
to the rear engine-door and over the side doors. I think Mirage’s
rubber tow cable is a bit too thick but used it anyway. The hand
tools are great. No storage boxes were used on the Mirage M3 engine
deck as seen on several Soviet M3’s in photos and the particular
Soviet M3 I chose to model. Mirage’s brass engine screen was
not used as it appeared too coarse and the molded-in screen was
more to scale (I probably should have cut it out and scratchbuilt
a new one? Oh well.).
A.
The Hasegawa M3 Lee Model

Above is the left side of the Hasegawa M3A3 conversion. M3A3’s
and late M3’s often had the side doors welded shut (as shown
here) or totally deleted, with or without the viewport. Ventilation
domes for the model, like those used on M4’s, were scratchbuilt
for the turret roof, over the driver’s area, and behind the
main gun. Gray styrene parts from Hasegawa’s Lee model kit
and tan parts from Hasegawa’s Grant kit contrast and better
show the different parts.
The
original Hasegawa roadwheels are used though a Revell M4 idler wheel
is substituted. The M3 VVSS bogies by Hasegawa are very simplified
as I have already mentioned above. The next time I build this kit
I will detail the bogies better. The mounting for the sprocket wheel
has been cut off for a substitute sprocket from another model kit
wide enough for the Mirage tracks.
On
the bow bolts were replicated on the three-part transmission armor.
Hasegawa gives us poor headlights so new ones were scratchbuilt
from sprue and spare plastic headlight guards taken from the Mirage
model. A file has thinned the leading edge of the mudguards (fenders)
to make them more realistic.
Rather
than the Hasegawa M2 75-mm gun, the spare Mirage M3 gun was later
used to match the particular vehicle I was modeling. Fit of the
Mirage gun into the Hasegawa mantlet was perfect. [I have no photos
of a Soviet M3A3 so this vehicle is pure conjecture.]

Here is another view of the rear of the Hasegawa M3A3 conversion
with a better view of the scratchbuilt engine deck for the diesel
engine and new positions for the handtools. Visible next to the
turret 37-mm gun is the long barrel of the coaxial machine gun.
Notice there is no long rod shaped counterweight under the 37-mm
gun like with the Mirage model. Whereas the M3 rear plate is vertical,
the larger rear plate of the M3A3 and M3A5 are angled out.

The left side of the completed Hasegawa M3A3 conversion with some
1/72 scale tank riders from Preiser company. I like the look of
the welded hull, an easy conversion. An unditching log is tied to
the bow. The Ace markings for the Soviet 193rd Independent Tank
Regiment, vehicle 21, have been used and applied well. Being a late
production M3A3 it would have been okay to add a hatch over the
driver area.

Another view of the Hasegawa model M3A3 conversion showing the gun
mount, no starboard side door but a visor still present. The very
front of the fenders has been cut back. Looking at the suspension
bogies here and comparing them in the photo of the Mirage model
below, I regret that I did not spend a little time detailing these
Hasegawa bogies.

A view of the starboard side of the M3A3 model shows the lack of
rivets compared to the M3. On this side the side hatch has been
totally deleted but the pistol port and visor has been installed.
The longer 75-mm M3 gun barrel shows well here. The Mirage tracks
I used on this Hasegawa model look good but the overly large solid
roadwheels detract from the model as a contest winner. An interesting
thing I’ve noticed is that the small visors on the machine
gun cupola look just like the direct vision driver visors of the
early M4 Shermans.

This is a good view of the engine deck modified to represent the
diesel-engine M3A3 or M3A5, with the larger air intake screens more
centrally located than on the gasoline-engine M3 and M3A2.
B.
The Mirage M3 Lee Model

Above is the mostly assembled Mirage M3 Lee model. The brass headlight
guard is from the kit’s brass fret. The commander’s
hatch was cut in half and folded open. The kit builds very well
and is superbly detailed so needs little extra detailing. Be careful
to fit and hold the superstructure sides together carefully to insure
no gaps!

The rear of the Mirage kit prior to painting: some white filler
putty and the separate hand tools on the engine deck are visible.
The suspension looks very good, significantly better and more accurate
than the Hasegawa model. I built a rudimentary interior since the
side hatches are molded open, unfortunately I do not have any photos
of the interior before I glued it together. A little part of the
turret basket is visible though the open side door. The grab handle
over the door was made with brass wire rather than using the plastic
kit part.

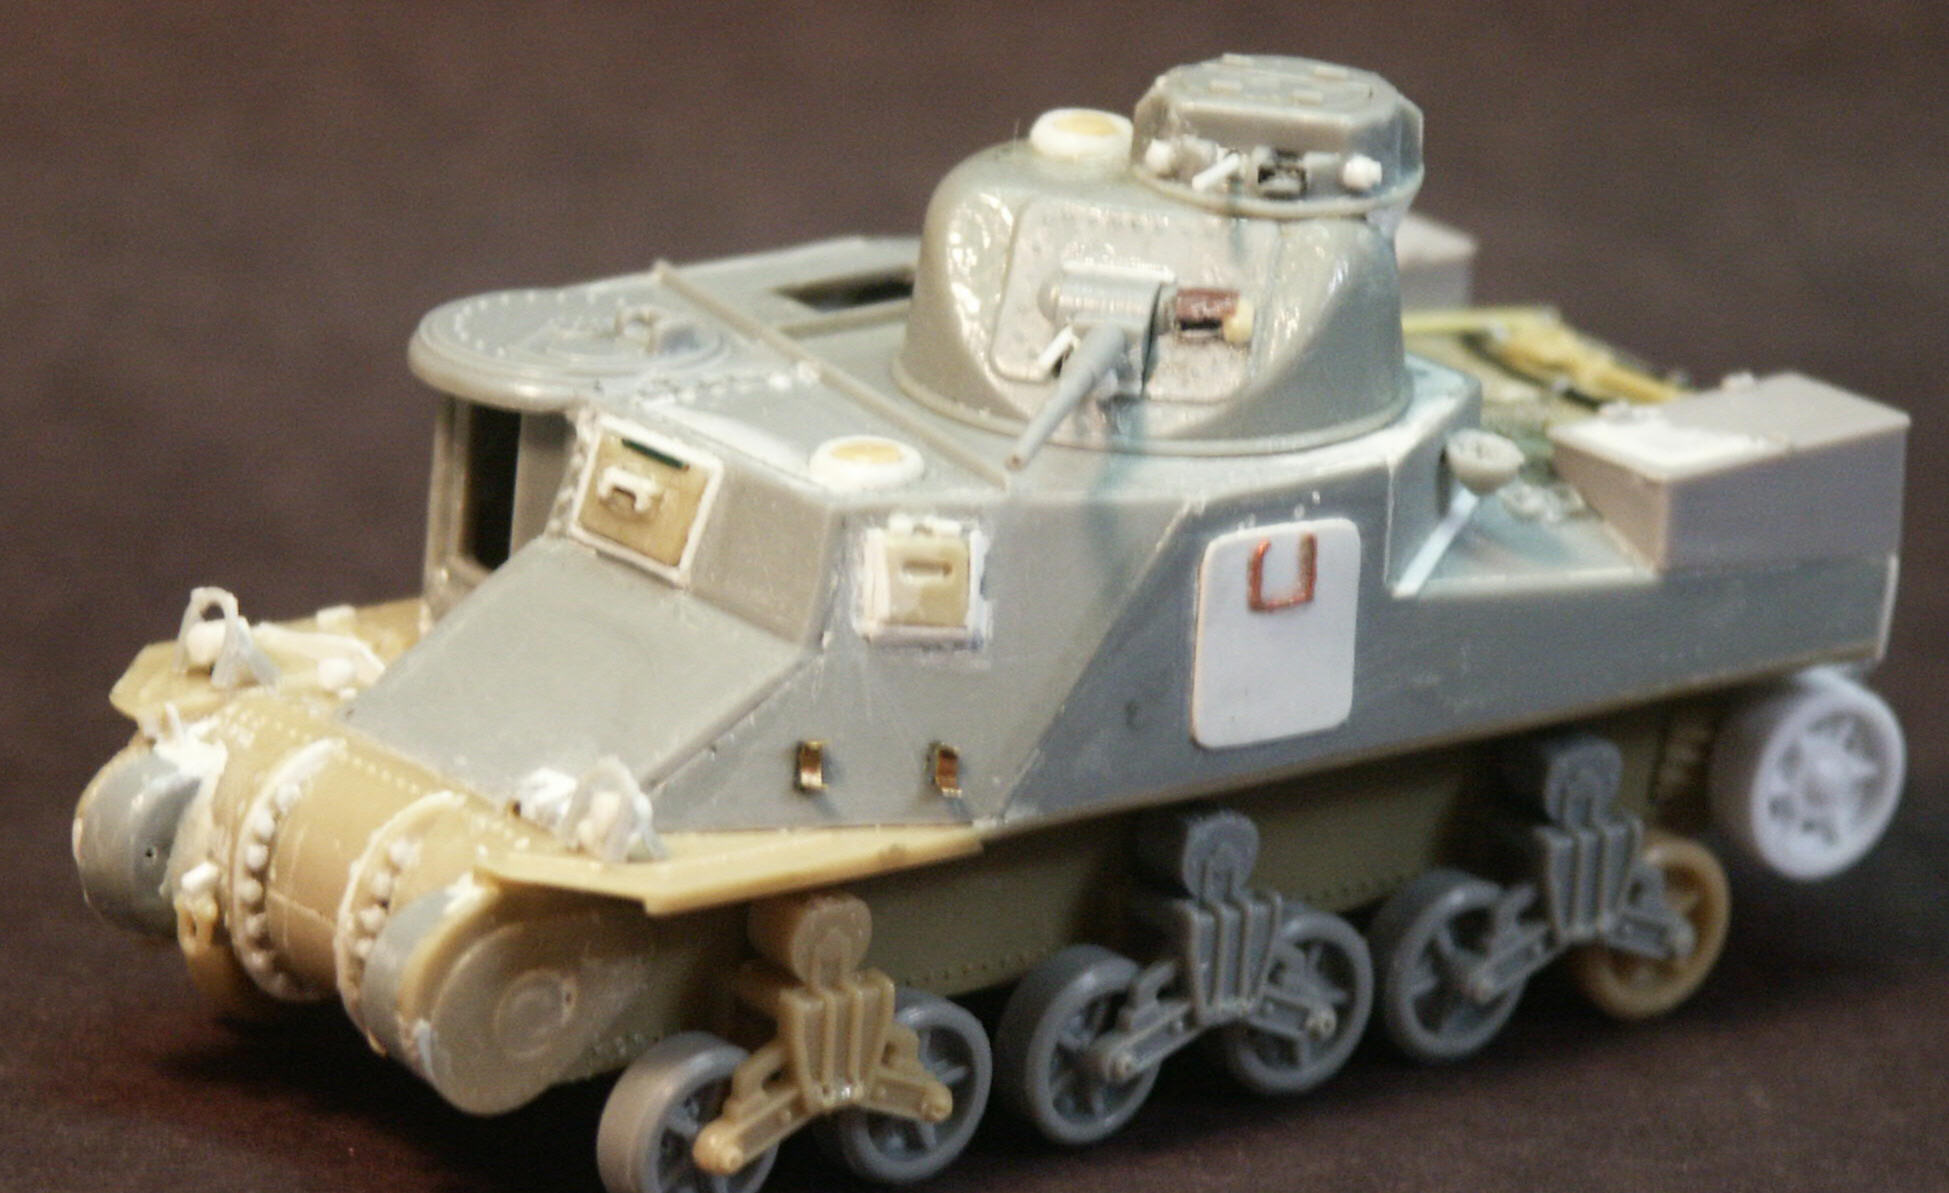
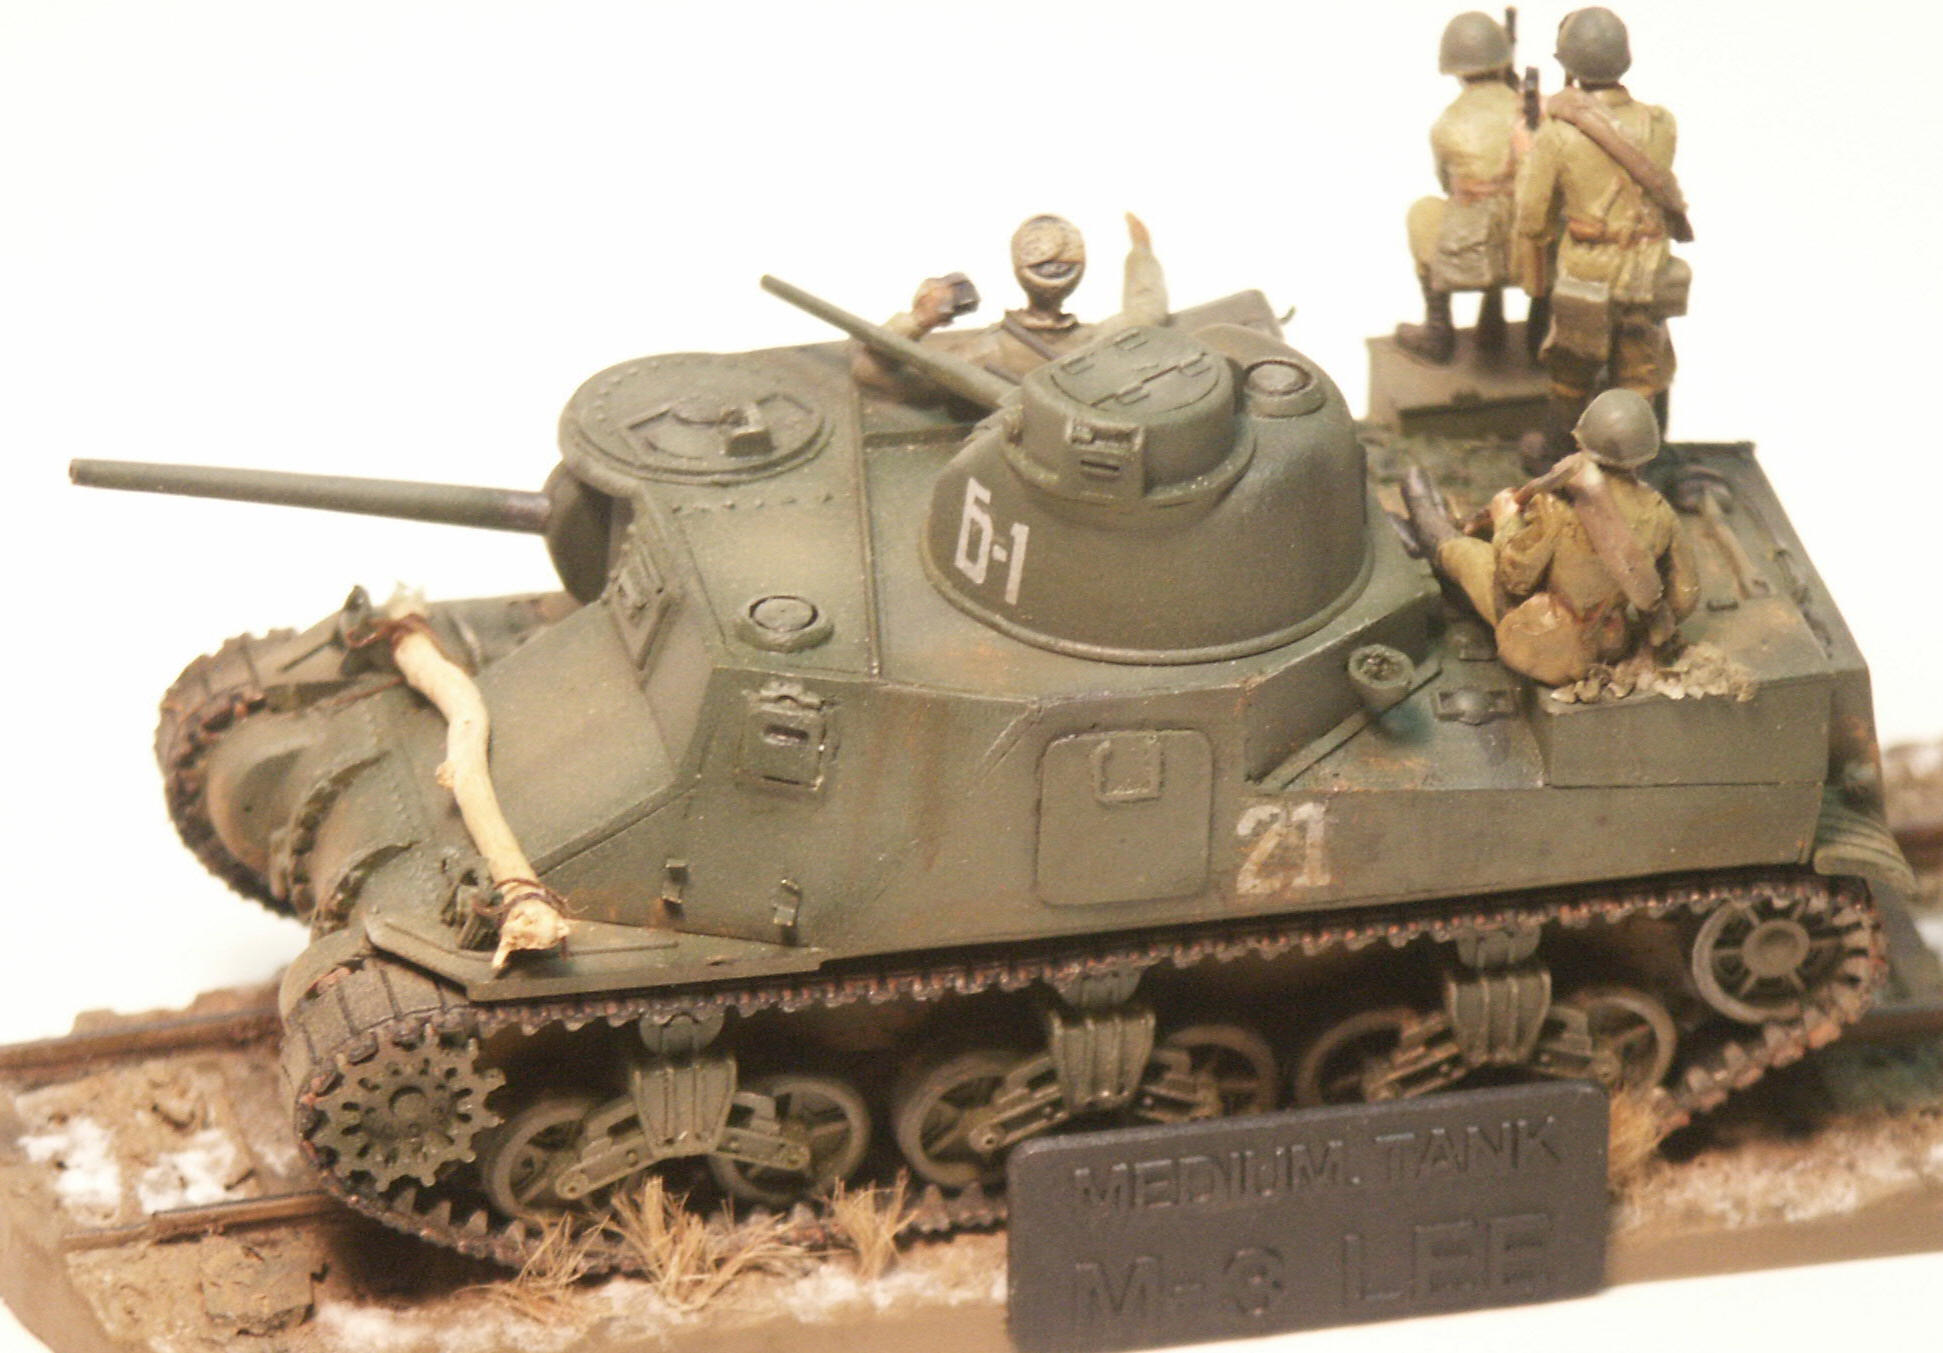
Mirage M3. The Mirage decals for tank 17 of the Soviet 193rd Independent
Tank Regiment seen at the Kursk battles in 1943. The decals settled
onto the model well over a coat of gloss acrylic, decal solvent
and then clear dullcoat. The number and quality of the rivet detail
stands out. The 1/72 scale figures are from Preisser

From the lack of roof ventilation domes this is an early M3.

The completed models, a stern view. With the Mirage M3 at left is
a good view of the pepperpot exhausts of the M3 and how the rear
plate differs from the large rear plate of the M3A5. Later M3 tanks
had external mounted air cleaners and fishtail exhaust pipes. I
apologize that the photo is a little crooked. Looking at these from
a judge’s point of view: the Hasegawa M3A3 has a crooked left
suspension due to poor line up of the idler wheel with the roadwheels.

V. Conclusions
The
Hasegawa M3 model shows its age but has the plus of overall correct
dimensions, easy assembly, and durability for wargaming and good
looks. We have a choice of building it as is and make a fine beginner’s
or wargaming model, or proceed with a whole slew of modifications
to bring it up to present day display standards.
The
Mirage model is more complex yet superior in all other aspects and
produces a more accurate replica. Though more expensive it is a
great kit of a fascinating AFV; I urge and look forward to additional
releases such as the M3A1 and the M31 armored recovery vehicle they
have indicated they would release; please. At this time I’ve
found no etched brass other than that included within the kit. Mirage
does sell a resin aftermarket conversion for a Canadian M3 Lee Mk.I
stowage set, but no other conversion or aftermarket details I know
of. Resin details for the M3 Medium, like a full interior, is something
I would love to see.
An
unresolved issue with Mirage M3 kits is inconsistent quality control.
Some Mirage M3 kits have prominent sink holes and several I purchased
came packed with the wrong turrets and missing the etched brass
parts. Mirage so far has not responded to an e-mail on this.
VI. References
- BRITISH
AND AMERICAN TANKS OF WORLD WAR TWO, Peter Chamberlain and Chris
Ellis. Cassel & Co., (2001). A great reference book on most
all of the tanks and many other AFV’s used by the American
and UK forces.
- Gunpower
32 M3 Lee/Grant Vol. 1, by Patryk Janda, A J Press., ISBN 078 83
7237 203 1. This is one of the best references on technical details
of the M3 Medium tank.
- M3
Lee/Grant In Action, Armor Number 33, by Jim Mesko & Don Greer,
Squadron Signal Publications (1995). A good and inexpensive modeling
and historical book on the M3 Medium tank.
- Russian
Battlefield website. An excellent website on Soviet AFV’s
and combat during World War 2. (Though I disagree with the information
on the variants of M3 claimed to have served with the Red Army.)
http://www.battlefield.ru/lendlease/index.html
(Ed. note: the site seems to be down.)
- Military
Miniatures In Review (MMIR) Magazine, Volume 2, Number 2. The Sherman
Tank: A Fragmented Look. Part 2a: M3 Glacis Armor. A great article
that came out about 10 years ago if you are lucky enough to find
it.
- http://users.swing.be/tanks.tanks/complet/526.html#594
Encyclopedia of the Tanks of World War II Home Page. Yet another
very good website on the AFV’s of major combatants of WW2.
(Ed. note: the site seems to be down.)
- http://www.smallafv.nn.ru/inbox/hasegawa_lee.html
An in-the-box review of the Hasegawa M3 Lee Model in Russian.
- http://www.smallafv.nn.ru/museum/museum_m3lee.html
A well assembled Hasegawa M3 in Soviet markings at the same Russian
website as above.
-
http://www.onthewaymodels.com/reviews/Hasegawa/mhatchM3rev.htm
Michael Hatch’s assembled Hasegawa M3 Lee.
- http://www.onthewaymodels.com/reviews/Mirage/M3Leeprev.htm
Doug Chaltry’s review of the Mirage M3 kit and the WE210 tracks
conversion accessory.
- http://www.toadmanstankpictures.com/grant.htm
- http://www.toadmanstankpictures.com/m3a5_lee.htm
|