Sturmgeschütz
III Ausf. G Sd.Kfz. 142/1
A Compare & Contrast Building Review
 vs
vs 
I. Introduction To
The Models
(The goal of this review is to compare and contrast the two
Sturmgeschütz Ausf. G kits for accuracy and ease of assembly.)
These two 1/72 scale
models are, at this time in 2008-2009, the most current and up-to-date
releases of Germany’s World War 2 Sturmgeschütz assault
gun. Soon we will have Trumpeter’s interpretation of the Sturmgeschütz
III G but that will have to be the subject of a future review. Both
represent the Ausführung (Ausf.) G, the final version
of the assault gun, which in 1944 was much more used in the role
of tank destroyer (Jagdpanzer). In its evolution it had started
with a short, low velocity 75-mm gun designed for infantry support.
By 1942 it had been modified several times and upgraded with a long
75-mm L/43 (43 calibers long) Sturmkanone 40 gun, then
soon after a 48-caliber (L/48) long gun similar to that in the Panzer
IV.
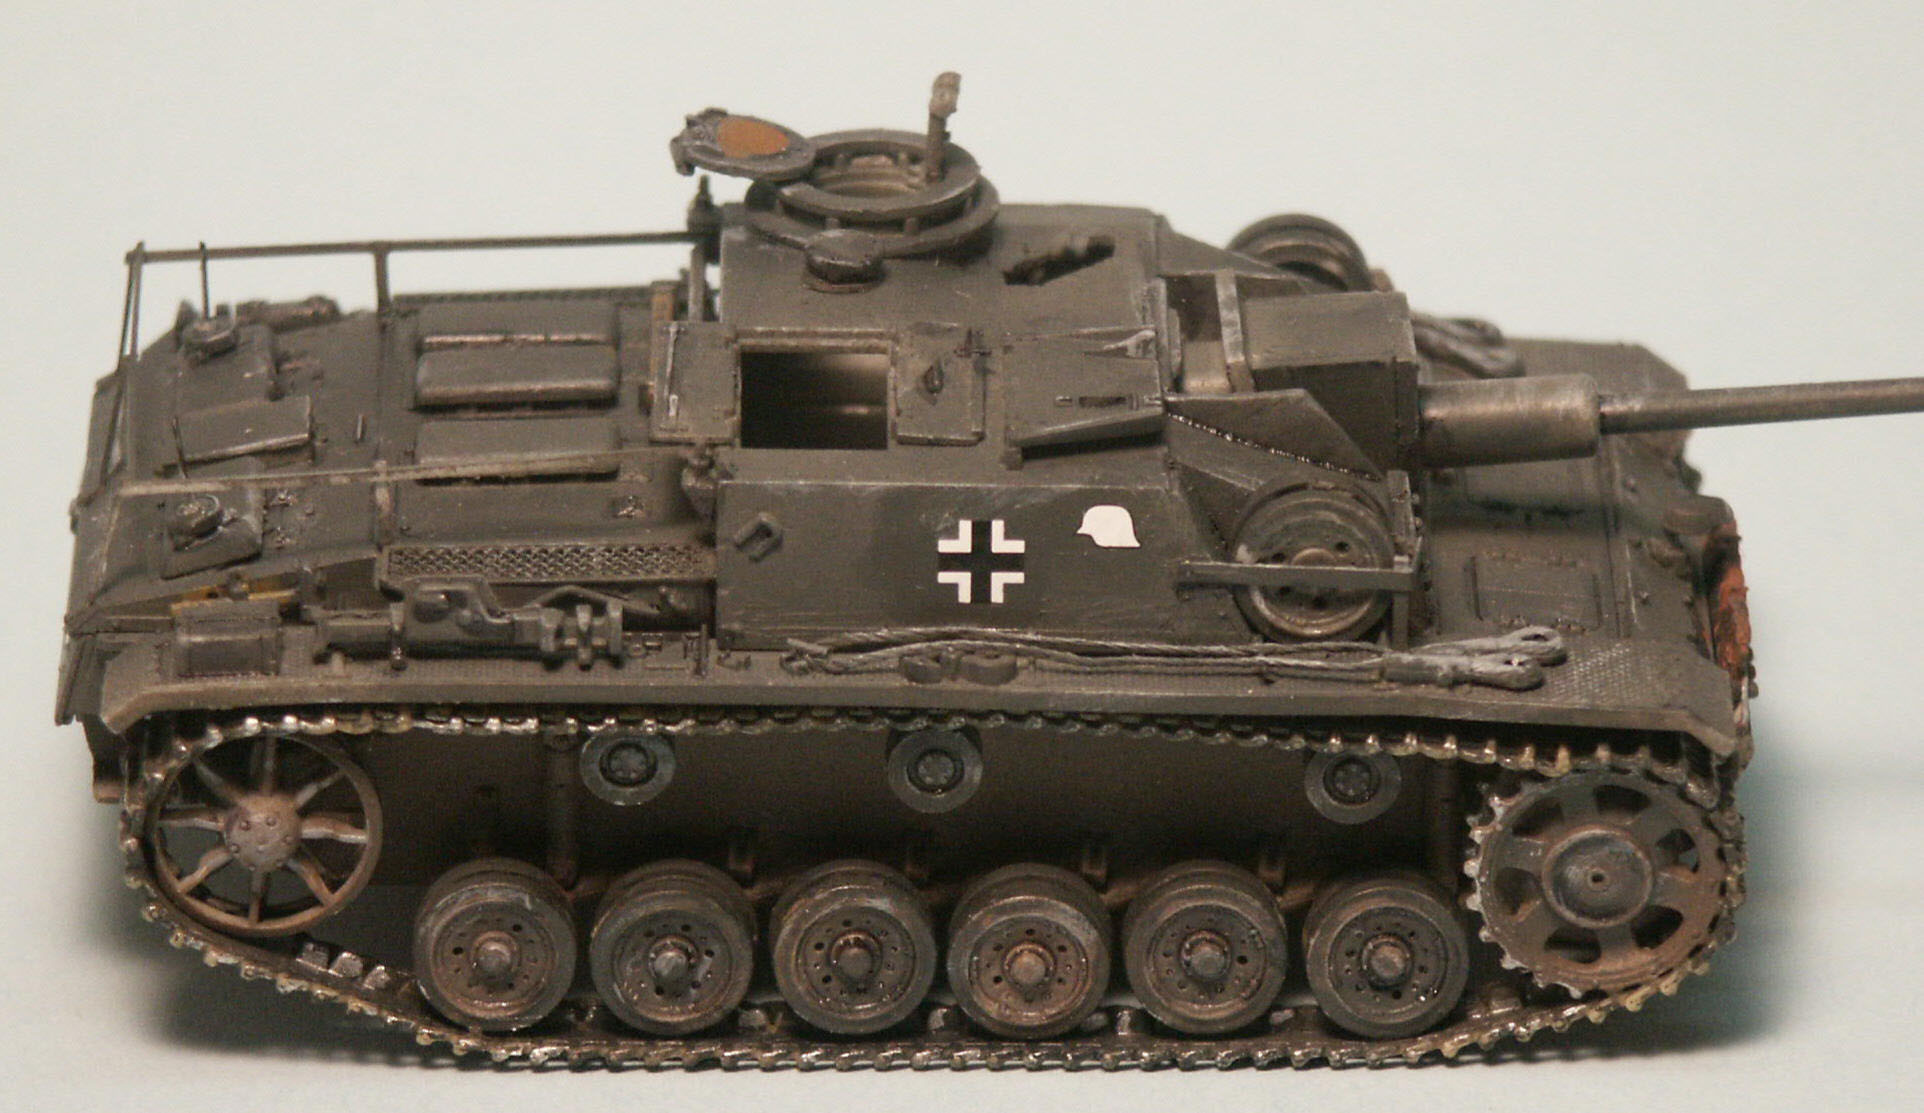
a) Revell Sturmgeschütz
III late G
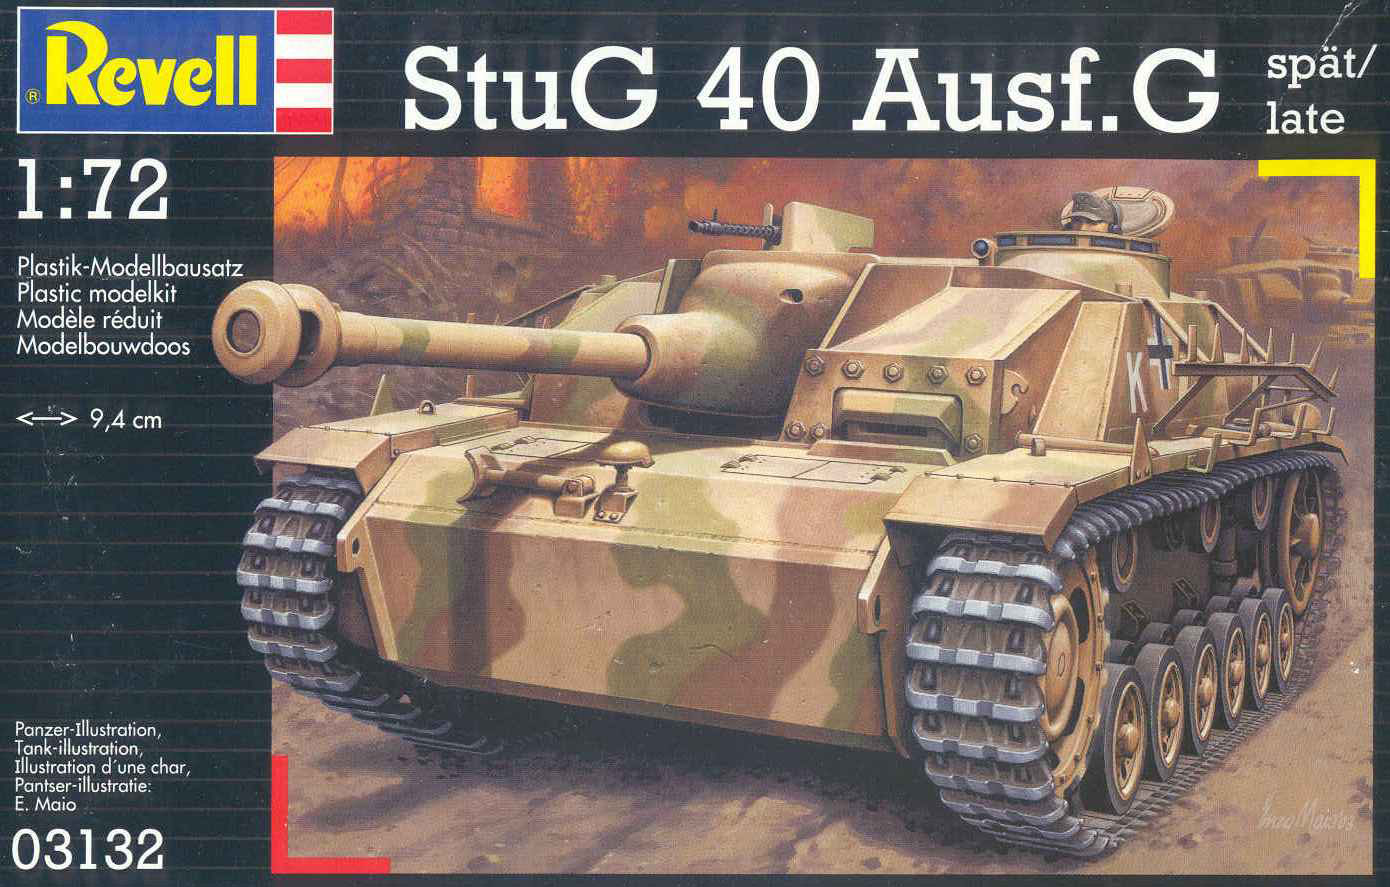
The first thing you may notice here
is that Revell refers to their kit as a StuG 40 Ausf. G, rather
than a StuG III Ausf. G. What I have read is that StuG 40 was the
initial reference for the long gunned Sturmgeschütz based on
the use of the Sturmkanone 40 (StuK40) main armament; StuG
III was used later to differentiate the StuG III from the StuG IV
that also used the StuK 40 gun.
This is a very late version of the StuG III with most of the features
of the final production batch. The gun mantlet (mantle) is the cast
Topfblende (a.k.a. Saukopfblende or pig’s
head mantlet) introduced in November 1943. In the mantlet we can
see a small hole for the coaxial machinegun introduced after October
1944. The bow armor is the 80-mm plate without bolted or welded-on
supplemental armor; there is still bolted-on armor around the driver’s
visor. On the bow we see a travel support for the gun barrel next
to the Notek light. We see no large MG34 gun shield on
the rooftop, but a Rundumfeuer 360-degree rotatable machine
gun mount controlled from within the vehicle. What we cannot see
is the Nahverteidigungswaffe (close quarters defense weapon)
on the rooftop; that appeared in May of 1944 and projected smoke
grenades or anti-personnel explosive grenades.
In the box-art we see the Schürzen side-skirt mounts
but no Schürzen skirts are actually included in the
kit. The Schürzen were initially introduced in June
1943 and were intended to help defeat Soviet 14.5-mm anti-tank rifles
and against high-explosive rounds.
According to Spielberger and other
researchers the skirts were not intended for or
tested against HEAT (shaped charges) like from the Bazooka or PIAT.
(When modeling keep in mind that these shields were 5–mm thick
steel plate and not easily bent and twisted sheetmetal as is sometimes
portrayed by modelers. )
There is no Zimmerit coating, which was discontinued in
September of 1944 and there is a steel shot-deflector in front of
the commander’s cupola introduced in October 1943 and mounted
on all StuG’s by February 1944. For those who are sticklers
for detail, Revell made one significant error by giving us six rubber-tired
return rollers rather than the late war all-steel
return rollers.
Based on these features in the kit,
the Revell model depicts a StuG manufactured no earlier than November
1944. So it cannot be depicted in Normandy 1944,
at Kursk 1943, nor in service with the Finnish, Romanian or Bulgarian
armies; at least not without some modifications to backdate the
model.
b) The Dragon Sturmgeschütz
III early G
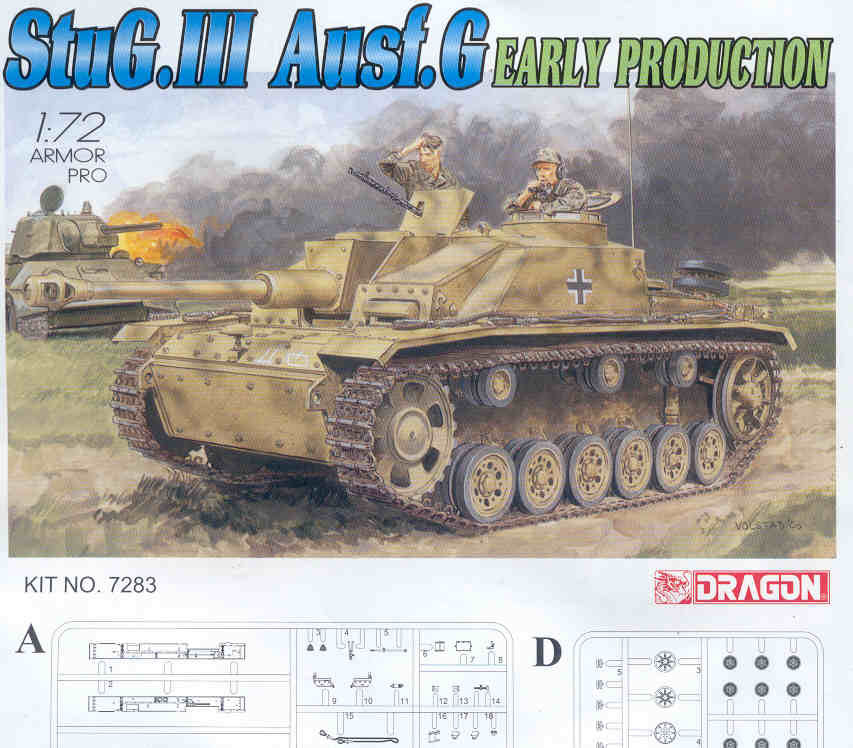
Here is Dragon’s nice box
art of an SS Das Reich Division (note the white Division marking
on the bow) early StuG at the Kursk battle of 1943, that well represents
what is given in the box. Below the painting is a partial view of
Dragon’s parts plans. In the painting we can note the six
roadwheels and the three rubber-tired return rollers. Also visible
are the periscopes ringing the cupola, the tow cables moved to the
fenders and an antenna mounted just behind the commander (German
antennas were made from a copper tube so did not readily bend like
a whip antenna). There is no Zimmerit coating so this vehicle
was produced prior to the September 1943 introduction of Zimmerit
anti-magnetic coating.
Characteristic of the early StuG III Ausf. G of 1943 is the 30-mm
thick bolted-on supplemental bow armor we see in the box art, the
bolted on armor left and right of the gun, and the welded box mantlet.
There is a lack of the steel deflection armor in front of the cupola.
There is a machine gun shield introduced in December 1942 for the
MG34. Some of these features could also be seen in late production
Ausf. G’s and were discussed with the Revell model above.
Two smoke-grenade launchers, of three tubes each, were mounted on
the forward sides from February to May of 1943; this vehicle art
is depicted as not having the smoke launchers though Dragon does
offer them in the kit.
Based on the features of the kit, this vehicle can be potentially
modeled anytime from late 1942 through to the war’s end and
in use by the Germans, Finns, Bulgaria, Spain, Hungary, or Italy.
It could also be given a Topfblende cast mantlet taken
from a Revell or Trumpeter kit, to create a vehicle upgraded with
a newer mantlet.
II. The Model
Kits
Both kits are 1/72 scale injection molded styrene plastic, though
Dragon’s model comes with a small etched brass fret for the
engine air intake screens and soft band tracks. I counted 152 styrene
parts with Revell’s model of which 48 are styrene link &
length track pieces. No resin or etched brass parts are included
in the Revell model. Many of Revell’s parts are the track
links and sections so comparing the total number is a bit misleading.
While Revell has only released one StuG kit, the late Ausf. G, Dragon
has so far (November 2008) released this early StuG Ausf. G and
a 105-mm howitzer armed Sturmhaubitze 42 (StuH 42) kit. Both Dragon
kits share most parts. Dragon’s StuG III has 124 styrene parts
with a small fret of etched-brass parts.
The Dragon kit will be completed as a December 1942 production Sturmgeschütz
belonging to the Grossdeutschland Division.
The Revell kit will be completed
as a March 1945 production vehicle serving at the Battle of the
Seelow Heights (Schlacht um die "Seelower Höhen")
Germany, in April of 1945.
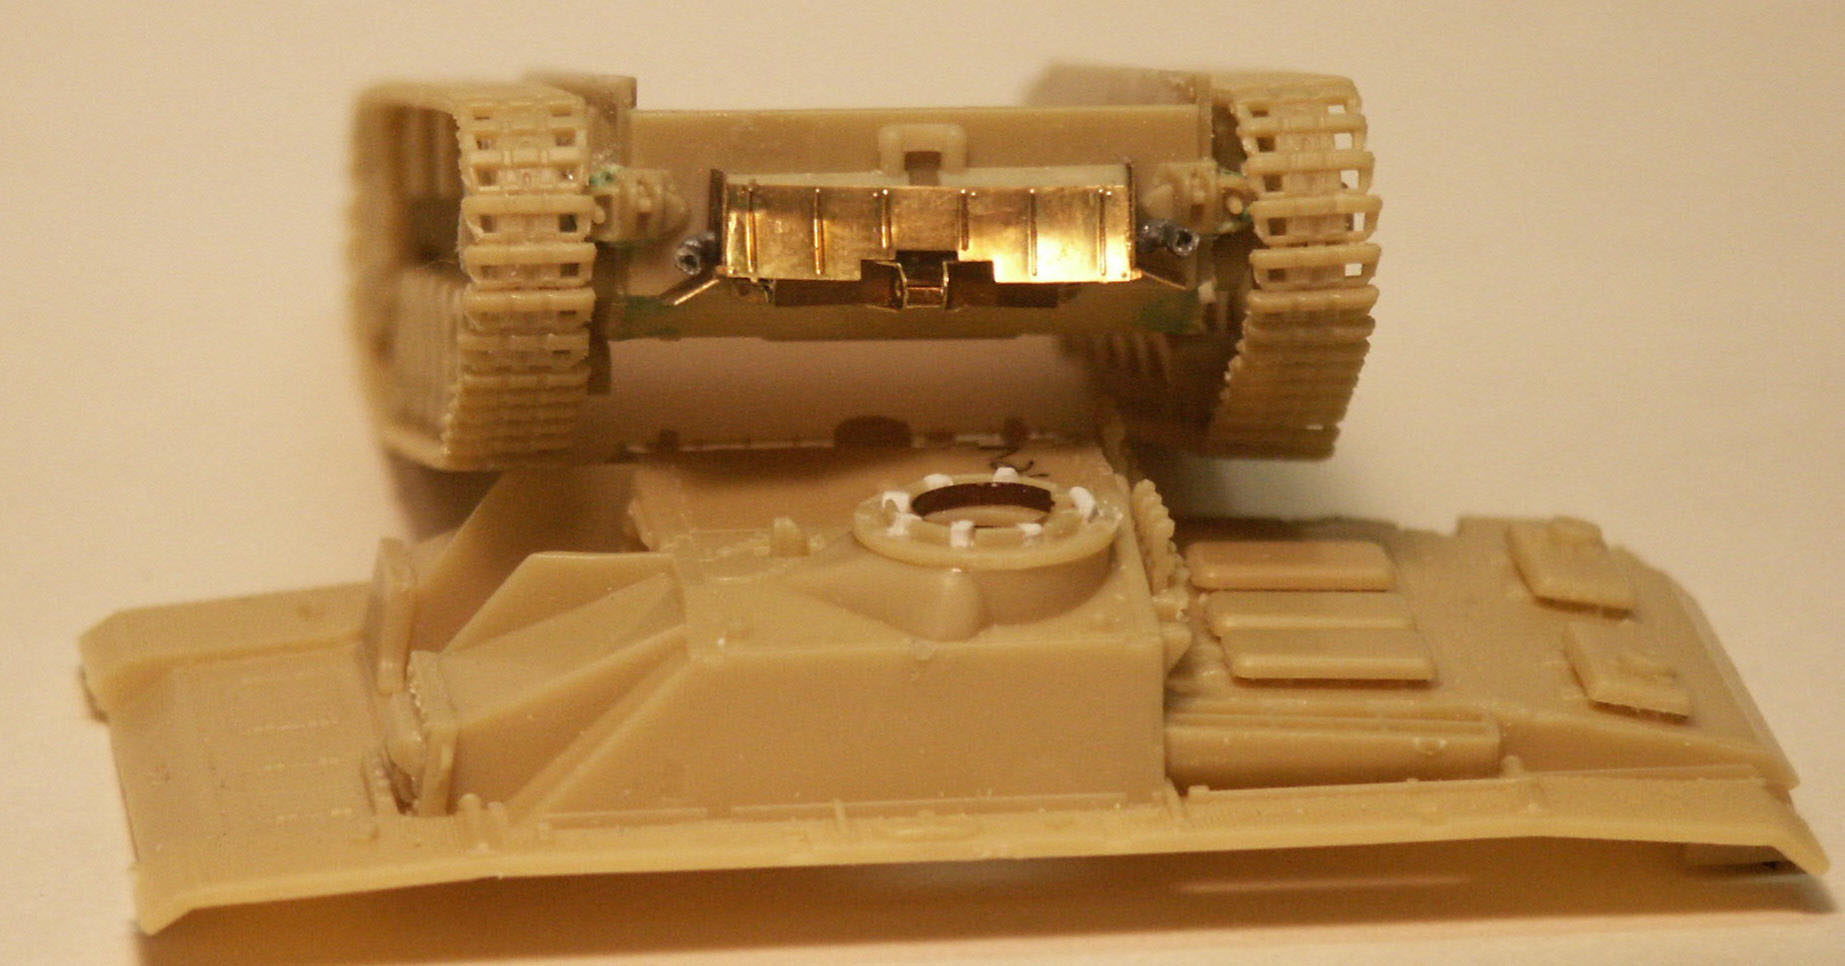
a) Revell Kit 3132
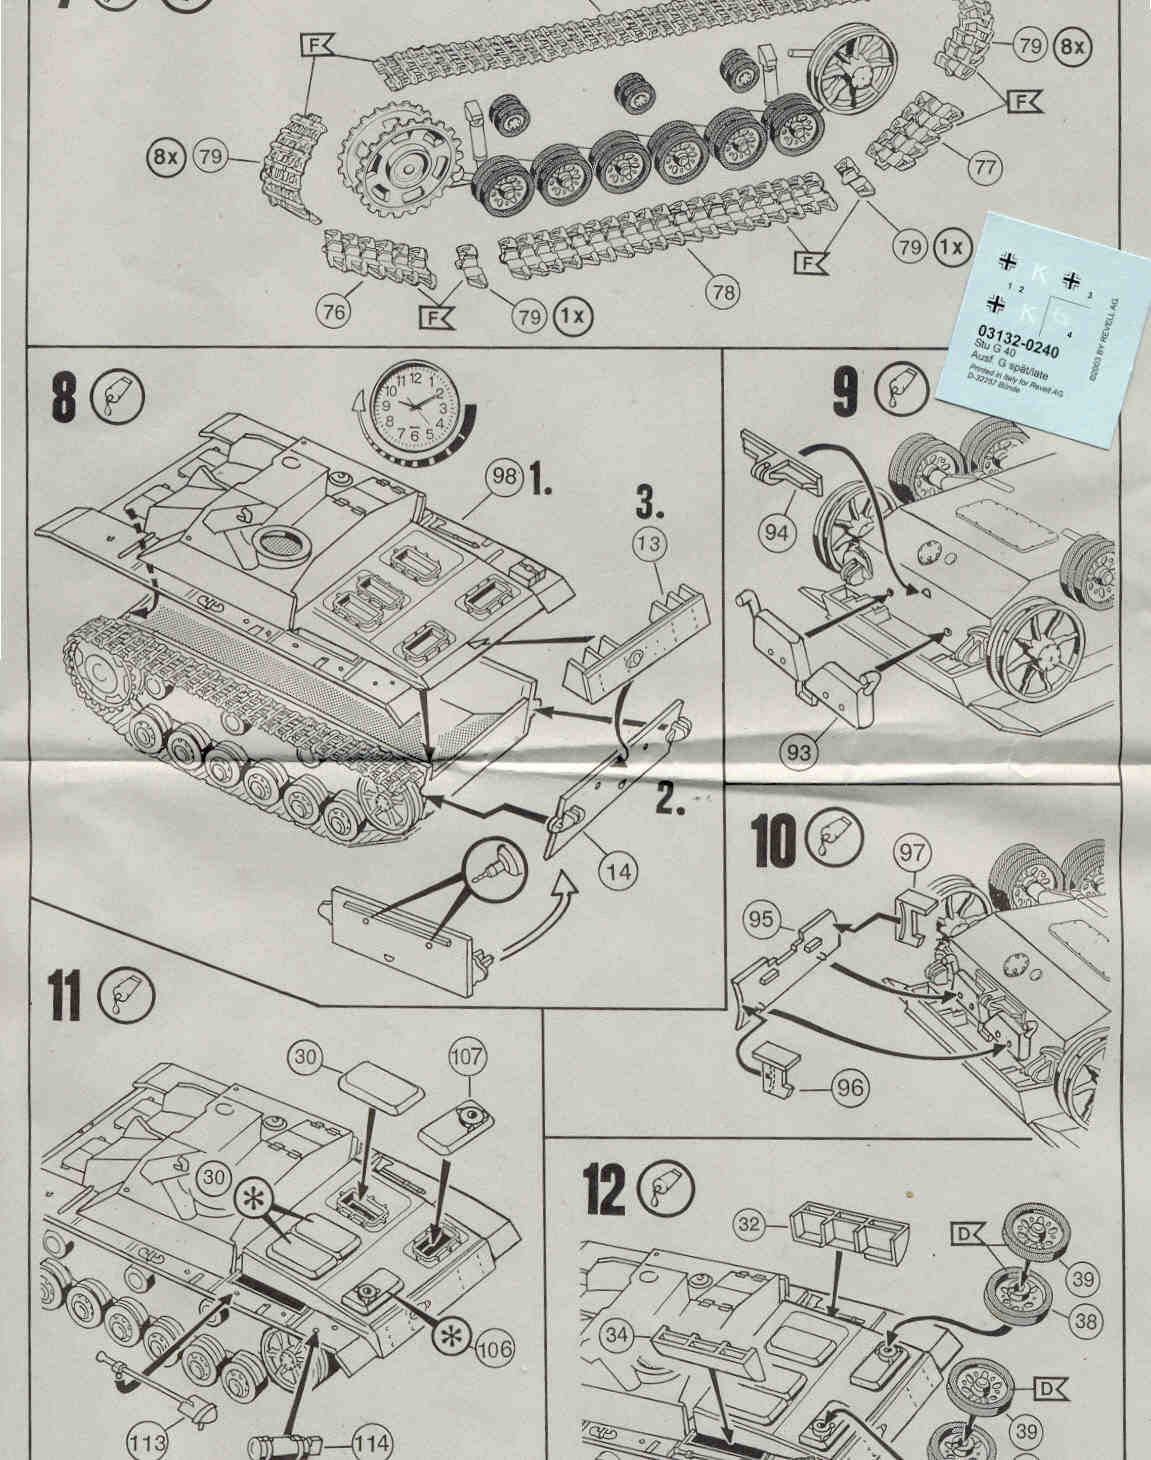
This scan shows the assembly of Revell’s tracks and superstructure.
Revell gives us very well detailed styrene link & length tracks,
which some kit builders love and swear by and others swear at. The
tracks consist of 48 parts out of the total number of parts. When
assembling them it may be hard to get them straight, but they can
be made to look good, although a tad thick; more on this later.
The engine deck ventilation covers (Parts 30, 106 & 107) are
separate and look much better than ESCI/Italeri’s old StuG
III. The Dragon (and Trumpeter) StuG III kits also share this design
with the separate vent covers. At the upper right of the scan are
Revell’s simple water-slide decals for two late war vehicles,
one on the western front and one on the eastern front.
The kit is crisply molded with essentially no flash or sinkholes,
which is typical for Revell's high quality. Though the Schürzen
brackets are a bit thick and can be improved with etched brass parts,
the horizontal bar with the triangular attachment points are actually
better rendered than the PART etched brass. During assembly I had
a difficult time mating Revell’s roadwheel halves (parts 4
& 5) together straight despite locating pins on one side. Revell
gives us open-air intake vents (parts 34 & 35) on the side but
no etched brass screen over the opening. This screen will have to
be scratchbuilt or taken from an etched brass fret.
b) Dragon Kit 7283
Dragon gives us 124 gray injection-molded styrene parts, five etched
brass parts and two long band tracks. This scan is of Dragon’s
typical two-color exploded-view assembly instructions. Dragon gives
us many more parts than are found in the Revell, ESCI (Italeri),
Fujimi or the Airfix StuG G’s, and the corresponding detail
is also better in my opinion. Dragon is interesting in giving us
nice detail even in places we should not normally see when the model
is finished. For example, take the spare roadwheel holder (parts
A3); this part is rendered well enough to model the roadwheel missing.
Another example of the great detail is the suspension, final drive
(part D8), and the hull bottom which are detailed enough that this
is your kit of choice if you wish to model the vehicle with the
bottom visible. The underside of the track guards (parts A1 &
A2) even has a textured tread pattern like the topside. If you should
want to leave part D8 off, such as with a vehicle under repair,
there are bolt holes showing underneath.
The side engine vents can be modeled with either molded in screens
(parts A37 & A38) or open with separate etched-brass screens
(parts A39 & A40 with brass parts MA1). If you use molded-in
screens for the Dragon kit you can use Dragon’s etched brass
screens parts MA1, on the Revell kit. Where
many other model companies mold the vehicle tools onto the track
guards, many of Dragon's tools are molded as seperate parts.
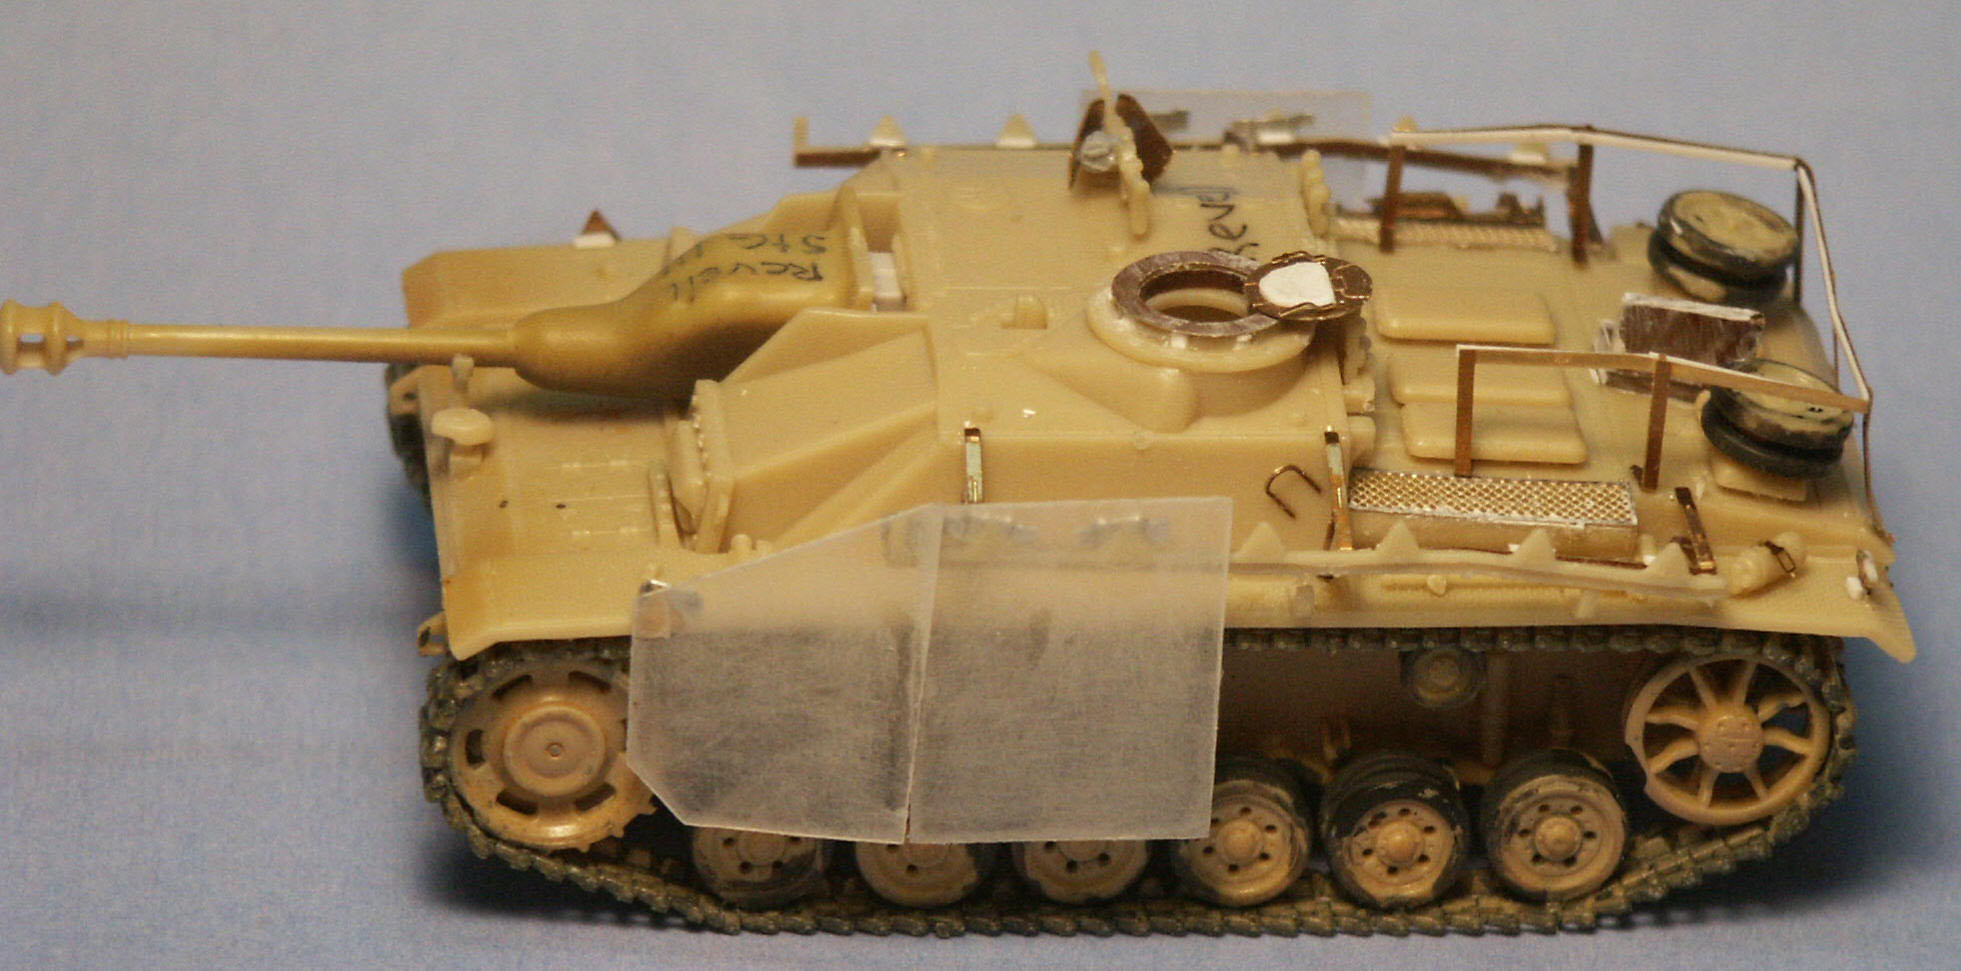
c) Part P72-117
This is one page of Part’s
Instructions for the etched brass set P72-117 for the Revell StuG
40 G late. Many parts of course can be used with the Dragon and
the ESCI StuG kits. The hand tools such as the hammer [part AA],
the wire clippers [part AC] and the engine crank [Part Z] are too
flat and are better done with styrene & wire, or you can just
use the kit parts. Use of the cupola parts [assembly part S] on
the Revell StuG will require us to add supports to hold the ring
above the periscopes.
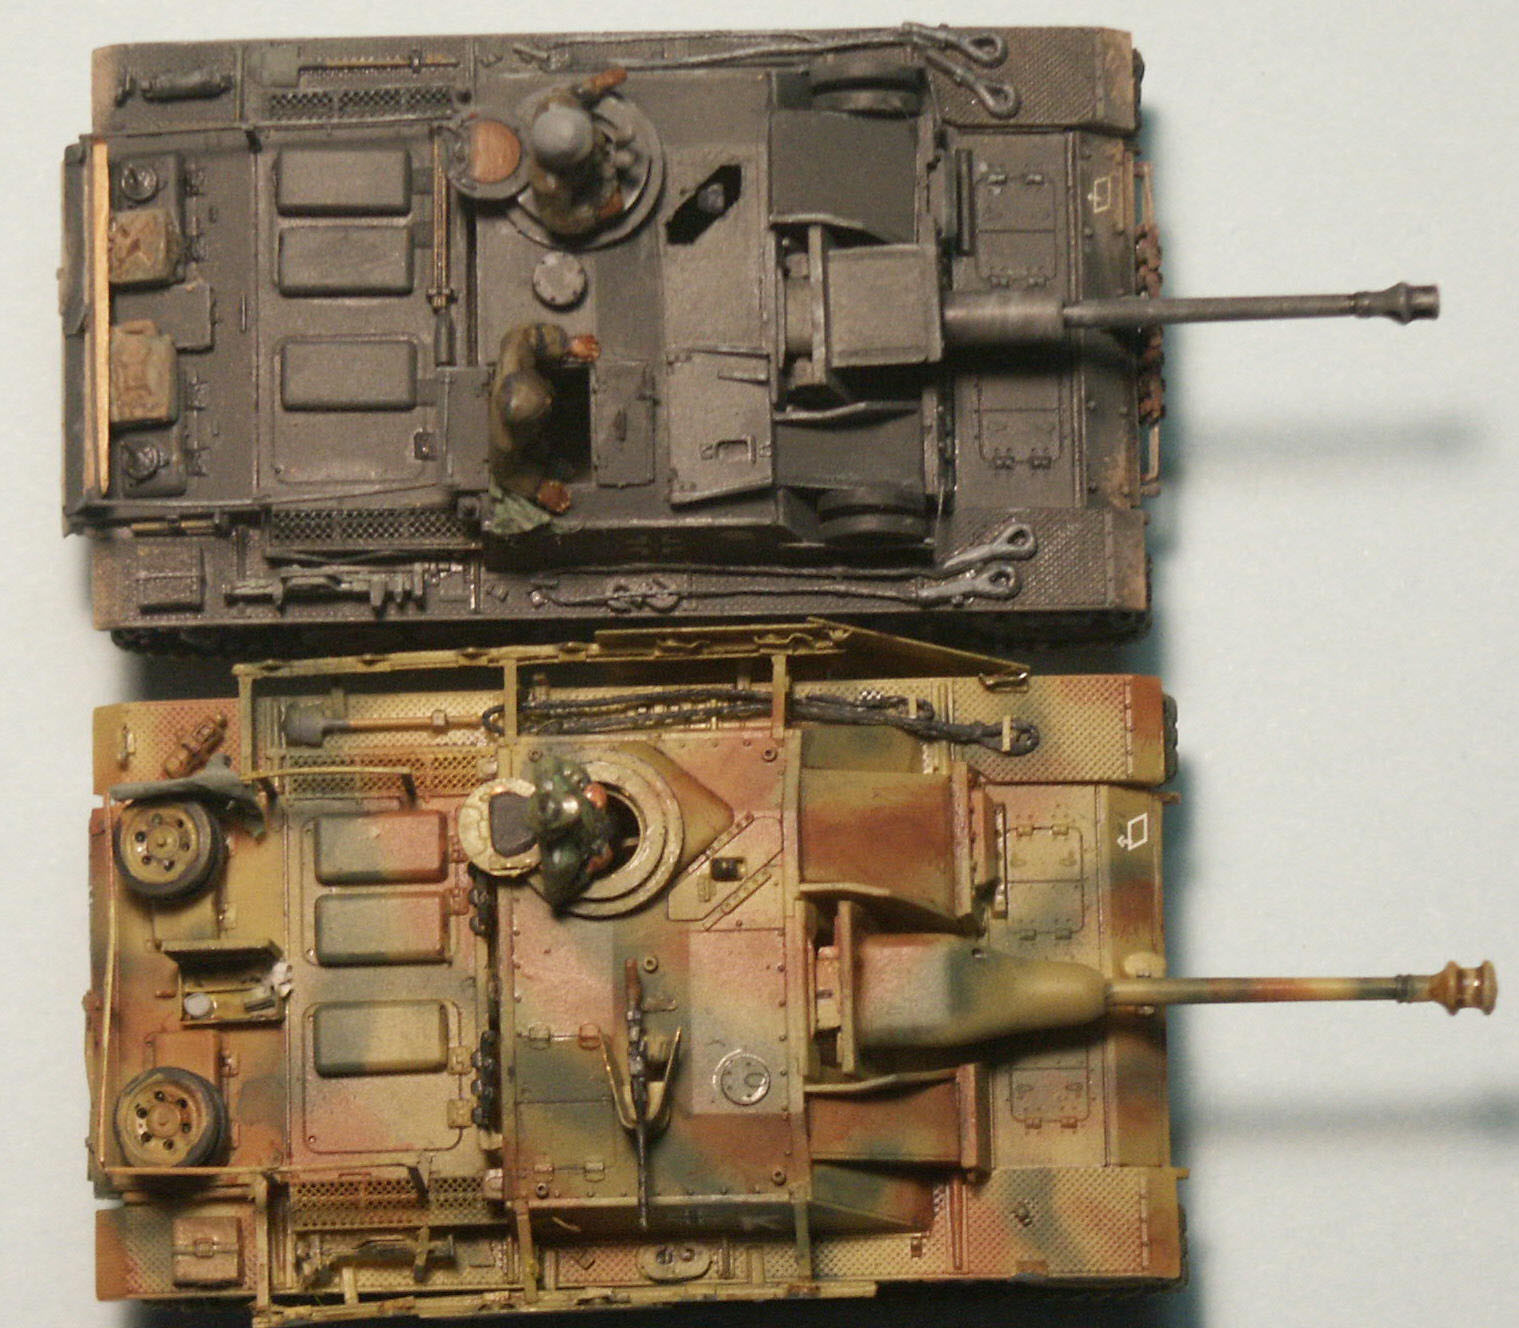
d) Comparison
Here is a top-view of the Sturmgeschütz
G superstructures: Revell at far left, ESCI in the center for comparison
and Dragon at far right in gray. Revell and ESCI’s superstructure
are molded in one piece with some tools (the axe and S-hooks) molded
into the track guards. The side engine vents are open and can use
some mesh screen, such as from fine lace or etched brass. Revell’s
roof has the five Pilze mounts for a two-ton jib, which
is characteristic of a post-September 1944 vehicle.
The Dragon superstructure is broken down into eight parts (A1, A2,
B31, 44, A21, A33, A39, A40) that fortunately fit very well despite
the complexity. I can guess that the kit is broken down into so
many steps in order to provide the detail. Being an early Sturmgeschütz
Dragon’s has no Pilze mounts on the roof.
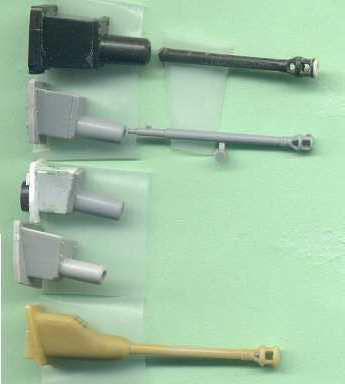
A comparison of the gun mantlets
(from top to bottom):
- ESCI in dark green;
- Dragon’s mantlet (parts
B24 & B30) in gray with the L/48 gun barrel (part B25);
- a partially scratchbuilt mantlet using the spare front piece from
Trumpeter;
- Trumpeter’s box mantlet in light gray;
- Revell’s cast Topfblende mantlet with coaxial machinegun
and StuK 40 gun barrel (parts 102 & 103).
While we cannot contrast Revell’s
and Dragon’s different mantlets, I feel that their gun barrels
are of comparable quality with the slidemolded Dragon muzzle brake
having the end already open. Though this is not a review of the
Trumpeter StuG, I will mention that it’s mantlet is molded
as one piece and has no weld seams or joints.
III. The Kits Under Construction
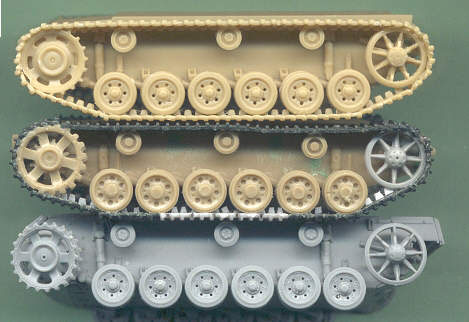
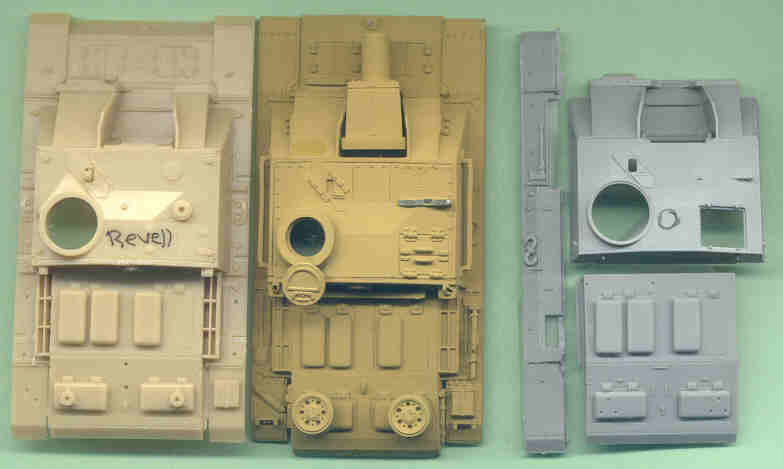
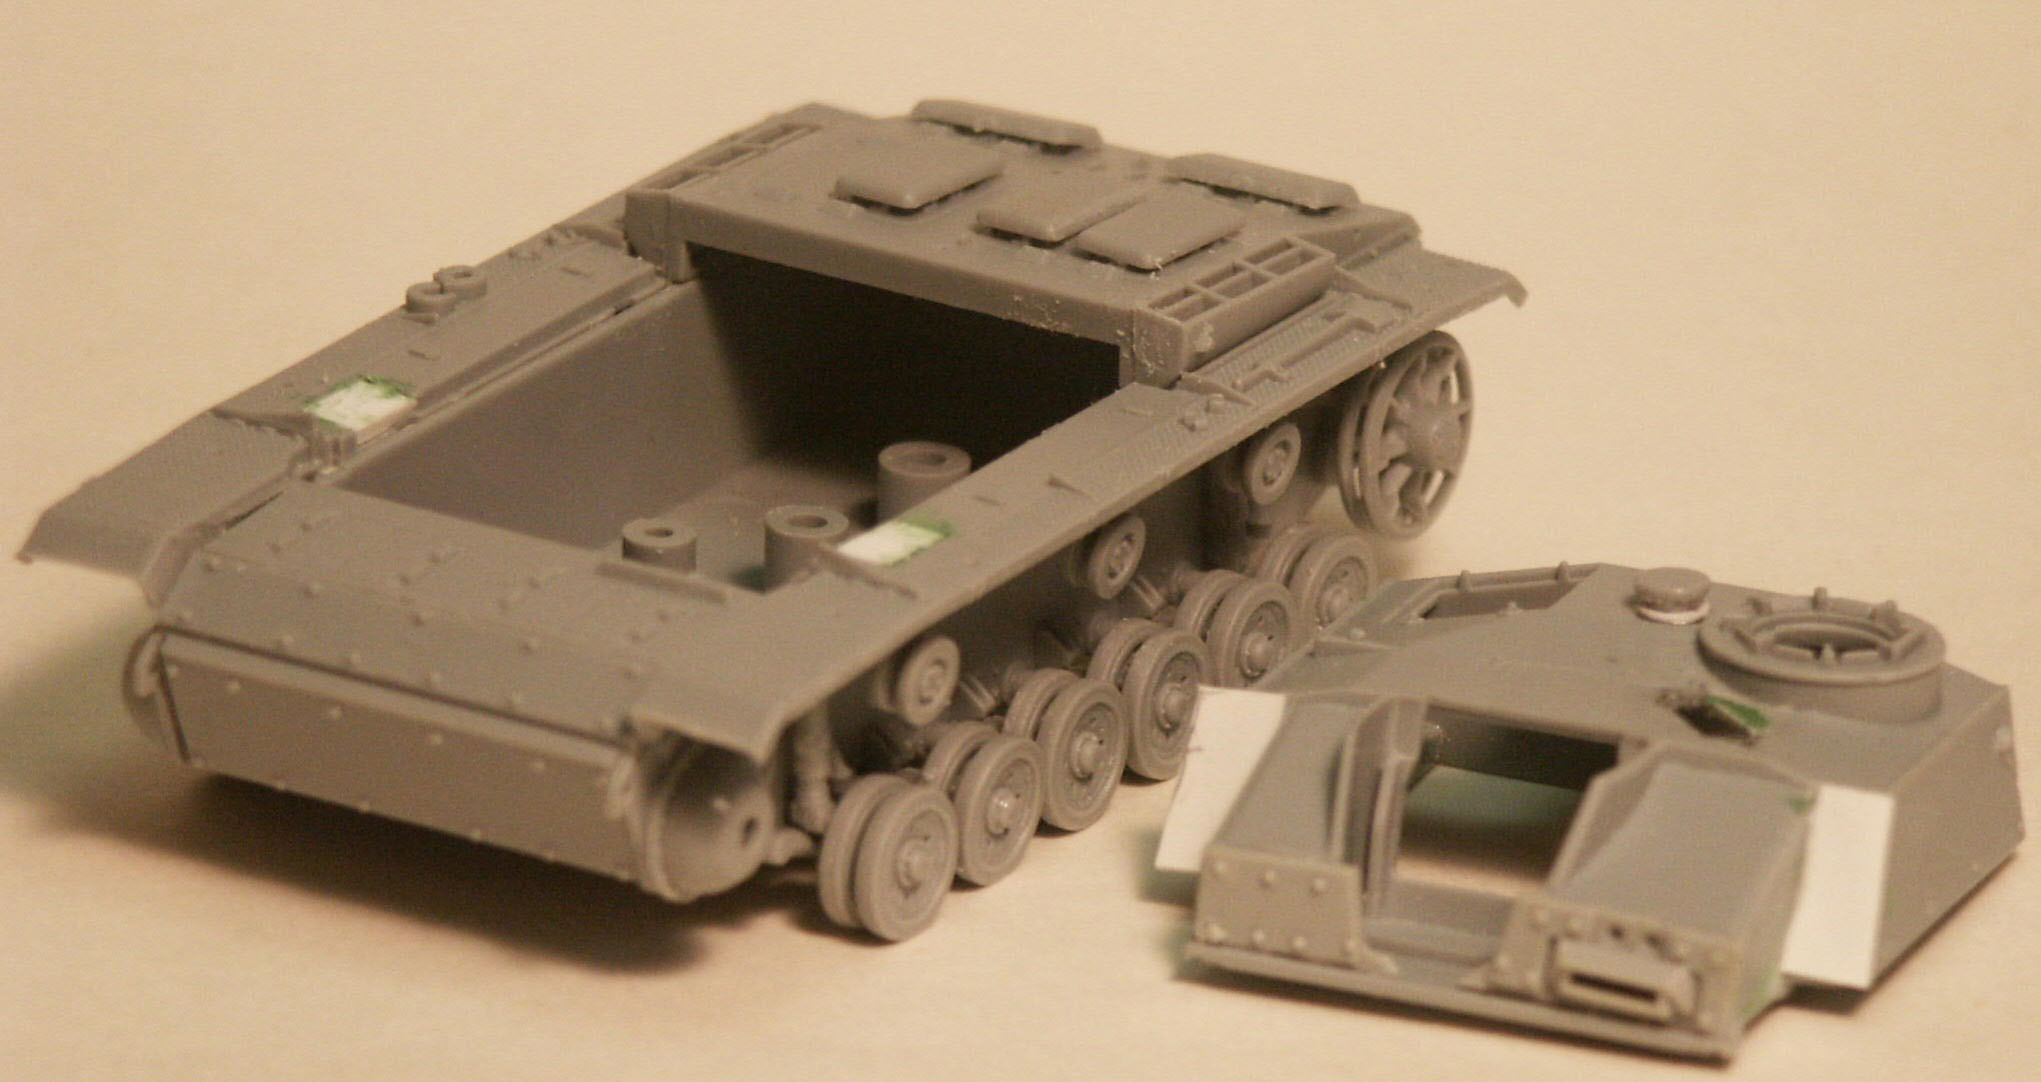
A Comparison of three StuG G chassis: Revell at top in amber plastic,
ESCI (for comparison) in the center in amber, and Dragon at the
bottom in light gray. (These particular ESCI parts are actually
from the Pz III M kit used in a StuG kitbash.) Revell’s return
rollers (parts 6 & 7) should be cast steel with no rubber tire,
and the sprockets (parts 11) are more likely to have exposed bolts
(no hubcap) like that offered in Trumpeter’s StuG kits. The
six sprocket holes are too small and should look more like Dragon’s
and ESCI’s and the sprocket teeth are also too small. (Please
excuse the little gouge in the edge of the sprocket caused by a
careless slip of the knife!) Revell’s link & length tracks
fit well with work and patience and look good, though a bit thick.
Dragon’s chassis (part J)
came as one slide-molded piece similar to Trumpeter’s StuG
chassis. This is the only one here that offers four separate shock
absorbers (parts A28 thru A31). Of these three, Dragon offers sprocket
and idler wheels that are closest to the real thing. Dragon would
have even more parts if the six return rollers (D5) were not slide-molded
in one piece.
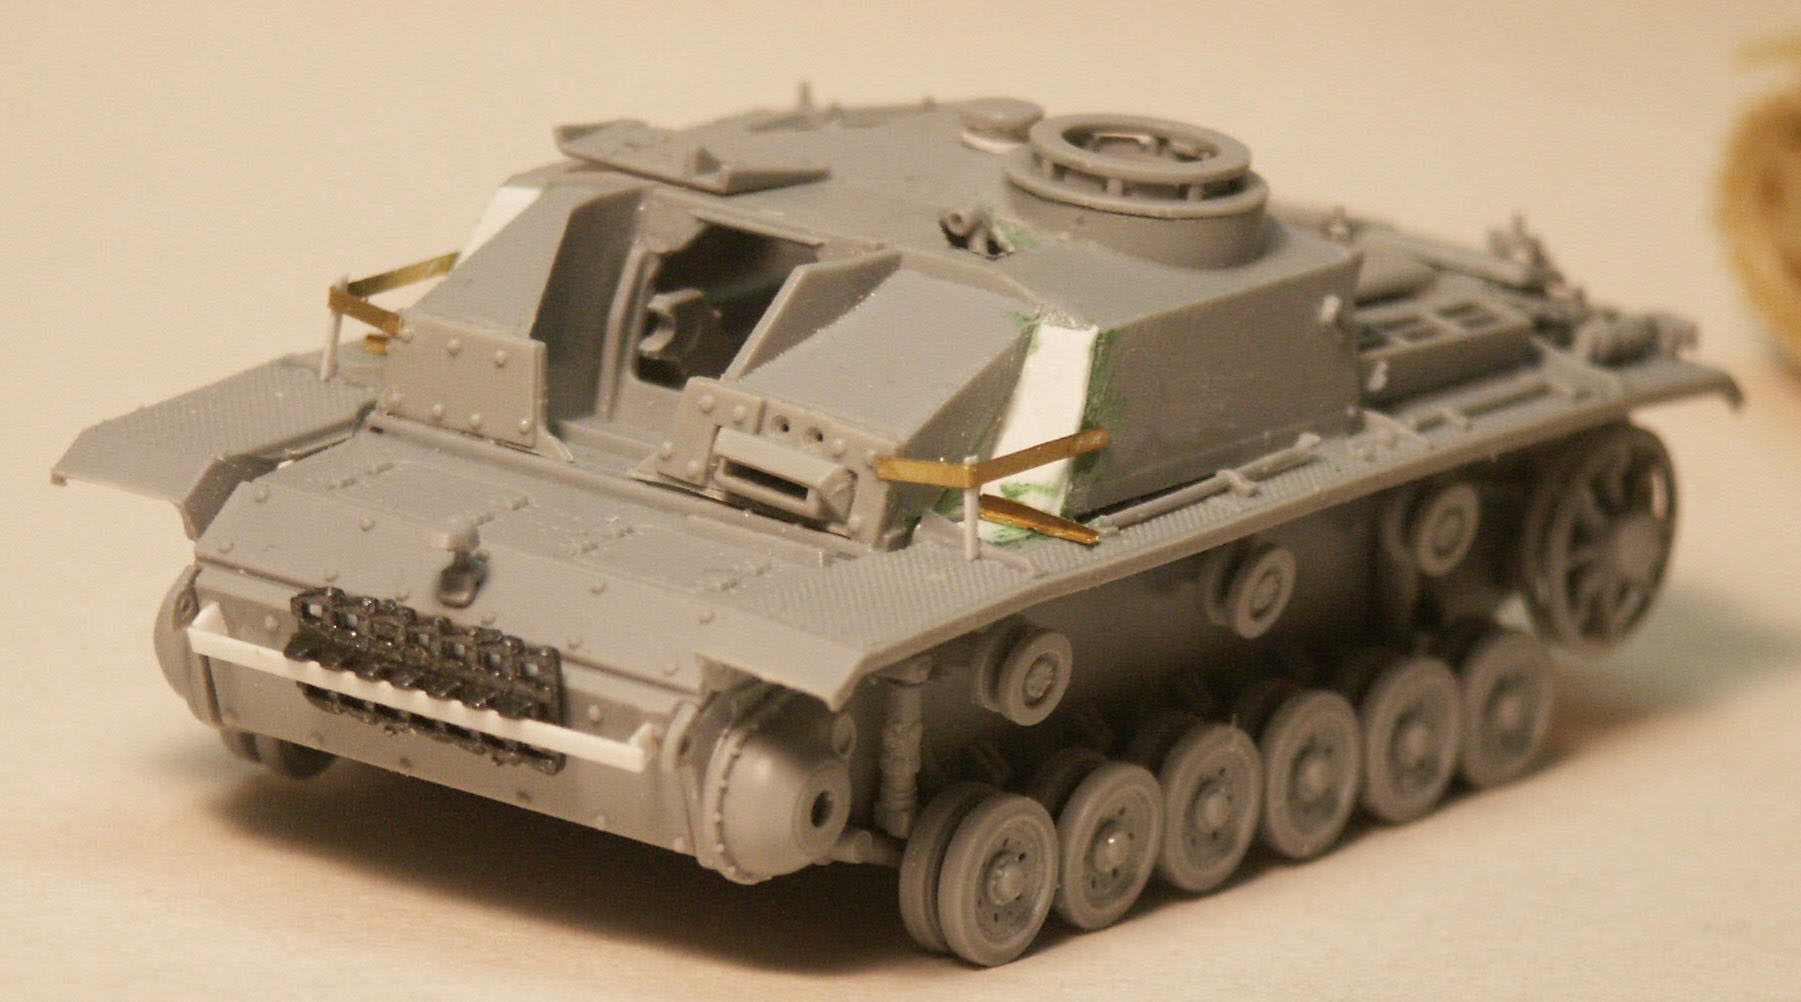
a) Revell Kit 3132
Fit of the Revell Sturmgeschütz is good and tight. In this
photo we see the stern with Part’s etched brass exhaust deflector
and brass tow coupling on Revell’s chassis. Revell’s
chassis is made of three parts (parts 1,2 & 3) that assembles
similar to the ESCI and the Airfix StuG’s. This tow coupling
was present on late-1944 Sturmgeschütz for use with rigid tow
bars. It’s hard to see in the photo but the exhaust pipes
have been replaced by thick soldering wire drilled out on the ends.
Revell’s exhaust pipes are too thin and hard to hollow out.
Since this vehicle will use a brass ring over the cupola periscopes
rather than the kit part, styrene supports needed to be glued around
the cupola ring. Note also the shot-deflector in front of the cupola,
characteristic of a post-September 1943 vehicle.
At this stage the superstructure
has been joined with the chassis and bunches of fine details added
afterwards. The Part etched brass storage rack (part 56) was too
flimsy, so I strengthened it with some plastic strip. It is unfortunate
that the super glue did not cure quickly enough and the strip shifted
from the brass frame when I was not paying attention to it.
The Part brass brackets (parts 59 thru 63) for the Schürzen
were mated with the Revell brackets (parts 124 & 125) to create
a more accurate Schürzen bracket. The brass brackets
were hard to assemble with glue so I recommend soldering them together.
Schürzen plates were fashioned with clear styrene
sheet that I find stiffer than the white styrene sheet. The Schürzen
were produced from 5-mm thick steel plate so not prone to being
bent and twisted like thin sheet metal. The
Schürzen brackets (parts 124 & 125) in the Revell
kit are the late improved type of brackets and plate hangers, different
from that used on the early to mid-war ESCI (Italeri) Sturmgeschütz.
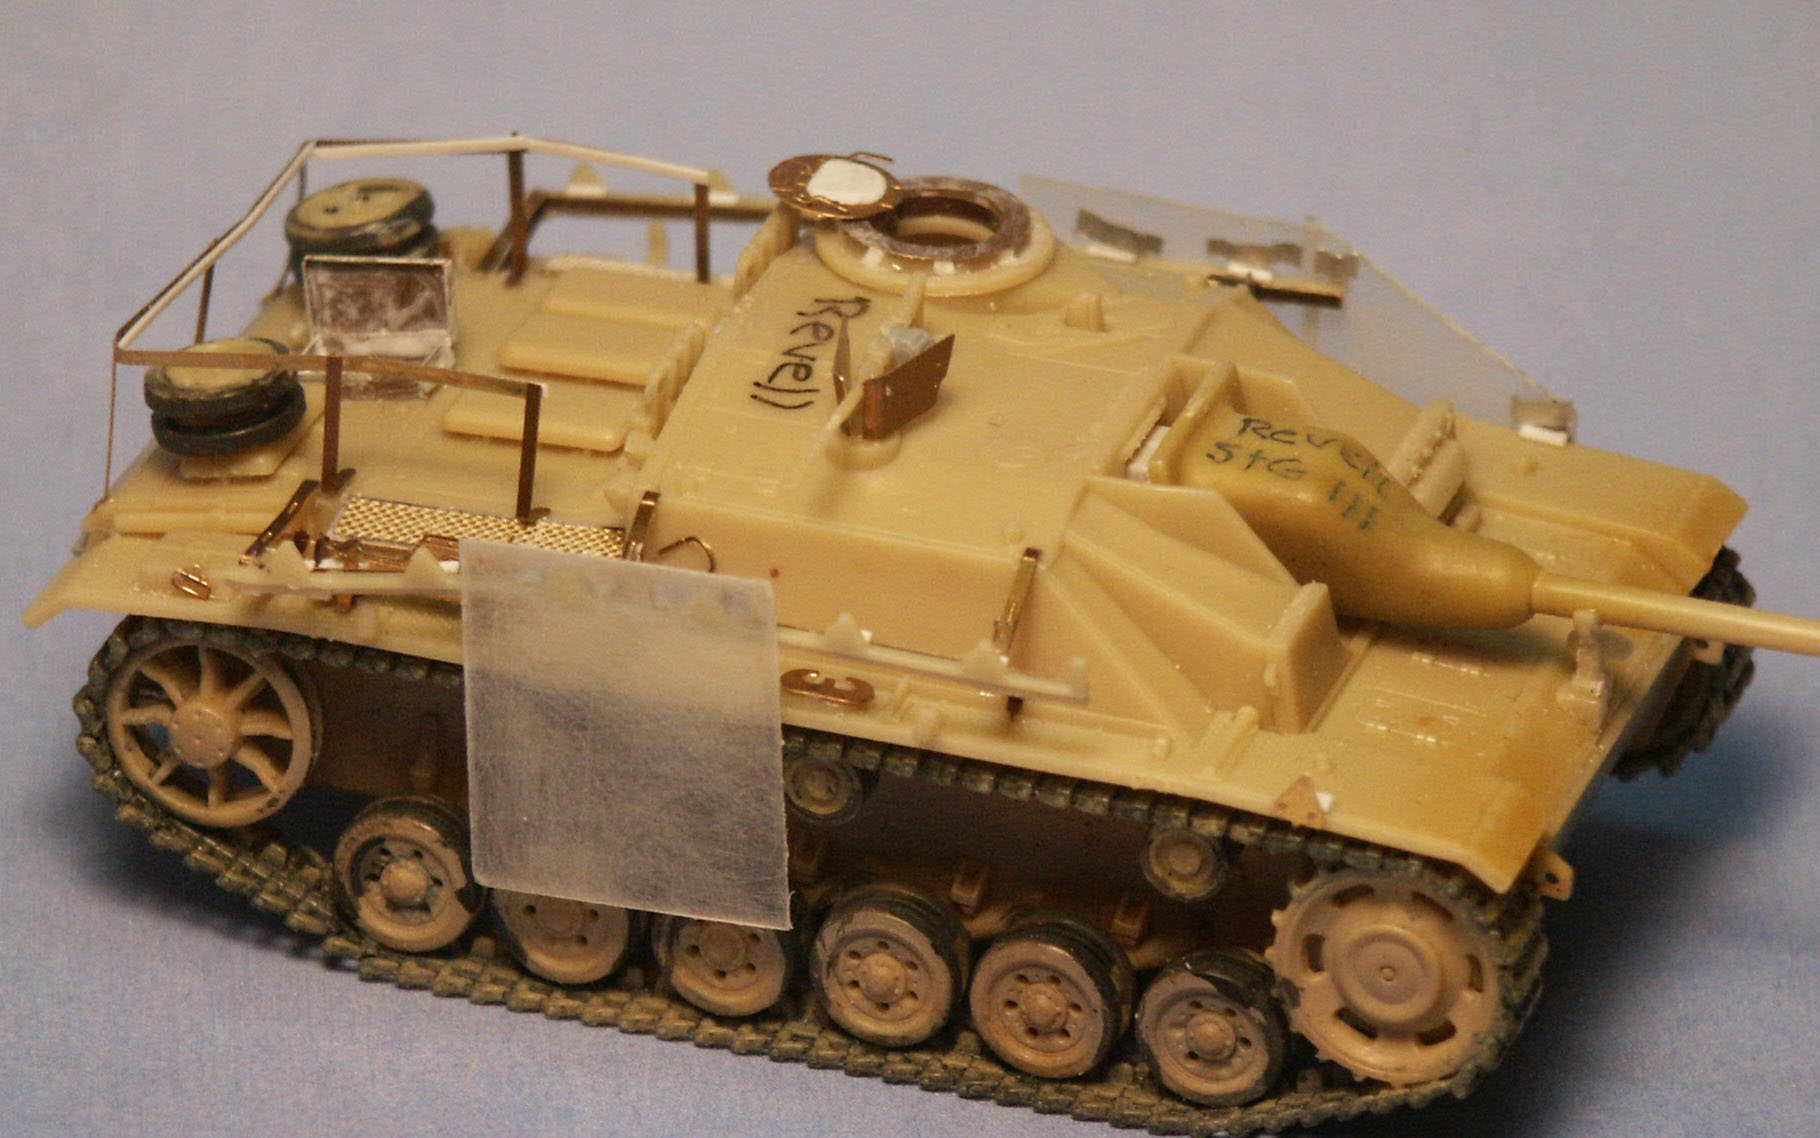
A view of the right side with one
shield remaining, the others having fallen off and the brackets
bent in places during travel and combat. The Rundumfeuer
shield was replaced by thinner brass etched parts (parts 28 &
29) and an ammunition drum added from a Dragon Sd.Kfz 251 kit. On
the engine deck the kit’s toolbox (part 108) has been replaced
by a Part etched brass part (part 34-37) and modeled open, a nice
advantage of etched brass in this case.

I found no period photos of this
particular German StuG so I had to rely on Revell’s description.
The camouflage pattern was completely done with all acrylic paints
by Model Master or Poly S. A point-wash of water-based
dark brown and black from The Detailer, Black It Out was
applied in corners and recesses and then the excess wiped away with
a damp paintbrush.
As the vehicle already has the Schürzen brackets,
I thought that it would make sense to add at least some Schürzen
plates. Applying the plates however caused the vehicle markings
on the superstructure to be invisible. To rectify this problem some
markings will be applied to the plates as well. These Schürzen
represent 5-mm thick armor plate and overlap several centimeters.
The water-slide decal markings are the decals included within Revell’s
kit. They applied easily to a gloss coat of acrylic floor wax.
Barely visible on the left side view is a scratchbuilt tow cable
replicated with tea-bag string and glued down to the left track
guard. The string was coated with white glue (a.k.a. Elmer’s
Glue) to keep down the fuzziness of the cotton string, then
painted medium gray.
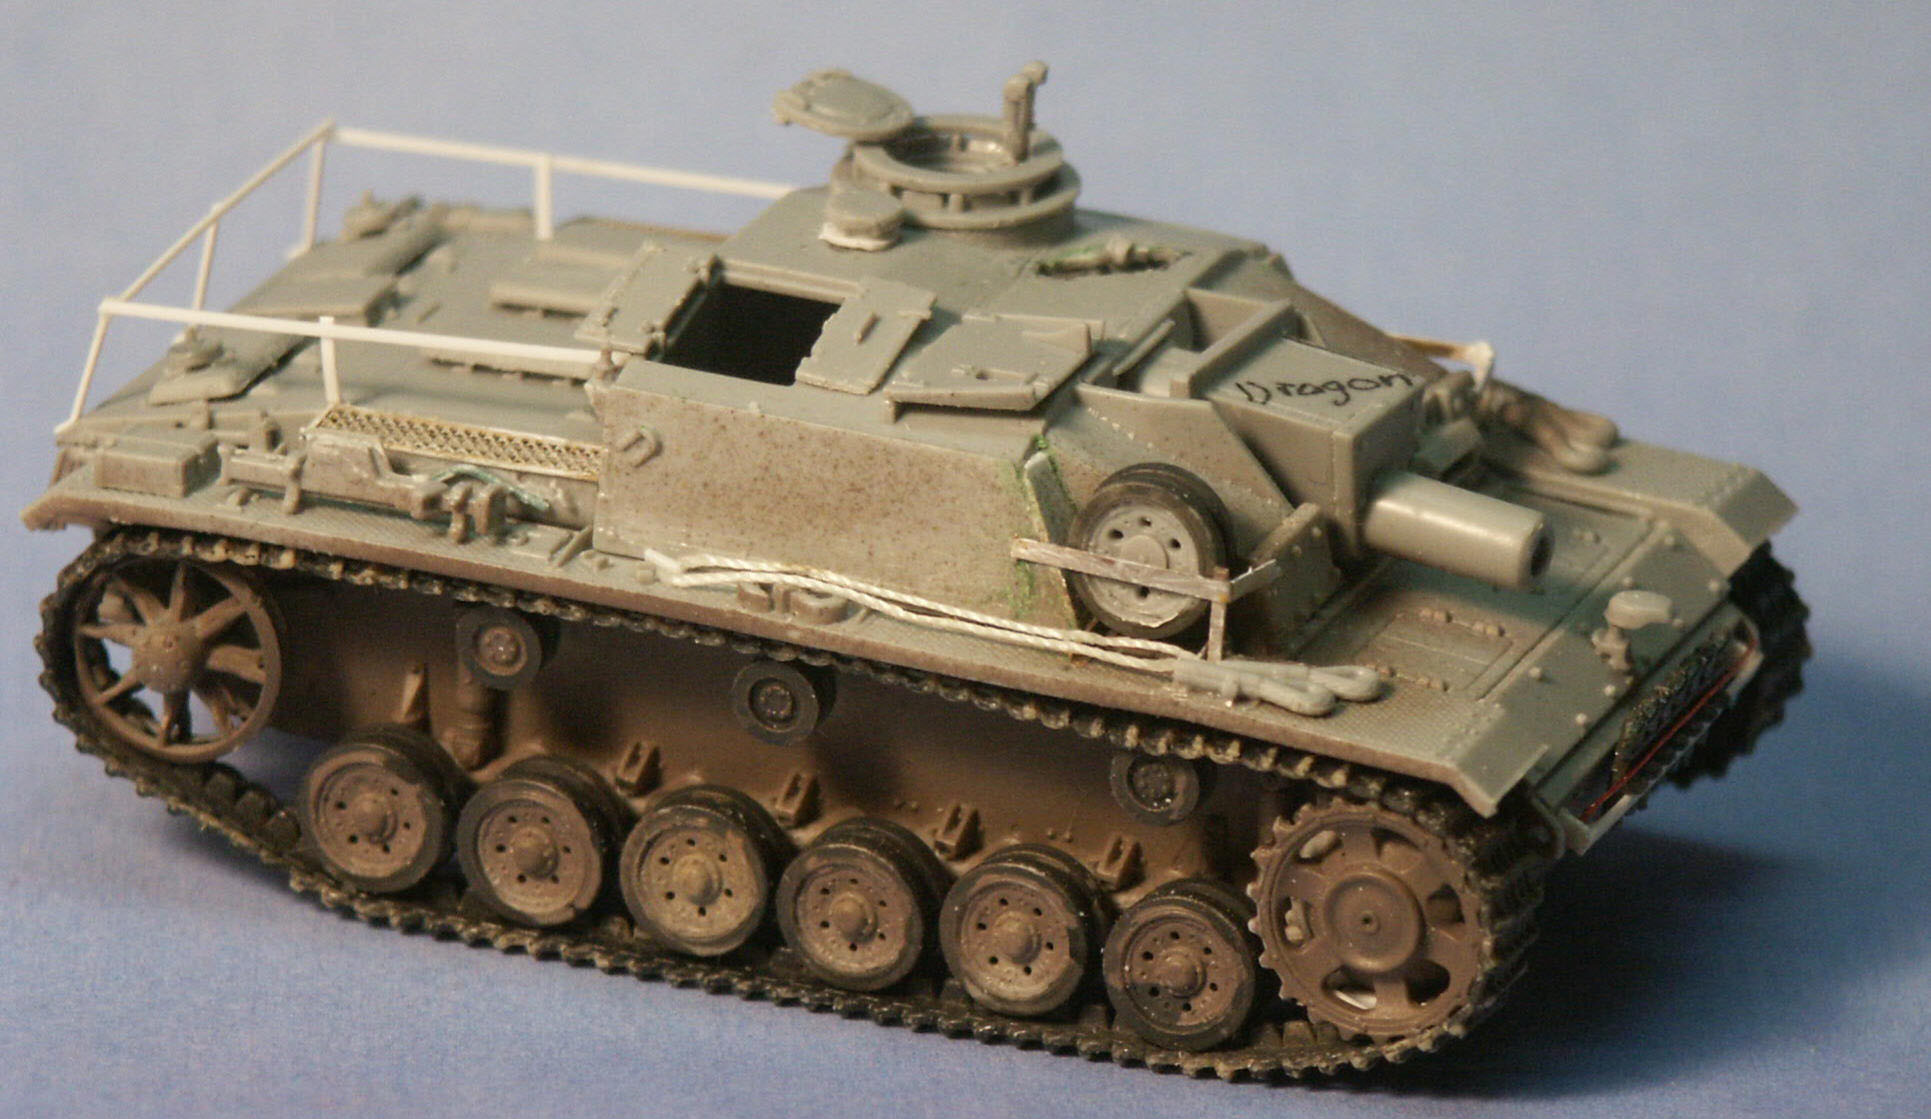
b) Dragon Kit 7283
Oh, didn’t I already mention that the Dragon kit would be
built as a conversion to an initial December 1942 version? This
requires some modifications. Note that the front armor plates of
the panniers has been cut back to a much steeper slope; this has
necessitated plugging a rectangular hole in the track guard. This
break in the track guard can be masked by replacing the entire fenders
with the Part etched brass set, or in my case by mounting spare
roadwheels here. On this photo we can see the guard for the rooftop
gunsight aperture has been cut out; also note the crew-compartment
exhaust fan (part B4) on the roof.
The initial Ausf. G fan sat considerably
lower than that on the earlier Ausf. F and F8; later Ausf. G’s
will see the ventilation fan moved to the back wall of the crew
compartment like on the Revell model.

Copyright
Hillary L. Doyle 1990
Here is part of one of Doyle’s
five-view scale plans showing the high quality present in his books
with Walter Spielberger and with Tom Jentz. This initial version
of the StuG Ausf. G was produced in December 1942, replacing the
Ausf. F8 but keeping the F8 chassis and with a new superstructure.
Spielberger states that 120 StuG G’s were produced in December
1942 (page 180), so up to 120 of these initial December-1942 version
Sturmgeschütz III G’s could have been made. These being
characterized by the more steeply sloping pannier front visible
in the above drawing, a vision port (or later a pistol port) on
the side of the driver’s area, a roof top crew-compartment
exhaust ventilator, and an open rooftop gunner’s periscope
sight opening. Some of the tool stowage is different from the later
Ausf. G’s. There is no shot deflector in front of the cupola,
no Zimmerit coating, and no cast mantlet.
In this photo you can see the bracket
and additional tracks added to the bow, which are track lengths
borrowed from a Revell Pz IV kit. Also note the spare-roadwheel
holders that were common the Grossdeutschland Division vehicles,
driver’s visor taken from a Trumpeter model, and the fine
chassis detail. Additional track-guard braces have been added from
the Parts etched-brass fret. On the bow is the very nice one-piece
bolted-on armor (part A42). To better match the initial-production
StuG G, the front superstructure armor (parts B16 & B17) were
replaced with like parts from a Trumpeter kit that represented the
early driver’s visor with the two periscope sight holes. It
is just as well that I switched from the Dragon driver's visor to
an extra Trumpeter visor as Dragon's visor (part B17) is molded
closed, something rarely seen in period photos and an unusual thing
for Dragon to have done.
In this stage the rear storage rack has been fashioned with styrene
strip and the cupola hatch and the commander’s periscope added.
The loader’s hatches were sanded
down a bit thinner first. Dragon’s plastic tow cables in their
kit (parts A15 & A22) are a bit thick so they were replaced
by coarse sewing thread. Looking at them here I think the thread
is too thin and I should have used something thicker.
The suspension and lower area of the chassis were painted in an
earth tone before the tracks were installed. Oddly, the tracks (parts
E) were too tight and had to be stretched over the wheels so that
no natural sag in the tracks was possible. An extra several millimeters
in length would be appreciated from Dragon in the future. The
tracks are painted in acrylic paints; take note that enamel oil
& solvent based paints can cause the Dragon’s DS (Dragon
Styrene) soft plastic tracks to degrade. (See this website
page
http://www.dragonmodelsltd.com/html/models-q&a.htm#tracks for
further information on DS tracks.) The tracks were glued down to
the wheels with super glue to better distribute the stress due to
them being too tight.
From the rear we get another view
of the storage rack common to Grossdeutschland Division StuG’s
in late 1942 and 1943. Over the air intake vents on the engine decks
we see the etched brass screens (parts MA1) included within the
Dragon kit.

In this view of the vehicle rear the base coat of Model Master acrylic
panzer gray is applied, acrylic gloss under the areas for the decals,
and complementary colors for the hand tools. An acrylic dull-coat
will later be added to blend the shiny decal area into the rest
of the vehicle. These are the water-slide decals that come in the
Dragon kit; they applied well and were adequately opaque and in-register.
Being modeled as a newly delivered vehicle in December of 1942 the
appropriate color would be dark gray. A coat of white winter camouflage
would likely be applied before going into combat. A point wash of
water-based black was applied in corners and recesses to add shadow.
A light dry brushing with light gray acrylic was also done. The
high wear areas on the tracks and the idler and sprocket wheels
were highlighted with steel-colored paint and a graphite pencil.
The Sturmgeschütz had a ring
of seven periscopes around the commander’s cupola. To represent
the periscope glass, a narrow strip of exposed camera film was cut
up into pieces several millimeters long and glued in with white
glue. They remain dark, shiny have sharp edges and are easy to produce.
For a better view of the finished periscopes, see the next paragraph.
IV. THE CONCLUSION
I find this photo and the ones below interesting in that it compares,
side-by-side, an initial December 1942 Sturmgeschütz G with
a late war last-of-the-series Sturmgeschütz of March or April
1945. In this top view of the two models there are a few small items
in the finish to touch up before they are contest-ready, such as
some glossy areas on the engine deck. More stowage will also be
added to the engine deck. German panzer crew figures have been added
from several sources. The area behind Revell’s gun mantlet
has been detailed whereas this area on Dragon’s kit is well
detailed as is. This overhead view shows the evolution of the various
tools and fittings such as the locations of the fire extinguishers
on the left rear track guard, the tow cables, change to the gunner’s
sight opening, the Rundumfeuer 360-degree rotatable machine
gun and cast mantlet with coaxial machine gun on the late StuG III.

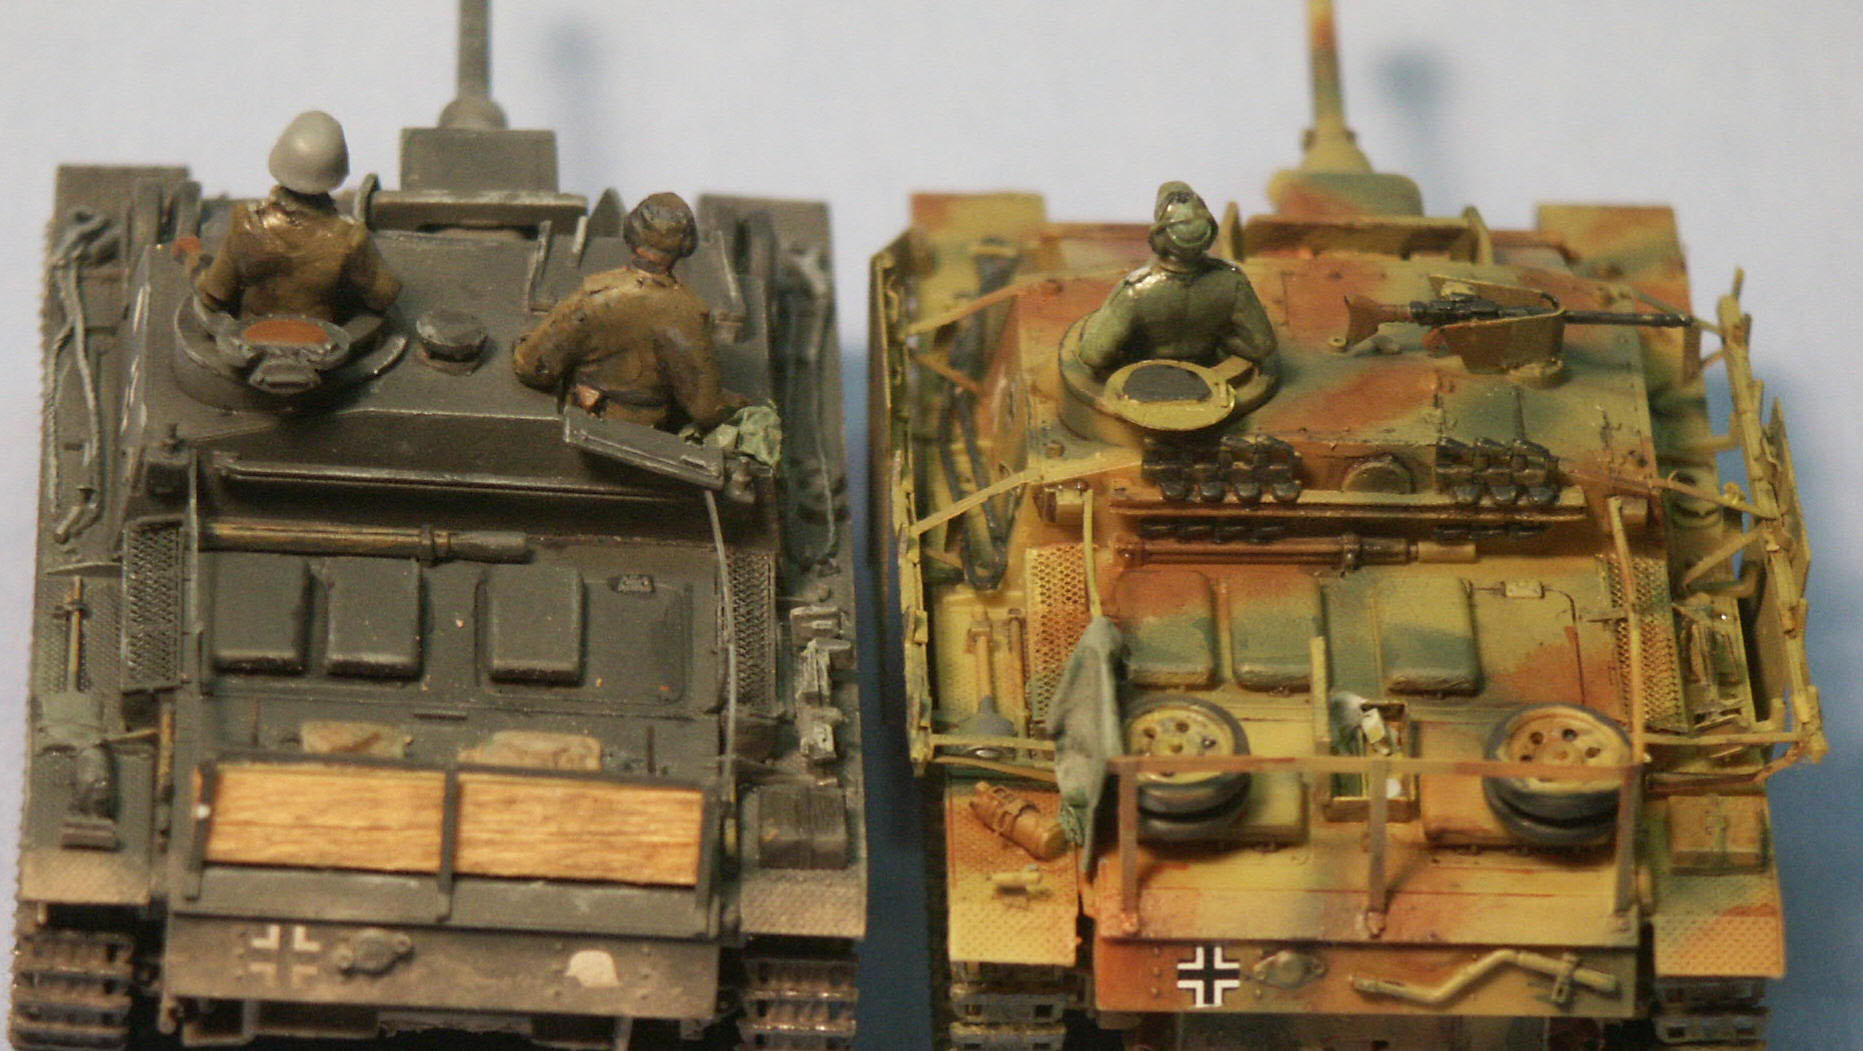
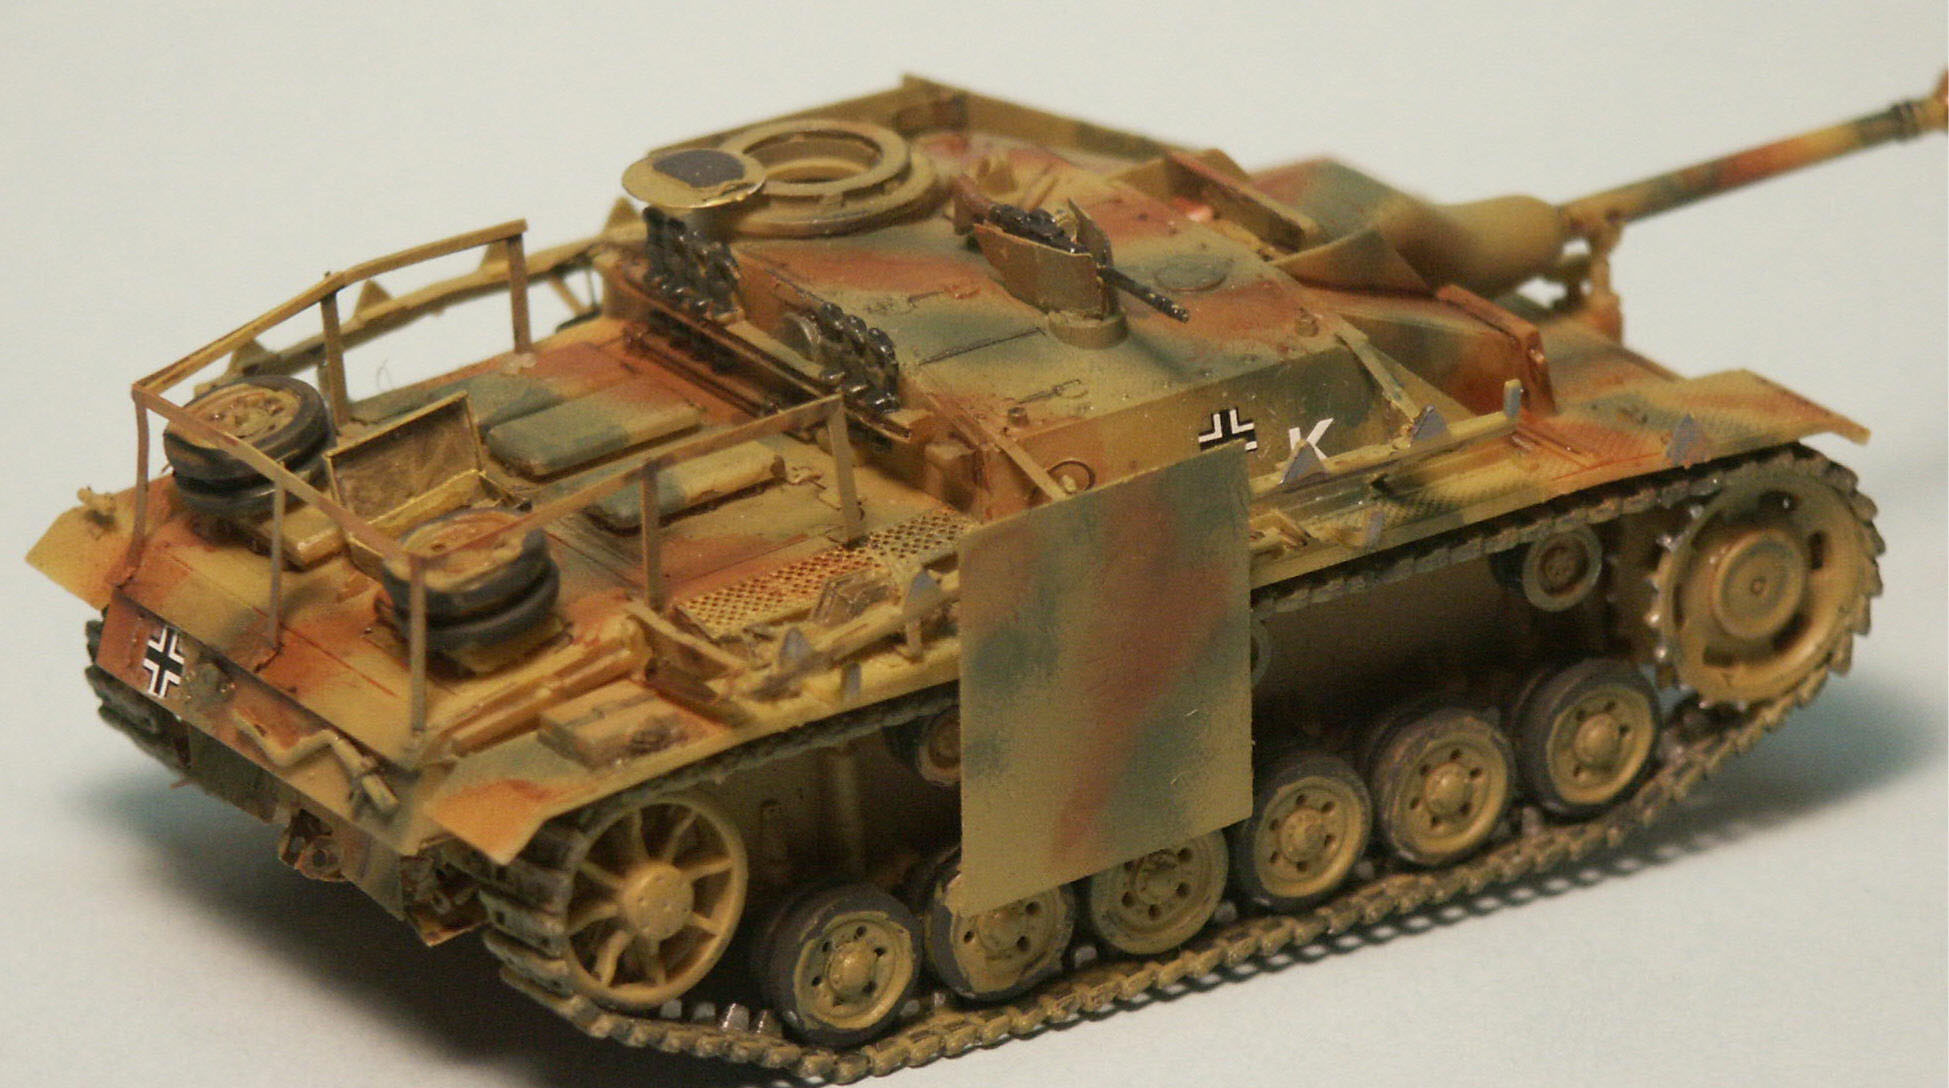
A view of the two completed models side by side. Some of the differences
between the early and late models we can see here are
- the location of the crew
compartment vent
- placement of the late model’s starter-crank on the rear
- the Schürzen.
The placement of the spare roadwheels and the frame for storage
were modifications by the Grossdeutschland Division. I have read
that the storage frame on the rear of the late-model StuG was factory
installed. A board has been added to the rear of the early panzer-gray
color Sturmgeschütz to assist in holding stowage, similar to
those seen in historical photos of Grossdeutschland Division vehicles.
Both vehicles built into accurate Sturmgeschütz vehicles and
represent the present state of the art in small-scale models. The
Dragon kit is several years newer and this is reflected in its assembly,
such as using the new slide-mold technology. Using slide molding
the Dragon kit’s lower hull is molded as one large but well
detailed piece whereas Revell’s lower hull has four major
parts. Still, Dragon offers more overall parts. Being a few years
older, the Revell kit has etched brass detail sets for it from Eduard
and from Part and NH Details, and resin conversions from BP Resin,
Modelltrans, which are designed for it. Both kits exhibited wonderful
fit of the parts with no flash or sinkholes to deal with. I highly
recommend both models.
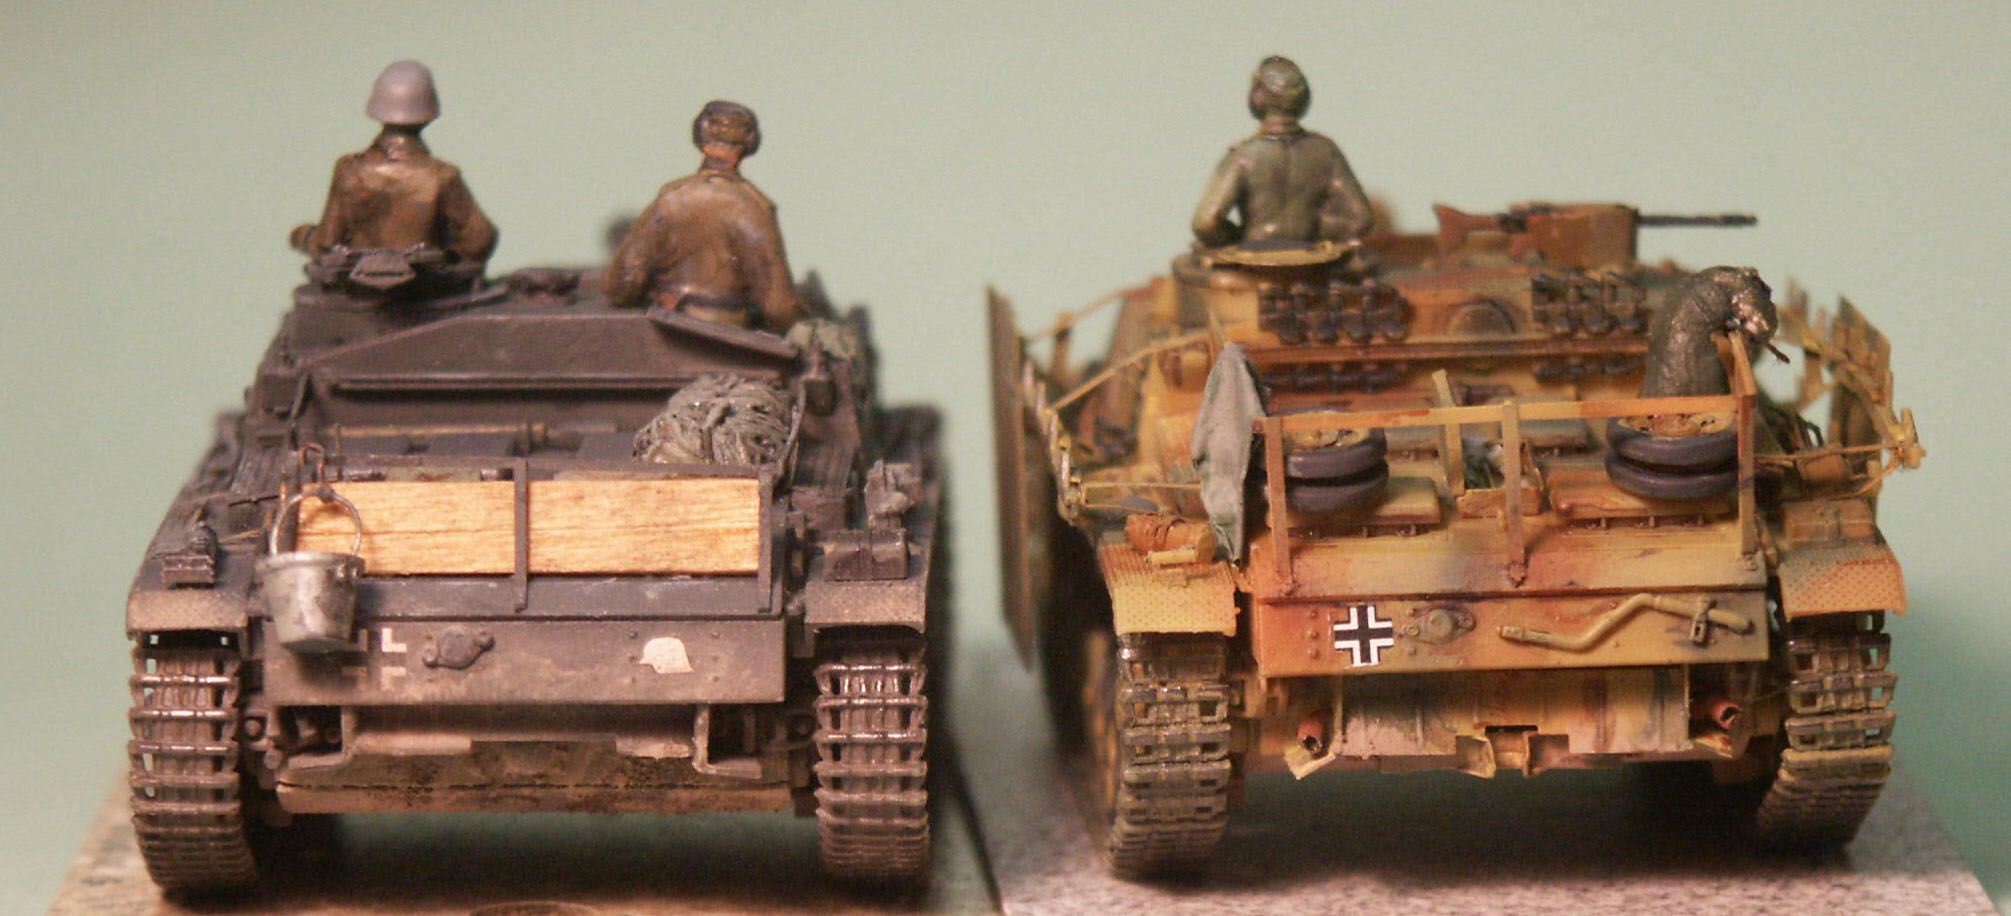
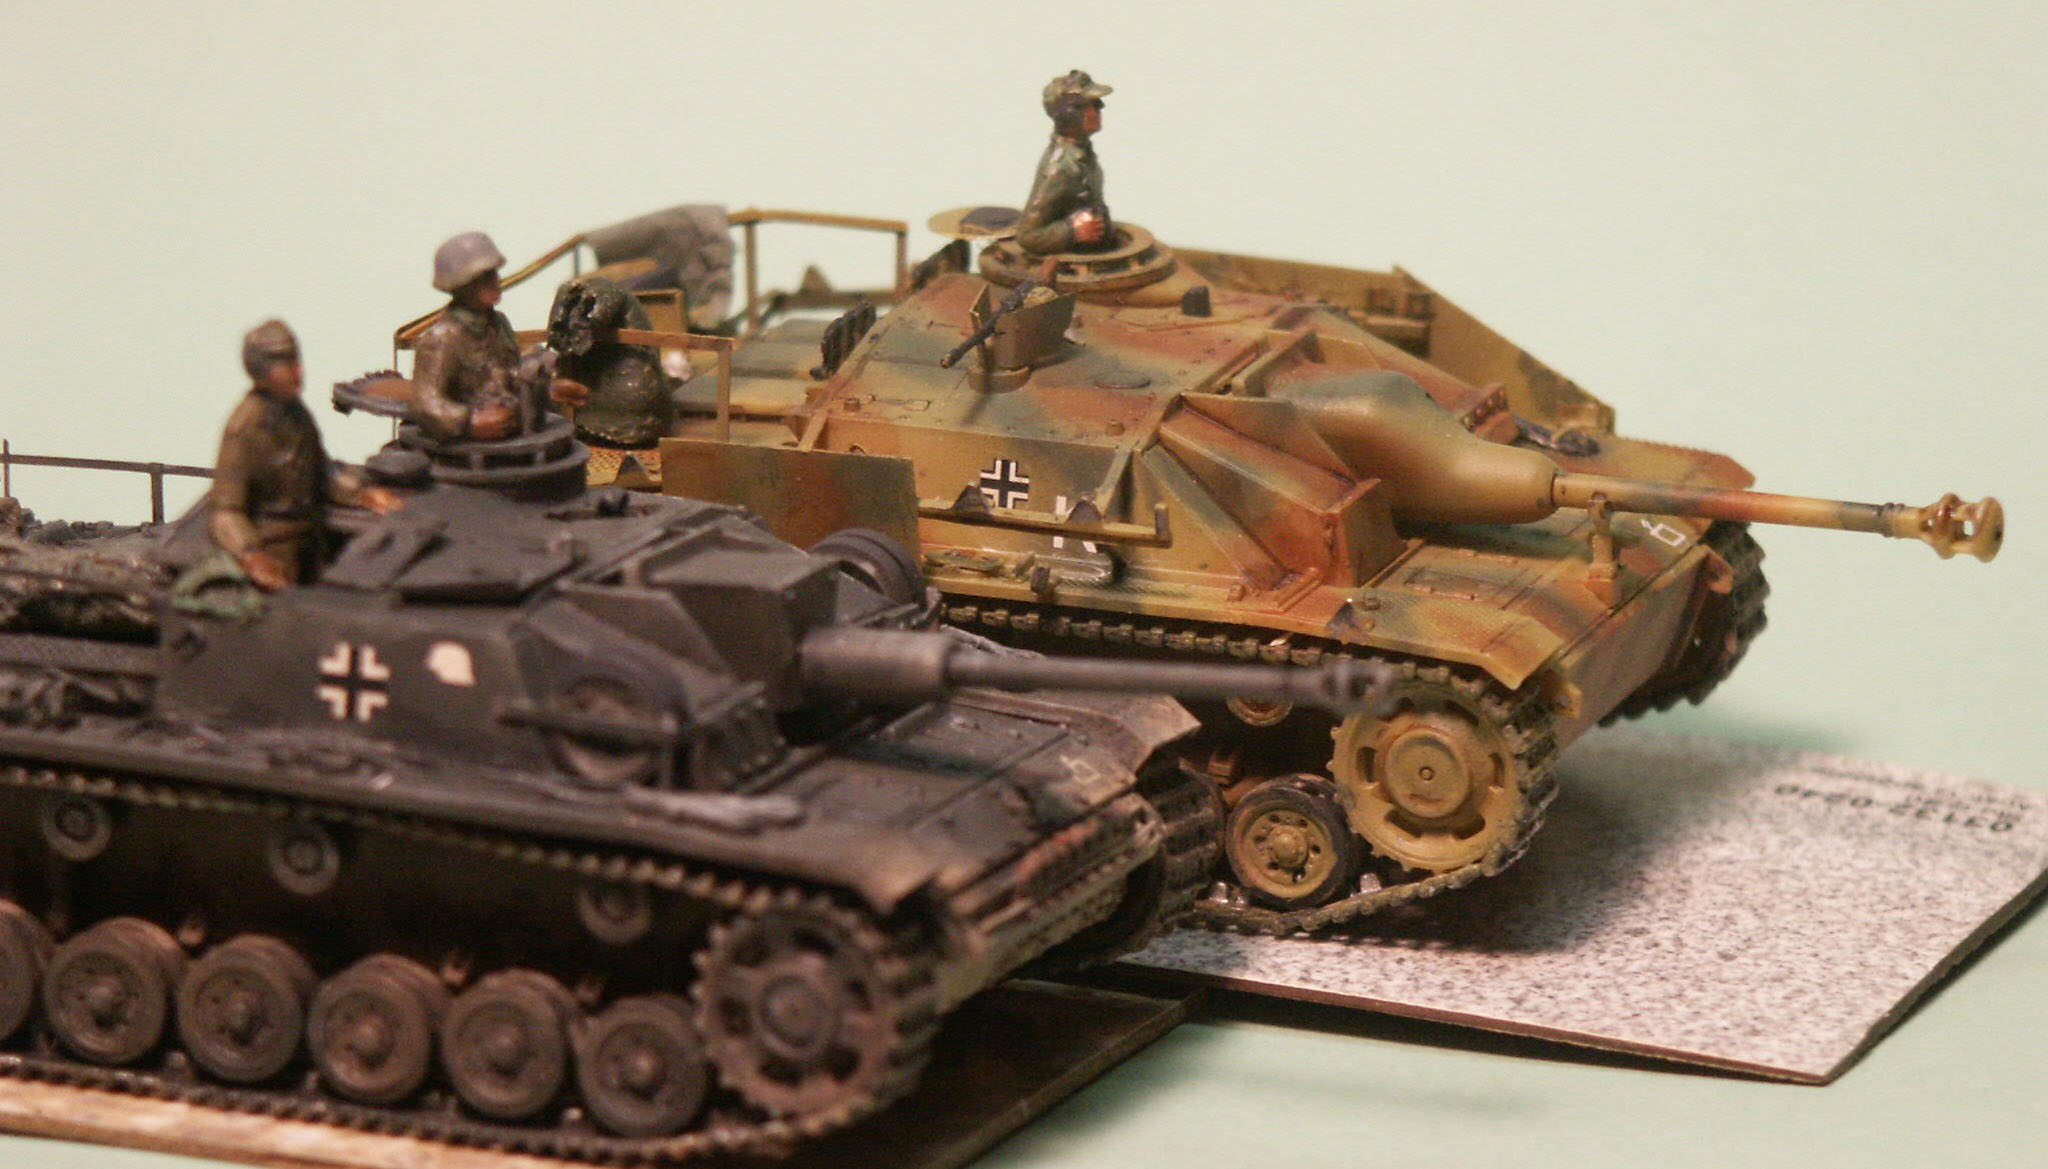
In this final view of the tank's stern (or derrière end)
we can review a few of the other earlier differences between the
initial StuG III G (Dragon model at theleft) and the late version
(Revell model at theright). Revell displays the tow bar beneath
the exhaust deflector, the starter crank mounted on the rear plate,
and the crew compartment exhaust fan on the rear superstructure
wall. Neither vehicle has Zimmerit coating.
Happy modeling !
Stephen ‘Tank Whisperer’ Brezinski (January 2009)
V. References
[1] Sturmgeschütz & Its Variants, by Walter J. Spielberger,
Schiffer Publishing Ltd., (1993). I consider this one of the finest
reference books on the StuG III, also including information on the
StuG IV and the StuIG III, StuG Battery organization and production
and support vehicles. A hard cover book of 253 pages, it includes
many high quality black & white photos and vehicle plans by
Hillary S. Doyle.
[2] Modeling The Sturmgeschütz
III, by Gary Edmundson, Osprey Modeling 22, Osprey Publications
(2006). A good softcover book covering the progressive assembly
and painting of four StuG III variants. I like this book, but if
it were printed with larger pages and photos I would really
like it. Printed in an 8” x 11” format the book would
be more helpful as a modeling reference.
[3] PANZER TRACTS No. 8 Sturmgeschuetz,
by Thomas Jentz and scale prints by Hillary L Doyle. A good inexpensive
softcover book of sixty pages, good black & white photos and
Doyle’s excellent scale drawings. This book covers all the
StuG variants and the Sturmhaubitze 42 and the Sturmmörser
as well.
[4] http://www.panzerworld.net/facts
Panzerworld Website with a section covering myths of WW2
including Schürzen.
[5] http://www.stugiii.com/Schürzen.html
“Sturmgeschütze vor!” website. A website with lots
of Sturmgeschütz information and photos.
[6] http://www.historynet.com/battle-of-the-seelow-heights.htm
Website with information on Battle of the Seelow Heights where the
Revell StuG is modeled to have served.
[7]
http://www.onthewaymodels.com/reviews/Dragon/StuGIIIG_early_preview.htm
A preview of the Dragon Sturmgeschütz kit 7283 by Rob Haelterman
and with photos of the parts and a partially assembled model by
Joaquín García Gázquez.
|