|
This is a compare and contrast review of two 1/72-scale M60A3 Patton tank kits, an 1980's release by ESCI ERTL company of Italy,
and a 2004 release by Revell of Germany. At this time the old ESCI M60 kits have not been re-released by Italeri or any other manufacturer, as has the old ESCI M48 kits.
To be clear up front, the Revell M60 is a whole new kit, NOT a re-release of the older ESCI M60 kits.
A Little History For The Modeler
The M60 is the last US tank to be referred to as a Patton tank. It was first deployed in 1960 alongside the German Leopard 1 and AMX 30 MBTs, facing off against Warsaw
Pact T-64s, T-72s, T-55s, etc. The M60 eventually replaced the M48 Patton in the US front line service. Most M60A1 variants were upgraded to M60A3 standards.
The M60A3 variant is the last main battle tank (MBT) variant of the M60 series. In the US Army and Marines it last served during the 1991 Desert Storm campaign though
presently still serves with a number of foreign countries. During the recent Arab Spring demonstrations in Cairo I noted it deployed by the Egyptian Army alongside M113
personnel carriers.
It puzzles me why both Revell and ESCI put a space between the M60 and the A3 in the title? All my references state M60A3, not M60 A3 nor M-60 A3.
A Gander at the Box Art
 |
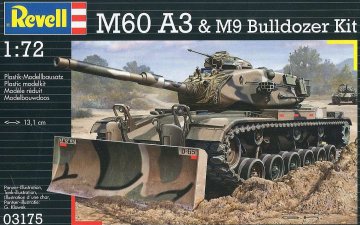
The Revell box art shows both turret hatches open and some detail on the underside of the hatches, this detail on the hatch undersides is lacking on the kit part.
Behind the loader's hatch is the wind sensor mast. In front of the M19 cupola we see the large thermal sight. On the side of the upper turret is a sight blister for
the original stereoscopic range finder, the M60A3 used a laser rangefinder. Below the sight blister is a long handrail and a smoke discharger particular to the M60A3
variant.
The 105-mm M68 gun appears to have a thermal sleeve and canvas weather cover. There is no Xenon searchlight mounted above the gun barrel as there was on the M60A1.
On the hull bow we see the dual headlights with the guard integral with the mudguards (fenders). On the front of the fenders there appears to be flexible black rubber
sections. The bow is the sharp wedge-shaped, different from the rounded boat-shaped nose of the M47. Right of the driver's hatch, our left, we see the exhaust pipe for
the crew compartment heater extending out over the vehicle's right mudguard.
The track looks like accurate M60 track with the replaceable octagonal block. There are the six rubber tired paired road wheels with the drive sprocket at the rear.
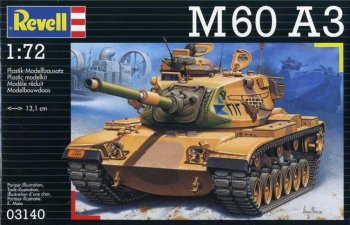
The M60A3 box art is finished in a 3-color scheme of ochre, green and earth brown, and according to the kit instructions, with markings for an Egyptian M60A3 during
Exercise Bright Star in 1999. Bright Star is an annual military exercise with American and Egyptian forces.
|
 |
This is an interesting variation of the M60A3 with a dozer attachment in addition to all the same parts as kit 3140 above plus a sprue
for the dozer and new taller headlights and headlight guards to shine over the top of the dozer blade.
The tank is painted in a 4-color camouflage with markings (according to the kit instructions) for the US 3rd Armored Division serving in West Germany.
|
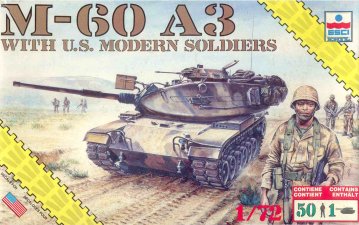 |
The very nice ESCI box art is not the standard box art for this ESCI kit, but a special release with 1/72 scale soft plastic figures of contemporary US infantry figures. (I will not be reviewing the figures.)
Starting with the top we see the M19 commander's cupola, which is more like a small machine gun turret. This cupola is notably larger than the similar M1 cupola of the M48 Patton tank. The cupola hatch is portrayed open. A row of vision blocks wrap around the cupola. There is a towing cable wrapping around the sides and rear of the turret.
The main lozenge-shaped, cast steel, turret has small bulges of the stereoscopic range finder on either side similar to that on the M46 and M47 tanks. Below the rangefinder bulge is a long handrail. A canvas and accordion-like cover protect the main 105-mm gun and mantlet. Above the main gun is the searchlight which is actually a fixture of the M60A1 variant not the M60A3.
The cast steel glacis, the bow, is wedged shaped which is a change from the rounded boat shaped bow of the M48. Like the M48 there is no bow machine gun or co-driver position. The driver is located in the center with three periscopes. The headlights are protected by a guard integral with the fender support.
The track is rubber block "live" track, and we can make out the six paired road wheels, and a sprocket wheel at the rear.
The vehicle is painted in a two or three color soft-edge camouflage scheme and I do not see any markings evident.
|
The Parts
 |
In the Revell M60A3 kit I counted 147 tan colored, injection-molded, styrene plastic parts not including 32 styrene plastic link &
length track parts, for a total of about 179 parts on four sprues.
In the ESCI M60A3 kit I counted 66 dark green color, injections molded, styrene plastic parts, not including 42 styrene plastic link & length track parts for a total of
about 108 parts in all on three sprues. There are no crew figures or etched brass parts included in either kit.
If you wish full views of the kit instructions I recommend you visit Henk of Holland's site here.
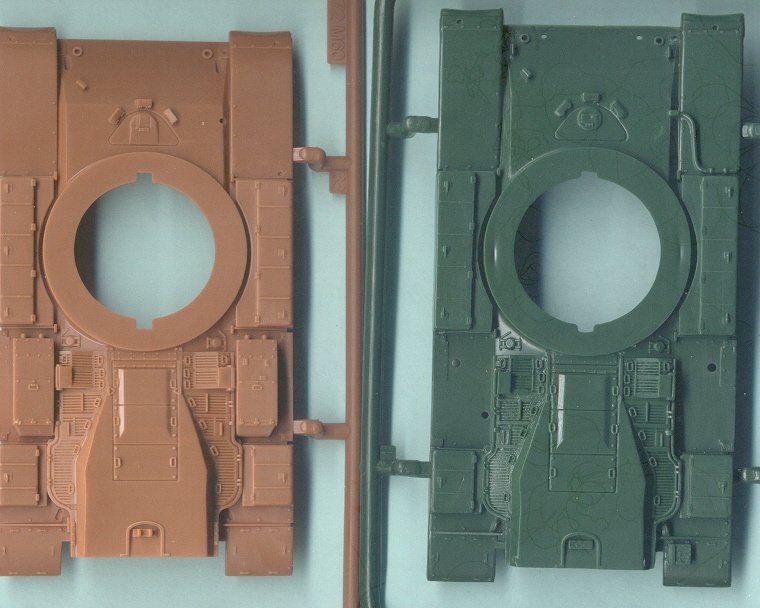
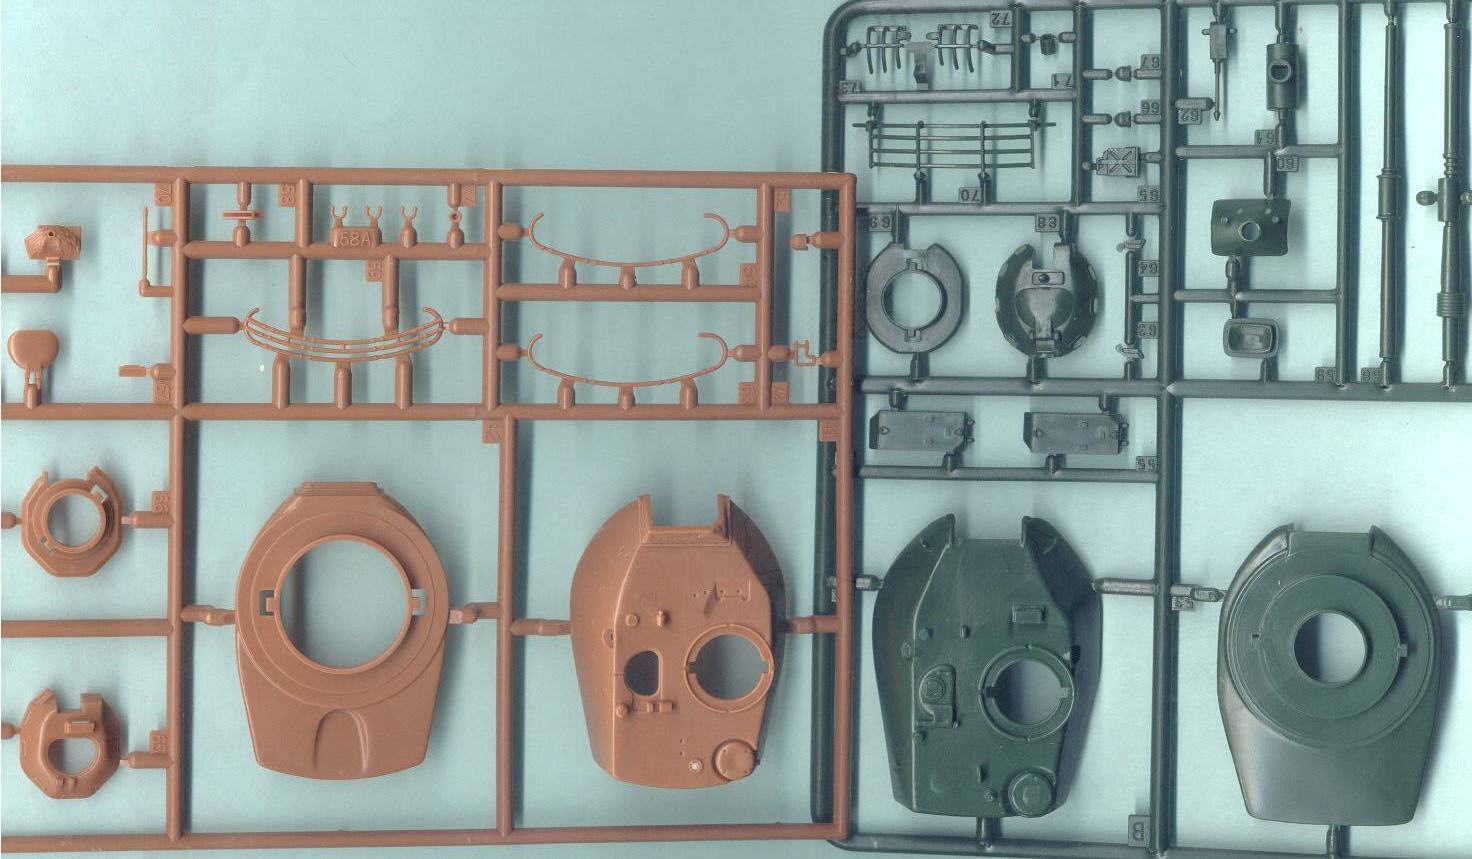
The upper hulls of the Revell (left), and
the ESCI kit (right) are very comparable
in detail and accuracy. If the ESCI hull were not several millimeters
longer than the newer Revell hull I would wonder if Revell had
copied the ESCI hull. ESCI offers some other differences such
as the separate air cleaner boxes in the fenders, but has the
crew compartment heater vent pipe, by the driver's hatch, molded
on. The ESCI kit is also longer than the Revell kit.
|
Evolution
of the Patton tank hull
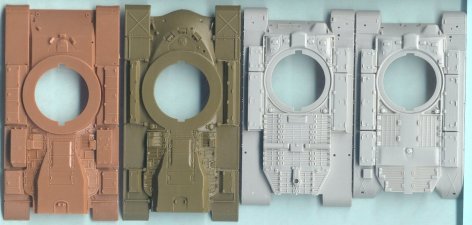
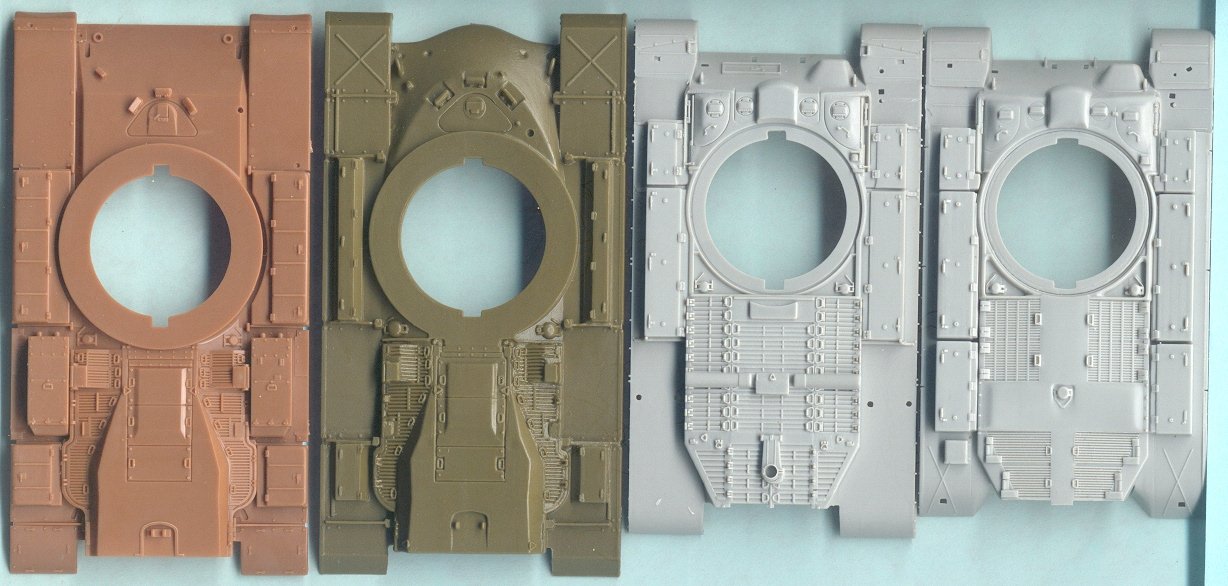
Going from right to left in the scan below we see the evolution of the
Patton tank hull starting with Trumpeter's light gray plastic M26 hull
at far right (the M26 is technically a Pershing), Trumpeter's M46 Patton
upper hull, then Revell's olive green color M48A3-M48A5 hull, and at
far left is Revell's M60 Patton upper hull. Unfortunately the M47 Patton
and the M48A1 hulls are missing.
- Sharing
a petrol engine with the M4A3 Sherman we see that the M26 hull is
the shortest in length.
- Being essentially an M26 hull with a new engine
and transmission the M46 is a little longer and with a revised engine
deck. The glacis looks essentially the same. (The M47 I understand
would have the same exterior hull and suspension as the M46 but
with deletion of the ventilation dome bulge between the driver's
hatches and would have a steeper glacis angle. This should make
it easy for Trumpeter to release an M47 kit!).
- With the M48A5 hull here we can see the revised boat-shape cast
hull nose (bow), now with no bow machine gun nor co-driver position,
and the characteristic diesel engine deck. The M48A5 was the M48
and M48A1 brought up to M60 Patton standards. (The initial production
petrol engine M48 and M48A1 had a distinct engine deck from the
M47 and from the M48A5).
- At far left we come to the dark tan color M60 hull from Revell
AG. It shares the same engine and engine deck as the M48A5. The
significant external difference in the upper hull here is the change
in the bow from boat shaped to wedge shape.

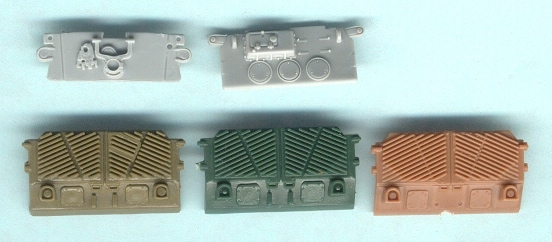
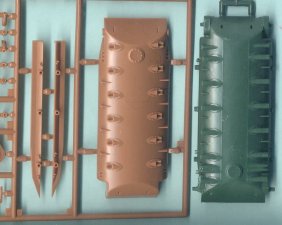
The rear
engine plate can be significant in identifying the vehicle, as at times
it is the only view.
At upper left we start with the M26 Patton which has it's exhaust pipes
(not shown here) coming out the rear plate. The object hanging down
is the gun travel lock. Next is the rear plate for Trumpeter's M46 Patton
with the three round access panels and no exhaust pipes since the mufflers
on the M46 were moved to the mudguards. At upper right an empty space
has been left for an M47 or early M48. At bottom left is ESCI's M48A5
rear plate that is considerably different from the M26, M46, M47 and
initial M48. Next, to the right, are the two M60 rear plates from ESCI
(part 10)and from Revell (part 32)for their Patton Kits, looking almost
identical to the M48A5 rear plate.
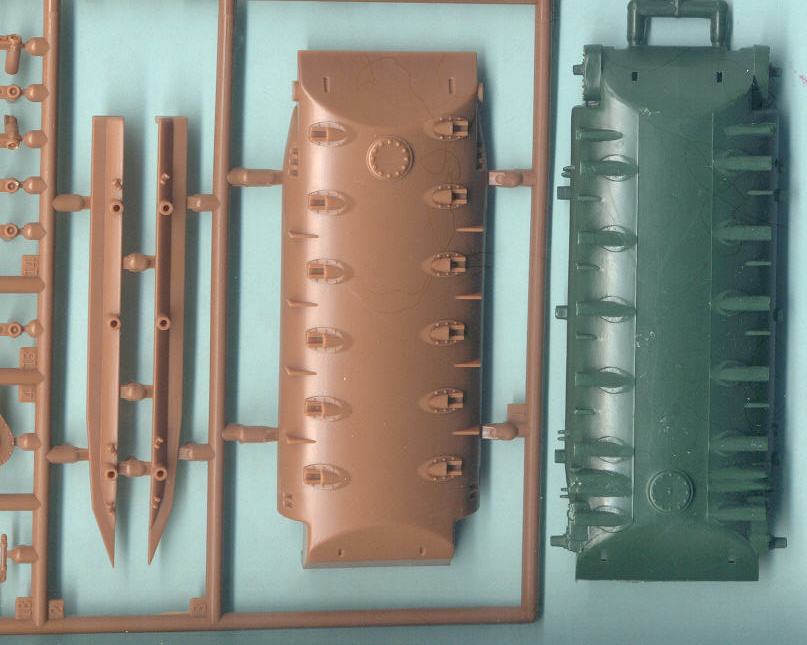
 In looking
at the lower, boat-shaped hulls we see that the green ESCI hull is longer
than the Revell lower hull. Revell breaks their torsion bar suspension
into more parts compared to the ESCI rendition.
In looking
at the lower, boat-shaped hulls we see that the green ESCI hull is longer
than the Revell lower hull. Revell breaks their torsion bar suspension
into more parts compared to the ESCI rendition.
Turret
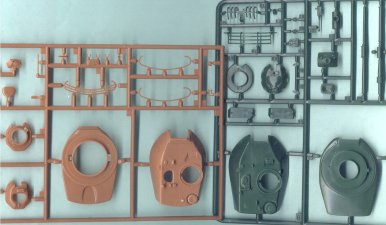 Though the
same general shape, ESCI's turret and M19 cupola are noticeably larger
than the Revell turret parts.
Though the
same general shape, ESCI's turret and M19 cupola are noticeably larger
than the Revell turret parts.
ESCI offers a nice choice of two 105mm M68 gun barrels, one coming wrapped
in a thermal sleeve. The Revell 105mm gun barrel, not portrayed in this
photo, is molded in two halves which makes me a little concerned about
a potential seam or an oval profile. The rear turret baskets appear
well rendered on both kits. I used to think the thermal sleeve was to
inhibit the detection of a hot gun barrel to an enemy's infrared or
thermal imager, but according to M60 Maine Battle Tank 1960-91, New
Vanguard No. 85, the thermal sleeve minimized barrel droop that could
occurred during prolonged firing and effect accuracy.
Both turrets could use some cast steel texture added. The two hatches
atop the Revell turret can be molded open, while the ESCI turret hatches
are molded shut. Unfortunately there is no detail on the underside of
the hatches; we'll have to scratchbuild it.
The tan Revell turret has the correct dimple on the underside of the
turret bustle which allows the driver's hatch to open when the turret
is facing to the rear. The Revell turret also has the more correct rounded
rear shape.
Wheels
& Track
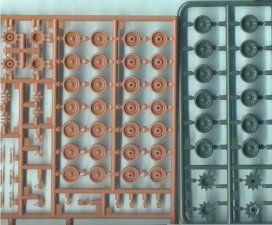 |
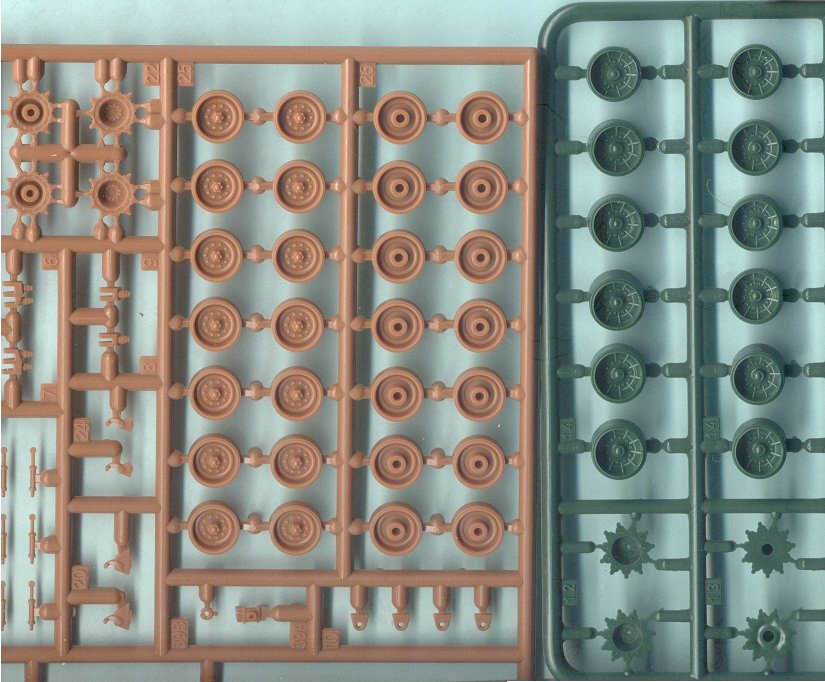
Both
Revell and ESCI offer wheels that are comparable, good but not
perfect. Consistent with their hull and turret, the ESCI wheels
are slightly larger than the Revell wheels. ESCI's road wheels
have spoke-like lines that I think poorly represent triangle shaped
braces around the rim of some M60 road wheels (see reference photo
below).
The ESCI M60 road wheels, like with their M48 kits, are molded
as one piece units rather than the correct paired wheels with
a gap between them for the guide horns to pass. ESCI molds the
torsion bar arms onto the road wheels while Revell gives us separate
torsion bar arms. Revell gives us the correct paired road and
idler wheels. |
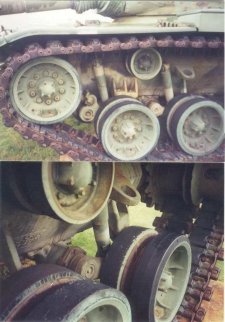 |
The
reference photos at left show the track, the front idler wheel,
road wheels and the rear drive sprocket wheel. Notice that the
idler wheel is the same wheel as the roadwheel. The sprocket has
a center set of paired flanges that the guide teeth slip in between.
This is portrayed in the Revell kit but not the ESCI kit.
The road wheels have the small triangular ribs that ESCI appears
to have portrayed poorly, and Revell did not portray at all. To
be fair, not all M60 road wheels have these ribs according to
my reference photos. I believe the spoked road wheels were an
aluminum version. The torsion bars of the road wheels have shock
absorbers. The track guide teeth look more to be guide horns and
note the rubber pad on the inside face of the track links. These
wheels and track are similar to that used on the M48 tank (M48
has chevron shaped track pads and no triangular ribs around the
rim). Notice that the track is similar to the old M3 and M4 tanks'
track in having end connectors to hold the links together.
In the top photo we can see a little bit of the accordion like
sleeve over the 105-mm gun barrel. |
 |
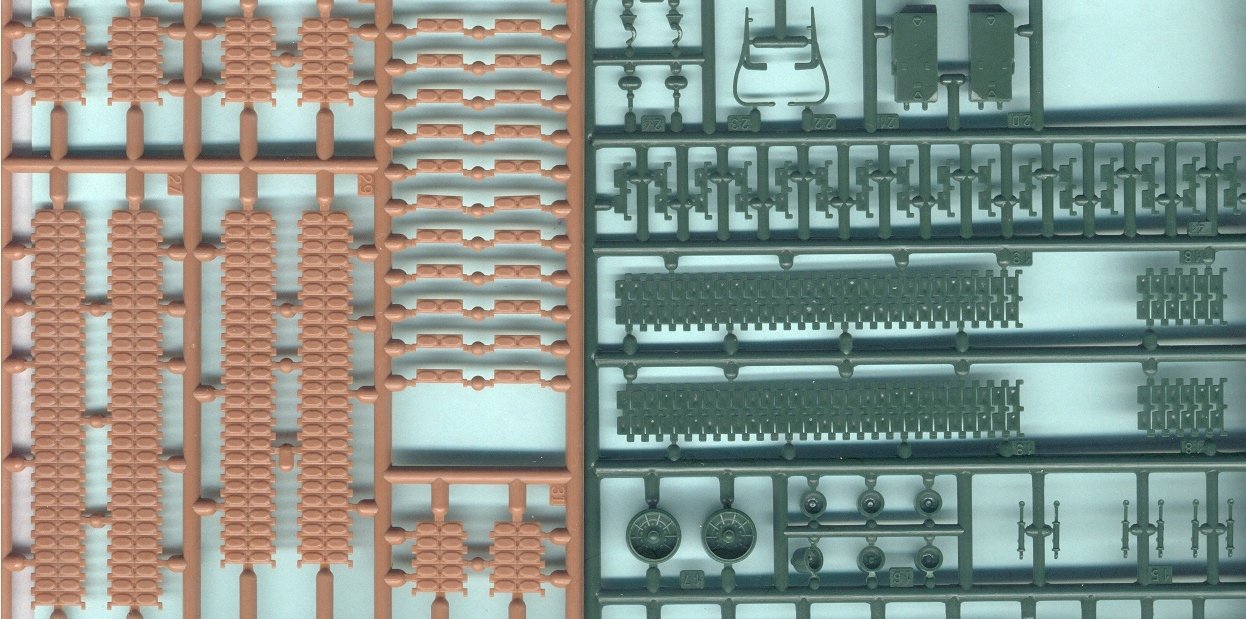
The
track is where Revell is overall better than the ESCI release.
Revell offers reasonably accurate guide horns and rubber track
pads. My assessment of the ESCI track is that it is too thin,
there is too large a spacing between the links, the inside face
has nasty sink holes, and there are no guide horns. ESCI's M60
track is similar to that offered in the ESCI and Revell M48 kits
with the same deficiencies. The M60 track has the octagonal rubber
blocks rather than the rubber chevron tread of the M48's track.
The individual links on both sprues look like they will need to
very carefully sliced off with a sharp blade to keep from distorting
the link parts. At lower right on the green ESCI sprue we see
some of the shock absorbers and the return rollers. |
M9
Dozer Sprue
 |
With
the M6A3 & M9 Dozer kit 3175 we get an additional sprue, with
25 parts for the dozer blade and new taller headlights and new
headlight guards (Parts 113, 114 and 115), so we have the original
kit headlight parts as extras. This dozer could also be used with
the M48, M60A1 and M60A2 Pattons.
We get water slide decal markings for two M60A3 dozer tanks in
the US Army serving in Europe. |
Assembly
Instructions
Revell
|
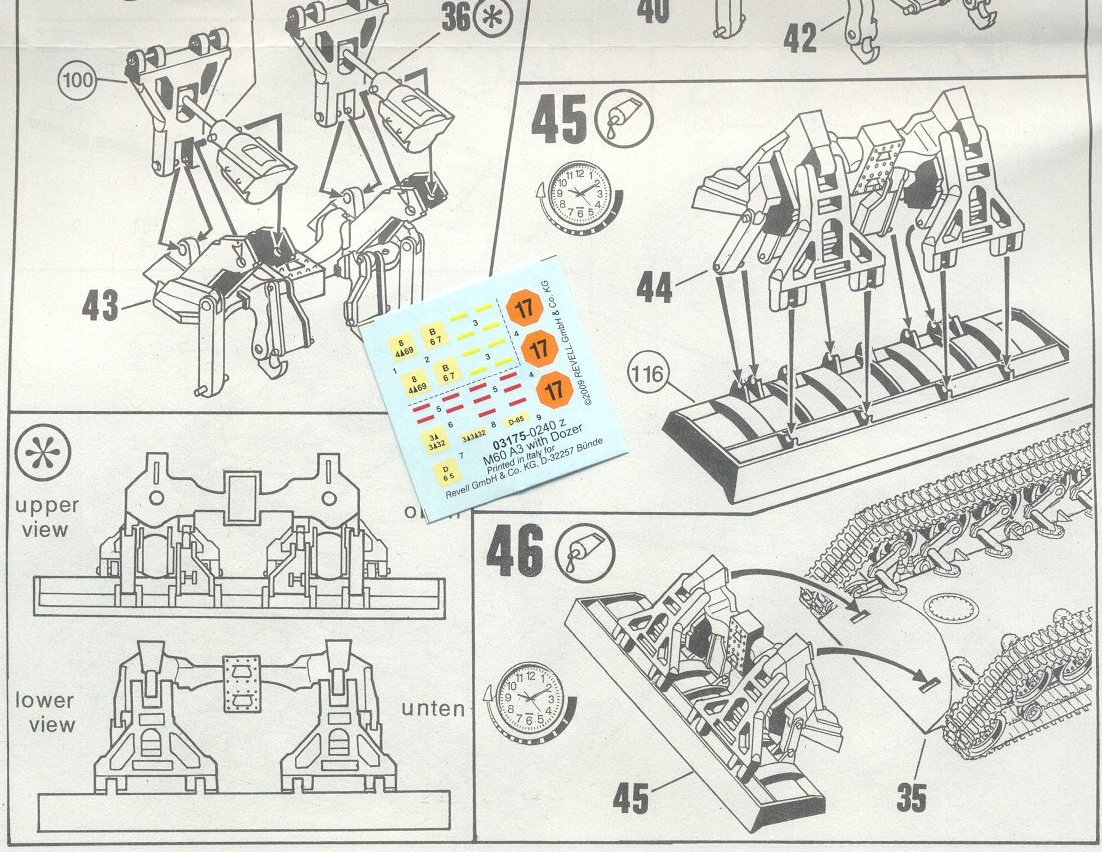
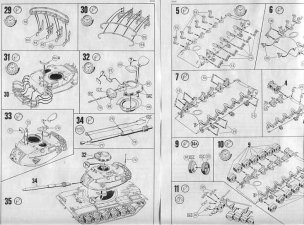
These two pages from Revell's 35-step assembly instructions demonstrate
the clear, detailed instructions. There are a lot of small parts
so be very careful with assembly, study the instructions well
and dry fit twice.
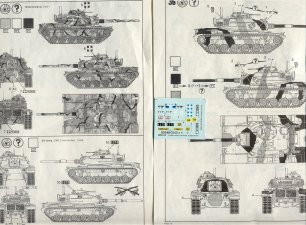
Revell shows painting and markings for a choice of an Egyptian
M60A1, Greek tank circa 2001, and a US Army M60A1 in 1995. The
water-slide decal markings appear sharp, bright, and in-register. |
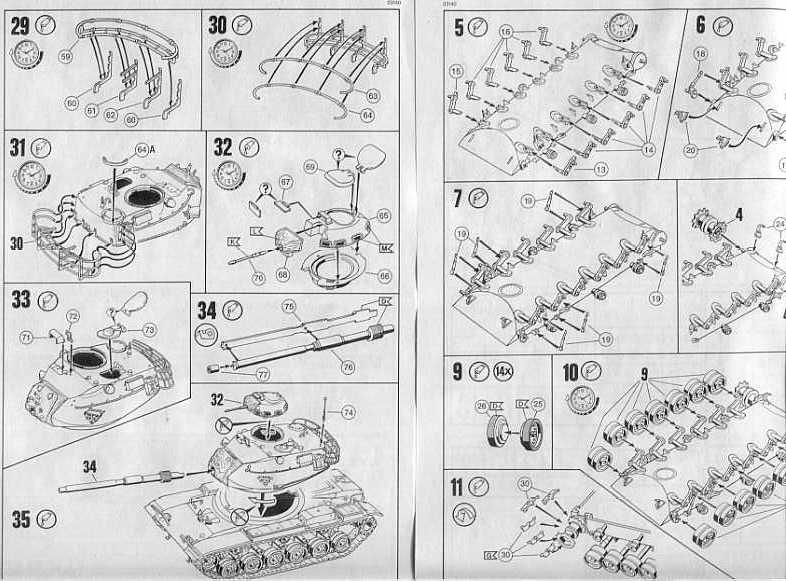
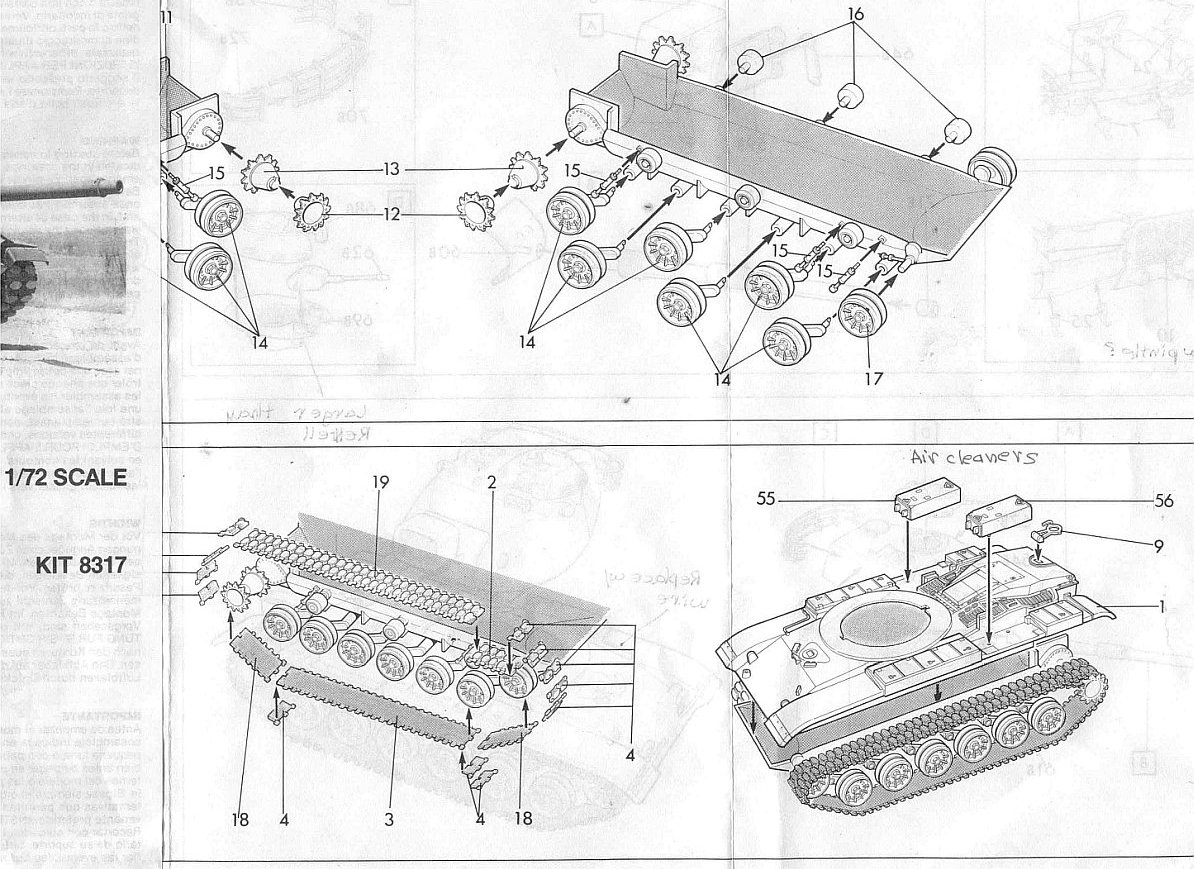
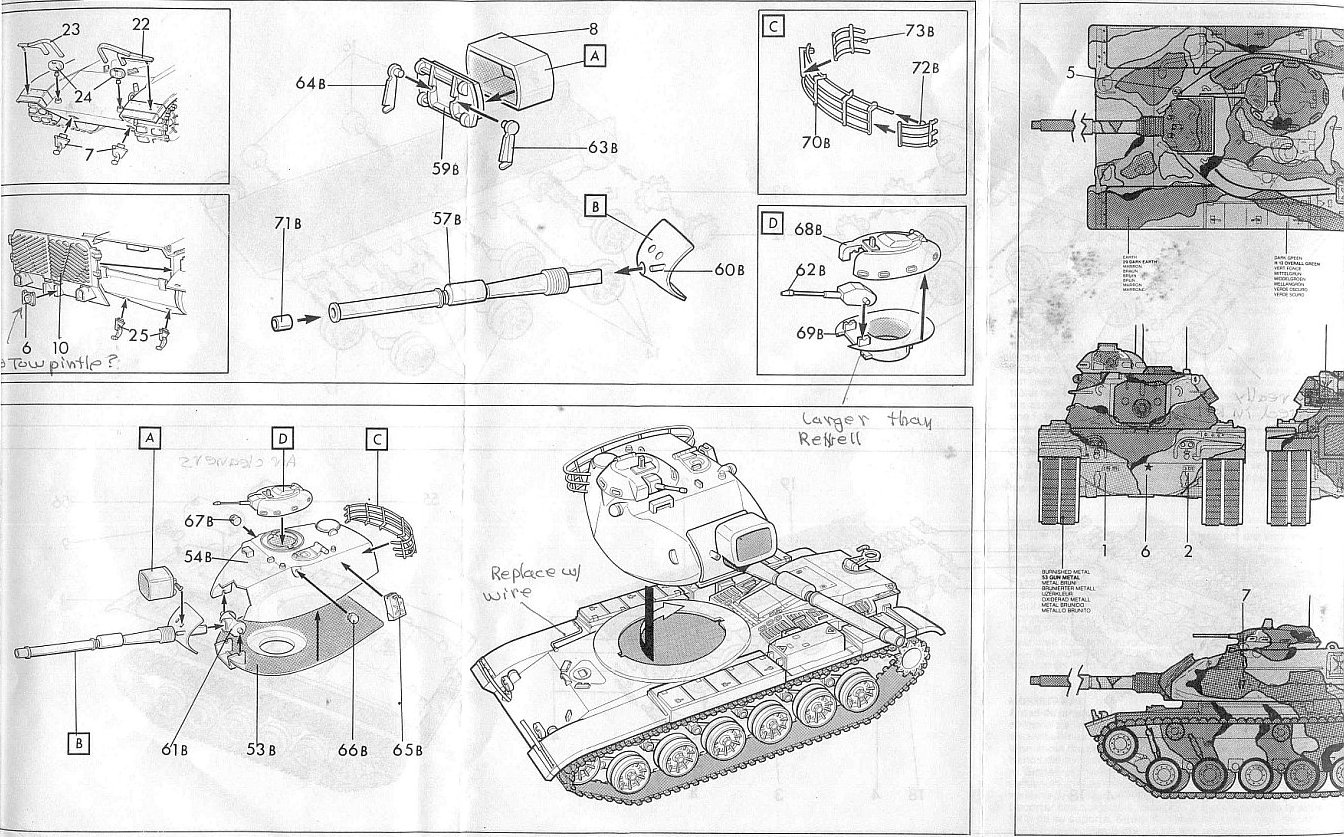
ESCI
|
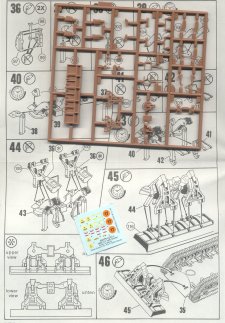
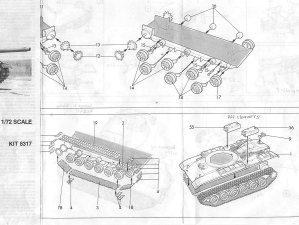
ESCI's instructions are short and reasonably clear. The M60 road
wheels are drawn as a pair of wheels with a gap in-between, which
is not accurate.
The ESCI sprocket wheels are simplified in not having the pair
of guide flanges that the track horns run through (see the above
reference photo to see what I speak of.
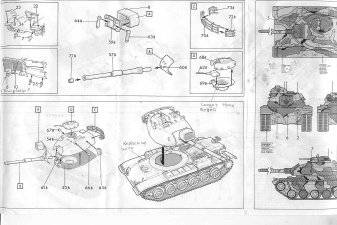
ESCI's instructions show easy step by step assembly and painting
and marking for one US Army M60A1 tank. The paint scheme appears
to be a 3-color NATO scheme of dark earth, green and khaki colors.
The decal markings are discretely small, and all black in color.
The ESCI M60A3 uses the thermal sleeved gun barrel (part 57B).
(The other 105-mm gun barrel, part 58B, I believe is for the M60A1
variant). Above the gun barrels is assembly of the searchlight.
The power cables for the searchlight are not included or portrayed.
Funny, the 3-view painting diagram does not portray the searchlight.
|
With both kits I recommend that the assembly and painting of the road
wheels and track should be done prior to gluing the lower and upper
hulls together.
Conversion Opportunities
- Using an ESCI or Revell M48A5 turret with the M60's M19 cupola on the M60A3 Patton tank hull we can convert this to an initial production M60 tank. Additional alterations
may also be needed.
- ESCI also offered a very interesting M60A2 "Starship" kit with unique turret for a Shillelagh missile-firing gun. I am not aware of any of this ESCI M60A2 kits being
in production at this time. I believe that a "Starship" turret has been released as a resin aftermarket conversion.
- The M60 was used as the basis for engineering and bridging tanks, and many special purpose AFVs in the Israeli armored forces.
- road wheels & T97 Tracks for Revell M60 Patton kit. Different tracks and road wheels for the M60 kit from MR Models.
(see picture here)
- M60 Patton initial production for the Revell kit: This aftermarket set converts the plastic kit to an initial production M60 model which has a turret like that on the
M48 Patton tank.
(see picture here)
Though not technically reviewed here, the below kits share many parts with the ESCI and Revell kits below and I cannot leave without
discussing them. Other offerings of the M60 Patton family are Revell's kit 3168 and ESCI's old kit 8318 with appliqué ERA (Explosive Reactive Armor).
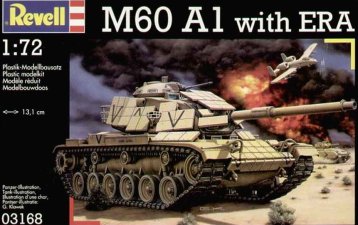 |
The Revell kit at left appears
to feature a US Patton tank during Desert Storm. This Revell painting depicts a Marine M60A1 during operation Desert Storm. Please refer to an M60 reference book for
information about the differences between the M60A1 and M60A3. I look forward to acquiring this kit when it is re-released. |
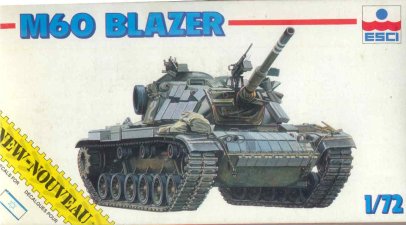 |
This ESCI M60 Blazer box does not specify what model of M60 it is but it appears to be an Israeli tank referred to as a Ma'Gach
(or Magach) based on the ERA blocks (notice the difference in number, shape and positions of the ERA blocks in comaprison to the Revell kit),
the marking and the machine gun mounted over the gun barrel, and the Israeli flag in the lower left corner of the box top. The ERA blocks have a significantly different layout than the
Revell kit. |
Conclusion
Based on measurement of the upper hull length and width I assessed the Revell M60A3 hull to be 1/71 scale in length and 1/72 scale in width and the ESCI kit to be
1/69-scale in length and 1/72 scale in width. The Revell M60 is closer to correct proportions and true 1/72 scale, though the exact scale here is not much of a deciding
factor for me on how much I like the kits. Unfortunately I do not have any measurements for the turret so cannot assess the scale of the two turrets yet.
Overall the newer Revell kit is a more detailed, more accurate in shape and proportions and better M60A3 kit. Not having assembled either, I cannot say much about fit
of the parts. Both should build into a great display or wargame model, though the ESCI kit will need some extra work.
Post script
After On The Way
first posted this M60A3 kit review I was contacted by modeler Fabrizio
Repetto with some additional information that will be particularly
helpful to a display modeler who may be particularly concerned with
historical and detail accuracy.
The ESCI
turret lacks the chin armor under the front of the turret added after
the 1973 Israeli combat experiences during the 1973 Yom Kippur war.
So, the ESCI’s turret is correct only for a pre-1974 M60 Patton
tank, not for an M60A3 hull. Revell’s turret has the cheek armor
so is correct only for a late M60A1 (M60A1 AOS, RISE, RISE Pass) or
an M60A3 Patton variant.
To model
an early M60 and/or M60A1 with the Revell kit, the air filters on
the fenders must be changed, as you need an earlier type that loads
from the top rather than the sides. A good alternative could be the
earlier filter type from ESCI’s M48 kits. The MR Modell’s
M60 conversion kit has the appropriate air filters, while Modelltrans
gives only the early M60 turret, so the Modelltrans’ conversion
still needs new air filters on the fenders. ESCI’s hull is correct
for both and both types of air filters are included in the model kit.
The air filters are the more visible difference between the M60 variants
but not the only. The ESCI’s turret also completely lacks any
traces of the smoke discharger and their control boxes.
Fabrizio
points out something I failed to mention, that, though better detailed,
the Revell T142 tracks have incorrect placement of the track guide
horns. Revell’s guide horns (track teeth) are molded in the
center of the track link where the guide horns should be located between
the track links. Check you references for a clear view of the guide
horns. If you wish aftermarket tracks be aware that MR Models and
Modeltrans both offer T97 rubber chevron tracks but they are based
on the Revel track and carry over the same error with the guide horns.
Another
possible conversion is to mate the Revell’s M60A3 hull or ESCI’s
M60A3 kit hull with M48 wheels and with ESCI’s M48A5 turret
to produce an exotic Republic of China (Chinese Nationalist) CM11
tank, also known as an M48H Brave Tiger.
References
[1] M60 Maine Battle Tank 1960-91, New Vanguard No. 85, R Lathrop
& J McDonald, Osprey Publishing Ltd., 2003 ISBN: 1 84176 551 1
[2] M60 PATTON In Action, Jim Mesko, Squadron/Signal Publications,
Armor Number 23, 1986 ISBN: 0-89747-176-9
[3] Tank Battles of the Mid-East Wars (1), Steven J Zaloga, Concord
Publications Co., 1996 ISBN: 962-361-613-9
[4] Tank Battles of the Mid-East Wars (2), Steven J Zaloga, Concord
Publications Co., 1996 ISBN: 962-361-612-0
[5] On
the Way!
Review samples purchased by the author.
|