|
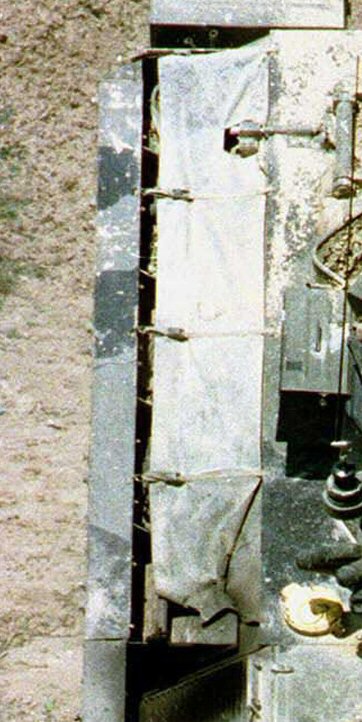
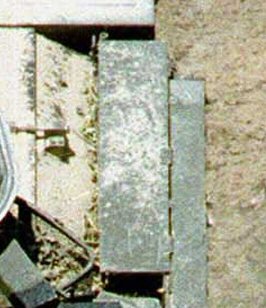
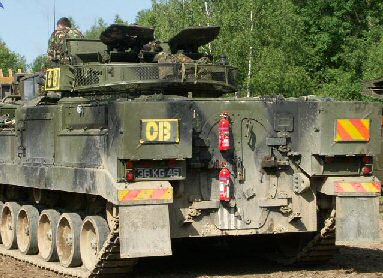
Other Warrior variants Uparmoured Warrior The Warrior was first up armoured with a Chobham armour package in the First Gulf War in 1990, although it wasn't until early 1991 before the start of the ground war that the actual armour appeared. This same armour was then fitted to vehicles in Bosnia and Kosovo and then into Iraq again in the Second Gulf War. Revell do a kit (03144) for the up armoured warrior. Released after a long wait since the arrival of the basic vehicle, I waited in anticipation for the release only to be bitterly disappointed when it arrived. The detail level is fine and nicely rendered, however it suffers from big dimensional errors, mainly around the frontal armour, but also affecting the sides. However all is not lost, the side armour is an easy fix. The frontal armour however is not. The CMSC conversion for the uparmoured warrior has a lot more problems mainly concerning the side armour. The frontal armour, although not correct, is salvageable. The problem with the frontal armour in both sets starts with the final drive housings of the basic kit. Because the kit housings (unaltered) encroach too far inwards, this puts both sets of armour out. Both CMSC and Revell have got around this in different ways. In the Revell kit they have simply shifted the lower armour to the right a bit, which not only has an affect on the stowage bin on the front, but also the top piece of armour in front of the driver. By shifting the lower armour to the right the top piece now sits too far to the right. To get around this Revell have simply widened the top piece, affecting the bolt spacing on the armour and is very noticeable. CMSC have done the opposite. They have left the top piece as it should be, and altered the lower portion to fit. This is not as noticeable as the Revell method, and if the final drives are not corrected, looks a lot better.
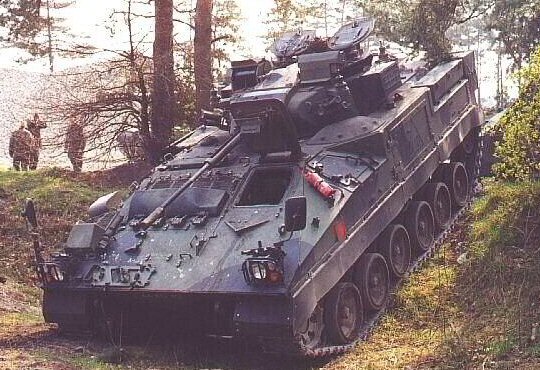
Revell's side armour fairs better, with it being the correct length and height. However, if fitted as per the instructions, the armour stands away from the hull, which it doesn't do on the real thing. Given the amount of time between the armour first being applied in 1991 and the release of the kit, it seems odd that Revell got it so wrong. However all is not lost, because the kit armour is also too thin and the thickness can be made up in the inner surface of the kit piece thereby bringing it flush to the hull. The CMSC side armour is worse, because there is no easy way of correcting it. Not only is it slightly too high, it is also too long. This is because of the way it is made. The individual armour panels are a standard size (apart from the 2 on the NBC compartment and the left hand front panel). On the CMSC armour the panels are different sizes (mostly too big) and as I have already stated, there is no easy way of correcting it. When adding the armour you also need to add mounting brackets to the front and to the left rear where the metal stowage bin is usually mounted (this is why it is sometimes seen mounted elsewhere on an uparmoured vehicle). Also DO NOT fit the right hand stowage basket as this is not fitted although the cover is retained. There is a large mounting bracket down this side. The exact shape of this bracket is unknown as the few pictures I have, have it covered either with a tarpaulin or just general clutter.
In 2004 in Iraq the Chobham armour was supplimented with the Enhanced Protection Bar Armour against RPG-7 warheads and also the Remote Controlled IED Electronic Counter Measure System (RCIED ECM) were deployed. Unfortunately again there is no easy solution for the Bar armour. The RCIE ECM is a fairly easy addition as it only consists of boxes and antennas mounted on the corners of the vehicle. At this point an ECU was fitted to cool not only the troop compartment but also the electronics in the vehicle. Also new 3 vision block hatches began to be fitted to the drivers station (although some IFV vehicles had them fitted earlier) and crude mesh protection for the Commanders and gunners sights. Warrior Command Post FV 511 The command post version is not based on the infantry Warrior and as such it loses the roof periscopes but has the ventilator on the left hand side of the roof. This vehicle also has the double rear doors but does not have the APU as found on the BCP and MAOV versions. The turret has 2 bins one each side and also has 4 antenna pots for the extra radio equipment.
CMSC did a conversion for this vehicle that included the turret bins and a new rear plate for the doors. It also supplied the masts usually seen on either side of the doors as well as grab handles and the extra antenna pots. Mechanized Repair Vehicle FV 512 This is a comprehensive undertaking requiring not only a new hull top and scratch built crane and turret, but also minor changes to the suspension. If you can get hold of the CMSC conversion then do so. I only rebuilt the hull of mine because the conversion hull had an odd kink in it, however I have seen these built into fine models.
The MRV has also been seen fitted with Chobham armour panels down the sides. On the right-hand side it is the same as the infantry vehicle, which allows no access to the stowage bins behind. On the left-hand side it is the same but the panel stop at the NBC compartment to allow access to the crane. Bar armour is also fitted, but has a slightly different arrangement near the crane allowing access to the controls. No bar armour is fitted to the rear. The vehicles mount the same frontal armour as the infantry vehicle with the A frame being mounted on the front of the armour.
Mechanized Recovery and Repair Vehicle FV513 Again a comprehensive conversion. This vehicle is the same as the MRV but has a huge spade on the rear and is fitted with an internal winch. Like before if you can get the CMSC conversion then do so.
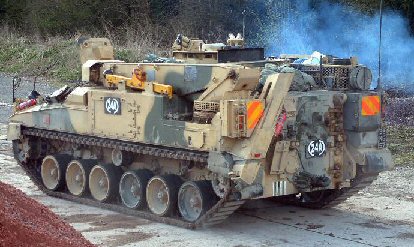
This also has been up armoured like the MRV. Mechanized Artillery Observation Vehicle FV514 Or Man portable Surveillance and Target Acquisition Radar, this being the radar system and not the vehicle. Sometimes referred to as an OPV . To all intents an purposes this looks like the normal Warrior with the exception of the rear bins either side of the door. The actual differences are more comprehensive than that and some require quite a bit of work. The MAOV and the BCP are not converted infantry Warriors, both are built as specialist vehicles and so have a few changes to the basic infantry vehicle, going from front to rear the changes are: Exhausts and deflectors need to be scratch built for the APU on the right hand front of the vehicle. This is quite a complex affair as you need to shave of the existing louvers on the forward triangular section. You also need to remove the moulded on plates for the front lifting eye. On the side of the hull what look like metal strips have been added along the edge of the triangular plate.
The drivers hatch can stay as it is, depending on which time frame you are wanting to model, as only now with the receipt of the WRAP2 armour are the MAOV and BCP receiving the newer drivers hatch. All other hull corrections are the same as for the basic infantry vehicle except that there is a slight modification to the right hand cage stowage basket in that there has been a gap cut into the basket towards the rear [1]. The roof periscopes are missing, unfortunately this means that the roof hatches don't have the cut outs on each corner, Also missing is the roof vent just to the rear of the turret, this saves on having to reshape it, there is also a connector/vent to be added to the left of the turret on the roof in line with the middle of the NBC housing door, behind this there is a small lifting eye similar to the one mounted next to the driver. The triangular vent on the NBC side wall is not present on the MAOV.
The turret can be modified as with the troop variant, unless you are actually going to build the optics. Some vehicles have been seen with a square cut out in the left hand cover. The other changes include the addition of 2 extra antennae mounts and 2 metal bins attached to the turret sides. I used the kit gun for this turret, as it is only a wooden decoy on the real vehicle and usually has covers fitted over most of the length hiding any detail. The periscope between the two hatches also needs to be removed, but here only. The circular mounting needs rebuilding after.
Now
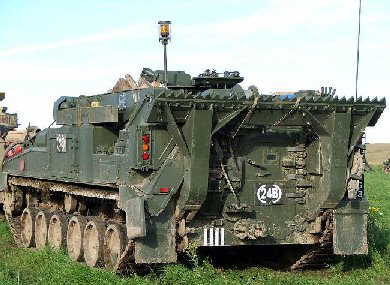
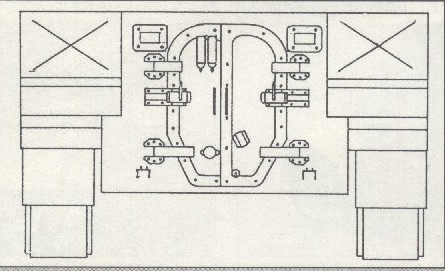
we come to the hard part, the rear. Here it's not only the rear bins
that need changing but also the rear door. On the MAOV and on the
command version the single rear door has been replaced with a double
set of doors of a completely different shape. This drawing shows
the shape of the rear doors. If I have done it correctly it should
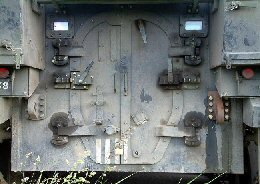
print out correctly for the model. Aside from the doors the rear bins are dramatically changed in that they are taller and longer. The left hand bin houses the mast used to raise the MSTAR system higher and as such has a set of doors in the roof. In between the bins there is a rack presumably for carrying shelters or cam nets. Before adding the rack a strip needs to be added above the doors in line with the roof. It also needs to be stood away from the hull.
CMSC used to do a conversion though I am not sure if it is still available, from somewhere or whether someone has taken over production. However this conversion will supply some of the parts especially the rear doors. It is not without its faults, in that the rear bins are too small as they are just modified kit bins and don't have the correct hatch arrangement. The exhaust for the APU is not supplied either, nor any of the other modifications required to the hull and turret. However they do supply a nice representation on the MSTAR radar, and the turret bins as well as the extra antenna mountings and a lot of the grab handles around the vehicle which certainly saves a lot of work.
Battery Command Post. FV515 This is a similar conversion as the MAOV, with the exception of the rear bins. The BCP carries the standard Warrior bins of which the kit versions only need a slight correction in shape. The rear is the same with the double doors however there are usually 2 radio masts, 1 on either side of the doors. All other changes are internal or to the optics.
Warrior Milan During
the 2nd Gulf War, the Milan sections started to be housed in warriors.
although some pictures seem to show them in the First Gulf War? This is
probably one of the easiest conversions. Apart from the changes
for the infantry vehicle the only other thing required is the Milan
launcher and mount from the Revell Marder kit.
Desert Warrior Another difficult undertaking and there are no aids out there to help. The kit requires modification to the hull at the front. It also has no roof mounted periscopes and so the roof hatches must be changed accordingly. The side armour is a different configuration to the British armour resulting in a different layout. The turret is a modified turret as found on the LAV 25 minus the rear stowage basket. It also mounts 2 TOW missiles, 1 either side of the turret which can be raised when in use.
Modernizing the fleet As with most vehicles, the fleet has undergone various upgrades, some due to radio fit now that Bowman has replaced Clansman (2004) and others due to Urgent Operational Requirements UOR's 2009 which mostly centre around armour fit. As it was found that the old armour fit degraded the mobility of the warrior because of the weight, it also includes a new improved Environmental Control Unit better able to cool the vehicle electronics. And so we come to the latest Theatre Entry Standard (Helmond) or TES H.
The new hatch that is now becoming standard, is actually the same hatch as the Desert Warrior. Warrior Reactive Armour Programme 2 This is the latest armour fit for the Warrior and consists of a new arrangement for the bar armour and new ERA bricks to the sides instead of the Chobham armour used previously. The bricks are mounted on an armoured plate on each side. So far in Afghanistan the Warriors have been seen without the bricks fitted and only the bar armour. This is presumably because the insurgents are not using modern tandem warhead AT missiles. The belly of the warrior has also been up armoured with a new belly plate for more protection against IED's, transparent armour for the BGTI sight of the gunner and wire mesh protection for the commanders sight, along with protection around the hatches for when operating opened up. A new ECU similar in shape to the previous one but with different openings and rear mountings for various antenna. The frontal armour has also substantially changed and now lacks the front bin of the Chobham armour.
MRV and MRRV also sport the new armour package. This changes the exhaust outlet. Other changes include new roof stowage baskets, clear protection for the commander, a roof mounted ECU. Still no access for the side stowage bins (unless these can be accessed internally). So far this armour package has been fitted to 21 FV510 IFV's, 2 FV511 command vehicles, 2 FV512 MRV's, 2 FV513 MRRV's, 1 FV514 MOAV and 1 FV515 BCP. All these vehicles are currently in Afghanistan.
Warrior Manned Turret Integration Programme 2 This is the planned installation of a 40mm CTWS or 30mm Bushmaster weapon in a new turret as yet to be decided.
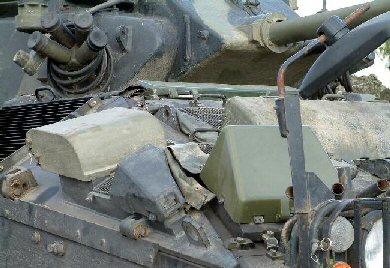
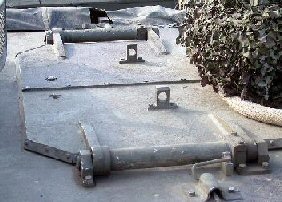
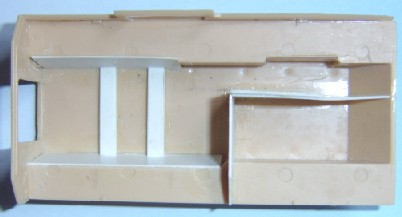
Other modifications made This section is not so much about the modifications needed to make a better Warrior, although a few are applicable. It is more to give hints and ideas for those who want to detail further, and will look at the Uparmoured Warrior, MRCV, MSTAR, Command Post, Milan and various other Warrior variants in service, as well as building an interior. Although most of these are available from CMSC as sets for the basic kit, each are not without their problems. One thing to note for the more adventurous of you, is that if you plan to build an interior, and there are many good photos on the web to help you achieve this, you will need to remove some plastic from the hull tub before attaching the track units. This is because the hull tub takes up internal space, which would make the interior too narrow. This is one of the problems with the PDI interior, to try and regain the illusion of space, PDI have made the seats very narrow, for anyone but a midget to sit on. The following photo shows where the plastic needs to be removed from. The forward portion is for the driver.
After the suspension units have been glued to the hull, the side walls for the troop compartment can be added. The walls should be at an angle and not vertical as in the kit. Once the suspension units have set, the top edge of the units can be cut back, so that the hull sides can be angled without them encroaching on the hull floor. Another detail that needs to be added are the housings for the torsion bars that rise up from the hull floor. This was done with plastic channel. The position can be determined from the underside of the hull from the rear two sets of road wheels, bearing in mind that the channel needs to cover the front of one side to the rear of the opposite side suspension housings.
References A lot of my references are just from observing pictures. The walk around by Dan Hay on Prime Portal is a great help, for working out details. Pictures of the MAOV, BCP and Command post versions are hard to come by. [1] Warrior,
British Combat Vehicle Tracked, Carl Schulze, Concord Publications 2001, ISBN 962-361-674-0. Back to Part 1: Building a Better Warrior |
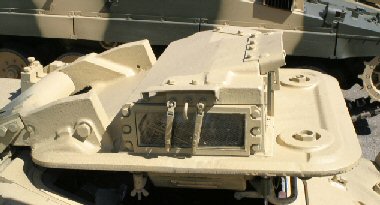
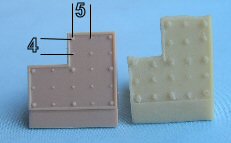 Revell
(left) and CMSC (right) showing that the spacing is out on the Revell piece. The bolt heads should be arranged in 4mm squares.
Revell
(left) and CMSC (right) showing that the spacing is out on the Revell piece. The bolt heads should be arranged in 4mm squares.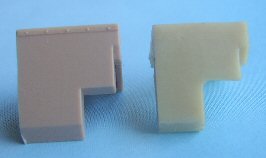 Again
showing how wide the Revell piece (left) is. The bin at the side has been
removed on both pieces.
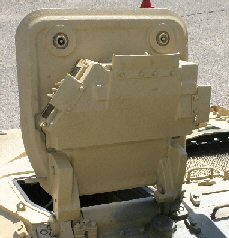
Again
showing how wide the Revell piece (left) is. The bin at the side has been
removed on both pieces.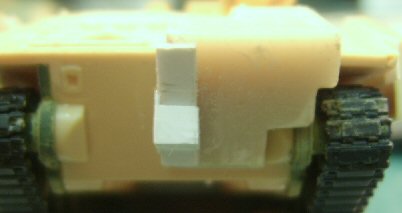 A modified CMSC piece


 roof showing missing periscopes
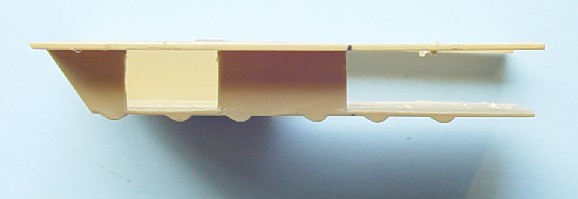
 Left bin
  Left bin from above
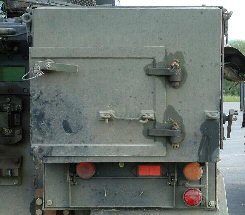 Right bin
 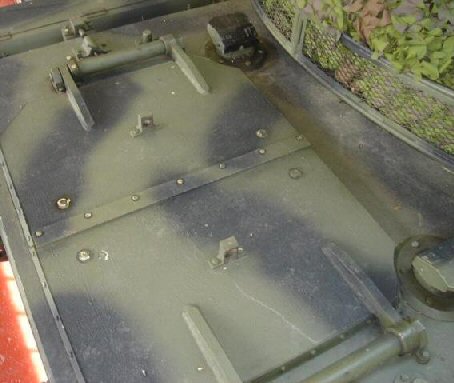 Right bin from Side
  Rear
Rear 
 [1]
[1] 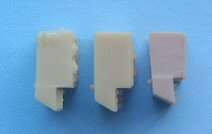 The CMSC MAOV bins. As can be seen the bins are actually thinner
than the kit bin and lack and backward slope.
The CMSC MAOV bins. As can be seen the bins are actually thinner
than the kit bin and lack and backward slope.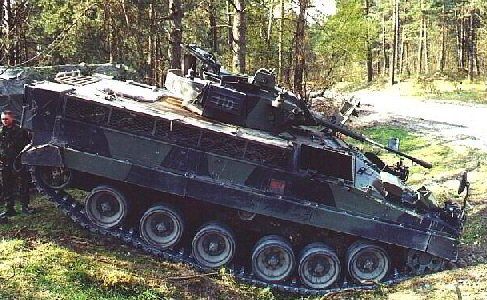

 Top view
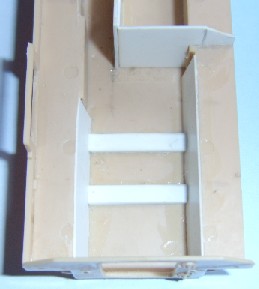 View from the rear