|
Kit Comparison Kit Comparison Hulls
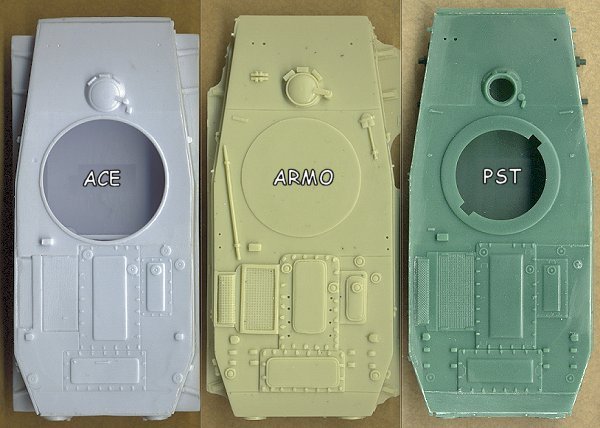
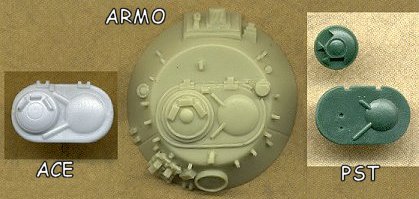
[Note that I had to partially assemble the ACE and PST kits in order to make an accurate comparison to the ARMO kit, which comes with a solid hull requiring little assembly.] There are only very minor differences in the hull dimensions of all three kits. The ACE and ARMO hulls are approximately the same size, and the PST hull is only about 1mm longer than the other two. All three of these compare very well to scale plans, and they are almost exact to 1/72nd scale (the PST kit is just a little bit long). The completed ACE hull is composed of six pieces: two top parts, the bottom, rear and two side pieces. The fenders are molded onto the hull bottom. The axles are separate parts. Being a limited-run kit, there is some required cleanup, and careful sanding and dry-fitting are necessary to ensure a clean fit. There is a small gap at the nose, which will be quite easy to fill, and some gaps at the rear corners, which will be a little more difficult to deal with, but not impossible. The driver's hatch is molded closed. The surface detail is top-notch; it is finely molded and perfectly accurate to scale plans. The engine screens have a fine mesh pattern, though I'm sure they could benefit from replacement with real screen instead. The turret ring is accurate in diameter, and an inner bulkhead is included behind the turret opening, because much of the interior may be visible through an open turret hatch. The ARMO hull is molded as a solid piece. The fenders are molded onto the hull, and although broken in several places, should be easy enough to fix with the broken pieces still within the kit's zip-lock bag. The driver's hatch is molded closed. As I have mentioned elsewhere, the detail on this kit looks hand-crafted, but it is very nicely done. The bolts and other raised detail have much greater relief than the other two kits, but do not exactly match the drawings I have. Some corners are rounded, some plates are longer than they should be, the shape of the engine screens are not exactly correct, etc. But again, unless you have drawings in-hand, or one of the plastic kits next to it, this kit will look very good when complete. But for the purists, the two plastic kits have more accurate hull details. The PST
hull is made from five parts: a top, bottom, rear, and
two sides. Portions of the fenders are molded onto the
hull sides, but the front and rear corners are separate
parts (I have seen photos of a PT-76 with the front
fenders removed). There is some filling and smoothing
required at the front and rear corners of the assembled
hull. The driver's hatch is open, though smaller in
diameter than it should be. The periscopes for the driver
are provided as separate parts, with the middle scope
giving the modeler the option of having it fully extended
for when travelling in the water. The turret ring
diameter is too small, though this is hardly an issue
when the turret is mounted. If someone was capable of
building a diorama with the turret removed and a detailed
interior, then enlarging the turret ring should be well
within their ability anyway. Another unique feature of
this kit is the open water jet ports on the hull rear.
This is the only kit that provides these open, which
gives diorama builders another option. Overall, the hull
details are very well done, and accurate to drawings
(almost identical to the ACE kit), though I am not
impressed with the small rings on the engine deck, which
I believe are fuel (or other fluid) filler caps. These
could have been done better. One other thing I noticed, is that the intake vents on the rear sidewalls (for the water propulsion jets) are formed backwards on the ARMO and PST kits. These two kits make these vents appear as though they are exhaust vents, or something. Only the ACE kit accurately represents these intakes.
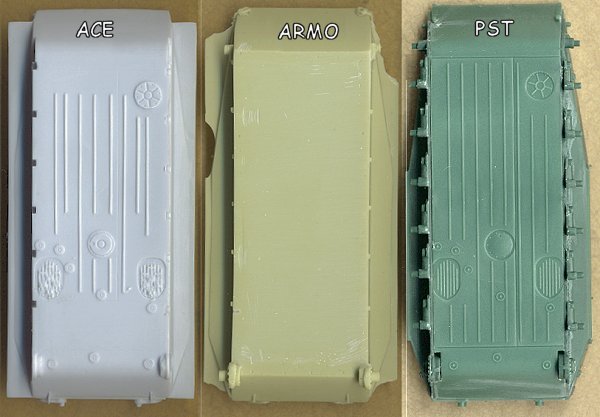
Hull Bottoms
Simply put, these are not very important to most people, but there is some variation here. The ACE and PST hulls are very similar in design, though the vents on the ACE kit seem a bit muddied with something. Notice the gaps around the drive sprocket mounts on the PST kit. The ARMO kit was attached to a substantial resin casting plug on the hull bottom, which has been removed for this shot, leaving a couple of scrapes that I need to fix. The edges where the bottom plate joins with the front and rear plates are sharp on the ARMO hull, whereas they should be smooth curves as seen on the other two kits. Turrets
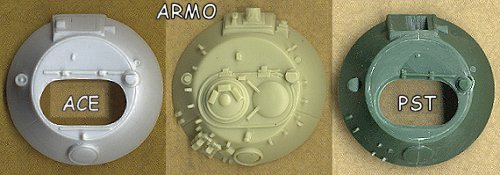
All three turrets are the same size, and are accurate to scale plans. The ACE turret is molded as two parts: the top piece, and a bottom turret ring that is intended to insert through the turret opening in the hull from the inside to the outside, and attach to the bottom of the turret, thereby allowing the turret to turn, but not fall off the hull. This would require the turret to be attached to the hull prior to hull assembly, which I did not want to do, so I snipped off the two small tabs on the bottom turret ring so that the turret can be removed at my leisure. The turret hatch is open. There is a fine recessed line representing the weld seam around the perimeter of the turret roof, and it is the correct thickness to represent the turret walls. The ventilator is a separate part, which I have already glued to the turret for this comparison scan, and it is not a bad piece; better than the PST, though not as good as the ARMO part. Other turret details are to be added later. The ARMO turret is molded as a solid piece, with closed hatch and all details molded directly onto it. The detail is very well done, and molded in excellent relief. I am particularly impressed by the ventilator on the rear turret wall, which I feel is the best of the three contenders. Only resin casting can provide the detailed relief necessary for such a feature. The small prongs along the top of the turret walls are mounting supports for the hand-holds, which are to be manufactured by the modeler out of brass, copper wire, or other appropriate material. One error that becomes apparent when comparing to scale plans is the fact that the gun is mounted too far to the right. The gun should be mounted directly in line with the center line of the turret, with the mantlet enlarged on the left side for the gunsight. ARMO has molded the gun mantlet dead center of the turret face, so that the main gun is no longer on the turret center line. The PST turret was molded in three parts: the turret roof, and two halves for the walls and bottom. This arrangment I feel is poor, because of the join line between the two turret halves, which is very difficult to sand smooth over the ventilator molded onto the rear of the turret. This ventilator would have been acceptable, except for the loss of detail due to sanding smooth the seam. I will attempt to replace the lost detail during the construction phase of the project. Also, the seam between the turret roof and the turret sides is roughly analogous to the weld seam on the real tank, but in this case, the turret walls would be far too thick. I will sand this seam completely smooth, and then perhaps try to scribe in a more accurate weld line to match the ACE kit (but probably not :-) One final note is the two large sinkholes on either side of the gun mount, which will need filling. These are pretty much the only sink marks on any of the three kits. Turret Hatches
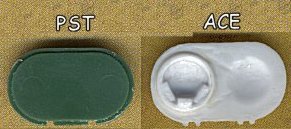
The ARMO turret hatch is molded onto the turret roof, and would be quite difficult to remove, unless you are really into advanced scratch-building. The ACE and PST hatches are very slightly different in size, with the ACE part the more accurate of the two (though barely noticeable). Both of these pieces have an advantage over the other. The ACE hatch is detailed on the inner surface, which is important if you are going to have an open hatch. Specifically, there are two depressions corresponding to the bulges on the outside of the hatch, and the commander's half has periscopes molded onto it. Some smaller details can still be added by the modeler, such as handles and latches, but overall this is well done.
The PST hatch, on the other hand, is more suited to being closed, due to the lack of interior detail. The advantage to this part, however, is that the commander's "periscope station" (not sure what to call this) is molded as a separate piece, which allows the modeler to rotate and position it facing whichever direction is desired, just as is possible on the real thing. The periscopes themselves are molded as separate parts, although I'm not sure to what advantage. So again, I think the ACE part is better suited to posing open, whereas the PST hatch is best posed closed. Wheels
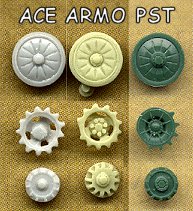
The main road wheels of all three kits are very similar. The ARMO wheels have a more hand-made appearance than the ACE or PST wheels, but all three look very good. You will notice the axle incorporated into the rear of the ARMO wheel. The PST kit has the axles molded onto the hull, and the ACE kit requires the modeler to attach separate axles to the hull. The PST wheel has a very prominant wheel hub, which is exaggerated from the real item, but this will be quite easy to correct. The sprocket wheels show some variability. The ACE wheel is most correct in size and shape, but takes some effort to clean up adequately. Two of the sprocket teeth are damaged due to removal from the sprue. Some of the teeth will be removed anyway when attaching the tracks, so this should be easy to hide. The ARMO wheel is also correctly shaped, though a wee bit too small. A little careful cleanup work with a sharp knife, and it looks very good. This is the only piece that correctly shows the prominent bolts around the hub (though there are too few of them). The PST wheel has an unusual design which I have never seen in any of my references or photos, and I do not think it is correct. Several of the sprocket teeth are missing to allow ease of track assembly. The rear of the wheel is "keyed" to the hull to assure correct wheel alignment. The idler wheels are somewhat similar to each other. The PST wheel is a hair smaller than the other two, but I believe that it, and the ACE piece, better capture the unique shape of this wheel than does the ARMO piece. Although this scan makes it appear that the size differences of the wheels are significant, that is only because of the magnification of the scan. The actual differences are only tenths of a millimeter, so all of these wheels are perfectly acceptable in size. Main Gun
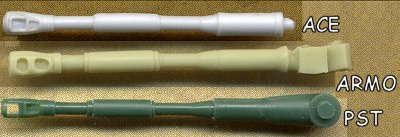
All three main gun pieces are of the same approximate size and shape, though there is some minor variation. The ACE part took some effort the clean up, and is not truly round, probably due to a combination of its molding and my cleanup efforts. But the size and shape (i.e., the bore evacuator and muzzle brake) are accurate. The ARMO barrel is a little stockier than the other two, and the muzzle brake is a little larger. It is also just a little bit too short, just behind the muzzle brake. The PST barrel is much more finely molded than the other two, and is more "petite", if you see what I mean. But it also was difficult to clean up (the molding seam), so some of the sharp edges on the evacuator and elsewhere were lost. The muzzle brake on this part is less robust than the others, which is incorrect, and the total length of the gun is slightly more than the ACE, but not noticably so unless sitting right next to it. It should be noted that the PST kit is the only one that allows for an elevating gun. Both the ACE and ARMO guns need to be fixed in place (as will my PST gun, because in order to elevate it, you need to sandwich the gun between the turret halves during turret assembly, which I did not do). Unfortunately, I was unable to obtain the turned aluminum gun barrel sold separately by ARMO for this article. From the photos, this barrel looks precise, and it comes with a hollow-cast, resin muzzle brake. The bottom line is that I think this replacement barrel would be a fantastic addition to all of these kits, and I hope to obtain three of them prior to finishing the construction review. Tracks
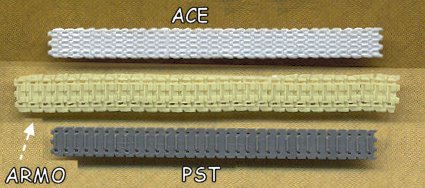
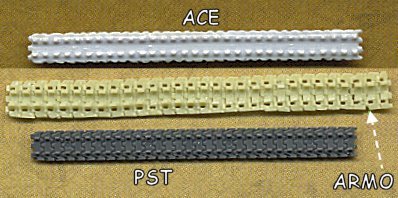
Great variety here. The ACE tracks are accurate in width and tread pattern. In fact, the outer surface of these tracks is highly detailed, and I think is the best of the three. But the inner surface lacks individual link detail. The guide teeth are nicely done, but the modeler may wish to scratch in some lines separating individual links.
Although the ARMO track is hand-made, is is also very detailed on both the inner and outer surfaces. In fact, I like the detail a lot. However, these tracks are about 1.5mm (or 30%) too wide. Since no aftermarket tracks are available, you are pretty much stuck with these, unless you steal some from another kit based on this chassis (BTR-50, ASU-85, etc.). The PST tracks are the opposite of the ACE tracks concerning detailed surfaces. While accurate in size, the outer surface is not very well done, and the tread detail is over-simplified, particularly the hinges between the individual links. However, since most of the track that will be visible is the segment composed of individual links wrapping around the sprocket and idler wheels, it's possible that the overall appearance won't be too bad. But considering the fact that the upper track run is highly visible on the completed model, it's also possible that this particular deficiency will be visible. Time will tell. Note that the insides of the tracks are very detailed, with excellent guide teeth, and the track hinges are very well depicted. Markings and Instructions
The ARMO kit comes with no markings, and the instructions are very rough. One would think that for such a simple kit with few parts that construction would be intuitive, but in fact, there are several parts in the kit that have only vague placement information, and photos of the real vehicle (or access to instructions from other kits) will be needed.
|
 The ACE kit comes
with six marking options, including two Soviet (1980s),
one Yugoslav (1990), one East German (1980s), one
Indonesian (1990s), and one North Vietnamese (1969). ACE
decals are typically very nice, with sharp printing, and
good adherence. The instructions are well drawn, though
they may be a little complex for beginner modelers.
The ACE kit comes
with six marking options, including two Soviet (1980s),
one Yugoslav (1990), one East German (1980s), one
Indonesian (1990s), and one North Vietnamese (1969). ACE
decals are typically very nice, with sharp printing, and
good adherence. The instructions are well drawn, though
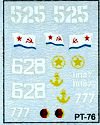
they may be a little complex for beginner modelers.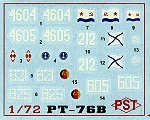 The PST kit comes
with four marking options, including two Soviet Naval
Infantry, one Polish (1968), and one East German. The
decals are very well printed, and other PST decals I've
used in the past were of excellent quality. The
instructions are step-by-step and very clearly drawn.
Excellent four-view drawings are included, and are
printed very close to 1/72nd scale, which makes for a
useful reference.
The PST kit comes
with four marking options, including two Soviet Naval
Infantry, one Polish (1968), and one East German. The
decals are very well printed, and other PST decals I've
used in the past were of excellent quality. The
instructions are step-by-step and very clearly drawn.
Excellent four-view drawings are included, and are
printed very close to 1/72nd scale, which makes for a
useful reference.