| I first
became aware of figure painting as a young lad watching
over my older brothers shoulder painting boxes of Airfix
figures many moons ago and I guess soon after I covered
my own figures in many layers of multicoloured coats of
paint. Over the last 22 years I have painted everything
from English and American Civil War, Napoleonics, Romans,
to Dragons, Elves and Skeletons from 15mm to 1/35 scale (now
I am back to my first love painting figures for my small
scale vehicles). I would say a lot of the standard I produce comes simply from the years of practice I have had but a lot also comes down to technique, so here is my simple technique. I usually prepare 2 to 3 figures at a time unless painting individual tankers. Once I've decided on which figure(s) I will be painting, first thing I do is wash them in cold water with soapy liquid to get rid of any casting agent/chemicals that may remain around the figure(s). Then I leave them to dry (I do this as a matter of course with every figure I paint now). Next I cut and file off any casting blocks or flash and fill any imperfections with milliput or glue depending on the size. Once prepared I glue the figure(s) to little bases of old model box card for easier handling while painting. PAINTS Mostly I use acrylics but on a whole I make use of both acrylics and enamels of various makes (basically what is in stock at my local hobby stores is Humbrol and various wargames makes), but I have no particular favourite at the moment; only thing is you can finish figure(s) much faster with acrylics. STAGE 1 : PRIMER THE FIGURE(S)
Patience is the key to figure painting, first I prime the figure(s) with a coat of light grey. This acts as a good base for any following coats and brings out detail and any imperfections I've missed. Then I leave the figure(s) to dry for a time depending on what type of paints I've used. STAGE 2 : BLOCKING IN THE MAIN COLOUR I work from dark to light with figure painting and I tend not to use black neat on a figure unless with panzer uniforms or the base for very small details. So I start off blocking out areas of uniform with a darker shade than I am aiming for (dark browns, dark greens and dark reds). I then block out the flesh area using the same method but using a blend of browns and/or blue and flesh, but I make sure I don't go too dark as the paint job can then become a wargames look. STAGE 3 : PAINTING FACIAL DETAIL I then paint in the eyes with white then Prussian blue; I do this before finally shading the face (many people leave eyes out but I feel they are very prominent in humans and I am happy with the way they look in my figures). Painting the eyes before painting facial features lets you blend them into the face as you begin adding in facial detail. I do this by using a very fine brush to apply subtle lightened shades of the base colours mixed with flesh to prominent areas such as nose, cheeks and ears. Then gently continue adding a little white until I am happy with the result. I also paint the rims of helmets or hat at this stage. (I do the face first, as once complete, I find it spirits me on to finishing a figure well; seems to be a little bit of self encouragement.) STAGE 4 : UNIFORM PAINTING
There is no big secret in my uniform painting, just the same working from dark to light and I leave all small detail till later and treat all webbing and weapons as individuals, leaving metallics till later too. I also leave headgear till later as I have a tendency to hold the heads with my index figure. STAGE 5 : PAINTING IN UNIFORM DETAIL I use black neat to pick out buttons, belt buckles, medals and unit insignia first, then it's down to a steady hand and individual skill to paint the items in their actual colour, and then I finish off headgear and metallic objects. (these are the points I feel really make a figure). So, that is my simple method of painting figures and definitely is not the only way, but it gives me my best results. (Hopefully it will be some help to someone else too.) Happy Figure Painting !!!
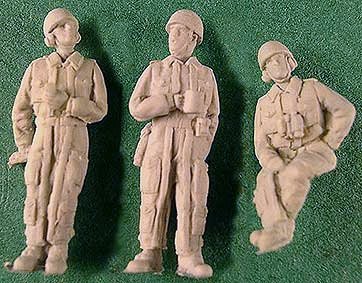
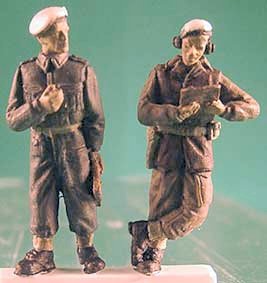
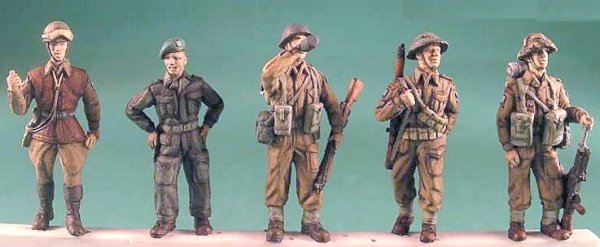
*If you look at the figures above you will see that the first 2 have their eyes painted and definately stand out better because of this small detail compared to the infantry figures who do not have their eyes painted. Please note that the photo's of the figures are ameatur shots outwith a studio and understandably are not a precise colour match. When I am painting figures I try to gather as much reference material on the uniforms as possible and feel this makes life so much easier. All the figures show in this article are from the Milicast range of 1/76 scale resin figures and are sculpted by Tony Boustead of England. Tony's figures are some of the best around for the smallscale modeller at the moment and can be found in many figure ranges such as Milicast, FCM and SHQ |