| Sd.Kfz. 250/1 Neuer Art. | ||||
| Kit # TT001 | Review by Rob Haelterman | |||
| Sd.Kfz. 250/1 Neuer Art. | ||||
| Kit # TT001 | Review by Rob Haelterman | |||
|
This is a true multi-media kit, as it follows the now well-established formula of resin combined with etched brass. That said, you do not get any decals, which seems to be the current trend with this type of kits. Apart from that, the packaging is very good, but somehow some fragile parts were still broken in my example. The manual is a multi-page type with drawings and pictures of a model under construction.
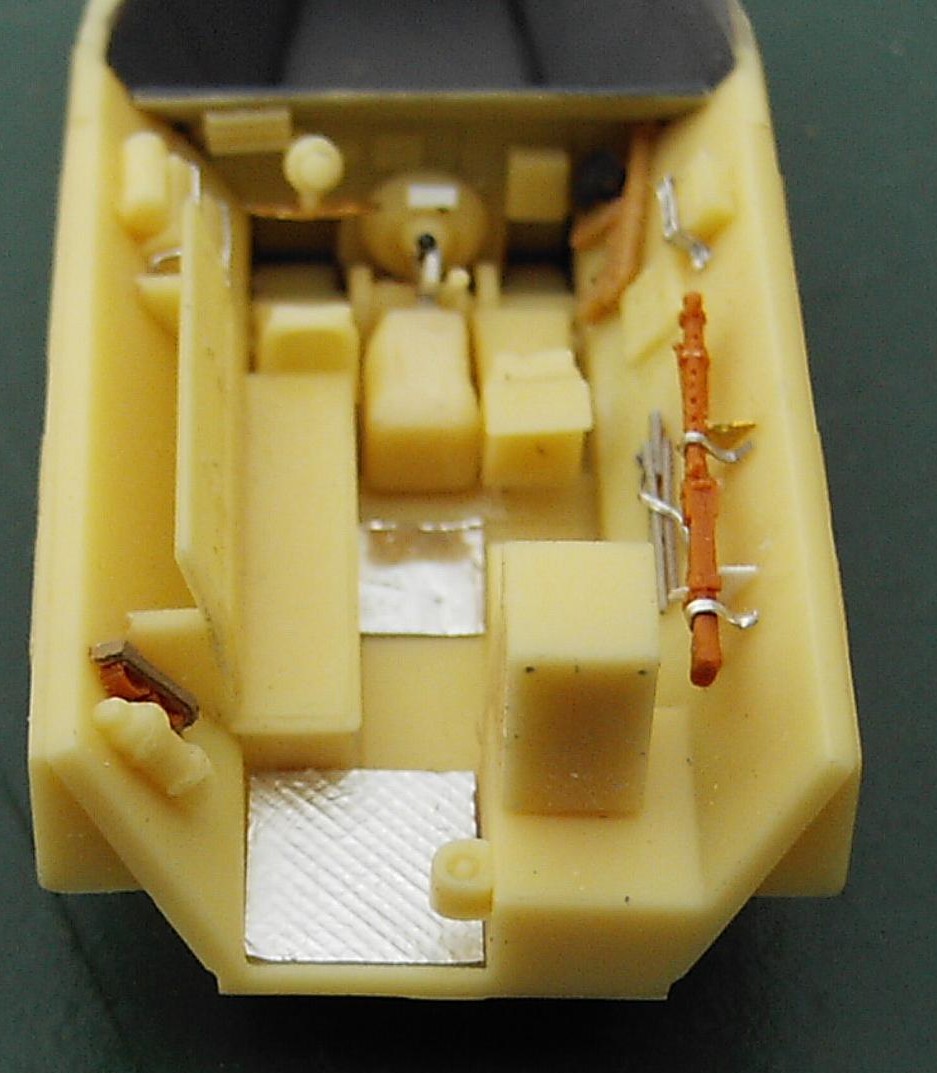
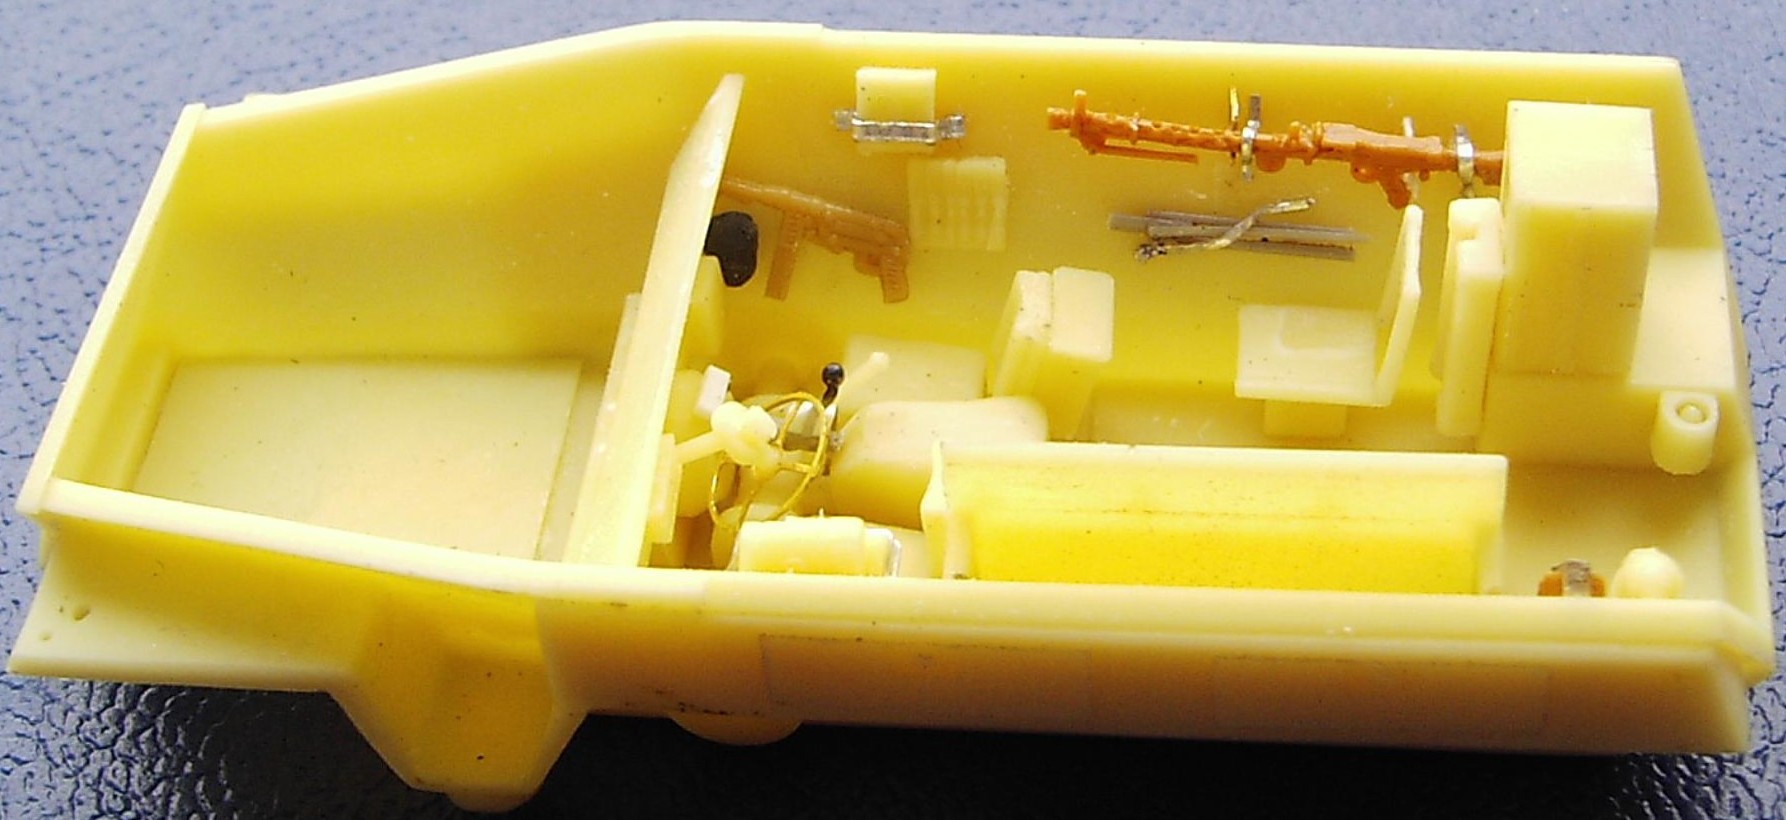
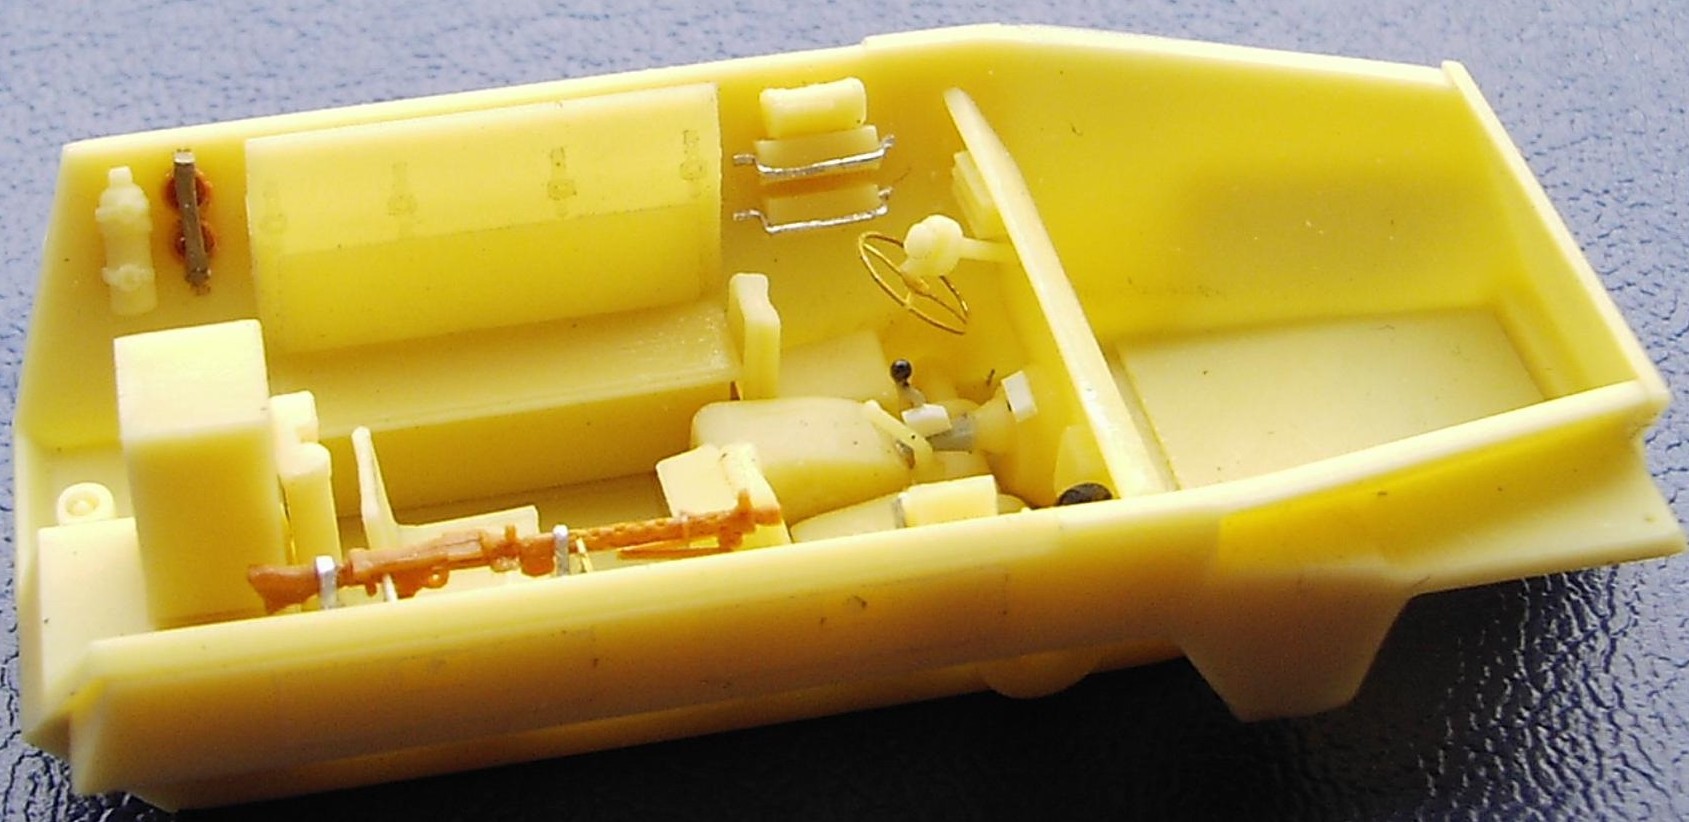
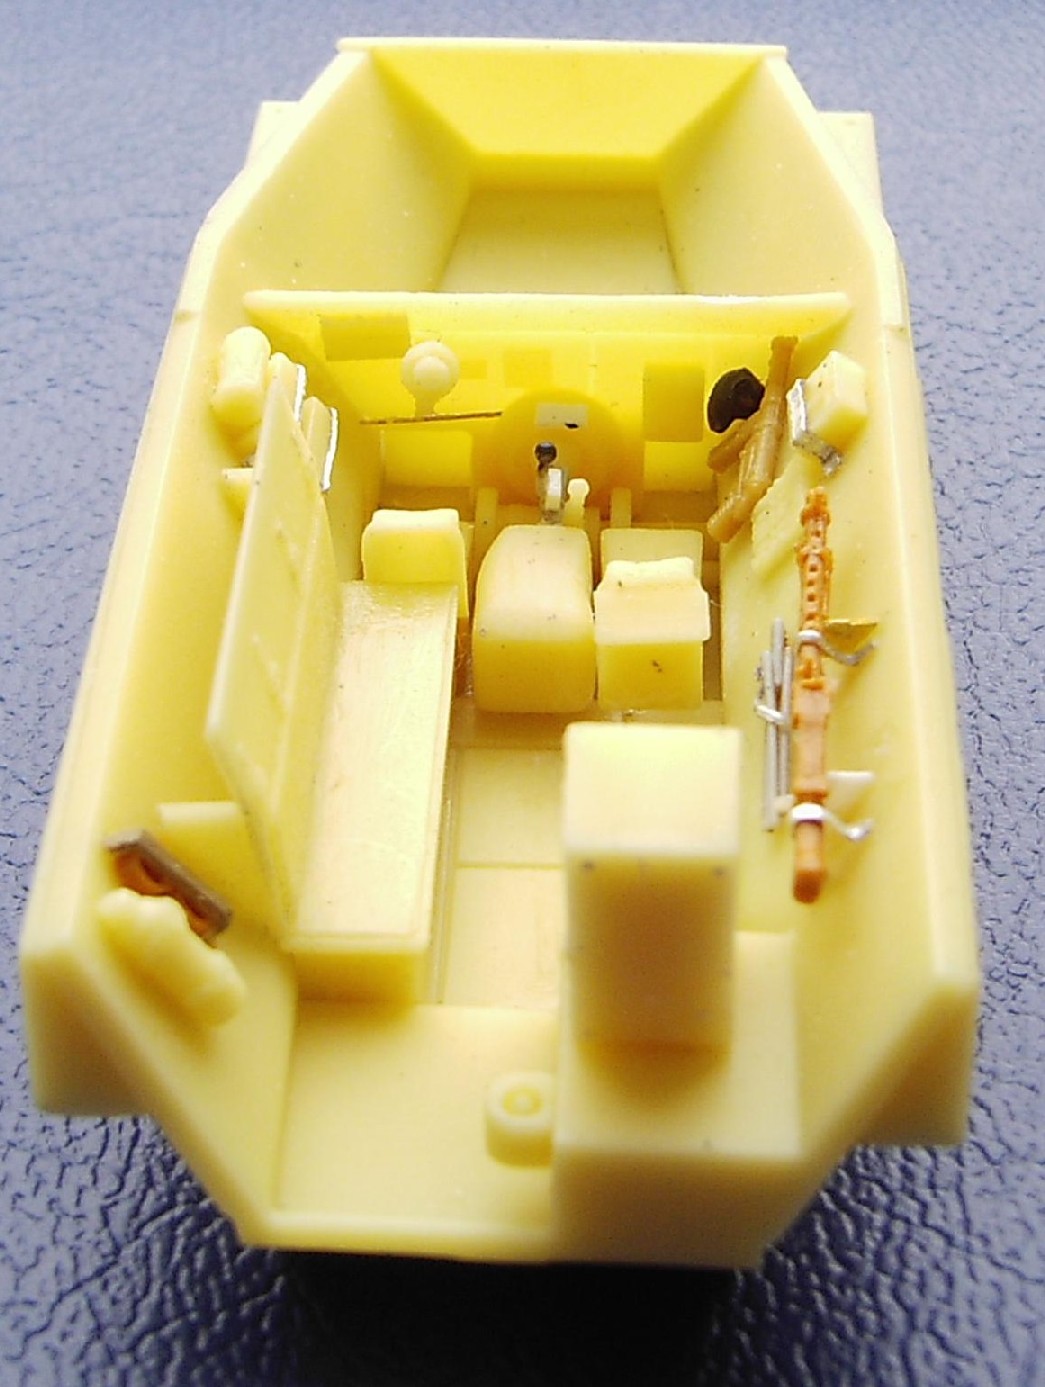
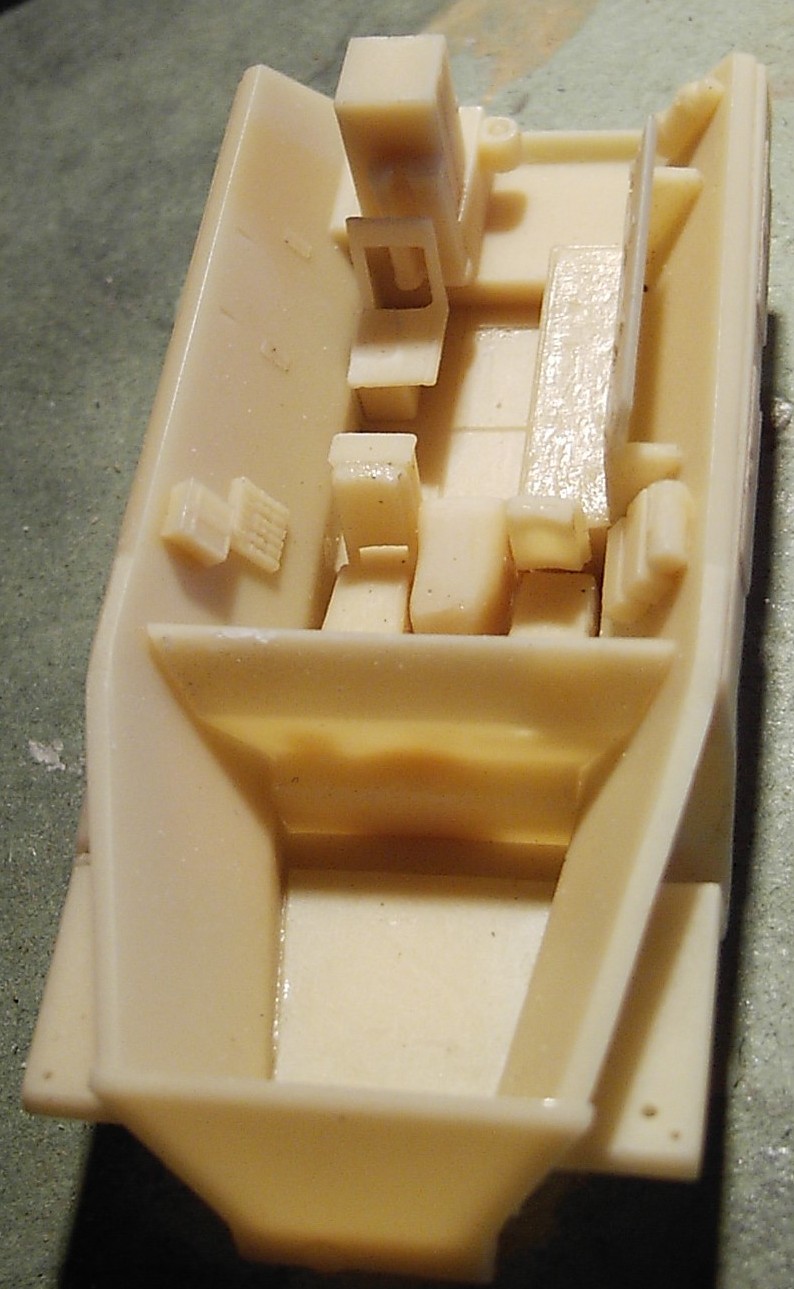
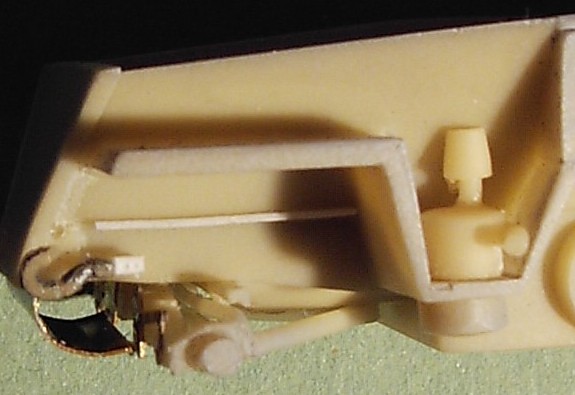
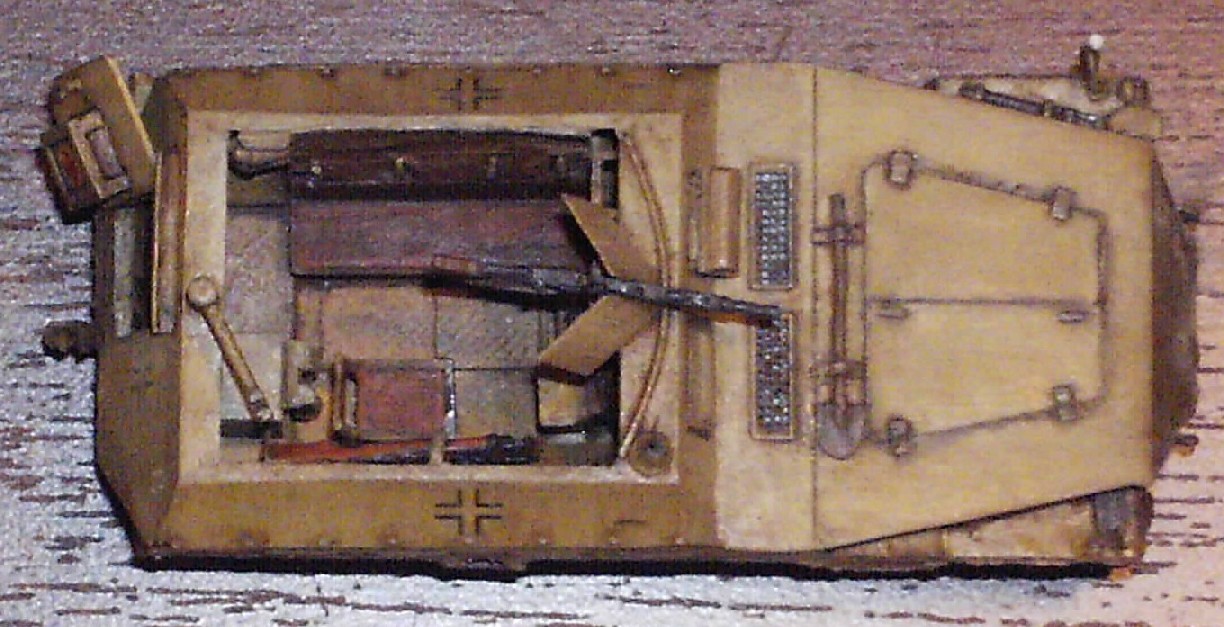
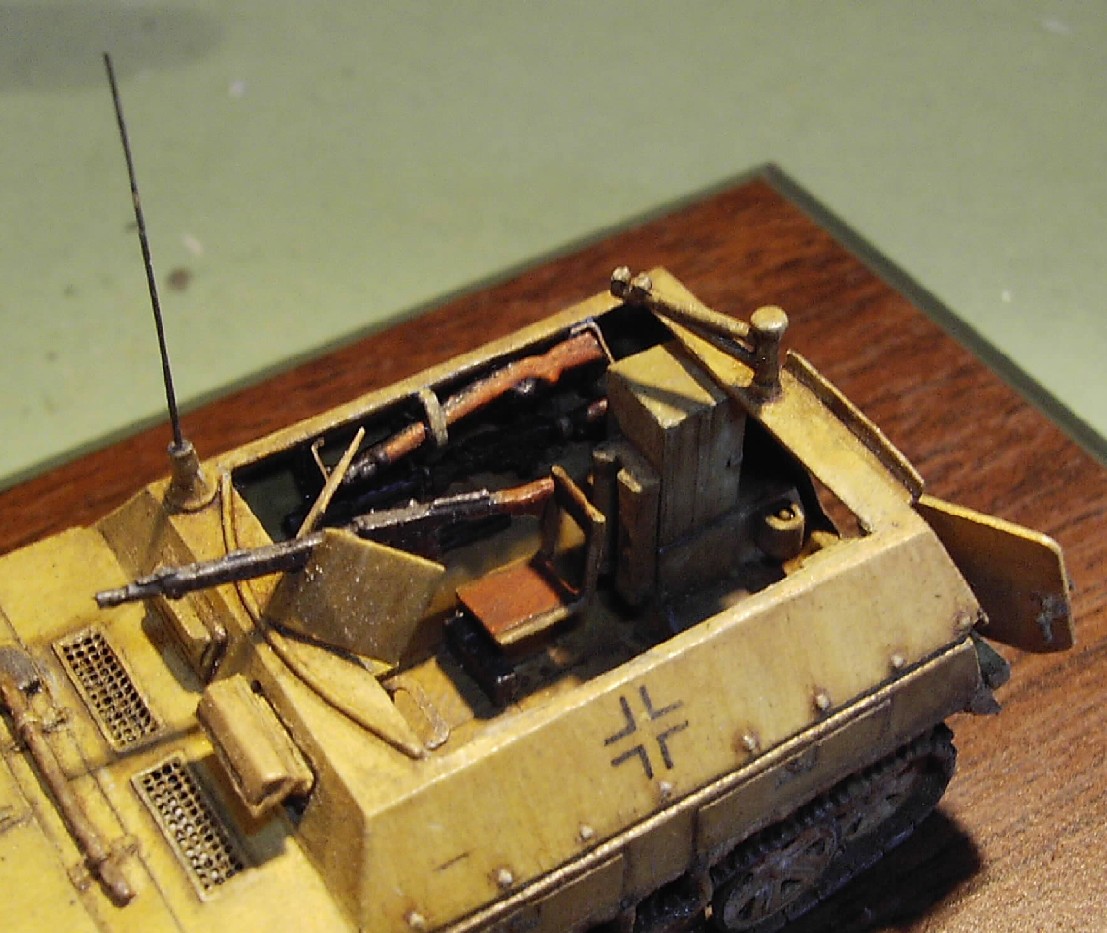
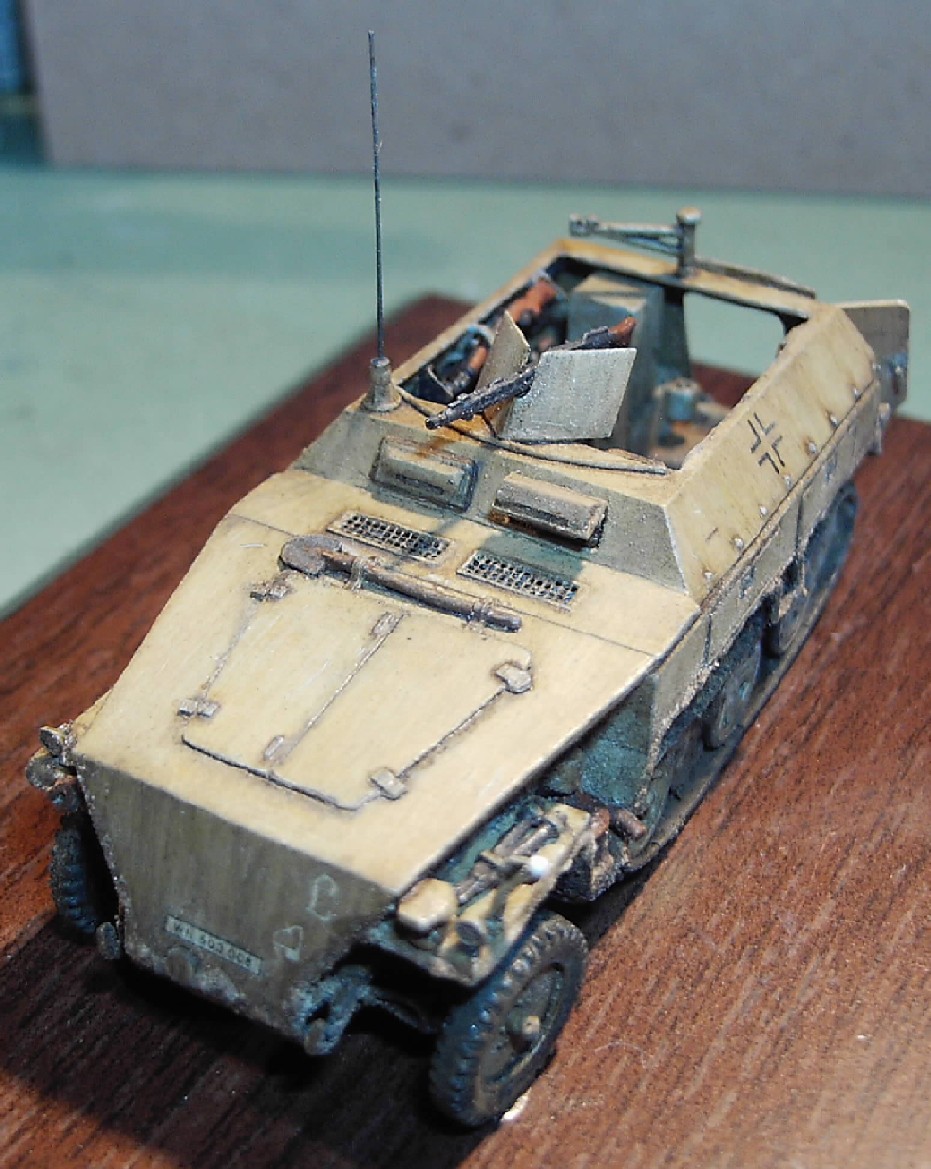
1. HighlightsThe kit is nicely moulded in a very nice pale yellow resin, which can be worked easily. Air bubbles are non existent, flash is rare, and some of the etched parts allow for scale thickness. The resin parts are very crisp. The overall quality immediately reminded me of Al.by kits, which says enough . The interior is highly detailed, and even the underside of the chassis has not been neglected; exemplary ! The engine compartment is hollow, and the engine bay doors can be glued in the open position. To fill the gaping hole, you could purchase the engine set from T&T, or adapt the Extratech offering. Note that the engine in the Sd.Kfz. 250 is the same as in the 251. T&T corrected the machine guns with respect to the very first production runs. Where you initially got 2 MG34, which were more or less uncommon for this vehicle, they later added a small sprue with 2 MG42. Apart form these you get 2 Kar98k rifles (unfortunately you need 4 to fill the rack on the right side) and these are all very nicely cast. 2. Shortcomings Below I've tried to list all the shortcomings of the kit. If you get the impression I'm doing my very best to find all the errors, you're absolutely right. This kit is so good, that it can be made into a very satisfying scale replica. For that reason, it has been one of the few kits that I actually spent time on correcting them all (assuming I've found all the errors). Besides, as I've got to know the people behind this project, I don't want to be seen as favouring their product. ;-) a) Manufacturing Some parts were broken upon opening the box. As the latter is very sturdy, I suppose this could only have happened during packaging. Fortunately for me, those parts that were damaged were easily repaired. The tracks and road-wheels are one piece, except for the outermost disks. The track teeth are given as separate etched pieces. This will cause some grey hairs, and will be very difficult to align perfectly. Worse, some teeth will interact with the rest of the running gear, necessitating some cutting/filing. Then again, the old Esci offering did not have any teeth at all your choice. Talking about the tracks, they appear a bit wide, but no one will notice. Also, while some major parts (engine deck, engine hatches, rear armor plate and door) are made in PE, and therefore are beautifully thin, I personally disliked the choice and remade some of them from thin plastic card. The reason being that a ham-fisted person like me can not be expected to keep the photoetch parts 100% flat when cutting them from their sprue, but some of you might fare better. b) The manual The manual is not too bad and better than I'm used to when doing cottage industry kits, but some good pictures of the real vehicle are still handy. Some parts are incorrectly numbered or not indicated. For instance, I suppose P6 in one drawing is actually PE6. Some other mistakes can be found (e.g. P18 and P19 should be P19 and P20, P6 is probably P7, etc), but as long as you don't build the model with your eyes wide shut, you can easily figure these out yourself. Also note that, depending on the variant you build, some parts will not have to be used. c) Accuracy According to my references the length of the vehicle scales out to 1/72 exactly, while the width is closer to 1/70. Still, it looks good, and I have seen other 250 Neu kits which were much more anorexic. Dimensionally, the only annoying inaccuracy I found is the region between the driver and the engine hatches. I wasn't able to pinpoint the error exactly, and the reference drawings differ, but you notice this when you glue the engine deck onto the hull. The problem is a peculiar mix of • the grilles being too big and too far to the rear • the driver's compartment extending slightly too far forward • the engine compartment extending a bit too far to the rear Thus the vehicle ends up with the grilles being partially over the driver's compartment. As these grilles are separate pieces, allowing you to look through the mesh, you actually see the driver's feet (if you put when there). Hard to correct, other then by blanking the mesh off from beneath. A pity, certainly when you choose to open up the engine compartment. In the same area, there is a gap between the dashboard and the top plate for the engine compartment, which is noticeable when looking through an open rear door. The floor has no anti-slip plating. I made my own by cutting pieces of aluminium foil to shape and rubbing them over a plastic part containing the desired effect (in my case coming from the Esci Elefant). The pieces were glued in place using Polly S gloss varnish.
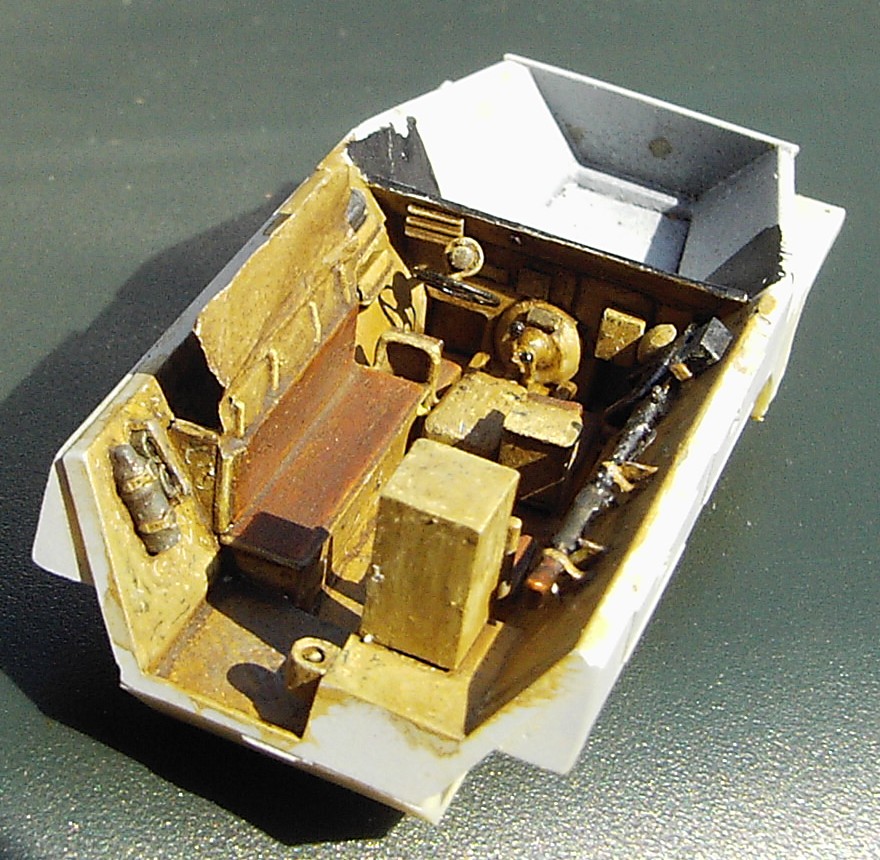
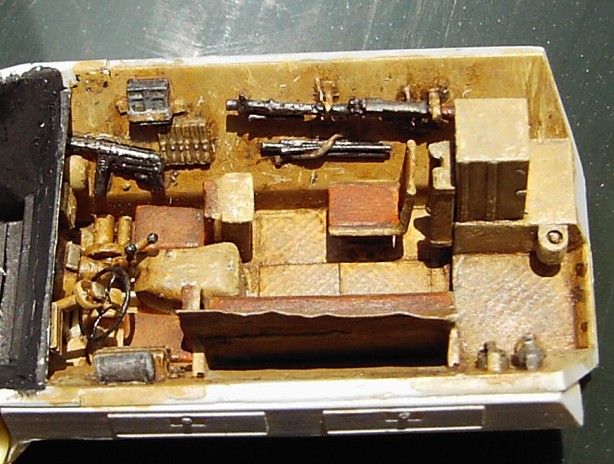
d) The interior The kit has two nice pieces for the instrument panel and radio. Some wiring and a headset can be added from scratch if so desired [1]. Using pictures found in [4] I added an MG34 (yes it was still used, although becoming rare) to the right wall, and constructed some supports for the weapon and its tripod (which I constructed from sprue). The MG itself came from the excellent MarS weapon set . The rack for the Kar98k rifles was filled with four of these that I recovered from one of the rare sets of hard plastic figures that Esci released many moons ago. On the left wall, close to the door and fire extinguisher, two ammo drums were added, again from MarS. From the Esci set I took an MP40 which was glued a bit more forward, next to the R/O. The ammo pouches for this weapon are already cast to the wall, but are a bit too far forward, but this would be very difficult to correct without destroying the detail. Underneath the MP40, a Notek light was sometimes stored. This came from the spares box. As the Esci rifles (and the T&T rifles for that matter) are a bit larger than is catered for in the kit racks, you are advised to shave of the little square box for the illuminating flares and position it a bit more to the rear. At the rear of the fighting compartment one is asked to glue a box (piece 33) in place. This is a very nicely cast piece, but needs to be sanded down a bit (reduced in height), otherwise the top of the compartment will not fit correctly to the lower part. The latch needs to be to the rear, which is not readily apparent from the instructions. The frontal visor for the driver and R/O were modified slightly. The exterior profile was modified, a slit was added, and the interior texture hollowed out to represent the armature for the armoured glass block. The opening mechanism was also added to the inside of the fighting compartment and to the left block that I glued in the open position. The glass insert was made from Kristal Klear (*) .
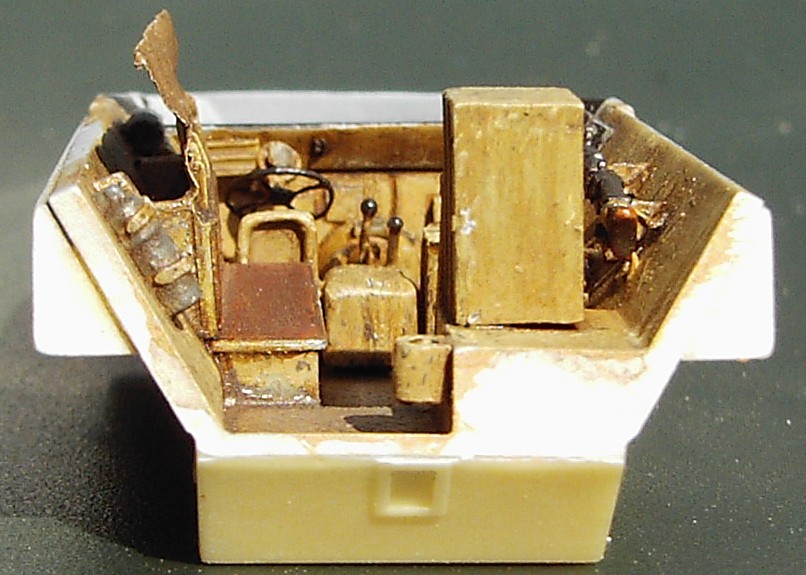
The lateral vision blocks on the inside are 1-2mm too far to the rear (compare with the vision slit on the outside). It is quite easy to shave them off and reposition them. The gearbox received some extra details from plasticard and sprue [1]. The leather protection patches for the skulls of the driver and R/O were built from plasticard. Straps were added to various stowed items. The canvas cover over the bench, protecting the stowage rack behind, needs to be replaced. It is much to flat to represent canvas, and worse the top of this cover floats in thin air (it is too low). Aluminium foil, stiffened with a very thin coat of superglue, will do the trick. Straps were remade from thin plasticard. Strangely enough, given the amount of detail that has been provided in the kit, the first aid kit that was fitted to the interior of the rear door is nowhere to be found. Again the spares box and some plasticard came to the rescue. A very flimsy PE handle is provided for the outside of the door, but not for the inside. Two were made from sprue.
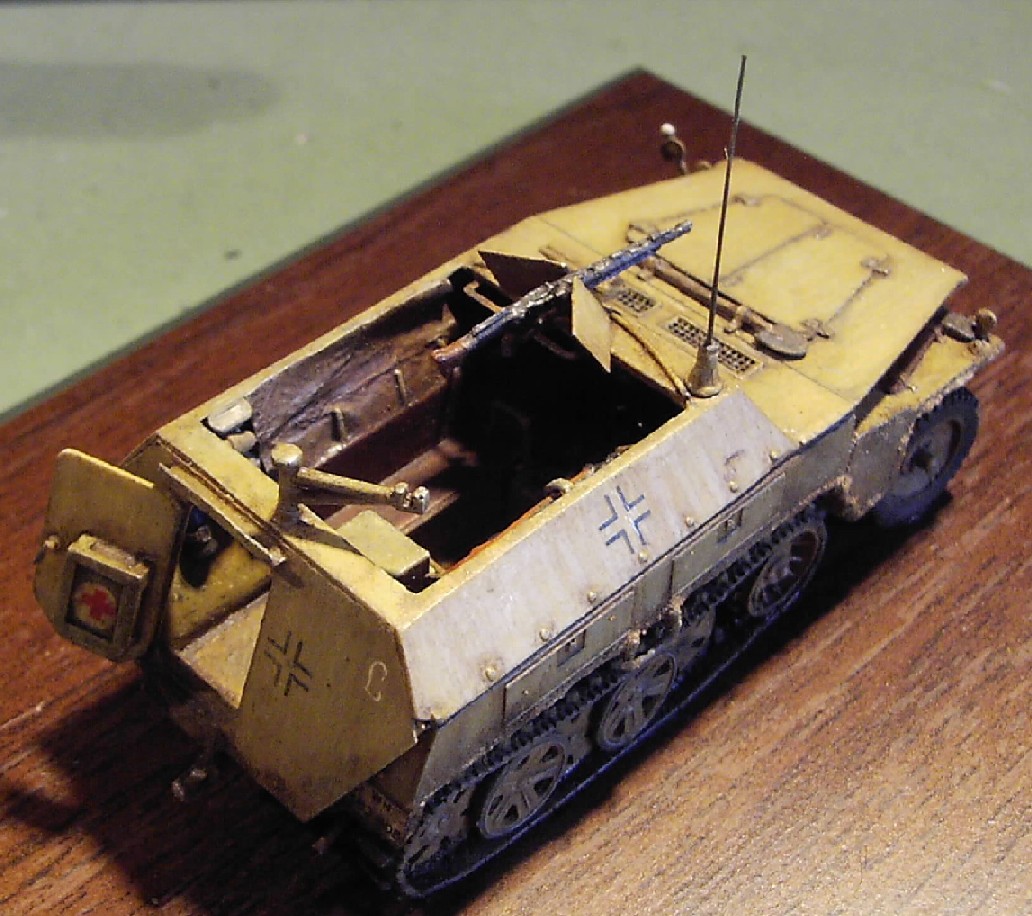
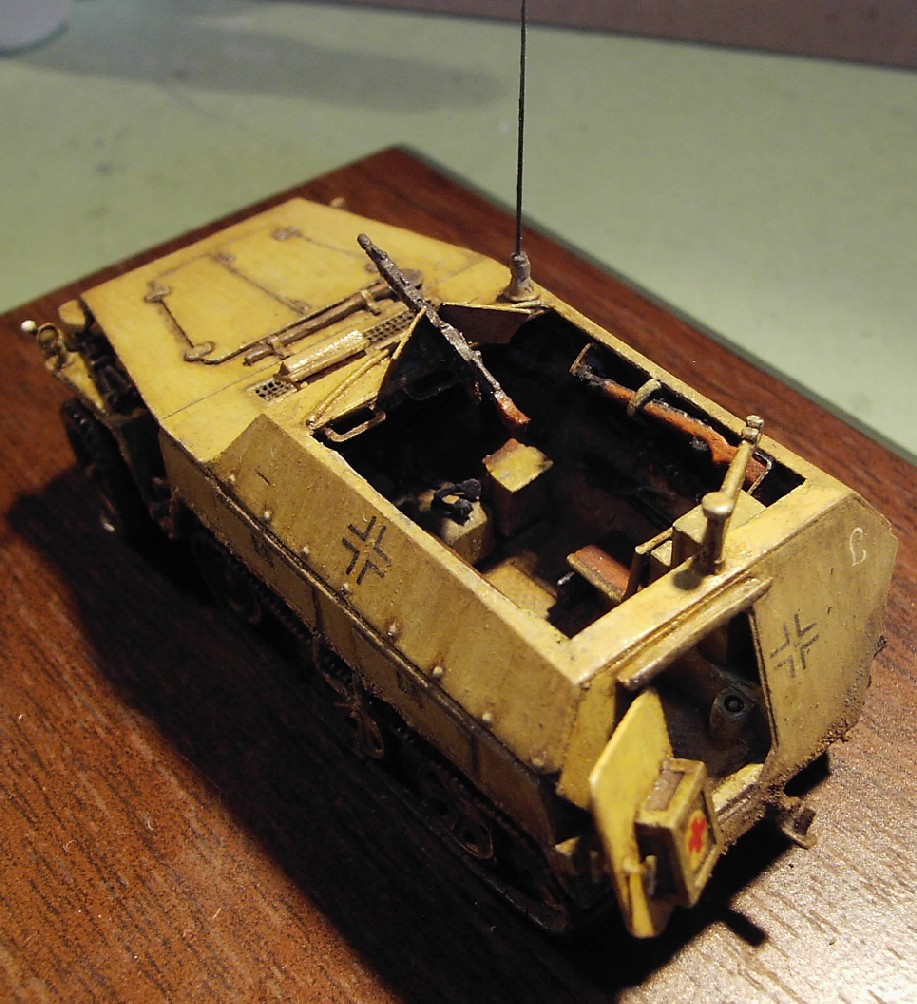
(*) These glass inserts were used whenever one was driving over long distances with the armored covers open. The were stored in the box behind the seat of the radio-operator. Some had manually operated wind-screen wipers. e) The outside The front MG shield needs to have the support for the weapon added [1]. The antenna mount on the real vehicle did not have a fixed position. Most however were of the clip-on type which is different from that in the kit. I fixed the mount to the front right edge of the superstructure (next to the MG shield), as seen in some pictures. You also might add a cable to the mount. The front tow hooks, which are given in brass, were replaced with three-dimensional pieces from the spares box. Footsteps for the crew were added to the outside. These are field modifications and come in various shapes and sizes. The lower rear of the storage bins have a slight upturn on some vehicles which can easily be done yourself. Also note that the hinges on the real thing varied from vehicle to vehicle. When gluing the upper hull to the lower hull, I was unpleasantly surprised with some fit problems. This was the only time I needed filler. You get 2 Noteks (which were only installed in the first production batch; it was later replaced with a Bosch light). The smaller of the two seems more appropriate to me. No tools are provided. I took mine from the MarS set. (An axe to front right fender, wire cutters to the left and a shovel on top of the engine deck). PE20 is not indicated, it should go below the rear end of the left mudguard. It was not installed on all vehicles. The convoy light (P20) should be positioned above the rear mudguard, not on it. The shaft of the towing mechanism should be extended by 1.5 mm. The protection plate for the steering mechanism below the nose is correctly shown as being rounded, but note that a flat version existed as well. The lower hull (behind the running gear) on the real vehicle had a noticeable joint with a flange, which was added from plasticard. At the rear of the tracks (behind the idler) the tensioning bars were added, made from sprue.
f) The chassis The casting of the track assembly is a bit less fine than the others parts, probably due to the complex structure, and multiple cavities. There is a small misalignment in the drilled out openings of the road-wheels, and the double inner wheels are cast as one. Note that the front wheels of the Sd.Kfz.250 had a very slight V-stance when viewed form head-on.
g) Decals There are no decals provided in the kit. I finished my vehicle as belonging to Panzer Lehr, autumn 1944. Black crosses came from a Milicast decal set (which were quite thick), Panzer Lehr markings from ICM, and the rest from the spares box (I think most were Esci). Disclaimer: The use of black crosses for this vehicle and this unit is my own artistic licence.
Other parts used on the kit: MarS: 7231,7236,7237 MMS: weapon set Preiser: weapons from figure set Esci: weapons from hard figure set
4. References
|
| Back to Tracks and Troops Kit List | Back to Home Page |
| Article Last Updated: 15 January 2007 |