Tiger I Ausf. H
Manufacturer: Revell AG.
By Michael Hatch and Stephen Hodge (photographer).
I built this Ausf. H first after being inspired by reading Doug's review. Being a fairly lazy modeler, I find it most helpful reading about other people's projects, allowing me to side-step problems that they may have encountered. It also gives me a little more time to plan how I will build the kit and I find that that can be the key in making the project both fun and relaxing.
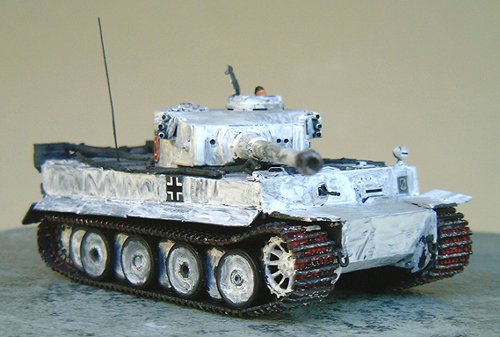
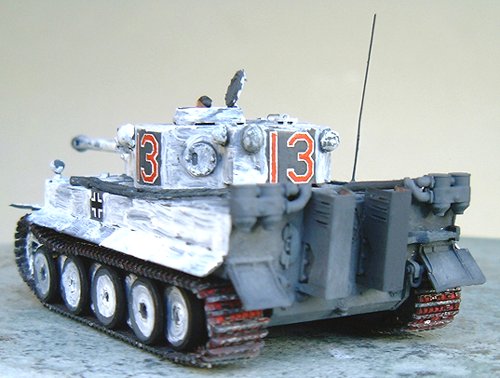
I built the 'H' as an early production machine deployed on the Russian Front during the winter of 1942/43. It is marked as belonging to the Heavy Panzer Company of SS PanzerGrenadier Division 'Leibstandarte SS Adolf Hitler'.
Upon first inspection (in the box) I was very impressed with the kit. My research revealed only two small errors that I felt needed correcting and both were easily done. The first one is that the loader's hatch on the turret roof is missing its two hinge straps. These were added with sheet styrene strips. The plan view of the model included with the assembly instructions correctly shows these straps. The second one is that early production Tigers didn't have a periscope for the loader in the turret roof. Therefore the cover for it (part #40) shouldn't be used. The plan view mistakenly shows this part in place. As Doug mentions in his review, the kit out of the box is accurate for only a very small number of Tigers deployed to North Africa by one unit. With a little work though, the mud flaps and muffler shields can be changed to represent an early production vehicle in Russia. (Eduard also makes an photoetch set for this kit that contains all the goodies that you might want to build just about any early or mid production Tiger that you would care for.)
I changed the assembly order by not installing the running gear and tracks to the hull, the engine air filters and exhausts to the hull back plate or the turret details to the turret. When I had the basic hull and turret shapes together, I then checked to see if there were going to be any snags with the rest of the assembly. At this time I filled in the mounting holes for the tow and track cables on the hull and the spare track links on the turret sides with crazy glue gel.
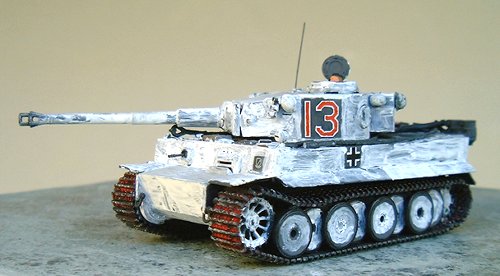
I then added most of the small details. Handles for the various hatches were made from soft steel wire. Full width mud flap extensions and their hinges were made from sheet styrene and added to the front mud flaps. While cutting out the headlights I snapped one headlight from its mount. I glued the headless mount on top of the hull on the right side anyway to show one that had been knocked off by the gun barrel traversing through it. I left off the muffler shields (parts #51 & 52) to allow for weathering and to give me a bit more time to decide if I wanted to scratch build a pair of rounded shields. (Being lazy, I ended up using the kit supplied ones.) If you are going to use these muffler shields, sand out the insides of them for an easier fit during final assembly.
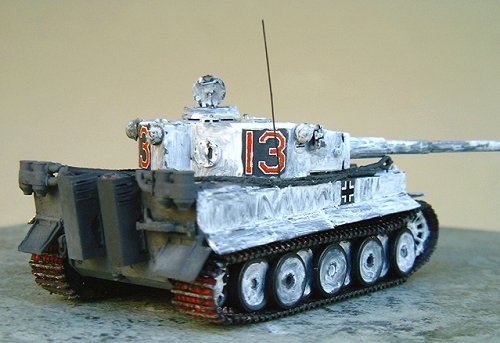
At this point I painted the model using Humbrol Panzer Grey lightened with about 20% white. The rubber portions of the road wheels were painted with Humbrol black that was just barely lightened with white. This was done to provide contrast between the components of the road wheels. Once the base coat was dry, the decals were applied onto wet Future floor wax and allowed to dry for 24 hours before decal setting solution was applied to them. I used the crosses and unit insignia from Hasegawa's Panzer IV decal sheet and the turret numbers are AeroMaster's white lettering with the insides filled in by hand with red paint. The tracks were painted Humbrol Gunmetal and when dry, given an orange watercolour wash. When that was dry, they were rubbed down with a silver pencil crayon. The molded on tools were then painted and I started to weather the mufflers.
As such, the kit was a straightforward and easy build. It was one of those models that your excitement for it grows as you assemble it. That can sometimes be a bad thing as rushing assembly led to the two mistakes I made during installation of the running gear. As is my habit, I glued on the drive sprocket and rear idlers on to the hull but left the road wheels off for painting. Once the paint was dry and I started to mount the remaining road wheels, I found that the thick, inner ones next to the drive sprockets caught on the drive sprocket and wouldn't slide onto the mounting pegs. The same was true with the thin, inner road wheels next to the rear idlers. Upon closer inspection, diagram number four in the instructions clearly shows that one should be careful with the assembly order of the running gear. Oh well, live and learn. I was able to get around this by angling the road wheels into the space between the drive sprocket's rims and gently bending and wiggling the mounting peg away to gain enough space to slip the road wheel into place. Surprisingly, it worked, all four times. I also had a bugger of a time placing the individual track links on the drive sprockets once mounted. You must carefully clean up the guide teeth holes in the links and check the fit before slopping glue all over the place like I did. Now with the benefit of 20/20 hindsight, I assemble and paint the drive sprockets off the model and test fit and glue on the links before I mount the sprocket on the model. I only glue the sprocket down after the rest of the tracks have been installed.
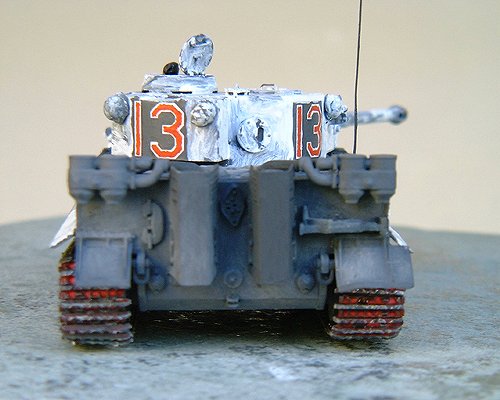
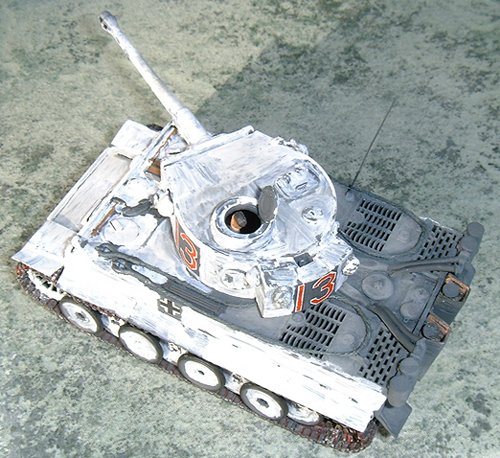
Once I had finished swearing at the running gear and tracks, I moved onto the fun part: applying the winter camouflage. I applied white enamel paint that had been allowed to dry somewhat using a MicroBrush to simulate a field application of paint. When that was dry, I moved onto the tow cables. For these, I cut the ends off of the kit supplied ones, drilled out their ends and crazy glued thick thread that had been dipped in Humbrol Gunmetal paint into the holes. The barrel cleaning rods were cut away, painted and glued down on the hull top. The tow cables were then glued into position on the hull. Helmets cut from vinyl figures were glued about the exterior of the vehicle, painted and camouflaged. The antenna is soft steel wire and the commander is the seated tanker from ESCI.
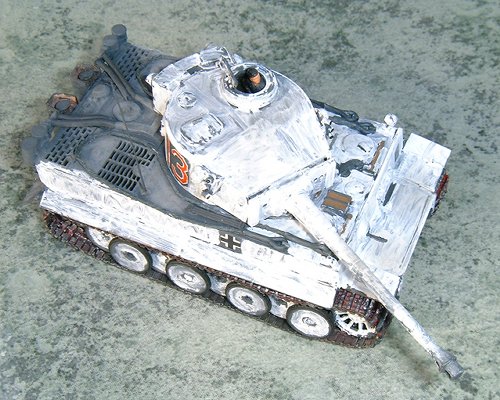
I used dark grey, pastel chalk dust to weather around the engine deck and the muzzle of the 88. Light grey, pastel chalk dust was then used to weather the hull and turret tops where the crew would have been moving about on. I weathered the insides of the sanded down muffler shields with baking power and brown watercolour paint and glued them on with white glue. The molded in vision ports were filled in with black paint and the faces of the periscopes were also painted black. This gives the elusion of depth and makes them more noticeable.
In spite of my mistakes, I really enjoyed this kit and would recommend it to anyone. Just slow down a bit and dry fit all that running gear. I still plan to add wire screens across the engine compartment intakes and maybe one day I will get around to adding a track cable to the left side of the hull and replacing the angled muffler shields with rounded ones. (I just never seem to fully finish my models.) I would also be interested in finding something that I can use for the carrying case thingy that you see stored underneath the left hand air filters in a lot of the photos of early Tigers. It looks like its mounted on some sort of shelf.
If I were to build this kit again, I would replace the barrels of the kit supplied smoke dischargers with slightly bigger ones and leave off the outer most road wheels (part #12) until final weathering was done.
| Back to Kit Reviews | Back to Home Page |
| Back to Revell AG. Kit List |