Soviet T-35
Multiple-turret Tank, Early Variant
Modelkrak Kit # MkT 005
Introduction & Historical Summary
Being an aficionado of the Great Patriotic War (a.k.a. Germany’s WW II Eastern Front) conflict of 1941-1945, this five-turreted, 9.7 meter (31 foot) long, 3.5 meter (11.4 foot) tall, behemoth of a tank has long been one of my favorite subjects. To assist the modeler with some potential diorama ideas, I offer a little historical perspective first. Historical information will influence your display markings, painting and weathering that you choose. For example: no T-35’s entering Berlin in 1945 with a IS-2 next to it!
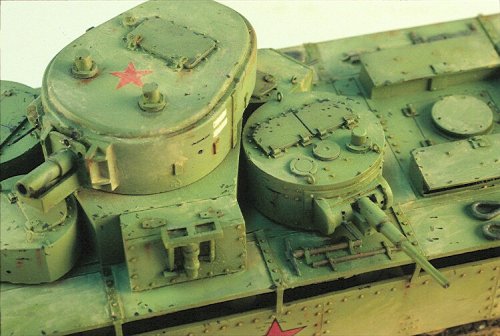
During the early 1930’s the idea of the heavy, multi-turreted "breakthrough" tank was considered, and spawned the British Independent tank, and the Soviet T-35. The T-35 was the only one of the two to actually reach production and service. Development began in 1930 and production continued from 1933 through to 1939, with final total production of about 61 tanks over the seven years. For those modelers familiar with ICM’s 1/35 scale T-35 kit (a February-April 1939 version?) you will note that there are some distinct differences between the two T-35’s depicted in these two kits. One of the most prominent differences is two hatches atop ICM’s main turret, and one large hatch on Modelkrak’s kit, which is an earlier, 1936 version. Later, 1938-1939 versions of the T-35 had slightly sloped, conical-shaped turret sides.
Overall, the length and 50,000 kg weight of this AFV made it hard to maneuver, and the tank commander had an overwhelming job of trying to command the vehicle and five separate turrets with weapons. Despite an impressive appearance, the armor was also relatively thin and vulnerable to even to the German light 37-mm Pak 36 AT gun. In July-August of 1941 most T-35’s appear to have been lost due to mechanical failure and in the most common wartime photos I have seen of them, they are often abandoned on the roadside. For further historical information please refer to the references at the end of this article.
The kit, initial impressions
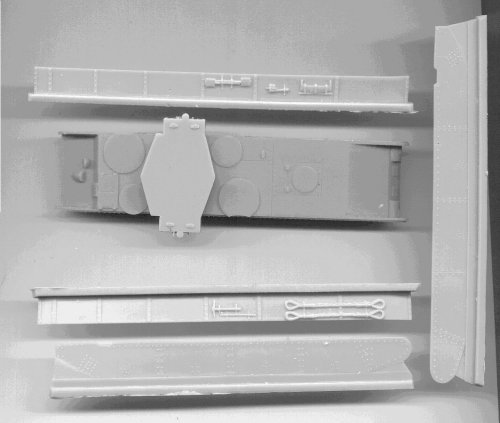
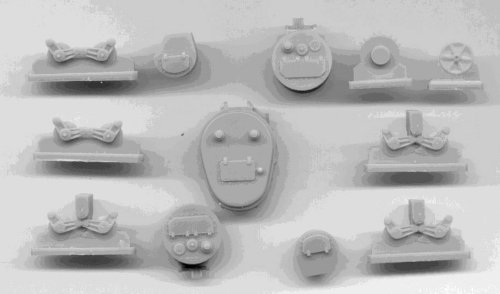
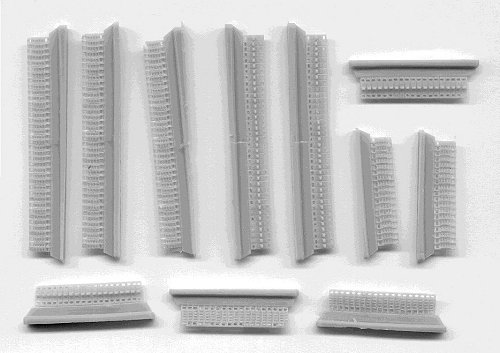
The model consists of approximately 80 very well rendered, amber, cast-resin parts. This includes one central 76.2-mm howitzer turret, two smaller 45-mm high velocity gun turrets, and still two smaller rifle caliber machine gun turrets. The tracks are resin cast with precisely defined guide-teeth, in two different lengths, and with plenty of extra. Hand tools and tow cables are molded onto the fenders but these are undercut and done capably. There are plenty of small rivets all over the side skirts, turrets, hull and chassis and these too are done very well and in-scale.
More information and opinions on the kit and casting will come with the progressive construction of the model described below. The scans below do not include all the small parts, such as all of the 16 main bogie parts and 14 return rollers.
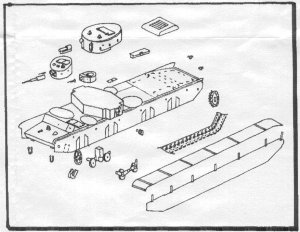
Instructions
I give Modelkrak great credit and thanks for including instructions, something many resin kits do not have. I think the instructions could be better though, and I honestly say that I could not have assembled an accurate T-35 model without my references. The kit instructions shown below are the "exploded view" kind but do not show all the parts, and the exact locations for some parts are unclear without other references to look at. I had an unbuilt ICM 1/35 scale T-35 that a friend lent me and that was invaluable during construction. An inventory list of parts will help in identity, part names, and to know if something is missing.
Resin Clean-Up
The 16 bogies (for a total of eight pairs of roadwheels with suspension) were the most difficult item to clean the casting blocks off. They were cast very well though and I can see no other way for Modelkrak to have cast them without making many smaller parts to assemble. Use a sharp razor-saw and a lot of patience. Do not rush any part of this model! Be prepared to break several pieces of the suspension while cutting off the extra resin; I did.
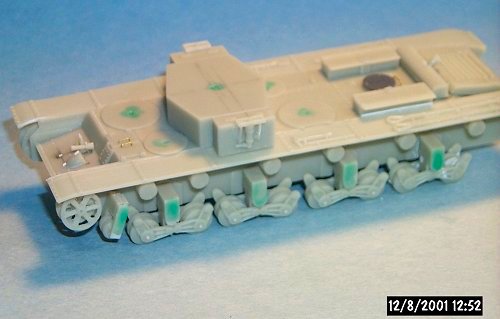
Photo 6. Left side of the partially assembled kit, minus rear drive-sprocket, tracks, turrets, etc. The light green is liquid mask over areas to be glued later on and I did not wish painted. Faintly visible are pieces of white styrene where I added missing or broken parts. Note the broken right front fender piece, something I had to reproduce in styrene sheet and graft in to both fenders. The dark gray circle on the engine deck forward of the muffler is a raised engine cover I had to produce out of styrene sheet. This, and most of the following photos were taken by me using a tripod mounted Kodak 260 digital camera under the camera’s flash only for light.
Resin casting blocks must also be cut off the turret and hull bottoms. Cut off all casting blocks and clean-up edges before any assembly. For this grueling job I used a sharp, new hacksaw blade periodically immersed in water to keep down (reduce) the nasty resin dust. Be gentle in how you hold the pieces while you cut so as not to break small parts or saw off fingers.

Photo 7. Partially assembled 1/72 scale Modelkrak T-35 in the background, with the smaller, 1/76 scale Red Star resin T-35 kit in the front. It is evident that the Red Star model is a less refined kit as far as a display model, particularly as far as the one-piece suspension & tracks, hull fittings, and engine grill. The shape of the hull superstructure is different though it appears they are the same T-35 variant
Construction
Below are some tips on assembling this resin model. Some tips are recommended, while some are critical. My feelings are that with the cost, detail and complexity of this kit, why not do the best you are capable of. If you wish a tough, simple T-35 kit, for War Gaming or to practice building resin kits, I recommend Red Star’s less expensive 1/76-scale resin T-35.
Remember: Dry-fit twice, Glue once!
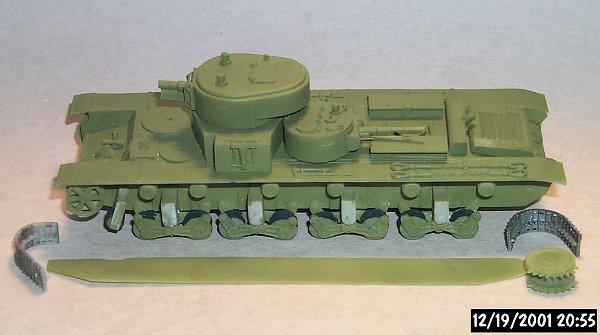
Photo 8. Left side of tank with base coat of Vallejo acrylic paints. This color was a blend of a darker forest green and a lighter green. Note the bent track lengths for around the front idler wheel and rear sprocket wheels. Taking into consideration "scale-effect" this is a reasonable base color for pre-war soviet AFV’s. This color will be considerably lightened with further painting to represent weather-induced fading of the paint, and dust. As my model was to be mounted on groundwork with figures, weathering was a must, though I don’t believe that you must weather every model you build.
Construction Challenges
Paint Scheme, Markings & display
For this model, because it is so well cast, I wished to give it an equally fine finish. Rather than the standard washes and dry-brushing I often do I opted to try a subtle "post-shading" method. I think the effect was well worth the effort. I wish to thank my friend Adam Wilder for his excellent article on this technique, which I have listed in the resources below, and for his personal guidance. The paints used were Vallejo acrylics, which are a European paint that I found very nice to use. The paint was already very thin yet I still thinned about 30% with water on Adam’s advice and experience. I used an Iwata double-action airbrush set to about 15 psi. This is not strictly a painting and weathering article but I will describe my method a bit in case you wish to try it. Expect this painting and weathering to take two weeks to complete, giving each step time to dry and cure.
My T-35 represents an older tank, rushed up to the battlefield over dusty Ukrainian roads in August 1941, with little time for gentle treatment and maintenance. It is going to be dirty and scratched!
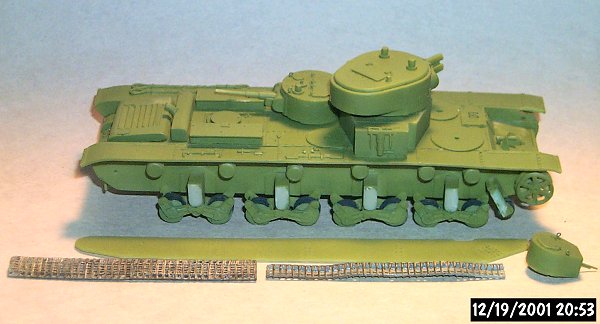
Photo 9. The Model with the green base coat, and before painting of tools. The liquid-mask has been scraped off in preparation for eventually gluing on the suspension skirt (in mid-foreground). Two lengths of resin track lengths are in the foreground, the right one being bent after heating with hot water to represent a little track sag. This is before applying a wash.
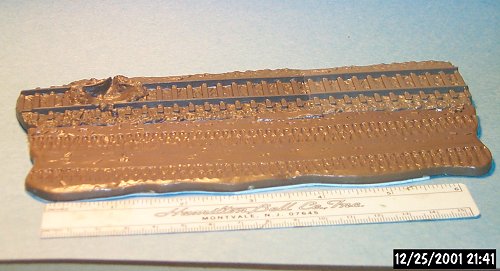
Photo 10. The Base: The model is over 13 cm when complete and needed a long base for display, protection during handling, and theft at model shows (yes this has happened to me and others, and a base makes a model that much harder to pocket!). Using extra diorama bases from Matchbox kits, I mated two pieces end-to-end from Matchbox’s 1/76 scale M-17 halftrack kits, and a roadway from Matchbox’s M-20 tank transporter kit.
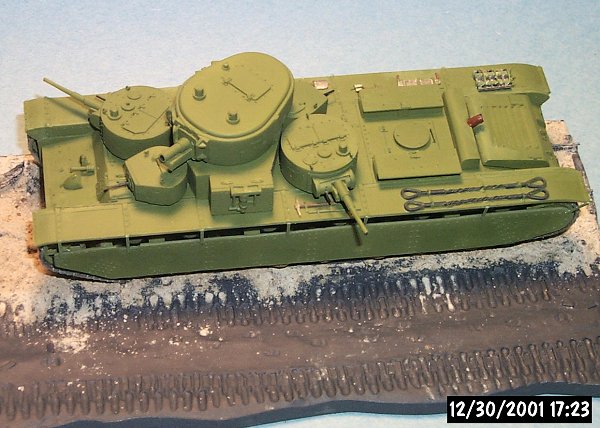
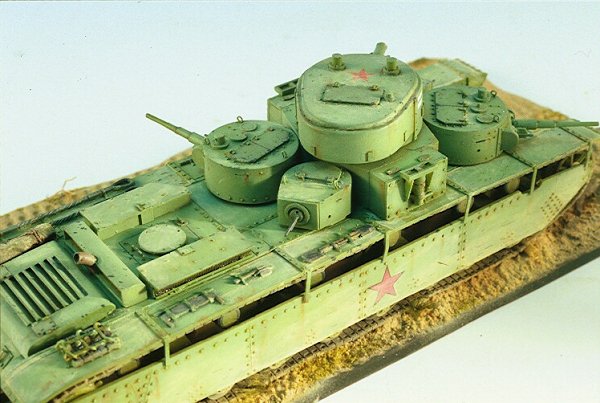
Photo 11. Oblique overhead view of the Model with the base coat of light forest green, prior to weathering. Soviet tanks were supposed to be in a standard dark green though my references state that with wartime quality control, scale effect and weathering, it would be acceptable to use various shades of forest or olive greens. The base has yet-unpainted groundwork added to improve realism of the display. After the base is painted, the model will be glued down with white (Elmer’s) glue. The tank is not centered on the base to allow for a second vehicle and figures of an upcoming diorama.
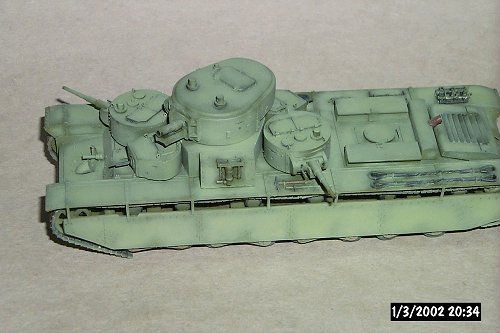
Photo 12. The "post-shaded" model. This is done by carefully and lightly spraying on a green several shades lighter than the base-coat. Start in the center of a panel, fender section or turret top, and slowly and carefully work out to the edge. Give a lighter coat near the edges and around rivets and weld-seams. This coat also blends in the dark wash applied around the corners and hatches. Rather than an overall wash over the whole tank (like I normally do), in this case I applied a small bit of dark turpentine & oil paint wash around each hatch to create shadow (I refer to this as a "point source" wash). More washes will come later.
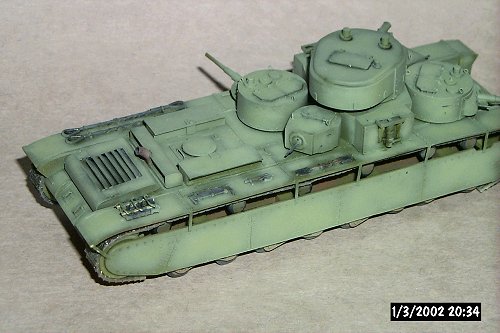
Photo 13. A view of the rear of the T-35, at the same stage as in the above photo #12. This post-shading is a step in really bringing out the model detail and making it more three-dimensional. The recessed areas, such as behind the turrets areas are less prone to fading by the sunlight and wear and thus have less or none of the light post-shading color, to give an impression of being in-shadow.
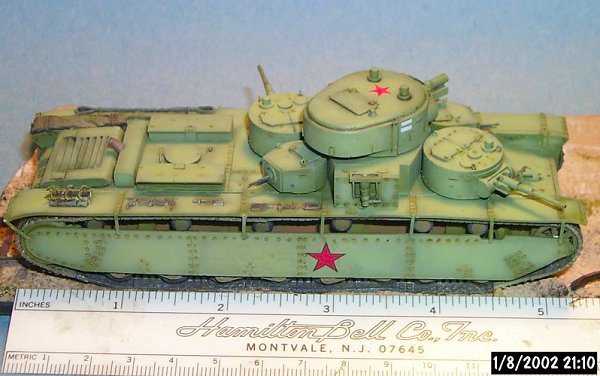
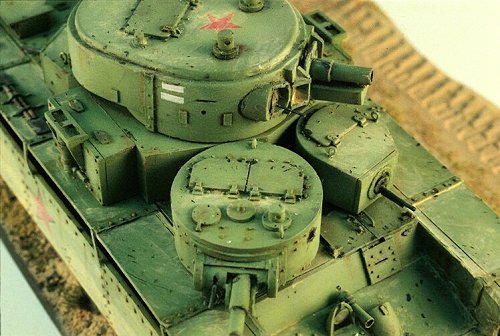
Photo 14. After allowing several days for the shade of lighter green to cure, I applied a light "point" or pin wash to the individual rivets and panel seams. I did this to add depth and accent the superb details of the kit. Red star markings were from a 1/72 scale Soviet aircraft model. The white bars on the main turret were cut from some white decal sheet. Now that the markings are applied and the model glued to the base, the finish weathering can be done to blend the model into the base so they look like they go together. Note that the broken front fender pieces have been repaired.
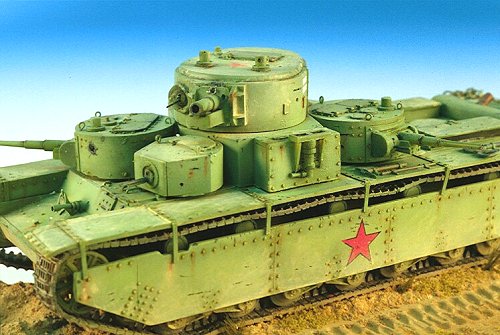
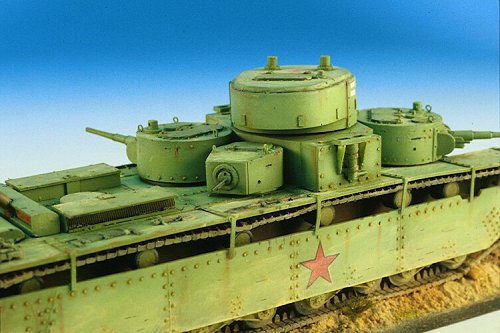
Photo 15. The completed model and display after adding "paint-pigment" dust and paint chipping. Note the AT penetrations in the mantlet of the main 76.2-mm gun and in the forward 45-mm gun turret. If you are going to model a tank abandoned it is good to show an obvious reason why. Eventually a German Kubelsitzwagen will be added, parked next to the tank with figures of curious soldiers, and graffiti painted on the hull side perhaps. This photo was taken with a standard SLR camera with a close-up lens, halogen lights and tungsten slide film, then transferred to a CD. Depth-of-field and color brightness is much better than the digital camera photos above. (Photo by Adam Wilder)
Conclusions, Conclusions, Conclusions
I very much enjoyed this model despite the turret problem and recommend it highly to intermediate and advanced modelers. If I can only con Doug Chaltry out of his Modelkrak T-28 too! I am pleased with the results of the painting and weathering which took considerably longer than the old wash & dry-brush methods.
I thank Doug Chaltry, Jadar Models of Poland, and Modelkrak Company for giving me this model to build and review.
Stephen Brezinski
Portland, Maine USA
References
Russian Tanks and Armored Vehicles, 1917-1945, Wolfgang Fleischer, pg. 64-75. Schiffer Publishing (1999). A very good English language hardcover book.
Winter Wonderland Part 1 article by Adam Wilder. AFV Modeler Issue 2, January/February 2002, Newcastle England. A construction article of the 1/35 DML IS-1 with extensive explanation of the painting & weathering used.
The Russian Battlefield website of Mr. Valera Potapov. http://www.battlefield.ru/ This is a superb website for knowledge about all aspects of Soviet WW2 armor and battles, including great coverage of the T-35.
AFV News, Interior Views, website. http://www.kithobbyist.com/AFVInteriors/ Another superb website focussing on the interior crew and engine areas of armored vehicles.
Medium Multi-Turret Tanks of the Red Army from 1930-1941 (T-35, CMK, T-100), Frontline Illustrated. A Russian publication, written in Cyrillic, with English photo captions. Superb scale plans and detail drawings.
Other Photos:
| Back to Kit Reviews | Back to Home Page |
| Back to Modelkrak |