|
Military Wheels (MW)
|
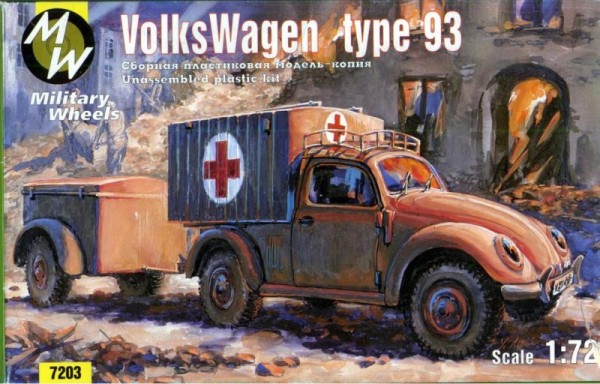
VW Type 93 Ambulance & Trailer |
|||
| Kit #: 7203 | Review by Neil Lyall - nlyall(at)bigpond.net.au | |||
|
Military Wheels (MW)
|
VW Type 93 Ambulance & Trailer |
|||
| Kit #: 7203 | Review by Neil Lyall - nlyall(at)bigpond.net.au | |||
 |
|
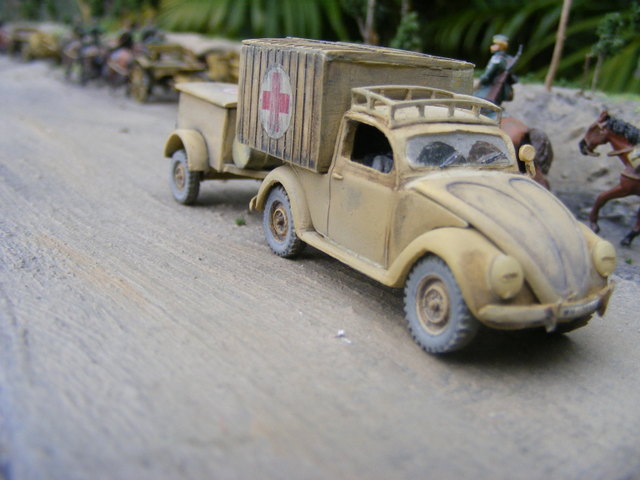
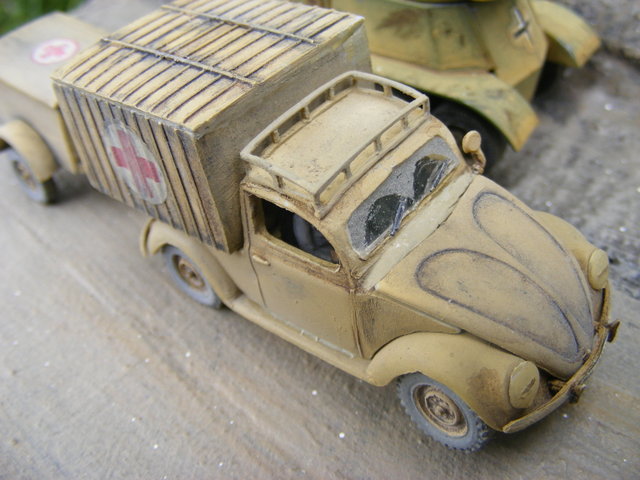
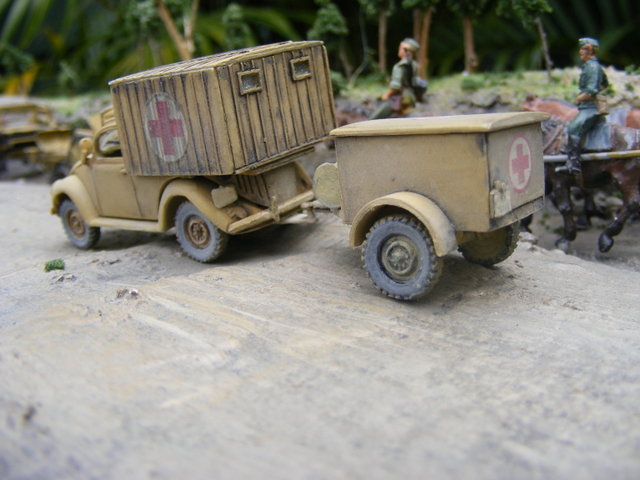
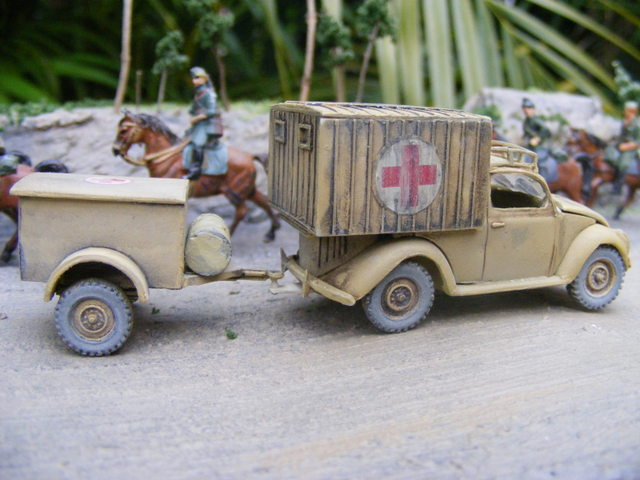
I started the MW 1/72 Volkswagen Type 93 Ambulance & Trailer last year - and I think as many of you know, despite not having many pieces, these MW Volkswagens are not a quick build, due to the main body components not being a good fit. As these VW models are the only ones on the 1/72 market, and as I have a fondness for VW beetles (since seeing Herbie in the Disney movies in the 1970s) I have persevered. I've spent more hours on this model than on kits with five times as many parts, but I feel it's definitely worth the effort. The VW Type 93 Ambulance Build In general the plastic of all components is very soft, so care is needed when filing or cutting, and removing from sprues. The plus side of this plastic is that its quite flexible - it tends to bend rather than break when (accidental or otherwise) force is applied, and once the liquid cement has bonded it is very firmly in place and can take a lot of pressure without breaking. Passenger Cabin The VW Ambulance (type 93) is comprised of about 50 pieces, having the same two piece cab shell as provide with the MW Volkswagen Type 825, the light truck tray variant, and has the same issues with lots of flash, poor fit, and no clear delineating line between where the cab roof, pillars, and the window area starts. This means very careful cutting and filing, lest you make the window opening too large. Much care is needed when clearing the flash and excess plastic from the front windscreen recess, with gentle filing and frequent test fit of the supplied clear plastic windscreen. Roof Rack The roof rack is made up of four pieces, and had cast lines and some flash, which needed very careful filing as it's quite fragile looking. I also thinned it down as the components looked overscale. I cleaned it up a bit, then glued it to the cab roof. After it had set hard (I always leave for a few days or more) it was set very solidly, allowing me to file it in place, much easier than trying to file these very small parts individually. Same with bumper bars - I found it easier to file the centre cast lines off these once they were firmly glued in place. Ambulance Body The ambulance box body went together fairly easily, but needed quite a bit of pressure to make the roof sit firmly in place while the glue set. I applied two bulldog clips to ensure good even pressure was applied. The back doors can be opened. I shut mine as it has no interior detail, and I wanted the trailer attached. Much filing was needed to make the body attach neatly to the cabin, as it has an access window from behind the cabin passenger set into the ambulance. Further filing was needed to get a good fit to the chassis. There is also a stretcher supplied, but I though it was fairly poorly moulded, so didn't use it. Bonnet (Hood) The distinctive curved Volkswagen bonnet (or hood depending where you live), is well cast but is too thick where it buts to the firewall, below the windscreen, so that it sits up too high and looks wrong. You need to use a fine flat file to thin down the rear edge so that it sits flush. Also it has two small scar shaped lumps on the surface near the front - I've checked all my VW kits and they all have this. These need to be scraped/filed off carefully otherwise they will mar the appearance. Windscreen The supplied windscreen is very thick, and has to fit into an aperture that has quite fine edges, and as described earlier, the moulding of this area is the least perfect aspect of this kit. It's not easy to cut/file a perfect aperture for the window, but if you fail to get this part looking right, it tends to spoil the appearance of the entire model. I obtained some Model Master "Clear Parts Cement and Window Maker" and attempted to make the front windscreen using that product. The window is about 15mm long and about 5mm high, and I was able to form a window with the liquid, no problem. It dried clear, with a few tiny air bubbles, but probably due to the amount of liquid I had to use, given the length of the aperture, it's not entirely flat looking, being a bit concave. If I press it from the inside it becomes convex, being quite flexible. For that reason I pulled it out, fitted the supplied window, and used a thin coat of the product over the entire window surface to fill the tiny hairline cracks where it wasn't a perfect fit into the aperture. (Note - this product works perfectly on all the other smaller windows of the VW sedan, as I have tried it on a VW sedan near completed. The front window is a bit too large though.) Not having window wipers supplied in the kit, and unable to buy any locally, I made some following a tip from Peter Bergstrom. I cut two small lengths of stretched sprue, and glued them together, one slightly overlapping the other one to represent the wiper arm, the other the wiper blade. Not as good as an etch one, but easy to do and free. Trailer The trailer, made up of 14 pieces went together with no extra work at all - everything fit very well. Painting, Decals & Finish The instructions suggest Humbrol 93 Matt Desert Yellow for the paint job. My tin of Humbrol 93 is brown, so I used Humbrol 83 with white added to lighten it up a bit. I painted the four main body components separately prior to final assembly (the cab, chassis, ambulance body and bonnet), and did the windscreen & wipers last. Then I used Winton oil paints, raw umber and soot black, very thinned down and applied with a 00 brush to bring out some light detail, then gave an overall light spray of dried dust/light mud, masking off the windscreen with a bit of cut "Post It Note", to cover the area that the wiper blades clean. A wooden toothpick, lightly applied can be used to remove dust, improving the size and shape of the cleaned window area. The instructions show different size red cross decals to place in five different places on the VW, but they only supply three, all the same size, which I decided to use on the trailer, and used two spare red cross decals from the Esci Opel Blitz Ambulance for the sides of the ambulance. I then put two crewmembers in the cab from the spares box, the passenger being a spare from the Hasegawa Mercedes staff car representing a Medical Officer perhaps. I also added the water drum from an Esci SdKfz251 Ambulance to the trailer, figuring a supply of clean water is a must for an ambulance. The macro lens of the camera is excellent for revealing a few imperfections that my naked (or glass wearing) eyes can't see, so I'll attend to them in due course.
|
| Back to Miltary Wheels (MW) Kit List | Back to Construction Reviews |
Article Last Updated: 29 January 2009 |
Back to Home Page |