| History
and version
The
Sd.Kfz.250 or leichter Schützenpanzerwagen (roughly translatable
as light rifleman armoured vehicle) first appeared in prototype
form in the summer of 1940 and was based on a shortened Sd.Kfz.10
chassis (by removing one road wheel). Mass production of the Ausf.A
started in June 1941, just in time for Barbarossa.
A little known fact is that between June 1941 and November 1941
two distinct variants of the Ausf.A were in production: one based
on the design of the Sd.Kfz.253 (minus the roof), known as Sd.Kfz.250/Z,
and one with a design that was specific for the Sd.Kfz.250, known
as Sd.Kfz.250E. After November 1941 only the Sd.Kfz.250E was kept
in production. (We will come to this when we study the accuracy
of the kits.)
In the summer of 1943 a simplified version (Ausf.B, better - but
incorrectly - known as "neu", i.e. "new") appeared
[1].
As
the boxtop shows, but the title does not, MK72 offers two variants
in each box: the Sd.Kfz.250/1 and Sd.Kfz.250/10 armed with a 3.7cm
gun. Production of this variant ran from early 1942 until the end
of 1943. Even though its production apparently started when the
Sd.Kfz.250/Z was no longer in production, [1] shows a drawing of
this variant on that chassis.
Phase
I: gazing at the boxes and their contents
This
will be the third and fourth MK72 kit I will build (previously,
I built the Zugkraftwagen 1t
(Sd.Kfz.10) Demag Typ "D7" and the Marder
II), so I know what to expect: a fine kit.
The
backside of the box clearly shows the contents of the kit, including
the conversion option. Notable features are the styrene "single
length" tracks (like in the Demag)
and the double Pak shield.
Color call-outs are given for RAL, Model Air and Model Color. (Watch
the shades carefully, as the painting instructions do not refer
to them explicitly; then again do not watch them too carefully as
we will explain shortly.)
The use of the MG42 on the Ausf.A is noticeable and suspect. The
kit parts are actually MG34s, so this was probably just a copy-paste
between boxes.
The Pak barrel is not hollowed out in the drawings, which corresponds
to the kit part.
_t.jpg) _t.jpg)
In
the following picture we see three sprues that are common for the
Ausf.A and B. The beige L-shaped sprue is actually part of that
found in MK72's Demag kit. This is
quite logical given the Sd.Kfz.250's ancestry.
As
you can see the "Demag sprue" contains tracks, idler and
sprocket, but the grey sprues also have them. I am not quite sure
as to the reason, but the new parts seem to have somewhat better
detail. (I believe the Sd.Kfz.250 and Sd.Kfz.10 used the same parts.)
On the other hand, the new tracks have prominent ejector marks on
the inside, which the old ones do not have. The Demag sprue will
also provide other spare parts, as the parts lay-out in the manual
will show below.
_t.jpg) _t.jpg)
This
is another sprue that is common to both boxings.
_t.jpg) _t.jpg)
Below
are the only sprues that are Ausf.-specific. On top that of the
Ausf.B, below that of the Ausf.A. The Ausf.A has MG34, the Ausf.B
has MG42.
_t.jpg) _t.jpg)
As
this is a brand new kit, no flash can be found, and the parts are
very crisp. In more than one way they remind me of what Revell offers
us these days.
Visors can be positioned open, but the slot in the hull behind them
needs to be opened up, if so desired.
Marking
options are provided for 6 vehicles in each kit, four of which are
for the Sd.Kfz.250/1, two for the Sd.Kfz.250/10. MK72 offers a novel
approach in that they don't use side-views, but two three quarter
views.
_t.jpg) _t.jpg)
 _t.jpg)
It's
a pity that the color references are not on the sheet with the markings
but on the back of the box, as the difference in printing makes
it somewhat unclear what the colors are. Worse, in the Ausf.A, marking
option "1" is probably a desert shade, while marking options
2 and 3 in Dark Yellow. The color chart on the back of the box of
the Ausf. A has a color "chip" for the Dark Grey that
almost perfectly matches the brown seen on the DAK vehicle, while
the Dark Yellow and Sand Yellow on the back don't match the colors
used in the drawings.
The
decals are plentiful. To obtain the numbers with white edges, you
have two options:
- use
decals with white edges, which are sometimes a bit out of register;
- use
separate white and colored decals that have to be positioned one
on top of the other. While a bit cumbersome, it pins the problem
of having them in perfect register on the modeler.
Most
numerals come in either red or white, even when the instructions
do not mention this. Actually, the instructions show decals with
the white edges already in place, so it seems this approach might
have come as an afterthought.
Note that the arms of the Wiking "sunwheel" are interrupted,
probably for legal reasons.
_t.jpg) _t.jpg)
I have
some misgivings about the marking option "18 Pz.Gren.Div."
in the Ausf. A kit. The insignia that MK72 proposes is the Stahlhelm
of Grossdeutschland, which (as far as I know) has nothing to do
with 18 Pz.Gren.Div..
The
manual is of the "common type", and presents no difficulties
at first sight.
These are the pages common to the Ausf. A and B,
_t.jpg) _t.jpg)
while
the following are type-specific.
Note that the sprues lay-out does not match the sprues that are
actually in the box.
_t.jpg) _t.jpg)
 _t.jpg)
MK72
limits the difference between the Sd.Kfz./1 and /10 to the roof.
This is the most obvious difference, but I guess the interior would
have been different as well, to accommodate the different types
of ammo. According to what I find in [1], the only difference is
that the seat (part 42) of the /1 should be replaced by ammo boxes
for the /10.
Phase
II: Assembly of major components
Ausf.
B
Although (once again) I had promised myself to finish the kits that
already were on my workbench, I couldn't resist removing some parts
to see how they fit. Then one thing led to another.
The first thing I noticed when assembling this kit is that it reacts
very well to my favorite glue, MEK, which means I had to use it
sparingly. This observation is probably linked to the styrene being
somewhat softer than on other injection plastic kits.
I rarely follow the sequence of the kit instructions, as I try to
get as much work done in parallel as possible. In this case this
led me to go for two major subassemblies: lower hull and upper hull.
I tried to add as much to both subassemblies as possible before
it started to obstruct the paintjob. This meant for instance that
I left the running gear for later. Speaking of which, when reading
the instructions carefully, I noticed that the left and right sprocket
are different, but carry the same part number. The instructions
do their best to point out the difference, but I guess the molds
were already made with the same part number for both parts when
this was spotted. (Note that the molds seem to be made by CMK, judging
by the prominent publicity on the sprues.)
The
detail on the lower hull is astonishingly fine with delicate rivets.
It's a shame most will be hidden by the running gear. Note that
the left and right running gear are slightly offset, as in reality,
due to the torsion bar system.
The
suspension for the front wheels is partially from the older Sd.Kfz.10
kit and partially from the new molds. I guess MK72 wanted to improve
the parts, as there is no significant difference except the level
of detail.
The
interior is very complete, with a delicate anti-slip plate pattern
on the floor. The way the kit is engineered, I would guess that
other variants are forthcoming, as the rear of the fighting compartment
floor is separate from the driver's compartment. As the bench on
the left rear is an integral part of the floorplate, it will be
difficult to remove and restore the floor plate pattern if you want
to do your own conversion work.
When installing the locker at the rear right, take care to add the
door with the hinge on the correct side. The separate door makes
it easier to open up the locker with some minor surgery.
The ejector marks on the side walls are strategically placed in
places where they will be mostly hidden by the interior. I am not
sure if this is intentional, as moving them just a little bit would
have hidden them completely.
_t.JPG) _t.JPG)
The
rear hull plate has some prominent ejector marks that need to be
removed. As they are on the smooth side of the plate, that is just
a question of applying some elbow grease.
When you clean up part 52 (the holder for the ammo drums), watch
out not to cut off part of the detail that is present on one side.
The outward slanting hull plates (parts 53 and 54) are a bit fiddly
to install, as they need to be butt joined to the lower hull. It's
utterly doable; just take care. You might want to add the nose plate
at this point to add some rigidity and check the angles.
_t.JPG)
The
front fenders had a bad tendency to slant upwards when I tried to
install them. Some sanding where they met the hull corrected this.
Some sanding was also needed around the edges of the rear door,
before it wanted to sit in the recess in the rear hull plate. As
the door can easily be positioned open, going for this option will
eliminate the need for sanding, as it is just a quarter of a millimeter
and no-one will notice. Note that the box on the rear door is for
a first aid kit and will benefit from a red cross marking (decal.).
The box that needs to be added to the right fender (part 65) is
something peculiar. It didn't want to fit properly. Luckily I discovered
that this is exactly what it should (not) do, as the real vehicle
apparently (sometimes) had a bad fit here as well, as can be seen
in this picture
from Wehrmacht
History. Note that this box came in two different sizes for
the Sd.Kfz.250 Ausf.A. The Ausf. B seems to have only used the larger
size, which might have been exactly the same as that used on the
Ausf. A but would now fit less well due to the different shape of
the hull.
The small roof section (part 58 or 68) has some ejector marks and
no head pads. With the door closed, you can't see. If you open the
door and suffer from AMS, you will need to sand the former down
and add the latter.
Note
that the dashboard doesn't touch the hull sides, while it actually
should as this picture
from a restored vehicle found on Wehrmacht
Awards shows. This might be because the same part is used for
the Ausf.A and Ausf.B, which have different shapes. When I construct
the Ausf.A and I find that it fits perfectly on that kit, then my
suspicion will be confirmed.
_t.JPG) _t.JPG)
 _t.JPG)
 _t.JPG)
I dry-fitted
the upper hull. By this time I had fitted as many parts to the subassemblies
as possible. At this point I am no longer convinced that adding
the storage bins before adding the tracks was a wise idea.
_t.JPG)
Ausf.
A
Assembly
was pretty much the same as for the Ausf. B, with the exception
that this time I took care to assemble the tracks before adding
the fenders. As expected, the fit of the dashboard was perfect this
time, as was that of the rear door. The rear door on the Ausf.A
stood slightly proud of the rear hull plate; in the kit it is flush.
The same can be said about the top engine hatches: they also should
be slightly raised with respect to the top plate, while they are
flush in the kit.
As I was building a /10, I left the extra seat off.
Some annoying ejector marks were found on the rear hull plate, which
had to be eliminated.
Phase
III: Further assembly and mating of the hull parts
Ausf.
B
The problem with open topped vehicles is that the interior needs
to be painted one way or another. The easiest way to do this is
when the hull halves have not been joined. The trouble with this
approach is that gluing the halves might damage the paintwork in
hard to reach places.
The
lower half was primed in black, which will help with the shading.
_t.JPG)
Pale
yellow was applied.
_t.JPG)
In
the picture above you can see that the toolbox in the rear slopes
a bit. This is due to the built in bevel in the kit part. According
to my references this is not correct, but I caught it too late.
Next time I will sand down the bottom of the box. Easy enough if
you do it in time.
.JPG)
While
a decal for the dashboard is present in the MK72
Demag kit, none is provided for the Sd.Kfz.250. A big white
dial on the dashboard is a prominent feature and was added with
a disc of plastic created with a punch-and-die set. Other dials
came from a decal sheet with dials that I bought ages ago. An MP40
was added for the co-driver. This is about the only other missing
item for this kit.
(Note that in February 1945 the interior was simplified and one
of the things omitted was the holder for the MP40.)
_t.JPG)
The
running gear follows an approach that has become the standard on
halftrack kits these days: you get a couple of one piece rows of
half roadwheels, connected with an arc (which becomes invisible
after assembly) and separate half road wheels for the outer row.
As with all manufacturers (Dragon, Revell, Maco, ...) that follow
this approach, all wheels are aligned at the same angle, which is
technically possible, but not very likely. (Dragon has the same
issue with their Sherman wheels too, by the way.)
I love
the foldable tracks that MK72 pioneered. In my opinion they offer
the best of both worlds: the ease of band tracks and the quality
of link-and-length. I wanted to assemble the wheels and tracks as
a subassembly, so I could paint the lower hull more easily. At this
point I realized that this would have been much easier if I had
done this before I added the suspension to the kit. Luckily, I had
a second kit to help me out.
_t.JPG)
_t.JPG)
Some
notes at this stage:
- Make
sure to align the outer road-wheel halves with the inner halves.
(Leaving them off until later might actually be wiser: it will
ease painting.)
- The
parts numbered 32 are actually parts 33.
- The
locating peg for the outer half of the drive sprocket is badly
formed. Shaving it off will be the easiest solution.
- The
Sd.Kfz.250 (just like other German half tracks) used torsion bar
suspension. This means that the left and right wheels are slightly
staggered, as you can see in the pictures above. Still, I feel
that on the right side, the drive sprocket sits too close to the
roadwheels.
- As
with all tracks, it is a challenge to ensure that the circumference
of the track run is an exact multiple of track links. The best
solution I have found was to slightly stretch the tracks where
needed.
- The
spare roadwheels on the sprue (which are there because the sprue
is originally from the Sd.Kfz.10, which had one wheel more), can
be used to spice up your kit. Spares were sometimes carried on
the nose plate. Alternatively, you could use the track links that
you have to cut off.
After
painting all the interior bits, I was ready to mate the hulls. At
this point, I discovered that the side bins wouldn't be parallel
to the upper hull, as they should be. Ensuring alignment would be
very easy if the modeler added the bins after mating the hulls.
My earlier misgivings caught up with me here, so I removed the bins.
It was not a pretty sight...
_t.JPG)
After
much careful repair-work, I managed to hide most damage. A close
inspection shows that some "battle damage" will still
be present. I also discovered that leaving off the front visors
would have eased the sanding. (It seems I had been rushing this
kit....)
_t.JPG) _t.JPG)
 _t.JPG)
In
the pictures above, some touch up work is still required.
Some
notes:
- It
must have become clear by now that I installed some parts much
too soon in the construction sequence. One more part in this category
is found in the suspension of the front wheels, in casu part 27.
(It is actually not numbered in the instructions, but it is on
the sprue.) Otherwise you are bound to break it off if you are
as ham-fisted as I am.
- Even
though I installed a lot of parts too soon, I only discovered
that I forgot to install the shift levers (part 17) until after
I mated the hulls. (You can tell I only started my modeling career
some months ago.)
- The
extra seat (part 42) has locating pegs, which I shaved off. Only
much later I discovered there are locating holes in the floor
plate that you can drill out. The instructions don't mention this
however.
- There
are ejector marks on the visible side of the wheels. The kit could
have been engineered with them on the other side, in my opinion.
- When
mating the hull, I noticed that the top of the dashboard interfered
with the upper hull.
- There
are no locating pegs for the Kar98k rifles and the rear fixture
doesn't reach the hull. A slice of plasticard can help.
Ausf.
A
Assembly
was again pretty much the same as for the Ausf. B, but with no fit
issues to speak of. Learning from my mistakes with the Ausf.B, I
followed a more logical sequence of assembly (visors left off till
last, etc.). I also corrected the box at the right rear in order
to eliminate the slant.
For
the vehicle I was going to depict, I chose not to add an MP40 (but
only the holder) and make an empty rack for the Kar98k rifles and
for the MG34 ammo drums. The Notek was also stored inside, to the
right of the co-driver.
_t.JPG) _t.JPG)
Phase IV: The final construction
work, painting and decaling
Ausf.
B
Final construction didn't reveal much that is worth mentioning.
Some points that might be useful
_t.JPG)
- There
are two parts 64, and both are mufflers. Use the one on the new
sprue.
- The
front wheels have a slight V-stance when seen head-on. When you
enter the model in a contest, inform the judges.
- The
instructions have you place the axe with the axe-head pointing
inwards. According to my references outwards seems more likely.
- There
are some extra tools on the sprues that are not for use, even
though the instructions do not mention it.
- An
antenna needs no be added to the right side of the roof. This
is not mentioned in the instructions. Note that German antennas
were rather rigid and about 2m high.
- Some
vehicles (especially Ausf.B) had a footstep on the sides of the
hull, probably as a field modification.
- The
MG only has detail on one side of the barrel. The longitudinal
slit on the other side is missing. MK72 gives two nice ammo drums
for them; banded ammo was also very common, especially for the
front gun. While we are talking MGs, note that the /1 came in
two variants: one with a front MG with a shield (as per the kit)
and one with the front MG installed on the sMG mount without the
shield. I have yet to see the latter on the Ausf.B. One more thing
about the MG: in my opinion the attachment of the front MG sits
too low. The bar that projects backwards from the shield slopes
down, while in reality it sloped slightly up (when the MG was
in the neutral position). If you don't modify the part, your MG
will point nose up and be slightly too far to the rear.
- The
jerrycans on the hull can be seen on many vehicles, but were not
standard. Jerrycans could be fitted differently, elsewhere, or
not at all. I therefore assume that some of the marking options
didn't have them. The jerrycans are missing the central bar, by
the way. (The three handle system was a true revolution when this
can was first put into production, allowing a soldier to either
carry two full cans or four empty ones with his two hands.)
- The
width indicators are a bit too "sturdy" and short. It
is recommandable, however, that they are included, as some companies
don't bother.
- There
is no pattern on the face of the front wheels, due to molding
limitations, I guess. You can always assume they are very, very
worn.
- One
of the left-over road-wheels was attached to the nose plate with
a "field modified" mounting.
- On
the left side of the interior there is a bin. On top of that bin
is a tarp. While building the Ausf.A I discovered that I had attached
the tarp on my Ausf. B upside down. It's rather easy to miss on
the Ausf.B as the instructions only show the tarp from the rear,
so you can't see where the latches go. In the Ausf. A you can
only install the tarp one way, due to the shape of the hull. The
pictures below show the tarp upside down, i.e. before I corrected
it.
As
a marking option I chose the one from the 2nd Pz.Div., but added
decals from
- ICM,
set D72001, for the unit insignia. (This set seems to be out
of production.)
- Aleran,
set GE2 for the licence plates. (Apparently I forgot to scan this
set before using.)
- An
old Fujimi 1/76 Sd.Kfz.222 for the tactical symbol (half track
recon unit).
I am
not vowing for the accuracy of these additions; I only added them
for artistic reasons.
_t.JPG) _t.JPG)
 _t.JPG)
Final
weathering will be done when the vehicle finds its place in a diorama.
Ausf.
A
Final construction didn't reveal much that is worth mentioning.
Some points that might be useful
- All
visors and hatches are separate. This will help the modeler who
wants to display them in the open position, even though the openings
in the hull still needs to be created.
- The
front wheels have a slight V-stance when seen head-on. When you
enter the model in a contest, inform the judges.
- The
instructions have you place the axe on the front right fender
with the axe-head pointing inwards and forward. According to my
references inward and backward (with the head below the pick axe)
seems more likely.
- There
are some extra tools on the sprues that are not for use, even
though the instructions do not mention it.
- The
MG34s are nice, but I left them off for my vehicle. Note that
the rear MG was sometimes stored on the lower right wall of the
fighting compartment.
- The
jerrycans on the hull can be seen on many vehicles, but were not
standard. I left them off for this vehicle.
- The
width indicators are a bit too "sturdy" and short. It
is recommandable, however, that they are included, as some companies
don't bother. I replaced mine with setting
pins used by butterfly collectors.
- An
antenna needs no be added to the antenna holder on the side of
the hull. This is not mentioned in the instructions. Note that
German antennas were rather rigid and about 2m high. I used the
rods that were left over when cutting the setting pins (that I
used as width indicators) to length. Talking about recycling!
- There
is no pattern on the face of the front wheels, due to molding
limitations, I guess. You can always assume they are very, very
worn.
- I
used one hollowed out head lamp (that's on the sprues anyway)
to simulate battle damage.
- The
color drawings (for the painting options) show a small shield
to the right of the Pak, which the kit itself lacks. I don't think
this was installed on many vehicles. I had some trouble getting
the gun to fit in its cradle.
- Having
discussed the possibility to use the low Pak shield for a Dragon
Sd.Kfz.251, note that the same Dragon kit could be the donor of
a high shield, as it seems at least one Sd.Kfz.250/10 was fitted
with a higher shield (see picture below).
- Only
after finishing the review, did I discover that I unstalled the
rear convoy light upside down.
.jpg)
Picture
found on the internet, source long forgotten.
As
a marking option I chose an SdKfz250/10 used by the Polish 13th
Self Propelled Artillery Regiment in Pomerania in 1945. Decals are
from Armo. As far as I know
only one photograph exists of this vehicle, which gives the modeler
a large margin for artistic licence. From the picture it is clear
that the Armo decals are a bit too large and that the asymmetrical
eagle in the decal is not quite correct. Applying the decals I discovered
that the "10" wouldn't fit due to the presence of the
antenna mount. Apparently the mount was positioned further forward
on this vehicle than I put it; it is also a different type. With
the decals still wet, I removed the mount, sanded the hull smooth
where it had been and repainted the damaged paintwork.
The hull of the vehicle in the pictures looks quite dark without
traces of overpainting the Balkenkreuze. The roadwheels seem lighter.
I therefore assumed the following scenario:
- The
vehicle was originally delivered in dark grey (i.e. before February
1943).
- The
Germans repainted it in Dunkelgelb in 1943, not bothering to repaint
the interior.
- The
Polish forces captured it in 1945, repainting the hull in green
(likely to be Russian 4BO), not bothering to paint the suspension
nor the interior.
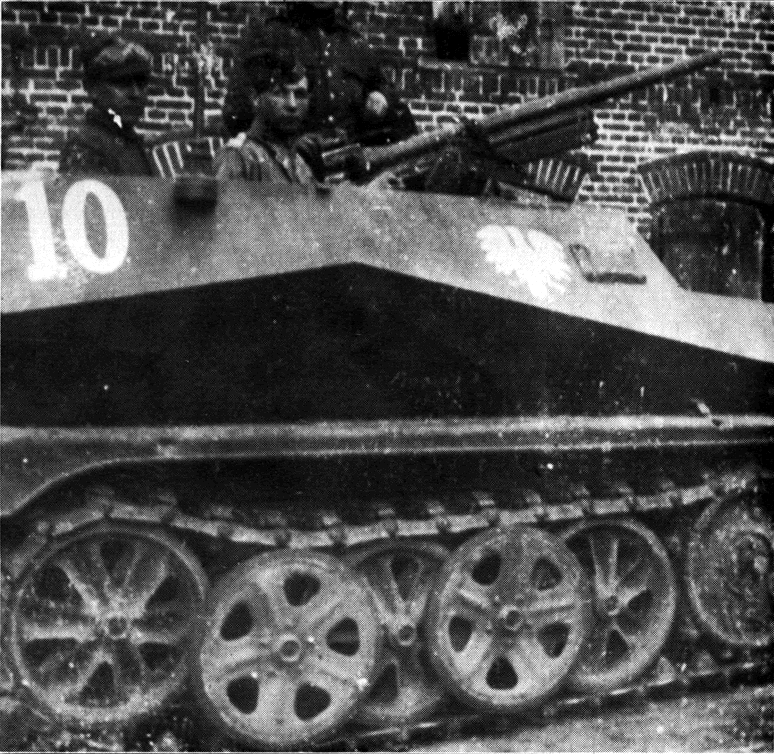
Picture
found on the internet, source long forgotten. For discussion purposes
only.
_t.JPG) _t.JPG)
 _t.JPG) _t.JPG)
 _t.JPG)
Phase V: Measuring the accuracy
Ausf.
B
Having built the kit without major surgery, I decided to compare
the kit against the information in [1]. The following might be of
interest, in random order:
- The
kit has 34 track pads per side, the real vehicle 38. For a short
time during the summer of 1943 all steel tracks were used. I've
heard complaints about their accuracy. Personally I think they
are quite good, except for their width which scales out to 296mm,
while the real tracks were only 240mm in width. Incidentally the
Revell Sd.Kfz.251 tracks scale out to 252mm, which is almost the
exact opposite problem as for this kit. If the track lengths weren't
that different, one might think about swapping tracks.
- Vehicles
produced before March 1944 had a Notek light and two small headlights.
Afterwards vehicles had a single Bosch headlight. The kit only
has the Notek, not the small headlights.
- At
first I thought that a conversion of the Sd.Kfz.250/10 into an
11 would just be a matter of using the Panzerbüchse from
a Dragon kit, but it seems the mount is completely different.
Conversely, if you build the kit as a /1, you can use the left-over
Pak of the MK72 on a Dragon /10, as these kits only come with
the high shield (in PE), which was rather rare, especially on
the Ausf.D. Also note that the Sd.Kfz.250/10 was no longer produced
after January 1944.
- If
you want to stow the rear MG, it should go on the right wall.
I guess there should be some attachments for that.
- The
pictures I've seen of the first aid kit on the rear door have
a different fitting: a frame that holds the edges of the box,
not a central "strap".
- Some
vehicles had an antenna mount that was attached to outside of
the fighting compartment. Most (like the kit) had a mount attached
to the roof.
I measured
the kit in some areas:
| |
Kit dimension
(mm) |
Real vehicle
dimension (mm) based on [1] |
Scale |
Correct dimension
in 1/72 (mm) |
Overall
length (excluding tow hooks)
|
62.22 |
4540 |
1/72.9 |
63.05 |
| Overall
width |
27.27 |
1930 |
1/70.8 |
26.81 |
| Overall
body height |
21.50 |
1603 |
1/74.5 |
22.26 |
| Height
of rear hull plate (measured parallel to plate) |
13.47 |
1029 |
1/76.4 |
14.29 |
| Length
engine deck (measured in the horizontal plane) |
23.94 |
1740 |
1/72.6 |
24.16 |
| Width
engine deck (at the nose) |
19.00 |
1308 |
1/68.8 |
18.16 |
| Length
opening fighting compartment |
21.55 |
1583 |
1/73.5 |
21.99 |
| Width
opening fighting compartment |
19.90 |
1431 |
1/71.9 |
19.88 |
Diameter
nosewheel |
11.95 |
888 |
1/74.3 |
12.33 |
| Diameter
roadwheel |
8.00 |
560 |
1/70.0 |
7.78 |
| Length
track |
40.72 |
2828 |
1/69.4 |
39.3 |
| Width
track |
4.12 |
240 |
1/58.3 |
3.33 |
While
most measurements fall within tolerances, the above table shows
that
- The
kit is slightly too short and too wide, but the Mk.I eyeball won't
notice that. (The Mk.II might.)
- What
is more noticeable is that the tip of the nose is too wide. This
causes the engine deck to taper too little, which the Sd.Kfz.250
expert might notice.
- The
nosewheels are slightly underscale, but not nearly as much as
Esci's Sd.Kfz.250 (which scales out at 1/81.5) or the Modell Trans
correction set for Esci (that scales out at 1/77.2).
- The
area where the more casual observer can really tell that there
is something amiss is around the tracks. Not only are they far
too wide, they are also far too long. The visual effect is that
the idler sits too close to the rear of the fender and the tracks
actually just pass behind the rear lower hull plate. With the
single part suspension this will be rather difficult to correct.
As already mentioned the first roadwheel on the right side also
almost touches the sprocket.
- Talking
about fenders. In the Ausf.B the fenders doubled as storage boxes.
In the kit the boxes extend a bit too far forward, say 1.5mm.
- The
rear hull plate should be tilted forward by a couple degrees more
and should be higher.
Ausf.
A:
I measured
the kit in some areas:
| |
Kit dimension
(mm) |
Real vehicle
dimension (mm) based on [1] |
Scale |
Correct dimension
in 1/72 (mm) |
Overall
length (excluding tow hooks)
|
61.88 |
4470 |
1/72.2 |
62.08 |
| Overall
width |
27.60 |
1942 |
1/70.4 |
26.98 |
| Overall
body height |
21.40 |
1590 |
1/74.3 |
22.09 |
| Height
of rear hull plate (section containing door - measured parallel
to plate at the right side) |
12.18 |
936 |
1/76.6 |
12.95 |
| Length
engine deck (measured in the horizontal plane) |
25.40 |
1912 |
1/75.3 |
26.55 |
| Width
engine deck (at the nose) |
11.20 |
766 |
1/69.69 |
10.84 |
| Length
fighting compartment (including roof sections) |
28.60 |
2008 |
1/70.2 |
27.89 |
| Maximum
width opening fighting compartment |
22.54 |
1627 |
1/72.2 |
22.60 |
Diameter
nosewheel |
11.95 |
888 |
1/74.3 |
12.33 |
| Diameter
roadwheel |
8.00 |
574 |
1/71.7 |
7.97 |
| Length
track |
40.72 |
2765 |
1/67.9 |
38.4 |
| Width
track |
4.12 |
240 |
1/58.3 |
3.33 |
While
most measurements fall within tolerances, the above table shows
that
- The
kit is slightly too wide. Also note that on the real vehicle the
superstructure was slightly wider than the fenders (at least according
to [1]), while in the kit you have the opposite.
- What
is more noticeable is that the tip of the nose is too wide. This
causes the engine deck to taper too little, which the Sd.Kfz.250
expert might notice.
- The
nosewheels are slightly underscale, but not nearly as much as
Esci's Sd.Kfz.250 (which scales out at 1/81.5) or the Modell Trans
correction set for Esci (that scales out at 1/77.2). Nevertheless,
they interfere a little with the fenders. I believe the reason
is that the vertical spacing between the wheels and the body might
be bigger. This might also solve the (slightly) insufficient height
of the vehicle.
- The
area where the more casual observer can really tell that there
is something amiss is around the tracks. Not only are they far
too wide, they are also far too long. The visual effect is that
the idler sits too close to the rear of the fender and the tracks
actually just pass behind the rear lower hull plate. With the
single part suspension this will be rather difficult to correct.
As already mentioned the first roadwheel on the right side also
almost touches the sprocket.
- The
door in the rear hull plate is too large, or better the rear plate
is too small. The door extends too far to the bottom of the plate.
In reality, its bottom edge was level with the bottom of the hull
plate at its right side (at least on the 250E Aufbau).
While we are talking
accuracy of the Ausf. A, it is perhaps time to discuss the differences
between the Ausf.A with 250/Z Aufbau and that with 250E Aufbau. Few
people actually know there were two distinct versions of the Ausf.A
(aka "Alt"):
| |
250/Z
(first version) |
250E
(second version) |
| Visors |
Flat,
double slit. Those on the side are at the same height as those
at the front.
Visor in rear door. |
Domed, single
slit. Those on the side are lower than those at the front.
No visor in rear door. |
| Headlights |
On the side
of the nose armor |
In front
of the fenders |
| Lift hooks
on superstructure |
Yes |
No |
| Driver's
front plate |
More vertical |
More sloped |
| Rear plate |
Shorter |
Larger |
| Plug on right
rear superstructure |
Yes |
No |
| Fenders |
Plain |
Beaded |
| Ventilation
for engine exhaust |
Holes
or slits |
Slits |
| Engine deck |
Three parts |
Two parts |
| Licence plate |
Plate below
nose |
Painted on
nose |
| Tool box |
Smaller box
between fenders and extra box on fender |
One, bigger
box |
| Turn indicators |
Slightly
more to the rear |
Slightly
more to the front |
| Width indicators
on fenders |
More to the
rear |
On the edges |
| Notek on
left fender |
On the edge |
In the middle |
Note that
- the 250/Z Aufbau
is the one used by the Sd.Kfz.253, so if you plan on converting
this kit by roofing it over: it is not as simple as that.
- there was a
pre-production run, that closely resembled the 250E superstructure,
but with some differences.
Comparison
with the S-Model Sd.Kfz.253.
We recently
reviewed the S-Model
offering of the Sd.Kfz.253, which represents the 250/Z body. That
kit is nicely detailed on the outside, but has some scale issues.
Comparison with this kit teaches us that cross-kitting might be an
option to arrive at a more correct Sd.Kfz.250 or 253:
- The
tracks of the S-Model kit are better, and might fit on the MK72
kits.
- The
front wheels of the MK72 kits are better, and might fit on the S-Model
kit.
- Other
exchanges might be possible, and we would be interested to hear
from our readers if someone attempts to cross-breed both kits.
_t.JPG)
_t.JPG)
 _t.JPG)
_t.JPG)
Conclusion
These are beautiful little kits that
go together well, and need very few additions. The main issue are
the tracks that are too wide and too long, extending too far to
the rear. I have been told that some of the sprues in this kit will
be used for another kit in the near future.
For those that light to stray from
the beaten track, we gladly share the following pictures.
_t.jpg)
Sd.Kfz.250
Ausf. A (and 250Z Aufbau)
with
Panzer I turret. Picture from EBay auction-used for discussion purposes.
.jpg)
Sd.Kfz.250
Ausf. A (and 250Z Aufbau) with a very peculiar position for a frame
antenna. Picture from EBay auction - used for discussion purposes.
_t.jpg)
Sd.Kfz.250
Ausf. B with an Italian Breda 20mm Flak gun. Picture from Robert
Icks collection - used for discussion purposes.
References
[1] Panzer
Tracts 15-1, leichter Schuetzenpanzerwagen (Sd.Kfz.250) Ausf. A &
B, T.L. Jentz & H.L. Doyle.
[2]
Sd.Kfz.250 Alt-Neu Archive Part 1 & 2, Total Detail, Martin Kögel.
[3] Sd.Kfz.250
Vol I & II, Wydawnictwo Militaria 173 & 231.
[4] Sd.Kfz.250-251
at War, Trojca, W. Trojca, K Münch.
[5] http://vincesgallery.smugmug.com/History/SdKfz-250-Alt
[6] http://vincesgallery.smugmug.com/History/SdKfz-250-Neu
[7] Sd.Kfz.
250, Miltar's kits Hors série N°1, MK Editions
[8] Die
Halbketten-Fahrzeuge des deutschen Heeres 1909-1945, W.J. Spielberger,
Band 6 der Reihe Militährfahrzeuge, Motorbuch Verlag
[9] SdKfz250,
Ground power special issue, Delta Publishing
[10]
«Pleins Feux sur : Le SdKfz 250 Neue Art», Dragon 1/35,
Steelmasters 30, Histoire & Collections
[11]
Schützenpanzer , B. Culver & U. Feist, Ryton Publications
Thanks to MK72
for the review sample. |
.jpg)
.jpg)
.jpg)
.jpg)
.jpg)
.jpg)
.jpg)
.jpg)
.jpg)
.jpg)
.jpg)
.jpg)
.jpg)
.jpg)
.jpg)
.jpg)
.jpg)
.jpg)
.jpg)
.jpg)
.jpg)
.jpg)
.JPG)
.JPG)
.JPG)
.JPG)
.JPG)
.JPG)
.JPG)
.JPG)
.JPG)
.JPG)
.JPG)
.JPG)
.JPG)
.JPG)
.JPG)
.JPG)
.JPG)
.JPG)
.JPG)
.JPG)
.JPG)
.JPG)
.JPG)
.JPG)
.JPG)
.JPG)
.JPG)
.JPG)
.JPG)
.JPG)
.JPG)
.JPG)
.JPG)
.JPG)
.JPG)
.JPG)
.JPG)
.JPG)
.JPG)
.jpg)
.jpg)