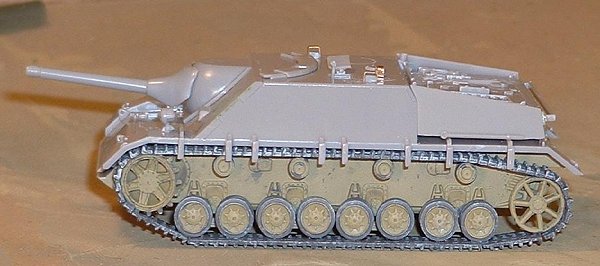
 Although the Hasegawa Sd. Kfz. 162 Jagdpanzer IV L/48 has a number of problems, it is actually a fun kit that can be built up into a very nice model with a few slight modifications. I did not spend a lot of time with the kit. I began it last summer at the cottage where I cut and assembled the running gear. I then put it aside for awhile while I worked on other things. Then, at the end of the Christmas/New Year vacation I took it out again and decided to finish it. From tracks to mounting on the display stand took just more than a weekend. The Tracks The first items that have to be dealt with are the rubber one-piece tracks. Some people prefer these to hard plastic length and link tracks but, at the end of the day, they just don’t sit right in my view. I replaced the ones in my kit with a spare set of ESCI Panzer IV tracks I had sitting around. These are inferior to the newer Revell Panzer IV tracks but I wasn’t going to sacrifice a Revell for a Hasegawa kit! Another option would be PART etched brass tracks but they seem to me to look a bit thin, even in 1/72nd scale. The ESCI tracks fit very nicely, although I did have to file the drive wheel teeth a bit to get them to fit.
The Periscopes The kit’s periscopes on the top of the fighting compartment are moulded as solid blocks – in reality they would have two parts, an upside down "U" shaped guard with the actual periscope contained within. This was surprisingly easy to fix. Using an exacto blade I cut down the size of the existing block. Then, using a thin section of "sprue" from an etched brass set (the frame from which you cut the parts you would normally use – this stuff can be very useful and I recommend keeping it around), I bent the "U" shaped cover and super glued them into place. In the photos I have not yet painted the periscope glass flat black.
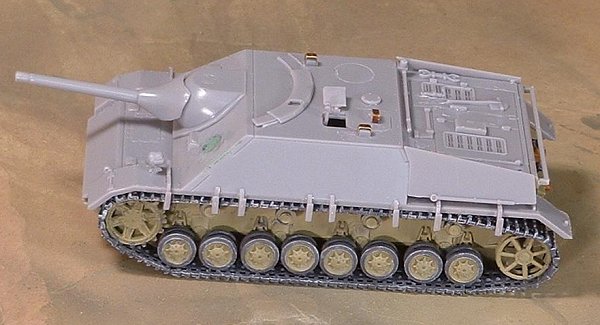
The Port-side Machinegun Port Early Jagd IV’s seem to have had two machinegun ports and, for maximum flexibility Hasegawa has moulded the hull with both. In the instructions it blithely tells you to fill the port side one. In reality getting rid of this hole is a real "bear". You have to make certain that, once painted, there is no depression or other indication that the hole was there. I filled it with Squadron "Green Stuff", sanded it down, painted it, sanded it down again, painted it a second time, and sanded it a third time. Even then I didn’t get rid of it completely – if you look hard you can see it. I would have been much easier if Hasegawa had provided a disk to insert into the whole. The Driver’s Vision ports Jagd IV’s all seem to have a driver’s vision port with two distinct rectangular slots. Hasegawa just leaves the area blank. I scribed the slots in using an exacto blade, then highlighted them with black paint. The "Nine Foot Shovel" Okay I haven’t actually scaled it out, but the shovel on the rear deck is wa-ay too long. Revell also seems to think that all tools (at least those moulded on to a kit) need to be really, really long. I cut off the last 20% of the shovel and then strategically hid the cut end with a carelessly placed jerry can. I also removed the bolt cutters and a towing shackle from the back deck (they looked "moulded on"). Hatches Hasegawa has engineered the kit such that the main hatches (commander, commander’s "scissor" periscope opening and loader’s) can be built open. The problem is that these are big holes – big enough that if you look down them you should be able to see something. Also, if you open the commander’s square hatch, you have to scratch build the bottom half of the periscope. I chose to build mine closed up, with the exception of the "scissor" periscope hatch. The kit includes the binocular periscope. I added a cut down ESCI commander figure so that if you look down the open hatch you see him, not empty space.
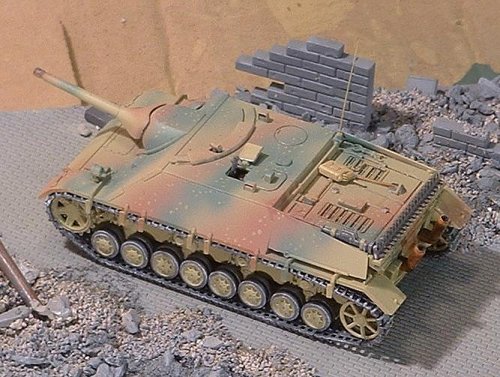
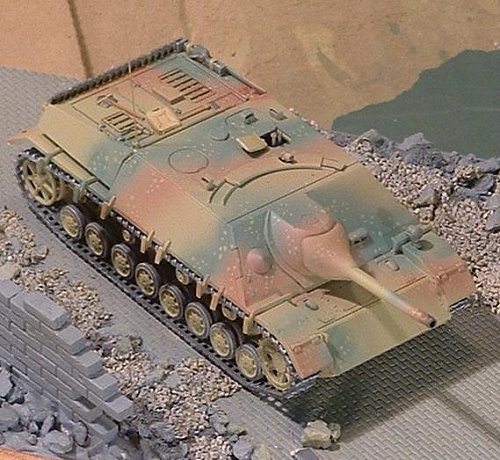
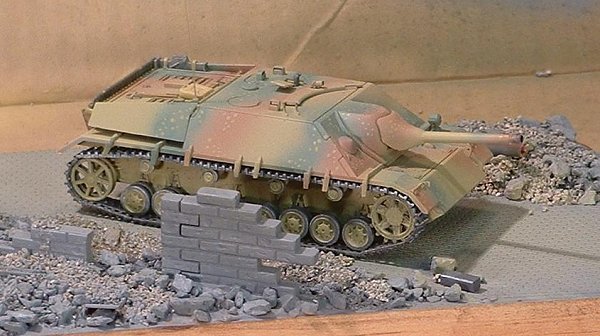
Painting Since zimmerit was generally discontinued around mid-1944, I didn’t have a problem building this kit without it. I am also experimenting with an air brush so I decided to give the famous "ambush" scheme a go. I have no pictoral proof that such a scheme was ever applied to a Jagdpanzer IV L/48 – it has been seen on L/70’s however. My intention was to build a vehicle of late 1944/early 1945 straight out of the factory to a reforming unit that applied the ambush scheme locally over the base yellow. The over-all base coat is Model Master Acrylic Panzer DunkerGelb 1943 (Dunkel Gelb??). The Green over-spray is Model Master Panzer OliveGrun, also acrylic. The red-brown I mixed myself from one of my kids’ War Hammer paints – something called Terra Cotta, mixed with Model Master Sand yellow. The dappling (spots) is Humbrol Ocher (#83) Enamal applied with a brush in tiny spots. I decided to leave it unmarked and also left off the spare bogies on the rear deck (I really liked the colour scheme and didn’t want to cover it up with a lot of spare gear).
The Base I originally started the base about a year ago, thinking I would use it for a Soviet JS-2. The base is a $1.99 special from the local Michael’s craft store. The brick wall is from an old Bandai 1/48th scale set. The rubble is mostly cat litter (unused) with bits of plastic from the spares box added here and there. I then added some model railroad ballast to fill in between the larger bits. The cobblestone road is also from rail road stock, and is supposed to be brick wall. My intention here was two-fold. First I wanted a clearly end-of-war atmosphere, something that brings to mind Hitler’s mid 1930’s speech with the comment "In ten years you won’t recognize Germany." The Jagdpanzer is gingerly working its way through the rubble of a blasted city to the front. Secondly, I wanted to really show off the ambush camouflage scheme. It really stands out against the rubble.
|