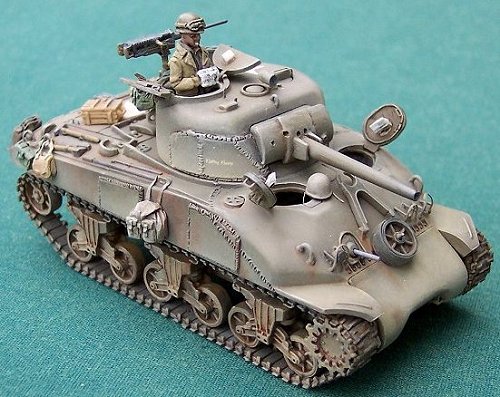
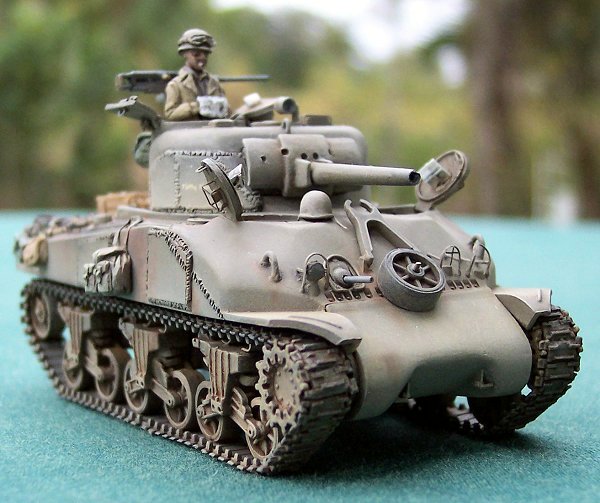
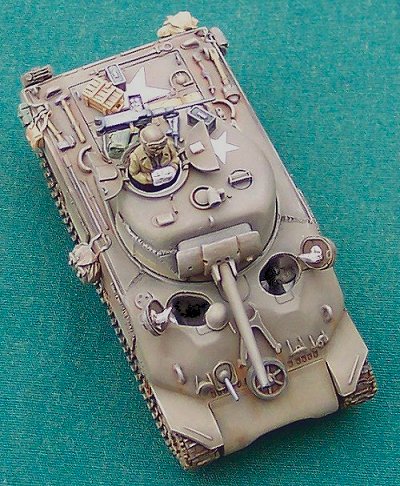
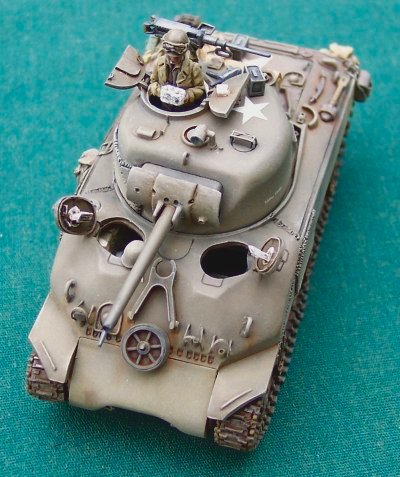
M4 Composite Hull Sherman
Manufacturer: Fine Scale Factory (Kit #TL 019)
I have owned this kit for about a year now, and have been looking forward to building it since first opening the box. Now that I am finished with the project, I can honestly say, this was one of the most enjoyable models I've built. Not only because the kit was of very high quality, but also because I feel that I have expanded my modeling skills on this project. I have always felt that adding stowage items, and heavy weathering of tank models really added something to the completed product, yet I so very seldom actually did any of that. Mainly it was because I felt that I was running out of time, and needed to finish a review project that I was commited to, but also a little bit out of fear of ruining what I was working on. With all of the additional add-ons I've included with this Sherman project, I am encouraged to do this more often with future kits too. (Another reason I haven't been going overboard with the additional detail lately is because when I build review kits, I tend to stay fairly close to out-of-the-box. However, since most viewers of this site are already aware of the high quality of FSF kits, I thought I would stretch it a little bit this time.)
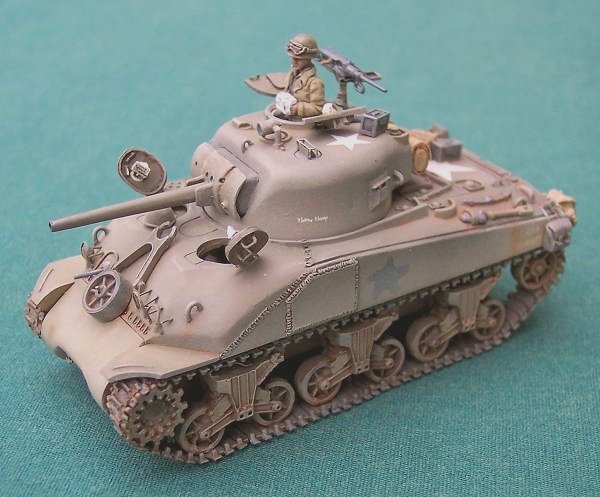
When I first began researching the late style of the M4 Composite Hull Sherman, I was concerned about the accuracy of the early style turret without the loader's hatch, paired with the late style hull. After reading Faustnik's Preview of the kit, I was comforted to learn that I wasn't imagining things, and that he shared the same concerns as I, as well as introducing a couple more. However, after further research, I think that we are in a gray area here. Regarding the steel bar cleat tracks, I have seen several photos of US Marine Corps (USMC) Shermans with this style of track, so I have no problem with using them. I have also seen several photos of USMC late hull Composite Shermans, so I decided that I was going to build a USMC version of this tank.
Regarding the turret, I have not been able to find any photo that clearly shows the early style turret paired with the late style hull. I have found one photo that is a possibility, but not conclusive. What I HAVE seen however, is a line drawing within the Squadron/Signal book Sherman in Action, that is clearly of this exact vehicle. So where did Squadron get their information from? I don't know. But I am not interested in getting into another "Did it, or did it not exist?" controversy, so I am going to take some artistic license, and build what Squadron indicates. If it's incorrect, then the fault is theirs :)
On to the kit:
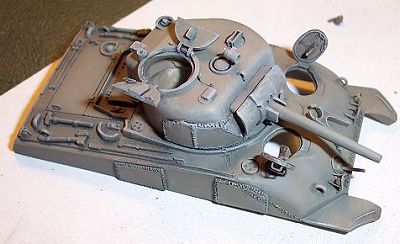
As can be seen in my Preview for this kit, it is all resin, and composed of a fairly good number of parts for a resin kit. FSF created the hull by grafting together the front hull from an ESCI M4A1, and the rear hull of an ESCI M4A3, using the A1 engine deck. Additional hull improvements include applique armor plates on the hull sides, and improved ventilator covers. There was some rudimentary interior detail provided inside the hull, which I felt needed to be added to, so that the hatches could be modeled open. The turret is modified from the ESCI turret, with the loader's hatch removed, and applique armor plates added to the right cheek. Assembling the kit was fairly easy. Once all the parts were cleaned up, everything fit exactly the way it should. The exception to this was the tracks, which will be explained below.
Turret
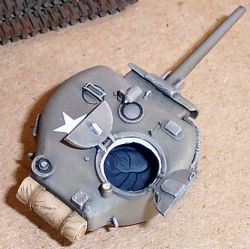
The turret was molded solid, but with an open commander's hatch. Since FSF took the time to add some detail to the insides of all the vehicle hatches (specifically periscopes), I decided that it would be unfair to not show it, and decided to model all of the hatches open. This of course meant that I needed to hollow out the turret, which I did, of a sort, but it is very rough and crude, and I did not add any turret interior detail. I planned on placing a commander figure in the open turret hatch, which would hide the lack of interior.
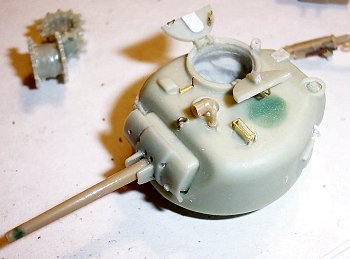
(As I am writing this article, it occurs to me how dumb I was in how I attempted to hollow out the turret. I used a Dremel tool to dig down into the resin from the commander's hatch opening, which was very delicate and difficult to do. I just now realized that I could have easily hollowed it out from the bottom up!)
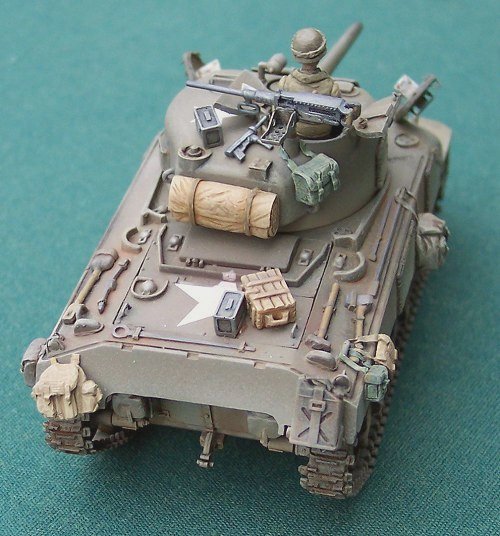
When FSF filled in the loader's hatch, the filler shrunk a little bit, leaving a slight depression, which needed to be filled with more putty and smoothed over. I added some brass details from the Eduard and Extratech Sherman sets, such as the commander's gun sight, .50 cal machinegun details, hatch handles and periscope guards. I also added some hatch details from styrene, most of which can't bee seen, because it is on the hatch tops. The lift rings on the turret sides are bent styrene rod, and the one above the gun mantle is brass wire. The searchlight was added from a spare ESCI kit, as was the gun barrel, since the FSF barrel was warped.
Hull
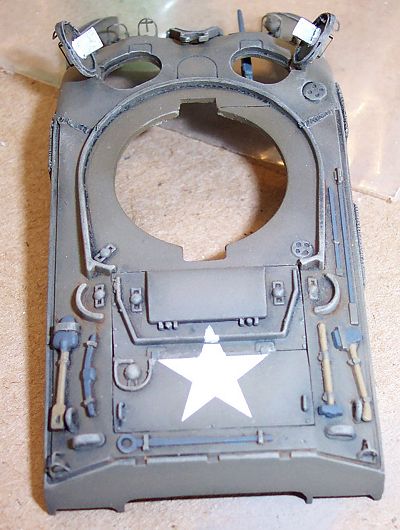
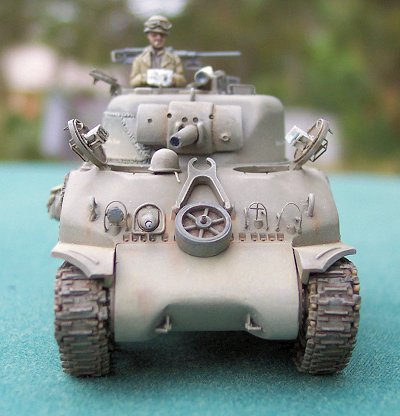
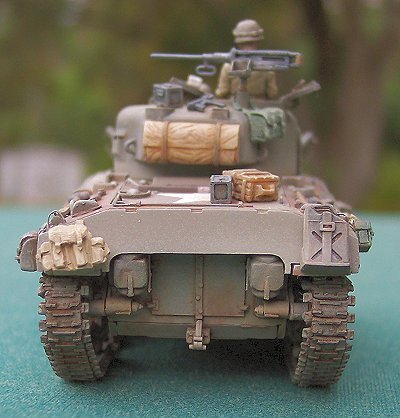
I made several additions to the hull: the machinegun protective shroud mounting rail was made from bent solder; lift rings were formed from bent styrene rod; two small handles were added to the engine access hatch from brass wire; the tail lights were made from styrene with etched brass brush guards; a single headlight was taken from the kit (with resin brush guard removed) and etched brass brush guards were added for all three light stations. Regarding the headlights, the resin lights in the kit are copies of the fairly poor lights from the ESCI kit. I have seen a great many photos of USMC tanks that have had some or all of their headlights removed, for some reason of which I am not aware. So I attached only a single headlight, and left the other light sockets empty.
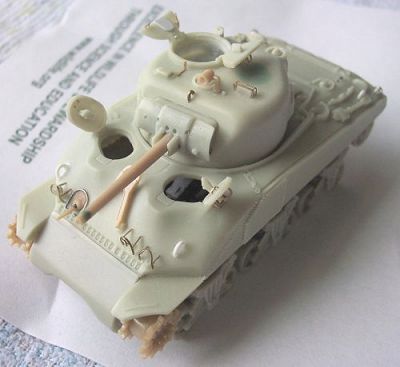
As can be seen in the in-progress scans, there were some other parts that needed to be provided from a spare ESCI kit. I had to add the hull machinegun and ball mount, the two box air filters on the hull rear, the gun travel lock, and of course the AA machinegun. Handles and etched brass periscope guards were added to the hull crew hatches.
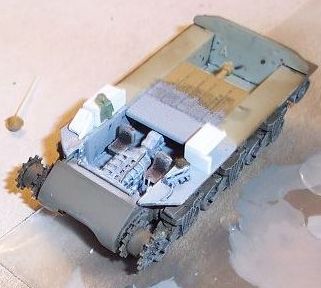
For the hull interior, the major components I added were the sponson storage boxes, the corners of which will be visible through the open hatches. I also added a couple smaller items, such as control sticks for the driver, some plumbing, a canteen sitting on the bulkhead, and a jacket draped over one of the storage bins. I added the drive shaft and raised interior floor from the ESCI kit as well, but you can't see these without a flashlight and close-up view through the hatches.
Chassis

I replaced the two drive sprockets, because there was a small loss of definition in the sprockets in the resin parts. Unfortunately, the resin pieces are just a wee bit wider than the plastic parts, which is important in fitting the tracks. I found this out when I started attaching the tracks, after everything was built and painted :( A bit of careful sanding of the sprockets took care of the problem.
I made mention in my Jumbo Sherman review that the Jumbo kit mistakenly came with four left side bogie trucks (wheel suspension units), and only two right side units, so in order to build the Jumbo, I stole a right side unit from this Composite kit. Now that I needed one to finish this Sherman, I replaced it with one from the ESCI kit. That ESCI kit is pretty much scavenged now, and is only good for spare parts.
Painting
At this stage, I started painting. First was the interior, which I painted off-white, and highlighted with white. After masking off the interior, I painted the hull and turret olive drab (Polly Scale acrylic), and then I did my standard wash technique with a black wash, and then a highlight coat of paint.
I started the weathering (drybrushing and rust and brown washes) while the vehicle was still disassembled like this, in order to reach behind the wheels, and more easily handle the vehicle. I painted and attached the tracks, and then weathered them extensively too. After applying the decals and dull coating, it was time to glue the hull together.
Tracks
After attaching the wheels, but before gluing on the tracks, set the tank down flat on some sandpaper that has been placed on a hard, flat surface. Gently sand the bottoms of the wheels all at once to make sure that all of them touch the ground evenly. Don't take off too much, because then the wheels may look flat! Just enough so that they sit evenly. If one or more wheels is so out of whack that you would need to grind down the others to their rims, then perhaps you need to re-attach it.

I'm not sure if I did something wrong with the tracks, but if I did, it was major. The tracks in my kit were not nearly long enough. For a portion of the bottom track run (the length on the ground) I used some leftover track I had from my FSF Jumbo Sherman kit. Seven links on each side, to be exact. Since those links are on the ground, you can't notice the difference, unless you pick up the tank (which judges are sure to do, so I'll have to "attach" it to a base if I choose to enter it into a show). Tracks from an ESCI Sherman would also work. I would be curious to know if others have had this same problem, because if so, then it is something that FSF needs to fix for future kits. Six track lengths came with my kit; a seventh would have been perfect.
![]()
In order to have the track lengths sit atop the track skids (or wheels or return rollers in other kits), apply some glue to the tops of the skids, slide the track into place, and stick in some small pieces of plastic rod (or other appropriate implement) to act as spacers that will press the track to the skids. Remove the spacers when the glue is dry.
Finishing
Once the hull was joined, and the necessary touch-ups done, I sprayed a thin coat of dust over the entire thing. I wanted to do that after the decals, so that the markings would also be weathered, but before I attached the stowage, in order to make those items stand out more. I attached the stowage items and then added a lot of pastel chalks for the extensive weathering (which does not appear in the photos as heavy as it truly is). I was concerned that I was overdoing it, but after speaking with a Pacific veteren, I think I need to rust it even more. Metal stuff rusted extremely quickly in the salt air, and the tanks were no exception.
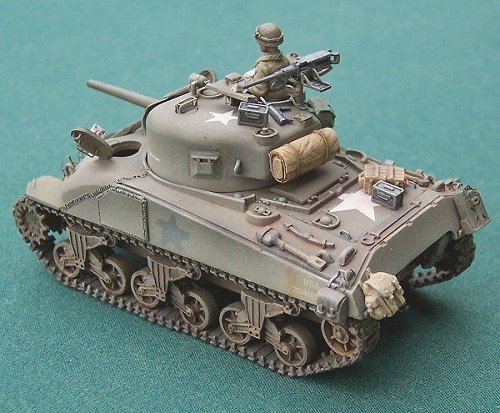
The markings were supposed to represent a "generic" USMC tank, based on numerous photos of real tanks. The large star on the engine deck, as well as the smaller one on the turret roof, were for air recognition. The stars on the hull sides were painted over, so as not to provide convenient targets for Japanese anti-tank gunners.
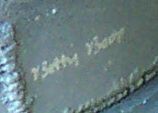
But then I made a very serious mistake. I found some generic US serial numbers to put on the rear corners of the hull, which is quite incorrect. Not knowing any better, I had assumed that the "USA" above the registration number stood for "United States of America". Of course, I found out later that is actually stands for "United States Army", which is a really dumb move on my part. Live and learn. I won't be making that mistake again (there are plenty of other mistakes I have yet to make first). The stars and serial numbers are waterslide decals from an old Microscale sheet. The small "Betty Boop" logos on the turret cheeks are dry transfers from SMA/SSP.
The stowage items came from a variety of sources. The box on the engine deck and the bedroll on the turret rear are from ARMO accessory sets, the gas can is from an ESCI WC51 kit (heavily modified), the .50cal ammo boxes are from MR Models, the rucksacks and bags are MarS (with straps made from lead foil), and the .45cal "grease gun" submachinegun is from MMS. The helmet on the front deck is cut from the head of an ESCI hard plastic figure, and the spare wheel on the hull front is from my "spare parts" ESCI Sherman kit.

This was a excellent kit, and I'd like to thank Fine Scale Factory for providing the review sample.

| Back to Kit Reviews | Back to The Sherman Story |
| Back to Fine Scale Factory Kit List | Back to Home Page |