As
you can tell from the boxtop, this kit is "1+1". With some
basic calculus this works out to two identical kits inside. I am not
a marketing guru; there must be a reason.
All parts
for the turret of an Sd.Kfz.222 are there, by the way, except the
turret mesh. (The upper hull is lacking too.) Other spare parts are
a slightly different type of rear licence plates. (More about them
later.)
When
you take a first, quick glance at the kit, you cannot but notice there
are a lot of similarities with the ICM kit, in parts lay-out and detail.
I've tried, and the lower and upper hull of the ICM kit and Dragon
kit can even easily be swapped without fit issues. That said, they
are not copies of one another, as a closer look reveals small differences.
I'll only name a few:
- In
the ICM kit the hubs of the wheels are separate parts, in the Dragon
kit they aren't.
- The
two tool boxes on the left side of the hull are separate in the
ICM kit, not in the Dragon kit.
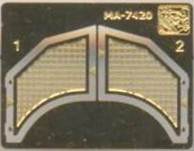
- In
the ICM kit the grating behind the turret is PE, in the Dragon kit
it is plastic.
- Crispness
of detail is comparable between the two kits.
_t.jpg) _t.jpg)
 _t.jpg)
_t.jpg)
_t.jpg)
So far,
chosing between the two kits would come down to:
- Availability.
- Price.
You get two kits in this box, and at the usual retail prices, it
seems Dragon would be cheaper per kit. On the other hand, I've seen
ICM kits selling far below the MSRP.
- Version.
The Dragon kit is the early flat-visored version, ICM the later
version. That's exactly the reason why I bought the kit: I needed
an early hull. More about that later.
Looking at the evolution
of the Sd.Kfz.222, this kit has a lot of the distinguishing features
of a 1. Series vehicle:
- Driver's
roof higher than the rest of the roof.
- Flat
visors: two in front, two at the sides, two on the turret. Interestingly,
[16] tells us that all Sd.Kfz.223 with flat visors had a configuration
where the co-driver's visor is more to the rear than that of the
driver's. Dragon has both in the same position, making this, technically,
an impossible variant.
Then,
I took out my callipers and my references. Compared to [16]:
- There is a
backslant in the hull, which shouldn't be there. It is anybody's
guess why it is there, and how you are supposed to correct it.
- The
turret is 1mm too wide (ICM's is 1mm too narrow, which I feel is
worse.) It is also not pointy enough at the nose. In that respect,
ICM's is better. This makes for two very different turrets between
the two brands, which shows very well in the PE parts that are provided
for the top of the turret.
- The
shape of antenna rail is slightly off; it looks more like a 4. Series.
It should be rectangular, with rounded edges, without any other
bends.
- The grating
behind the turret looks more like a 5. Serie Sd.Kfz.222 than a 1.Serie
Sd.Kfz.223. It should be one mesh (not three sections) and should
extend farther forward.
- Just like ICM
with their Sd.Kfz.222, Dragon has a longitudinal plate in the turret
to which you are to install the gunner's seat. The real thing was
rather different. Still, it is better than ICM's which doesn't give
you anything in their Sd.Kfz.223, except the MG.
- The integrated
tool boxes in the front fenders are missing, just like with ICM.
It should just be a matter of adding a small plate of plastic.
- Square licence
plates are not provided, which were typical of earlier vehicles.
It is strange in this respect that Dragon did provide an alternative
type of licence plate, but not the early one.
_backslant.jpg)
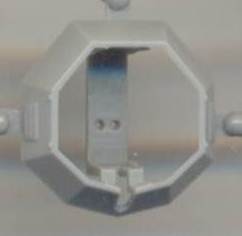
While the backslant
is an annoying issue, something that I find unforgivable is shown
in the next picture.
 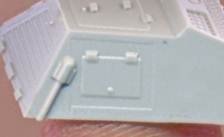
As you can tell
the right engine hatch is RECESSED, while the left one is slightly raised (as
it should be, i.e. on a flush hull). What were they thinking ??? And how are we to correct
this without some backbreaking surgery ?
Having
been rather disappointed so far, I also noted some other minor things
that still slightly annoyed me.
- The
instructions want you to install the width indicators to the very
tip of the front fenders. That was a 5. Serie feature. They should
be positioned on the horizontal section. As you must actually drill
a hole to install them, it's just a matter of drilling the hole
slightly more to the rear.
- There
are locating pegs for the toolbox on top of the engine compartment.
Very early vehicles didn't carry that box. This is not so bad, as
you can shave them off, if so desired.
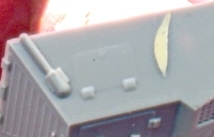
- Dragon
provides a rack for jerrycans on the nose. Nice feature, but why
did it need a recess in the nose? As long as you fit the rack, it's
not a big deal, but if you don't (and I guess the gray marking option
shouldn't have it, only the desert ones), you are in for some filling
and sanding.
- The
manual shows the rear armor for the engine vents installed, a couple
of steps before you are to install it. A 1.Series vehicle didn't
carry it, unless it was backfitted, which was probably in the second
half of 1940.
- The
instructions ask you to install the armored hubcaps (as you should),
but further instruction drawings don't show them anymore.
- The
instructions have you install the Notek light. This was an upgrade
done in February 1940, three years after the end of production of
the 1. Serie. Historically correct, but take care if you want to
go for a Poland 1939 setting.
- I
am not sure if the toolbox on the left rear fender (part B23) is
anything standard. I am not saying some vehicles couldn't have carried
it, only to check your references for the particular vehicle you
want to build.
- I
think that part B7 is a tropical filter. If so, it should probably
be left off for the first marking option (and any vehicle not operating
in sandy conditions for that matter).
- The
early 4-wheelers only had the big bin on the left side of the hull.
Later, the small triangular bin was added. In the ICM kit these
two bins are separate parts, so you can choose to install the small
one or not. Dragon has a single piece. Being an early vehicle, you
might want to leave the small one off. Having both kits, and given
the apparent similarities, I believe I will use the Dragon part
on the ICM kit (which is a late type anyway), and use the ICM part
on the Dragon kit.
Note that only
some measurements and details were investigated; those that caught
my eye. I will go into more detail when I actually build the kit.
_t.jpg) _t.jpg) _t.jpg) _t.jpg) _t.jpg) _t.jpg)
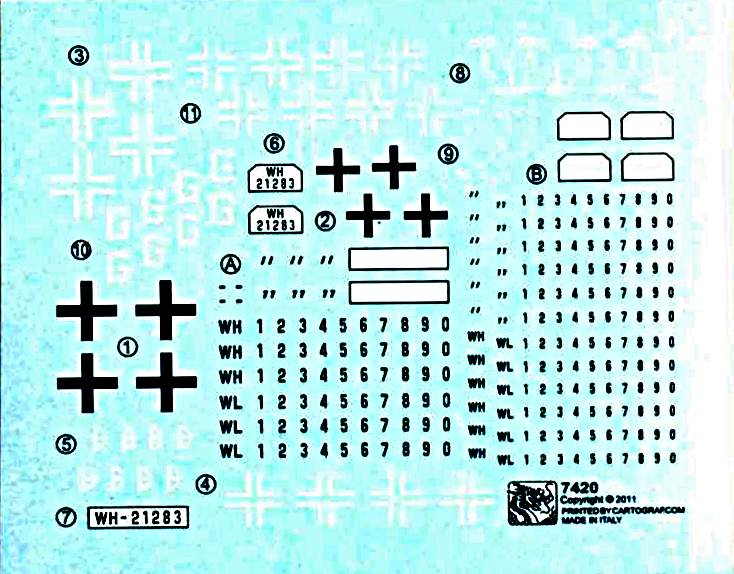
3 Marking options
are given:
- Unidentified
unit, Eastern Front, 1940, Panzergrau. I am still puzzled to know
what is meant by "Eastern Front". Didn't Barbarossa start
in 1941 ?
- 21.Pz.Div.,
North Africa, 1941, Green Brown.
- Unidentified
Unit, North Africa, 1941, Green Brown.
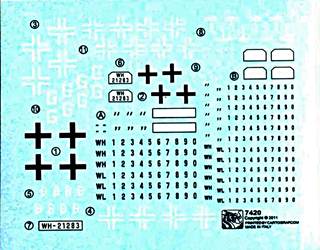
My scanner
doesn't do justice to the mostly white decals on the blue blackground.
They look very thin, crisp and in perfect register. Enough decals
are given to build any two out of the three vehicles on offer, but
the North African ones have licence plates that you have to compose
yourself. While offering great flexibility, this is a tedious business,
especially with the SS runes, that are very tiny, and split in half.
(I don't think you need those for the marking options that Dragon
gives us, but Waffen-SS units did drive around in these vehicles.)
WL (Luftwaffe) licence plate letters are given too. DAK palm trees
are offered (with half a Swastika, that needs to be completed with
a miniscule extra decal), but are not mentioned in the instructions,
even though two vehicles obviously belong to the DAK. The same goes
for the unit insignia of 21.Pz.Div. which is given 8 times, but is
not mentioned. Counting all the Balkenkreuze, it seems some will have
to go to the spares depot too, together with some of the "G"s.
So there
you have it: a kit quite similar to the ICM one, but one that adds
and corrects mistakes at the same time. To add insult to injury, this
would have been the first plastic flat-visored hull Sd.Kfz.222/223
around, which is so typical of early war years. There is still scope
for the aftermarket guys after all.
Sample
kindly provided by my own pocket money.
References
[1] Samochody
pancerne 4x4, J. Ledwoch, Militaria.
[2] Missing-Lynx
website (http://www.missing-lynx.com). Discussions on forum,
e.g. Robert Johnson, 27/02/05
[3]
AFV Interior, http://afvinteriors.hobbyvista.com/
(Currently closed)
[4]
DAK SdKfz 222 http://members.verizon.net/~blu.skink/blueskink/222_interior/222_interior.htm
(Currently off-line)
[5]
Littelfield collection pictures, http://russiannavy.net/photos/littlefield
(/Sept_2004/Sdkfz222)
[6]
Petr Vanek, private communication.
[7]
SS Armor, R.C. Stern, Squadron/Signal
[8]
Panzer Colors I, B. Culver & B. Murphy, Squadron/Signal
[9]
Panzer Colors II, B. Culver, Squadron/Signal
[10]
Panzer Colors III, B. Culver, Squadron/Signal
[11]
Gepanzerte Radfahrzuege, W.J. Spielberger, Militärfahrzeuge 4,
Motorbuch Verlag
[12]
Panzer Tracts N°13, Panzerspaehwaegen, T.L.Jentz, Panzer Tracts
[13]
Panzerspähwagen, Ryton
[14]
Steelmasters 53, Les automitrailleuses SdKfz 222 et 223, October
2002
[15]
SdKfz 253, 252 & early 250, Archive Part 1, M. Kögel, Total
Detail
[16] Panzer Tracts N°13-1, leichter
Panzerspaehwaegen and kleiner Panzerfunkwagen, T.L.Jentz & H.L.
Doyle, Panzer Tracts |
.jpg)
.jpg)
.jpg)
.jpg)
.jpg)
.jpg)
.jpg)
.jpg)
.jpg)
.jpg)
.jpg)
.jpg)
.jpg)