| Preliminary
note:
This set is meant for ESCI kit 8613 and Italeri kit 72063.
Only
64 of the M3 Scout Car were produced before manufacturing changed
to the improved M3A1 so this 1/72-sale conversion set will apply to
the almost 21,000 M3A1 Scout Cars produced by White Motor Company.
Because of its manufacturer it is sometimes known as the White Scout
Car. For potential diorama purposes it is interesting to know that
the vehicle was initially produced for high speed scouting using a
4x4 commercial truck chassis. It first saw combat in the Philippines
in 1941 and 1942.
My references tell me that the vehicle was not all that successful
and not very liked by US forces so by 1944 it was being used primarily
by the USA’s allied forces, particularly France, and by the
Soviets, for instance as a tractor for the Zis-3 field gun. The White
Scout Car’s major deficiencies were the open top, and poor off-road
performance. Post war it served in many small nations worldwide.
The
Parts
This conversion kit consists of 47 pale yellow cast resin parts on
seven pour blocks. Detail and molding quality is very good. Clean-up
of the parts looks reasonably easy with a sharp blade and small files.
There is some fine paper-like flash around parts but no air bubbles
on my set. Some of the parts have the part names scratched into the
pour block, a nice touch.
In the
review below, I will reference the ESCI kit part numbers which may
not be the same as in the kit re-release by Italeri. My, and the manufacturer’s,
assembly tips in this review are written in italics.
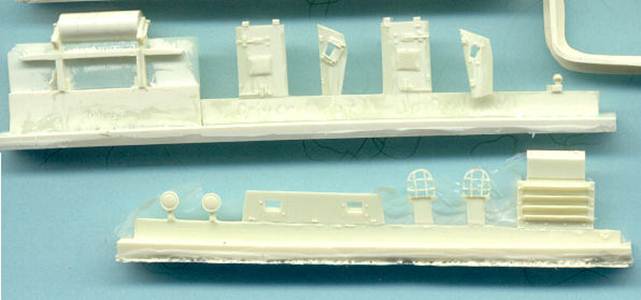
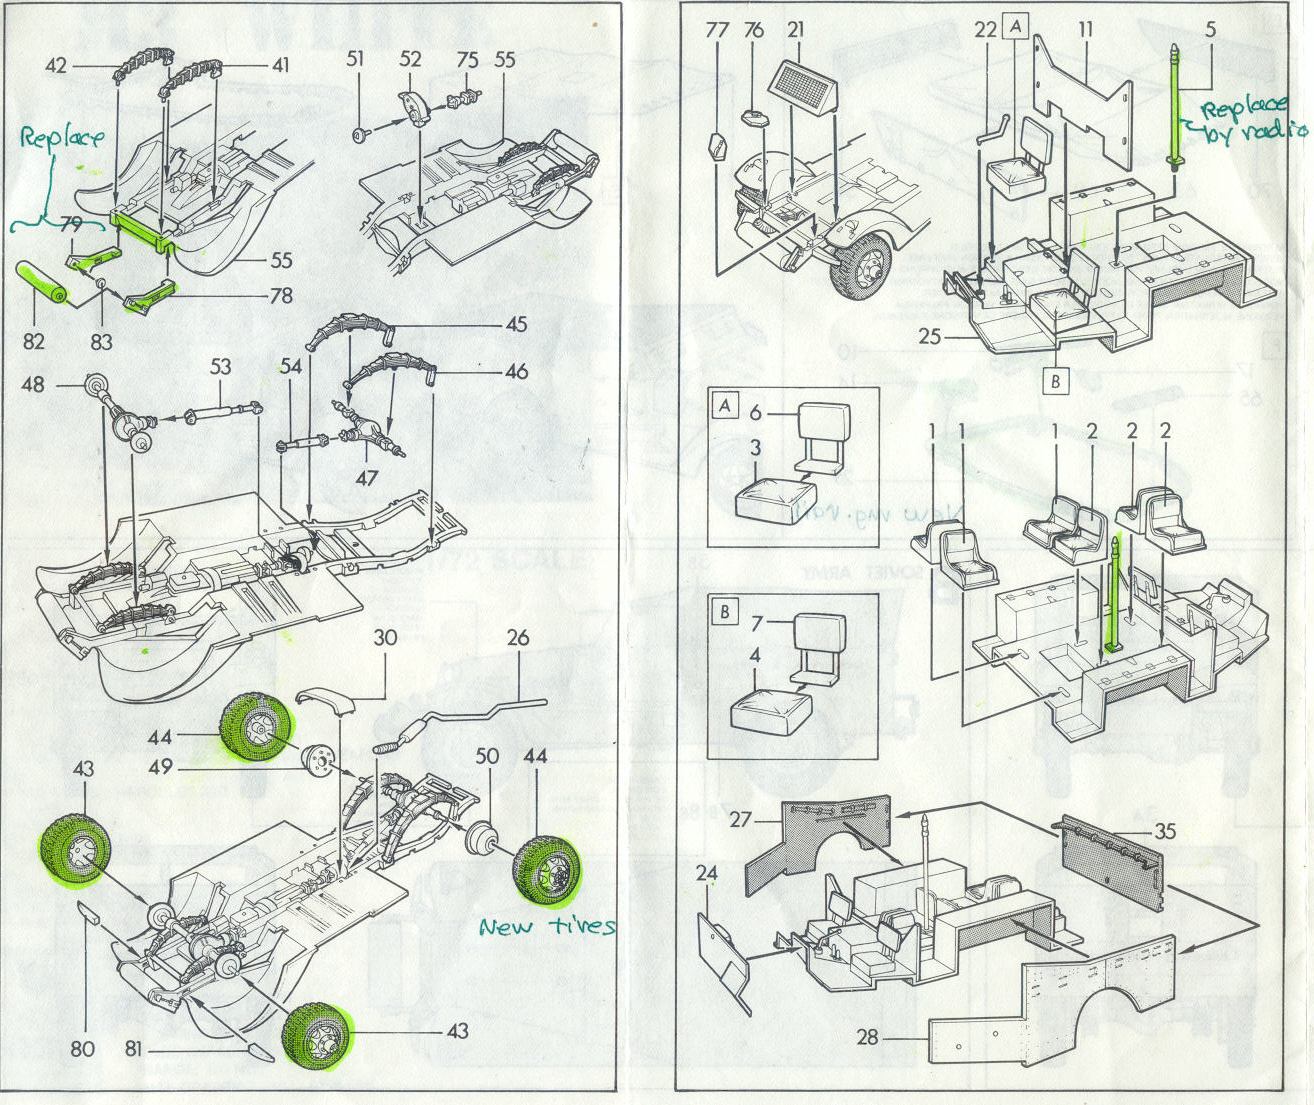
At upper
left are the new bumper roller and bumper to replace kit parts 78,
79, 80, 81, 82 and 83.- On
the upper pour block are the four armored door parts to replace
the plastic parts 31 through 34. These resin parts are thinner and
appear better detailed than the plastic doors. At the far right
is a small part I think is an exterior horn that mounts on the driver’s
side by the front engine louvers. (Ed.Note: it seems to be a part of the black-out driving lamp.)
- On
the lower pour block are two headlights to replace the poor kit
representations; the headlight guards are to the right and appear
very delicate. The kit headlights should be first shaved off the
fenders (part 55) and sanded smooth, then holes drilled in the fender
for the new resin headlights.
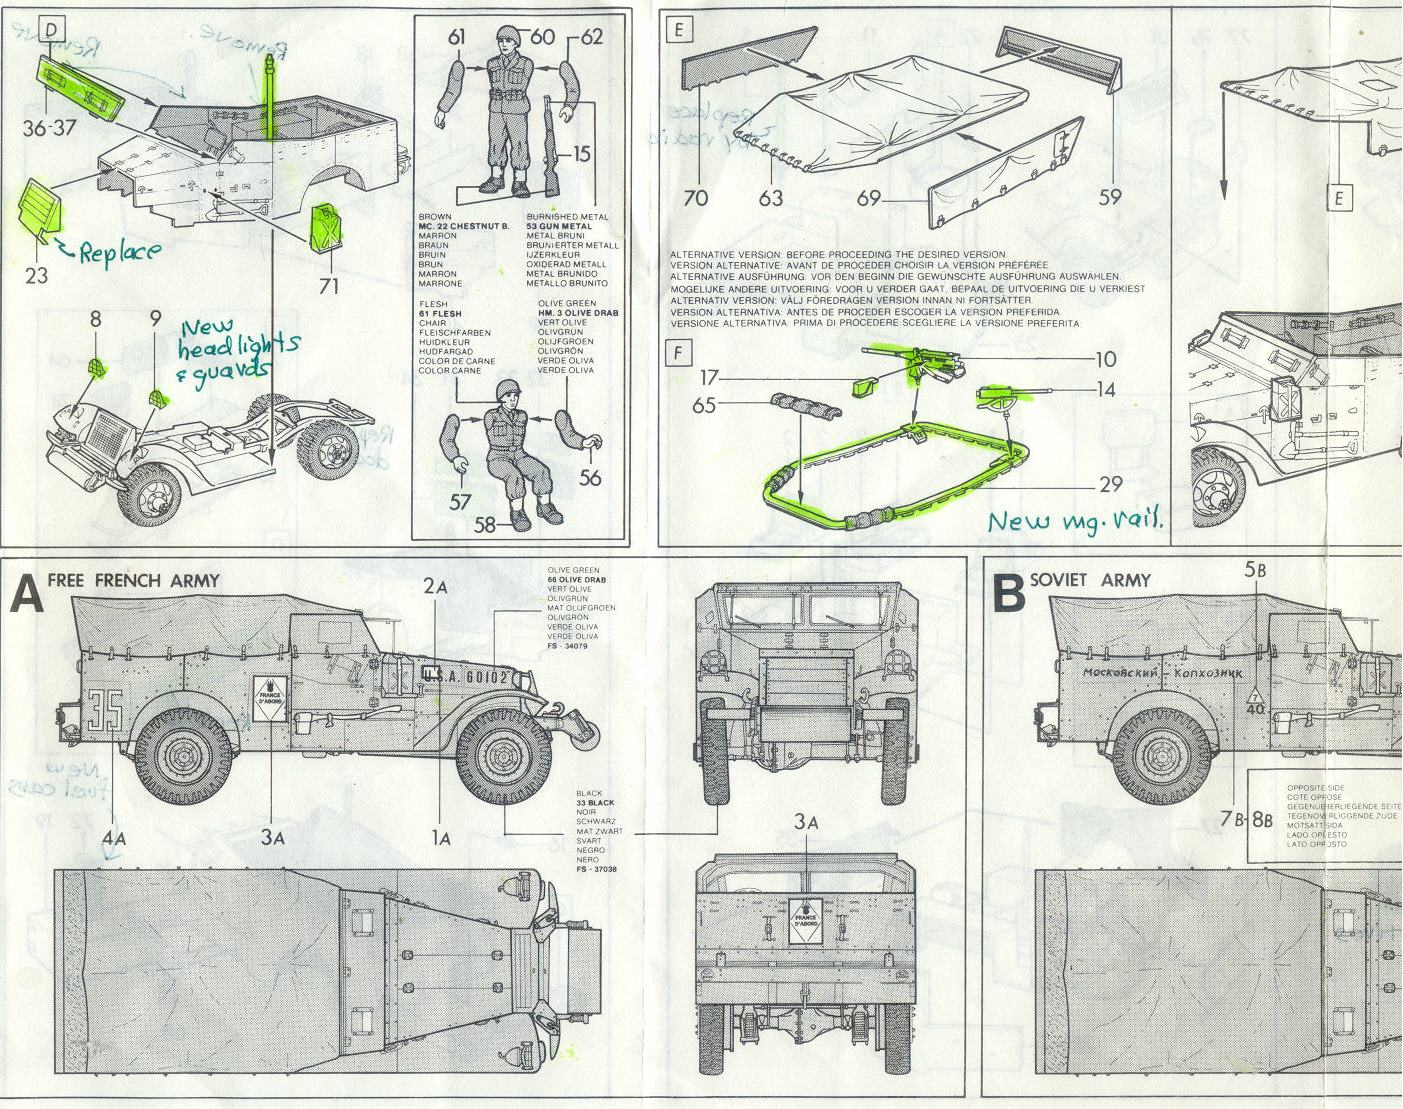
- Right
of the headlights is the armor windscreen to replace the ESCI kit
part 37. If you model the armored windscreen open remember it is
hinged at the top and uses three vertical stays to keep it open.
- At
the far left is the replacement front armored grill with open louvers;
the ESCI kit louvers (part 23) are molded closed. Ken Overby advises
to gently shave off the plastic of the front fenders and frame until
the replacement resin louvers fit.

As my conversion set included no assembly instructions (Ed.Note. See
link in the reference section), I have taken my ESCI kit instructions
and made notes and highlighted the parts to be replaced or modified
by the resin parts.
- There
are no replacement parts for the underside of the vehicle, which
is not a significant issue.
- The
antenna mast (part-5) is to be replaced by the resin radio set and
shorter antenna mount that mounts between the two sets of crew seats.
I have seen photos which show a radio mounted at the very back of
the crew compartment as well.
- The
manufacturer advises to remove the crossbar at the very front of
the truck frame between the fenders on part-55.
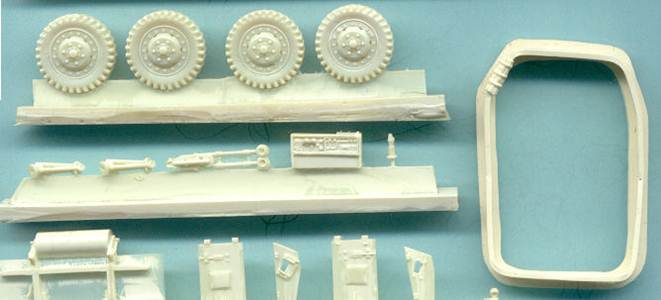
The
replacement tires at above left look superb. Ken Overby stated that
these replacement wheels are for the Wartime version of the Scout
Car; we should use the kit plastic wheels (parts 43 & 44) for
the Pre/Early War version.- At
far right is the new machinegun rail to replace the ESCI part 29.
The machine guns mount on this rail and the guns can be slid along
the rail to different positions. On the right forward part of the
rail is a cloth that has been wrapped around the rail and tied on
with three straps. In photos I have typically seen this on both
sides of the rails. I can see two purposes for this apparent padding:
to protect the driver’s and passengers heads when they enter
and exit the vehicle through the doors, and/or to discourage the
machine gun from being moved and fired directly over the driver
and passenger’s seats.
- On
the center pour block are two nicely cast, folded, ground tripod
mounts for the 30-calibre Browning machineguns (mg), and a tripod
for the 50-calibre mg. These tripods mount on the rear exterior
of the vehicle (ESCI part 35). An oval knob in the center of part
35 should be removed.
- To
the right of the tripod mounts is the kit radio and short antenna
mast. The ESCI (Italeri) kit comes with no radio, just a tall antenna
mast (part 5) which is not used when the resin radio is installed.
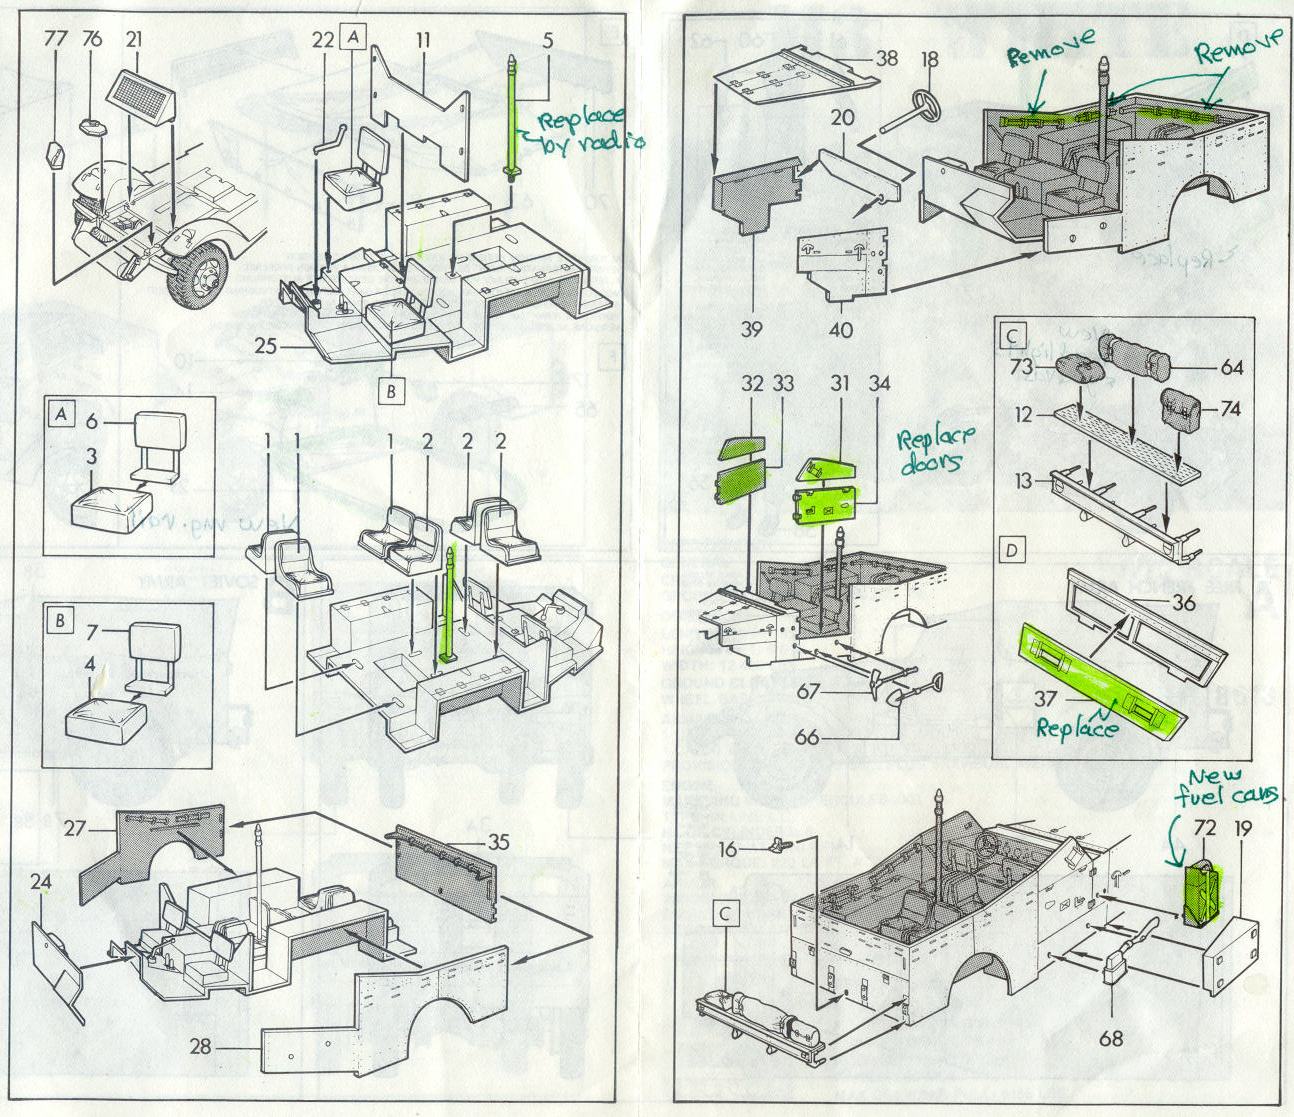
-

The new two front doors with fold down flaps replace the kit
parts 31 through 34 shown on the ESCI instructions. The new front
driver’s plate (part 37 in subassembly D) is also replaced
by a new improved and thinner resin part.
- Subassembly
step D shows assembly of the rear bumper. The stowage (parts 64,
73 & 74 should be left off till the end so as not to interfere
with the new resin machinegun tripods.
- Parts
71 & 72, the fuel cans, are replaced by improved resin cans.
- For
the Pre/Early Wartime version replace the kit’s tow pintle
(part 16) with the new resin one. (Ed.Note: it seems this would qualify for all versions, i.e. wartime as well.).)
- The
interior gun rail braces on the insides of parts 27, 28, and 35
are supposed to be removed.
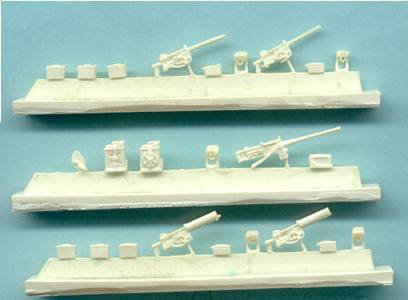
This
photo displays the armament that comes with the kits. The conversion
kit offers two choices of either a Pre/Early War version or a Wartime
version largely depending on the armament we chose.- The
War Time Version M3A1 Scout Car conversion set comes with the air-cooled
Browning 30-cal. machine guns on the top pour blocks. Ammunition
boxes are included for attaching to the gun mount and extras.
- Both
versions use the 50-calibre mg shown on the center pour block. Also
on this pour block is a gun mount, an ammo box, two fuel cans, a
new towing pintle between the fuel can and the mg mount. At the
far left are two new tow hooks for the front bumper, one of which
broke off my pour block during my handling. One fuel can has a landmine
strapped onto it. (Ed.Note: it seems this is a collapsable bucket, commonly seen in pictures.)
- The
Pre/Early War version comes with the water-cooled Browning 30-cal.
machine guns on the bottom pour block which also has ammunition
boxes and gun mount that attach to the rail.
-
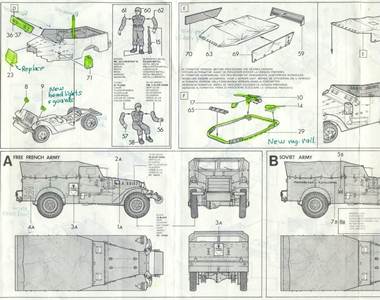
This last photo here shows final assembly and painting with
a choice of an open Scout Car or with the canvas cover (parts 59,
63, 69 & 70). With all this extra resin detailing why bother
with the kit’s canvas cover?
- When
installing the new front armor grill with the open louvers we are
advised to trim the plastic kit parts as needed for best fit.
- Three
hoops for supporting the canvas cover can be made from thin wire
and stored on the rear plate above the machine gun tripods.
Conclusions
- I
like this conversion set and look forward to using it. The set includes
practical new parts, and by this I mean that they improve on the
already good model kit where it was necessary to improve.
- Many
parts from this resin detailing set may also be used to modify and
upgrade the M3 halftrack kits by Italeri (kit 7510 and 7509) and
the M3A1 halftrack from Academy (kit 13408). The wheels and roller
bumper appear to be common to the US halftracks; and the machine
guns and tripods are useable to upgrade any US vehicle.
Though the front doors and armored windshield of the Scout Car look
identical to the M3 halftrack family, I have read that they were
different in size and not interchangeable.
My thanks to Ken Overby for this review sample.
References
|