 |
Sturmgeschütz StuG III Ausf. F | |||
| Kit # 72820 | Review
by Stephen
'Tank Whisperer' Brezinski -
sbrez(at)suscom-maine(dot)net Edited by Rob Haelterman |
|||
|
Sturmgeschütz StuG III Ausf. F | |||
| Kit # 72820 | Review
by Stephen
'Tank Whisperer' Brezinski -
sbrez(at)suscom-maine(dot)net Edited by Rob Haelterman |
|||
 |
 1. INTRODUCTION There has been so much written in books and on line about the Sturmgeschutz assault gun that I need not go into much here. Briefly, the Sturmgeschutz III Ausf. F was essentially a StuG III E with the long 75-mm L43 or L48 StuK 40 gun, changing the primary vehicle function from that of an infantry support vehicle to a tank destroyer. [After 1943 the Axis was largely involved in defensive battles and did not appear to have been doing a lot of assaulting.] A welded box mantlet was produced to hold the gun’s recoil system and was used till the end of the war. A rooftop ventilator was also added. The vented engine deck was the same as the Ausf. E which was developed for the tropical version of the Ausf. D. Many of the comments and observations in this review also apply to Attack’s other Sturmgeschutz model kits. Attacks’ box art is simple but adequate and shows an accurate StuG III F with markings for one of the two vehicles featured by the decals and painting instructions. This vehicle was issued in early 1942 so I think the tan and green squiggles camouflage scheme is questionable; dark gray is more likely. Of course it could have been repainted in 1943. No tools and equipment are portrayed on the track guards. 2. THE KIT The kit consists of about 70 injection molded, light gray, styrene plastic parts on eight sprues [not including the nine tracks lengths and bedroll and fuel can accessories]. This compares with about 78 parts for the Trumpeter StuG F kit [not including the two band tracks and extra gun barrels, etc.]. The kit is basically the same as Attack’s StuG III Ausf. E kit but with the addition of the rooftop ventilator and the long 48-caliber gun with double-baffle muzzle break and box mantlet. A sprue of vehicle stowage like bedrolls, German helmets and sandbags is also included. There are no crew figures included. Hatches are molded closed however it should not be too hard to cut them open.
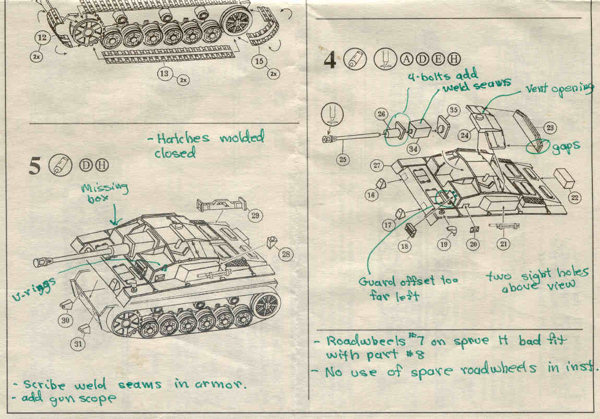
Here are part of Attack’s exploded-view instructions with my pre-assembly notes in green ink. I noted no glaring errors though there are no guidelines for the spare road wheels, which are to be mounted on the rear track guards [a.k.a. fenders]. Building tips include: scribing weld seams, adding a gunner’s periscope sight, a U-shape lift ring on either side of the forward superstructure, add the missing tool box on the left front fender, and add some fine screen material over the air intakes.
This is a scan of five small-scale StuG superstructures. Important to this review and us is the light gray Attack StuG E/ StuG F hull at far right. Next to it, left, is the TP models resin StuG F/8 kit; between these two we can see the similarity in the crew compartment superstructure but the difference in the layout of the engine decks. Our Attack StuG F model appears shorter than the TP, ESCI and Revell models, but longer than the 1/76 Airfix model; I believe the front bow area, where the transmission is, is too short on the Attack model. The Attack model does not appear based on the ESCI Sturmgeschutz while the TP superstructure does look based on the old ESCI.
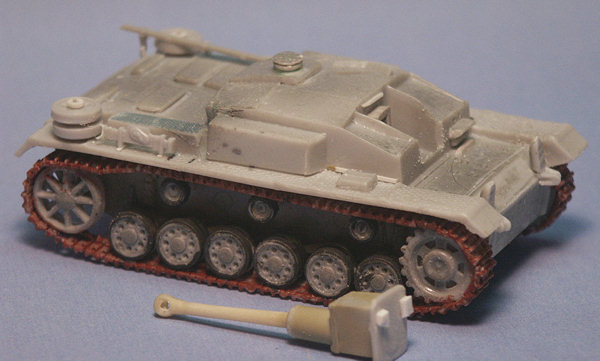
The model will be built as a basic vehicle newly issued to the Sturmgeschutz Battalion 191, without much of the stowage and racks common in photos. Photos of StuG F assault guns in the Grossdeutschland Division, for example, have racks on the back for fuel cans, spare tracks and personal gear; but none of that here. The gear could be used to mask soft detail on the stern though? Attack’s Pz III/StuG III tracks look to me to be copies of ESCI’s hard plastic tracks. To add some realism to the tracks; on the lower more visible run of track, the little nubs were cut down and replaced with more realistic track guide teeth made from sheet styrene. Attack’s track comes in lengths only, no individual links like ESCI gave us, so carefully bend the track [parts 12 & 15] around the sprocket and idler. Added detail includes pieces around the otherwise bare area behind the gun mantlet, drilling the driver’s periscope holes, scratchbuilt tools on the track guard, undercutting the pannier to raise it off the track guard, scribing the weld seems, a tow cable made from string. Attack’s raised roof ventilator is a little low so to add some height add a spacer to represent the ventilation gap and cap it with a round disc. The gun barrel is a single-baffle muzzle brake version found on some StuG F’s and F8’s and the barrel cut down to an early L43 length. The gun barrel is resin, taken from the TP Models kit, the muzzle was drilled out and the barrel thinned with careful sanding. (In Trumpeter’s 2008 release of a StuG F model, included as extras are L43 barrels with the single-baffle muzzle brake and the double barrel muzzle brake.)
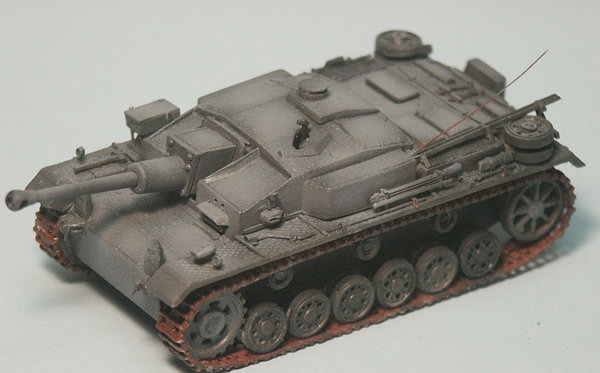
At left Attack’s Sturmgeschutz has been given its initial coat of Model Master panzer-gray acrylic paint but this photo is before the point-wash; a wash of black artist’s oil paint diluted in turpentine carefully added to only recesses, panel lines, and corners. We’ll note that the gray coat is not fully opaque, and some of the gray plastic color shows through. This problem will be taken care of with the second coat following the wash. The antenna behind the commander’s hatch is replicated from a plastic paintbrush bristle. Tools stowed on the track guard were scratchbuilt with copper wire. The antenna trough is taken from a Trumpeter StuG kit. On the track guards styrene rod has been added to make the braces look more realistic.
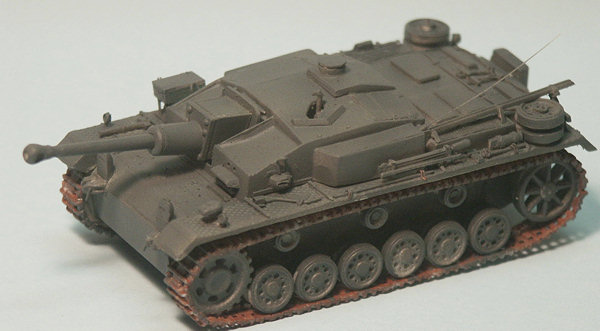
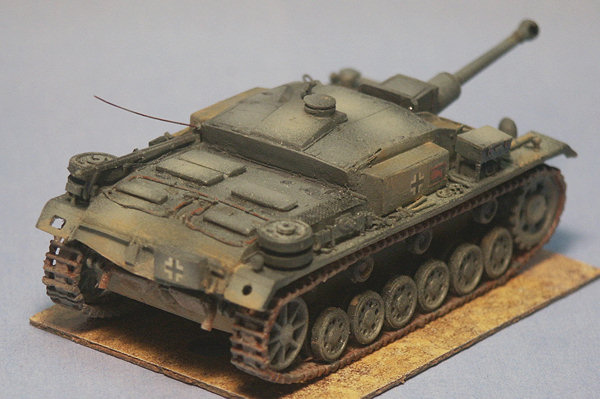
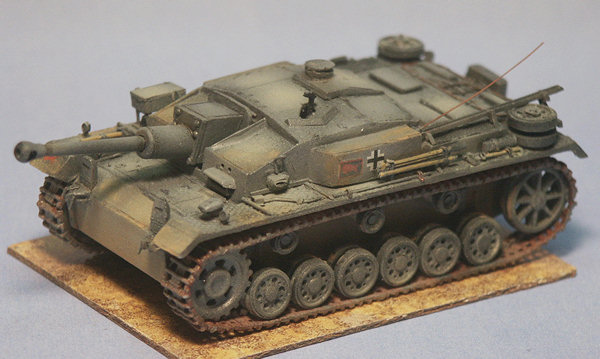
In this photo a lighter coat of gray has been sprayed over the model concentrating on the upper sun-bleached areas. This lighter coat compensates for the ‘scale effect’ of distance and air moisture and dust making paint shades appear lighter, more muted, the further you got from an object. I have heard that for a 1/72-scale model the color should be about 30% lighter than the original shade. So your final model should not exactly match your color chip! The tires have been painted Poly-S Grimy Black which is a flat dark gray acrylic color. A scratchbuilt gunner’s periscope sight is now protruding from the roof. The four bolt heads on the mantlet are from Grandt Line Co. German WW2 antennas were made of rigid copper tubes so I painted my antenna a copper color. I guess there is no reason why it could not be the same color of the vehicle. On the left side is the antenna trough taken from a Trumpeter StuG kit. On the forward track guards are two small items I think are horns, taken from the Fujimi StuG kit. Wiring to the lights and horns has been added with fine copper and solder wire. On the right forward fender is a scratchbuilt toolbox sitting over the jack block. Fini! Attack’s water-slide decal markings for StuG Battalion 191 (Abt. 191 on the Ost Front, 1942) have been used and went on fine over a coat of clear gloss and then a little Solvaset over them, no problems. Sturmgeschutz Battalion 191 with the red Bison unit marking was a renowned unit that served in the Balkans and then the USSR in 1941 and then Italy in 1944. Weathering was done with sprayed light earth colored paints and then powdered pigments. I always mount my models on a base to allow easier handling without touching the model. This base is a Pionite countertop sample leftover from a remodeling project. This is one of my favorite materials to use for a base: the size is perfect for many small AFV’s and landscaping material can be glued down to them for a small vignette.
From the rear view we see a better view of the engine deck. The smoke candle rack is taken from a Trumpeter kit that is notably better than Attacks. A tow cable has been replicated with course sewing thread. The exhaust pipes for many Attack’s, ESCI’s and even Revell’s StuG kits I found quit poor so they were replaced by thick soldering wire. Some StuG F’s had a simple sheet metal exhaust deflector separating the exhaust pipes from the air intake above. Appropriate holes were made in the rear mudflaps for the taillights [for when the mudflaps are folded up]; but take note that there should be another metal plate below the holes so we should not be able to see through to the track. Alas, this will be fixed someday when I get around to it. 3. CONCLUSION It would be hard to make this model into a Gold Medal winner so I was reluctant to go ‘hog wild’ with scratchbuilt detail, still I am pleased with the results and think the kit is a fine representation of the Sturmgeschutz Ausf F. For several years, until Trumpeter released their StuG F in late 2008, this was the only StuG III Ausf F I knew to be available to small-scale modelers. The most significant improvements can come with replacing the gun with that from Aber Co. or a spare from another kit; and with replacing the tracks from a number of aftermarket resin, etched brass or the CMK band tracks. While some modelers write off Attack kits as too crude or inaccurate when compared to Revell’s, Trumpeter’s and Dragon, I think they can build into reasonable models and are a great challenge to improve you modeling skills. For the wargamer they are great. 4. References: [1] Sturmgeschutz & Its Variants, The Spielberger German Armor & Military Vehicle series Vol. II; by Walter J Spielberger, and with vehicle plans by Hilary Doyle. Schiffer Publishing Ltd. (1993). A 250-pge hardcover book that is about the best single reference book on the Sturmgeschutz. The photos are sharp and printed on good quality paper and there are plentiful excellent Hillary Doyle scale plans. [2] Panzer Tracts 8 - Sturmgeschuetz to Sturmmoerser, by Tom Jentz & Hilary Doyle, published by Panzer Tracts, P.O. Box 312, Boyds, MD 20841. This and other books in the Panzer Tracts series are soft cover books featuring good representative photos and Doyle’s 1.35 scale vehicle plans noted for their great accuracy. Panzer Tracts books are noted for being the most accurate and up to date publications on German WW2 armor. This volume, Panzer Tracts-8, covers the StuG III Ausf. A thru Ausf G, the StuG IV, StuIG 33, Sturmpanzer IV Brummbär and the Sturmmoerser. [3] Modeling the Sturmgeschutz III, by Gary Edmundson, and Robert Oehler. Published by Osprey Publishing, 2006. This is an 80 page softcover book featuring the assembly, detailing and painting of three StuG’s, both short and long gunned. I like the idea of this book, quality is very good and am happy with purchasing it but I feel the 22 x 15.5 cm size pages are just too small for this type of subject that is so dependent on good ‘big’ photographs. [4] http://www.panzernet.net/panzernet/stranky/stihace/stug3.htm A wonderful website focusing on the Sturmgeschutz. [5] http://www.attack-hobby-kits.cz/pk7202.htm Attack Hobby Kits website. |
| Back to Attack Plastic Kit List | Back to Construction Reviews |
| Article Received: 12 December 2008 Article Last Updated: 19 December 2008 |
Back to Home Page |