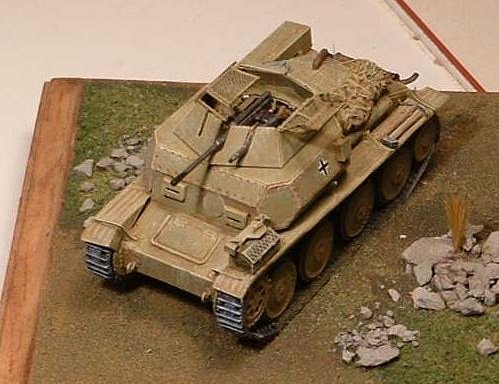
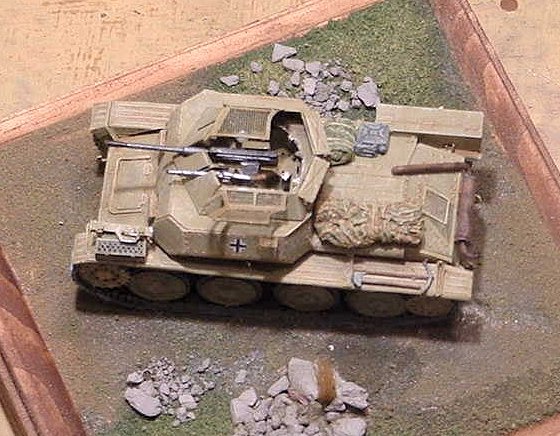
Aufklärungs 140/1 Reconnaissance Vehicle
Manufacturers: Attack with Part Photo Etch Upgrade Set
by Dave Showell
Attack Models of Czechoslovakia burst on to the scene a few years back with a new line of 1/72nd scale models of subjects that were not really available previously. The Aufklärungs 140/1 is a good example of this kind of esoteric subject. While these kits build up satisfactorily out of the box (with some careful work) they are hampered by the short run injection moulding techniques which Attack has available. These are definitely NOT Revell kits (note: Revell of Germany currently sets the standard for moulding quality in small scale armour). To Attack’s credit, they do include photo etch anti-grenade screens for the 140/1 and the tracks -improved I think from the original Panzer 38 (t) kit - are length and link.
The Attack Aufklärungs 140/1 suffers from some pretty heavy handed and often soft detail. Large components are often thick and the fit can be poor for major assemblies such as the hull. Fortunately, Part of Poland has come out with a photo etched brass upgrade set which essentially replaces everything above the tracks. Between the two kits you can build up a pretty impressive recon vehicle.
Construction begins with putting together the hull. This required the removal of a fair amount of flash - an operation which required considerable care not to lose the bevelled edges which are necessary to line the sides up correctly. The heavy flash also led, at least in my case, to the parts which should have been completely straight and square to be slightly askew. This in turn caused the lining up of the hull to be more difficult than I had anticipated. The eight bogey wheels, although also a bit flashy, were actually quite nicely detailed. Much care had to be taken in lining them up when attaching them to the hull since the alignment holes were a bit large for the pegs. The drive wheels and idlers are very softly moulded on the original kit. The Part set provided replacement outside wheels, but doesn't really explain how these should be mounted. I ended up using the Attack plastic pieces but filing them down to receive the etched brass covers. This was not an ideal solution, especially since the teeth of the drive wheel did not match the holes in the tracks. I had to bend the teeth down to fit the tracks around the drive wheel. The tracks are just okay - better than one piece rubber jobs but not really up to other length and link standards. The return rollers (two on each side) are abysmal - I wish I had replaced them.
With the exception of the back deck and two side sponsons this was pretty much the end of the Attack kit as far as this assembly was concerned. I painted the running gear and began the photo etch.
Now I began to run into the problems caused by the non-straight hull. The p/e is, of course, completely straight. It does not match up very well with the approximate angles of the hull. The result was fairly visible seams in many of the places where brass met plastic. As far as I know, you can't file etched brass very well and sanding the plastic would remove whatever detail exists. I puttied where I could get away with it and left the rest as is.
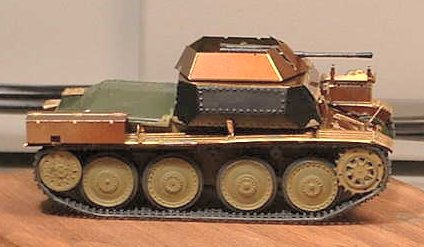
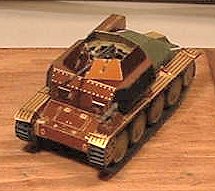
Part photo etch is really good - well designed with generally good instructions. The component pieces folded and went together very well. Items like the aiming reticule for the 20 mm gun, the pierced box thing on the front fender, the anti-grenade screens (which are finer than the Attack-supplied p/e ones) and the two seats that hang down under the turret are fantastic. Some of the stuff provided, like tools, are less useful since they are an attempt to portray 3D round items with flat brass - I used tools from other kits instead. I especially like the jack which comes with the Part set - you build it up out of several flat pieces.
The final part of the original Attack kit which I used was the 20 mm gun. It's not perfect but I couldn't find a really suitable replacement. The co-axial MG-42 machine gun was taken from an old Fujimi infantry set - normally I consider these mg's a bit thin but it was the only gun I could find that would fit the slot in the etched brass turret.
I had a problem with the placement of the box which holds the antenna - neither the Part nor the Attack instructions were really clear where it was supposed to go. I attached it to the turret, which of course was wrong. It would have interfered with the opening of the screens. I had to remove it, after painting and move it down to the hull. The exhaust system needed some thought as well. The attack kit offers two different muffler versions but neither is really useable. I found an old ESCI muffler from their Marder III which seemed better. From the 1/35th scale kits that I could find, I noticed that there seemed to be a pipe running from the muffler to the top of the engine deck - this was completely missing on the Attack kit. I replicated a pipe from a paper clip (easy to bend) to represent this.
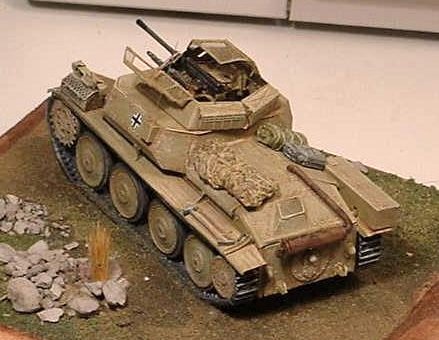
Given that there were not many 140/1s built (approximately 100) and they appeared at the end of the war (from April 1944 onwards), there is not a lot of information available on colour schemes or markings. The Attack kit offered two suggestions - a white wash over yellow version attributed to Poland in late 1944 and a three colour scheme (possibly in pre-war Czech paints - they sure don't look like standard colours). Markings provided are limited to three choices of balkenkreuz. I chose to paint my vehicle a generic panzer yellow (Humbrol 83 Ochre) with only two crosses for markings (Archer transfers). I used a wash of medium brown around protrusions and non-wear areas to darken the overall effect somewhat, the dry brushed the kit overall with a lightened ochre to make the detail stand out better. The exhaust was done in a mixture of browns and reds.
I added an antenna from stretched sprue. On reflection it may have been more appropriate to have a "crow's foot" antenna (the 1/35th scale kits seem to have these). Some pieces of personal gear, a folded cammo net and jerry can were also added.
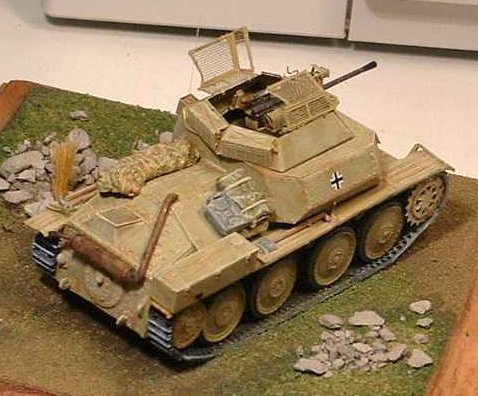
The final step was the base, flocked with model railroading turf and a few scattered rocks of kitty litter.
AMPS Outcome
I took the completed model down to the AMPS Nationals in Maryland in April. For a bit more of an explanation of the AMPS judging process please see my build article on the MR Models Sherman Composite. While I was worried about the gaps between the plastic and the photo-etch I figured it would do okay. Here are the results of the judging taken from the scoring sheet:
Initials |
Score (out of 10) |
Comments |
JTR (?) |
8 |
Gap on p/e in three places |
JDM |
8 |
Seams overall and visable |
JW |
8 |
Dry brush a little heavy |
JT |
8 |
Weathering and dry brushing (a little heavy?) |
Total = 24 out of 30
(with 4 judges the lowest score is dropped, if 5 judges are available, highest and lowest are dropped)
According to the tally sheets, which each judge fills out on each model, I lost points on:
The judging marks were remarkably homogenous - I got hit for the same errors by each judge losing 2 points from each of the three counted scores for total of 6 negative marks.
A score of 24 did put me firmly into the silver medal category. I was extremely pleased since for the first time this year I was competing in the "advanced" class rather than the "intermediate" which I had been in last year. Once again the AMPS judging process provides a good indication of where you need to improve your building skills to produce better looking models.
| Back to ATTACK Kit List | Back to Home Page |
| Back to Kit Reviews |