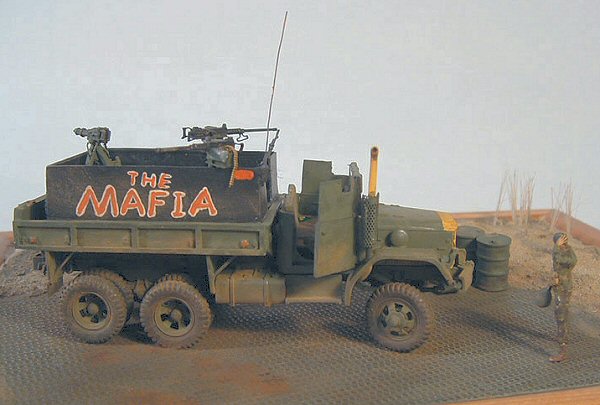
 German armor of World War II has always been the most appealing to me. Nevertheless, occasionally I venture out. I am fascinated by vehicles that got the "A-team" treatment; vehicles that were never meant to take part in the frontline fighting. Like the Land Rovers from the SAS, or the Chevrolets from the LRDG. For a long time people have been putting weapons and armor on machines that were never intended for this task. During the war in Vietnam, the Viet Cong found the American military convoys to be easy targets, as only 1 in 5 of the trucks in a convoy had a ring mounted .50-caliber machine gun. This was too little firepower for an enemy that had a large jungle to hide in. Things had to change, so trucks were converted in such a way that they got armor and extra firepower. Armor was first bolted to the sides, and later was welded on the inside of truck bed. The last version had double spaced armor. The firepower was also improved over time. Most gun trucks first had one M-60 on each side and a .50cal to the rear. Later the M-60 was traded in for .50cals, and a double .50cal to the rear. Even mini-guns taken from wrecked helicopters were put on the trucks. Building a gun truck in 1/72 was always something I wanted to do, and with the release of the M35A2 by ARMO, I got the chance. When I bought the kit, I was told that ARMO was planning to bring out a gun truck based on this kit, but that was two years ago now. This kit is a little gem; very delicate and like a scaled down version of the 1/35 kit from AFV Club. Some of the resin parts are so small that you have to look hard at the sprue to not miss the part. Like the AFV kit, this project is for a more modern version of the truck, which means that you have to backdate the kit. This sounds more serious than it really is. The main thing that you have to change is the indicator lights. This I took from the Willys Jeep kit from Arfix. However, this can also be done with a small piece of rod, which I did for the rear lights, because they are for the most part hidden under the body of the truck. I put a little piece of photo etched wire mesh over the exhaust. The rest of the truck was built straight out of the box.
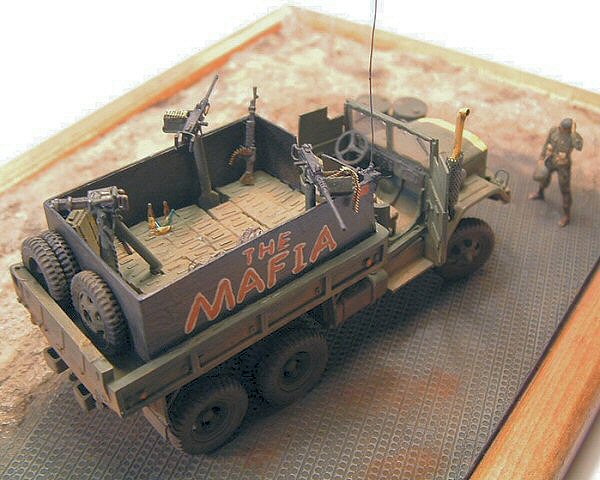
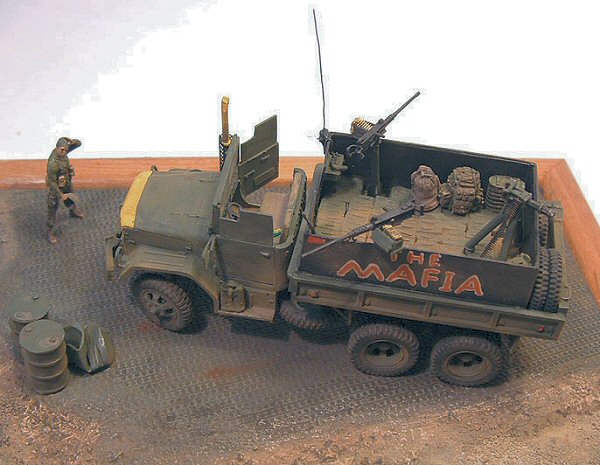
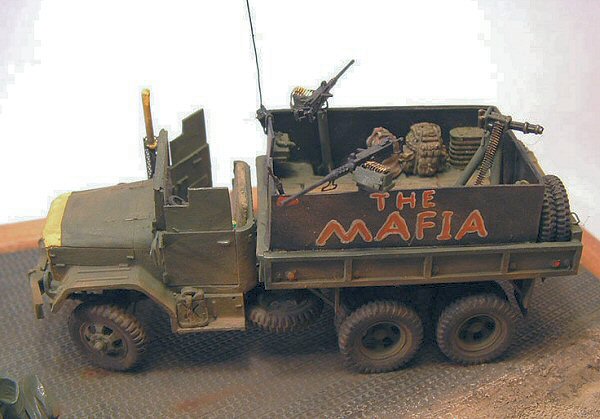
Before I started building the model, I looked at many pictures of the real gun truck. With a bit of help from fellow modelers, I found many pictures. There are so many variations that you hardly can go wrong. However, I wanted to build one that really had existed, so a few things were important for my choice. I wanted one that had single spaced armor, and had a name on the side that I easily could paint by hand. I also wanted one that had its exhaust pipe through the fender so that I did not have to build a new exhaust system. Therefore, my eyes fell on "The Mafia". The truck is a middle production version, with a .50cal on each side. In addition, in the rear it has a mini-gun. On top of the cabin door there were armor plates welded. The rear armor did not extend all the way to the ends, so there was some room left for spare tires, and in case of an emergency they could easily be taken out of the truck. During an ambush the tires were among the main targets. My spare tires I got from the GMC truck by Arfix. They are a little smaller than the wheels from the Armo kit, nevertheless, I hope that the difference is not too noticeable. The cargo beds of the trucks were loaded full of .50cal ammo boxes. Buying them commercially was not an option, because there are so many. So, I made a mould of a resin one. And I pressed it in some epoxy putty. After the putty has dried, you can heat some plastic sprue and push it into the mould. But it smells bad. It is dangerous: an open flame, plastic and myself are not a good combination. Besides that, it takes a long time. Enter the hot glue gun. I made sure the glue in the gun was really hot, then I squeezed some in the mould. I waited a few minutes, so that it was dry enough to take it out. After a couple of hours, I had a whole stack of ammo boxes, all with a little blob attached to them. After removing that, I glued them to the truck. However, the result was not to my liking. The space between the boxes was too great, so I removed them all again. Plan B: Make them from styrene. So that is what I did. They were not as detailed as the one’s out of the mould, but the result was better. If you are looking for a way to drive yourself crazy, this is definitely the way to do it.
The .50 caliber machine guns are from the Extratech set. They are excellent except for a few omissions. There are no rods in the kit, so every grip needs to be made from a piece of sprue that has to be stretched. Not a big problem. If you want to use the beautiful photo-etched ammo box, this box consists of five parts and looks amazing. However, you need to make a bracket for it, because this is not supplied in the kit. In addition, there is no cradle for the gun, if you want to place it on a vehicle. So, both were cut from an empty tube of putty. The kit includes a tripod to put it in a firing position on the ground. I hope Extratech will change this in the future and bring out a .50cal set especially for vehicles. The mini-gun came, just as the real thing, from a helicopter. I only had to make a few changes to the gun itself. The gun had a flame dampener, which was replaced by small pieces of rod. But the gun had no bracket, so one had to be build from scratch. I made a box-like frame from wire around the main body of the gun, and underneath this I made a mount where the gun could move around on. There also had to be made a structure to place it all on. Pictures show many different versions of this. First, I made one that had four legs, but did not like it. Therefore, I made a new one: a tripod. That looked better, but I still think its legs are a bit large. An electrical motor drives the gun, but the gun does not have a battery. Therefore, some electrical wires need to be attached to them. Mine are still not hooked up to a battery. The crew must have taken it so that it would not run flat. Or… I just did not get round to making one. The gun also needs an ammo belt, and this I took from the Extratech set. There are plenty of ammo belts in this set. Goffy models have a nice range of supplies too. In their modern U.S. supply set there are a couple of ammo boxes for the minigun, which comes in very handy now. Because gun trucks were on the road for a long time, crews carried a lot of stuff for their own well-being. Most of it came from the Goffy set: a hot food container, rucksacks and a duffle bag. I also put some empty bottles from a Preiser set in the back of the truck, just to give it some color. Crews also carried an M-60 in case one of the other guns would jam or break down. Italeri have a nice M-60 in their ex-ESCI M-113. Perfect for the back of my truck. All gun trucks had a radio to stay in contact, because the trucks were spread out in a convoy. In addition, with so much firepower it had to be well directed. I made a radio from pieces of styrene. The dials I made from small discs cut from stretched sprue, and the antenna mount was made from lead-foil and bent in to shape. The antenna itself is also a piece of copper wire. This way it gets bent, but not broken when it is handled. As reference, I used a 1/35 radio. I painted the gun truck with Humbrol 116, which is a very dark green. However, I was not planning a wash; just a dry brush and a lot of dusting with powders. The nose was painted with yellow, one thing that seems to be common to all gun trucks. Looking at pictures of the real truck, the back armor looks almost black. I did the same, which made the slogan stand out even more. The slogan was painted by hand… All the lights were first painted silver, then I put a small amount of crystal clear over it. Now I use window color for it. It is basically the same stuff, it just comes in a bigger bottle. It looks like white glue, but when it is dry, it is transparent. Ideal for puddles of water and also lamps. I left the headlights clear, but the turn indicator and rear lights were painted with Tamiya transparent orange and red. I kept the weathering to a minimum. Although the crews treated their trucks rough, they kept them in good condition. So, I just dry-brushed it to show the influence of the sun. To finish off I gave the truck a thick layer of dust. This was done with a mix of light colored powders.
I mostly place my models on a picture frame. In it I put a piece of psp plating from styrene, which came from a company out of the Ukraine, however, I forgot the name. It is a very thick piece of styrene and hard to cut. I had real trouble getting through it with a razor saw. At least I got a nice workout for my arms. The areas that were not covert by the psp plating I filled up with dry plaster. On the dry plaster, I dripped some water, which gave the plaster a more irregular affect once it dried. I made some puddles of water to give the surroundings a swampy appearance, and as an excuse to use the psp plating. To give the base some vegetation I stuck some hairs of an old brush in the ground. Before I attached the truck to the base, I sanded down its wheels just a little, to lose the roundness of the tires. Otherwise the truck looks like it is floating. I also wanted to put a figure next to the truck to show how large this truck is (it is longer and just as tall as a Panzer 4). The figure came from Preiser, out of the modern American soldiers in a relaxed pose. I modified him a little bit, and brought him back in time, so to say. This is very simple: I just removed the spade and the gasmask container. Because of the lack of camouflage on the truck, I gave the soldier some tiger stripe pants. I did this by first painting the trousers white and then applying horizontal stripes, starting with buff, then lamp black, and finished with green. And there you go, an expensive kit, made even more expensive, by attaching extra stuff to it… |