| INTRODUCTION
This 1/72 scale model kit represents an American made “multi-bank”
gasoline engine powered version of the M4 Medium tank of World War
2 armed with the medium velocity M3 75-mm gun: an M4A24(75). The term
“multi-bank” refers to a bank of five Chrysler gasoline
engines arranged in a star-pattern. This M4 version was produced from
July 1942 to November 1943, which I consider not a long time period,
and served till the war’s end and afterwards with the British,
French and Chinese Nationalist forces. Because of the unusual engine
configuration this Sherman is about 6 inches (15 cm) longer than other
Sherman variants that were produced.
The M4A4
was only produced by Chrysler Corporation and only had the three-piece
bolted differential housing (the nose). They were also commonly converted
to Sherman Firefly tanks (the Sherman Vc, armed with a British 17
Pounder gun)
1. Above is the box art for the medium size cardboard box for this
full, all resin, small-scale model kit. The box art shows a fully
assembled M4A4 model; we can tell it is an M4A4 from the engine deck
distinctive to this Sherman version.
2. The M4A4 was only produced with the small driver hatches with protruding
cast steel hoods in a 57 degree angled glacis. This box photo shows
cast hoods with rotating periscopes mounted in the driver’s
hatches and an additional periscope mounted in front of the hatch.
This box art portrays the final production configuration according
to the Sherman Minutia website.
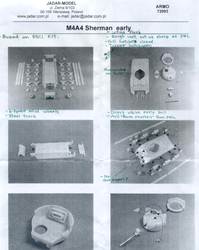
3. The assembly instructions consist of a double-sided full sheet
of paper with black & white photos showing progressive assembly
of this full model kit. The first two photos show all the parts laid
out which saves me the effort!
4. There are 37 amber resin parts for the lower hull and suspension,
about 16 resin parts for the upper hull, turret and a turned aluminum
M3 gun barrel. Since the Armo kit is based on the ESCI/Italeri Sherman
kit, I suspect this plastic kit’s instructions can be used as
an additional assembly guide.
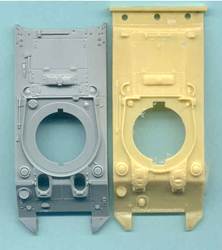
5. Here is a side-by-side comparison of Armo’s cast resin M4A4
hull alongside the gray plastic M4A4 upper hull from Dragon. They
seem pretty comparable in dimensions. The older Armo hull does not
appear to have features as crisply molded as the more recent DML hull.
6. Per my references, all M4A4 hulls were produced with the 57-degree
glacis and the protruding small-hatch, cast-steel driver and co-driver
hoods; none had the later large-hatch 46-degree sloped glacis. The
M4A4 also was only produced with the three-piece bolted differential
housing.
7. An interesting and subtle difference between the two hulls is that
Armo’s has the earlier direct vision (DV) viewports for the
driver and co-driver. These are not the same driver’s hoods
seen in the Armo box art above!
8. The driver’s hatches are molded shut. If you chose to open
them up you can take extras found in some DML M4 kits.
9. The periscopes and the DV blocks are also all molded closed! This
is annoying; how can you accurately model your vehicle in a vignette
of diorama when there is no way for a vehicle crew to see!
10. An odd thing is that the DV view ports for the co-driver appear
to be misplaced a little off to the left (driver’s right); it’s
not centered in front of the hood. Many of these tanks were later
fitted with appliqué armor plate in front of the hoods which
would mask this issue.
11. As with the ESCI M4 hull this kit is based on, the oil filler
caps and right rear mushroom vent are too small.
12. Appliqué armor plates can be added to the hoods and to
the hull and turret sides based on your historical references.
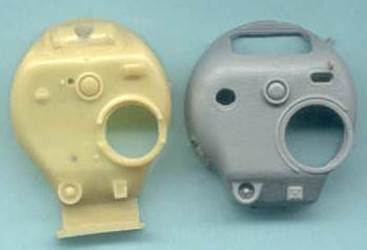
13. Armo’s amber resin turret, side by side with that from a
plastic Dragon M4A4 kit. Both are low bustle turrets with no loader’s
hatch and the M34 gun mount. (By “low bustle” we mean
the rear turret bulge that holds the radio, the top turret roof slopes
down and the bustle is lower. When the M4 hull switched to a big-hatch
46-degree glacis the bustle was raised so the bottom of the bustle
could clear the larger driver hatches better; this is the “high-bustle”
turret.) This is the same turret as in my
Armo M4A2 kit #72-544.
14. The Armo turret appears to me to be slightly smaller in dimension.

15. Here is a scan of Armo’s resin VVSS bogie and track parts.
The Armo kit wheels appear to be direct copies of the ESCI/Italeri
Sherman kit styrene plastic parts at the top of the photo. The roadwheels
and idler are the six-spoke closed wheel. So far I’ve not seen
the initial 5-spoke open roadwheels on an M4A4.
16. There is some flash around the parts but otherwise casting and
molding quality looks good. We can also substitute extra suspension
bogies and sprockets from Trumpeter or UM plastic M4 kits.
17. The tracks look to be the T54E1 all steel type and look to me
to have improved detail over the old ESCI kit track. Armo’s
track here appears comparable to MR’s aftermarket resin track.
18. One of my track runs is deformed with a big blob of resin along
the inside face. Separation and clean up don’t look too bad.
Be careful of breakage! Heating the resin track up in hot water and
wrapping it around the sprocket and idler will be challenging. The
track often cools before we can form it around the sprocket! If you
make a lot of small scale Shermans I recommend making a wood form
in the shape of the full Sherman suspension profile to help get the
bend around the sprocket and idler wheels correct. Both the resin
track and the form can be dipped in the hot water together. This method
may also work with ESCI’s stiff polyethylene track.

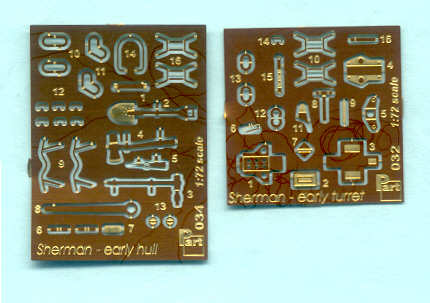
19. I think it is great that Armo includes comprehensive 1/72-scale
etched brass detail frets in their kit. These are the same etched
brass frets, titled Sherman early hull and early turret, as in my
Armo M4A2 conversion kit.
20. The frets appear well done and with many usable parts. I’ve
always found brass lift rings and tools, like the shovels and hammers,
to be too flat and prefer to scratchbuild them or take them from a
plastic kit.
21. The early turret fret has parts for a 50-caliber AA machine gun,
which is not included in this kit. Parts not included, but should
be, are for a frame for holding spare track blocks and which is particular
to Shermans used by the UK and Poland.
22. Soaking the brass in vinegar can etch the surface a little for
better paint adhesion.
Painting & Markings
• No decal markings are supplied which is typical of resin model
kits. One of Dragon’s M4A4 Sherman V kits, and several aftermarket
decal producers can supply our markings.
• There is no painting guide supplied with the kit. My references
indicate this tank would typically be finished in olive drab and with
the rubber roadwheel tires painted in dark gray. (Remember to wash
all parts in warm water and mild detergent before assembly, and again
before painting.)
Conclusions
1) Being based on the old ESCI/Italeri Sherman kits, this conversion
kit carries over some of the errors of the plastic kit such as the
small fuel filler caps and small rear right mushroom vent, etc. In
my opinion, it is a good M4A4 kit that I recommend for an intermediate
or advanced modeler if you wish a good display model.
2) The kit hull inside the box is not the vehicle displayed on the
box art. The actual M4A4 kit hull included has direct vision blocks,
while the photo on the box depicts cast hoods without direct vision,
the late production M4A2. This will be no big issue to most builders.
I think it is cool to get a DV hull as they are so rare in 1/72 scale.
3) Now that we have the UM and DML full plastic kits, I am curious
how these complex resin Sherman kits will sell?
4) I recommend something like Mr., Surfacer 500 to give a rougher
cast-metal texture to the turret, rotor shield (gun mantlet) and the
differential housing.
References
Sherman Minutia website, The M4A4 Sherman. This
is the best on-line reference for the details of the Sherman tank
variants; not as much of vehicle combat history though.
Sherman
Vc Firefly, Armour PhotoGallery #13, by Wojciech J. Gawrych,
British
Sherman Tanks, Armor At War Series 7062, by Dennis Oliver,
Concord Publications, (2006) ISBN 962-361-131-5
Modeling
the Sherman Tank in 1/72 Scale
website:
|
.jpg)