T-55
... Continued from Preview
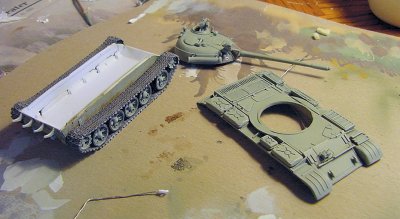
I built the kit in sub-assemblies prior to painting: the turret, the upper hull, and the lower hull with wheels and tracks. Normally I would completely assemble the model before painting (except for the wheels and tracks), but because of the overhanging fenders, I thought it would be easiest to build it this way instead. I know that many people completely build the wheels and tracks prior to painting, but I normally paint the tracks separate prior to assembly, which is what I also did here. Here was my assembly sequence: 1) turret, 2) upper hull, 3) lower hull, 4) wheels, 5) paint everything, 6) tracks (assemble, paint, weather etc.), 7) attach upper and lower hulls and clean up attachment points.
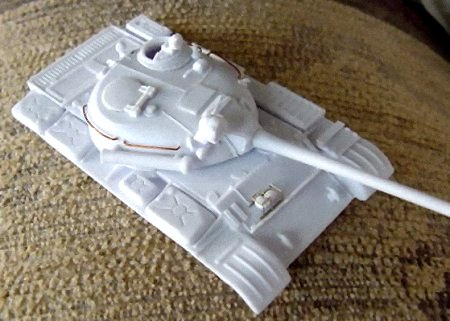
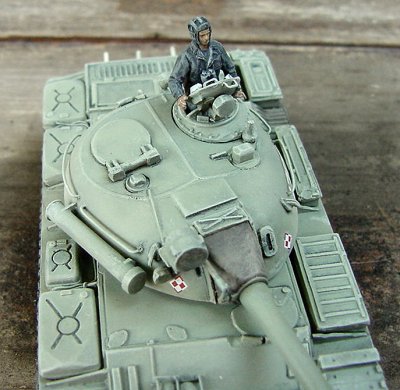
 The turret was very easy and quick
to assemble. The front IR floodlight mounting plate needed
considerable cleanup. The small hatch cover (part #40) is shown
in the instructions to be attached to the middle of the turret
roof, but my reference drawings show it on the turret rear, where
I put it. The hand holds along the turret sides are to be made by
the modeler by bending wire into shape. I used copper wire,
because it is soft enough to bend into smooth curves, yet also
stiff enough to retain its shape. Solder is too soft, and brass
is too stiff. The open commander's hatch has some grab handles
and periscope details which I added on my own. There is no
interior detail included with the kit. The tip of the gun barrel
needs a little reshaping to match the adjacent scan. The barrel
also required quite a bit of effort to sand it into a round cross
section. Luckily, ARMO has just released a turned aluminum 100mm
gun barrel, so I will use those replacement barrels for future
T-55's.
The turret was very easy and quick
to assemble. The front IR floodlight mounting plate needed
considerable cleanup. The small hatch cover (part #40) is shown
in the instructions to be attached to the middle of the turret
roof, but my reference drawings show it on the turret rear, where
I put it. The hand holds along the turret sides are to be made by
the modeler by bending wire into shape. I used copper wire,
because it is soft enough to bend into smooth curves, yet also
stiff enough to retain its shape. Solder is too soft, and brass
is too stiff. The open commander's hatch has some grab handles
and periscope details which I added on my own. There is no
interior detail included with the kit. The tip of the gun barrel
needs a little reshaping to match the adjacent scan. The barrel
also required quite a bit of effort to sand it into a round cross
section. Luckily, ARMO has just released a turned aluminum 100mm
gun barrel, so I will use those replacement barrels for future
T-55's.
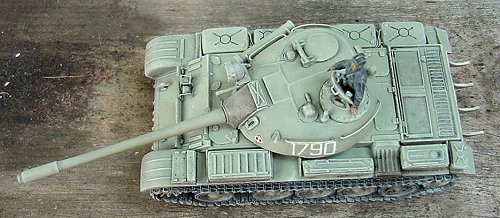
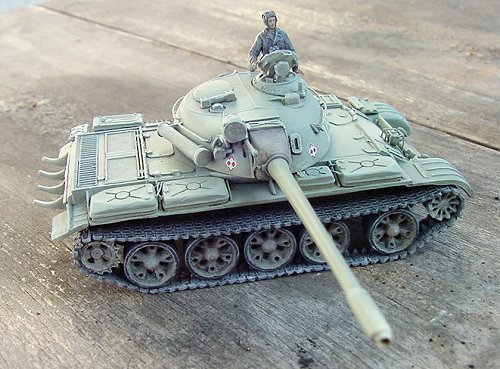
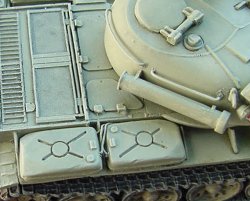
 The upper hull was also very easy
to build. The only problem I had was with the rear fender pieces.
They were a little crude, and needed to be sanded and shaped a
little better. They also are not long enough to provide enough
overhang for the attachment of the unditching log, which should
be on the rear of the tank. The front splash-guard needed to be
thinned a bit with sandpaper. The modeler is required to
fabricate the protective frame around the headlights, which was a
little complicated. I also added some plumbing to the spare fuel
cells on the right fender. The two crescent-shaped parts which
fit below the turret need to have their bottoms sanded down a
little bit so that they don't sit up too high. Also, the location
marks on the hull do not match what I have seen in my references.
The drawings I have show these parts to be exactly opposite each
other, not offset like the instructions show. So I had to cut a
small notch in one of the fender braces, and glued the pieces
into the positions shown on the adjacent scan.
The upper hull was also very easy
to build. The only problem I had was with the rear fender pieces.
They were a little crude, and needed to be sanded and shaped a
little better. They also are not long enough to provide enough
overhang for the attachment of the unditching log, which should
be on the rear of the tank. The front splash-guard needed to be
thinned a bit with sandpaper. The modeler is required to
fabricate the protective frame around the headlights, which was a
little complicated. I also added some plumbing to the spare fuel
cells on the right fender. The two crescent-shaped parts which
fit below the turret need to have their bottoms sanded down a
little bit so that they don't sit up too high. Also, the location
marks on the hull do not match what I have seen in my references.
The drawings I have show these parts to be exactly opposite each
other, not offset like the instructions show. So I had to cut a
small notch in one of the fender braces, and glued the pieces
into the positions shown on the adjacent scan.
The lower hull required much filing and sanding, but no filler. Test fit ... test fit ... and test fit again. Yes, it takes time, but the end result is that everything fit very well, once it was all carved down into shape. Building the wheels was a little more difficult. The first step was shaping all of the wheels. After carving off with a knife most of the heavy flash around each wheel, I had to sand them into shape. For the inside wheels, the ones with the hole all the way through their centers, I was able to attach them to the end of the motordrill, and turned them against a flat piece of sandpaper on a block of wood. This sped up the sanding considerably, but I was unable to do the same for the outside wheels, and had to sand them all by hand.
I opened up the large lightening holes between the spokes, using a router on my motordrill. I then started to also open up the smaller holes on the tops of the spokes, but then I saw some photographs showing these holes to be very small. After further research, I found other photos of wheels with larger holes, about the size which comes molded onto the kit parts, so there were apparently a couple of versions of this wheel style. Don't open up the holes any larger, because they are just on the edge of being too large as is.
I then sanded the back sides of the wheels smooth to have a good mating surface between the inner and outer wheels. I also tried to sand the rear edges, to make all the wheels an even thickness, but that wasn't possible. It's not too important, since once the tracks are attached, you can't see the wheels clearly enough to judge their thickness. I glued each pair of wheels together, not bothering to line up the center holes, because that would be difficult. Rather, I got each pair of wheels to match each other in diameter, and then carved open the holes large enough to accomodate the axles with a little wiggle room for adjusting wheel location.
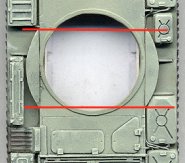
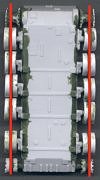 Attaching the wheels to the hull
was also a little tricky. The primary consideration is that you
must get the centerlines of each pair of wheels in alignment with
the centerline on the idler and sprocket wheels, so that the
track guide teeth don't get hung up (see adjacent scan). I first
attached the sprocket and idler axles to the hull, and then
attached the wheels onto their respective axles, and ensured that
they were in alignment. Then I started work on the road wheels:
beginning with the four corner wheels, so that the tank sits flat
on the ground. Begin with the wheel nearest the rear sprocket
wheel, keeping in mind that it should be VERY close to the
sprocket - almost so that the sprocket is overlapping the outside
of the tire, but not quite. On the left side of the tank, I had
to relocate the axle about 1mm forward to clear the sprocket
wheel (a better alternative would have been to move the sprocket
wheel back 1mm). Keep in mind that the wheels are on individual
torsion bars, and do not share axles with the same wheel on the
opposite side of the tank, so that the wheels on the right side
of the tank should be about 1mm further forward than the left
wheels.
Attaching the wheels to the hull
was also a little tricky. The primary consideration is that you
must get the centerlines of each pair of wheels in alignment with
the centerline on the idler and sprocket wheels, so that the
track guide teeth don't get hung up (see adjacent scan). I first
attached the sprocket and idler axles to the hull, and then
attached the wheels onto their respective axles, and ensured that
they were in alignment. Then I started work on the road wheels:
beginning with the four corner wheels, so that the tank sits flat
on the ground. Begin with the wheel nearest the rear sprocket
wheel, keeping in mind that it should be VERY close to the
sprocket - almost so that the sprocket is overlapping the outside
of the tire, but not quite. On the left side of the tank, I had
to relocate the axle about 1mm forward to clear the sprocket
wheel (a better alternative would have been to move the sprocket
wheel back 1mm). Keep in mind that the wheels are on individual
torsion bars, and do not share axles with the same wheel on the
opposite side of the tank, so that the wheels on the right side
of the tank should be about 1mm further forward than the left
wheels.
After the rear corner wheels are firmly set, attach the front corner wheels, again, so that the vehicle sits flat, and with their center grooves aligned with the rear wheels. After all four corner wheels are dry, go back and attach the middle wheels one at a time, letting them dry in position, sitting flat on the table. I did not glue the axles to the hull, and then the wheels to the axles. Instead, I glued the wheels to the axles first. Open the holes in the hull very wide, and shape the nubs on the backs of the axles very small, which will allow a lot of room for movement while attaching them to the hull. This is critical, because you will need a lot of working room to get the wheels to fit without touching each other. This makes for weak hull attachments, so I used superglue (after dryfitting!) to make sure that the wheels were firmly set. On my kit, the left side wheels are almost touching each other, and I think this is because the wheels are just a LITTLE bit too large in diameter. According to one of the sources I have, the wheels are about 0.5mm too large each, which results in adjacent wheels being 1mm closer to each other than they should be. You can sand the wheels down some more, but then you'll lose the distinction between wheel rim and tire. Or you can do what I did, and just play a little bit with the location of each axle within the locating holes on the hull. Remember that all this while, you need to make sure that each wheel sits out just as far as its neighbor, so that both the center groove (for the track guide teeth) as well as the outer wheel faces are in alignment.
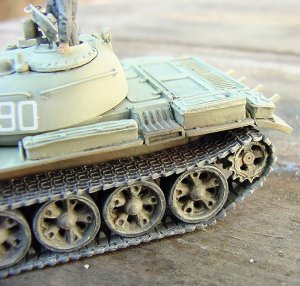
 The wheels were by far the most difficult
part of the model, and once they were complete, the rest of the
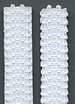
model went very smooth. The tracks, however EASY they were to
assemble, were very tedious. I needed fourteen individual links
on each side of the tank, but you may need one more or less,
depending on how much track sag you want. After cutting them off
the sprue (with many extra - because I didn't know how many I
would need), I spent a long time cleaning up each link with
sandpaper (I got blisters on my fingers!!). This is very
time-consuming, but necessary. The individual links are a little
thicker than the lengths of track, so they need to be thinned a
bit with sandpaper. I improved the track lengths by doing two
things to them: first, using my motortool, I cut notches into the
track edges between individual links (see scan). Second, on the
lower track segments, and the short lengths, I scratched some
link detail onto the inner surfaces to differentiate between
individual links. It looks a little crude at first, but after
weathering, it's not too bad. After cleaning up all the track
parts, it was actually quite simple attaching them to the wheels.
It takes awhile, with all the dry-fitting of each individual
link, but there were no fit problems: no "half-a-link
short" problems here. There are no holes in the track links
for the sprockets, so you need to clip off the sprocket teeth
where the tracks wrap around the sprocket wheels. Regarding track
sag: most of the photos I have seen show the top track run to be
resting on the middle three wheels, and angling up to the idler
and sprocket wheels without touching the tops of the front and
rear-most road wheels.
The wheels were by far the most difficult
part of the model, and once they were complete, the rest of the
model went very smooth. The tracks, however EASY they were to
assemble, were very tedious. I needed fourteen individual links
on each side of the tank, but you may need one more or less,
depending on how much track sag you want. After cutting them off
the sprue (with many extra - because I didn't know how many I
would need), I spent a long time cleaning up each link with
sandpaper (I got blisters on my fingers!!). This is very
time-consuming, but necessary. The individual links are a little
thicker than the lengths of track, so they need to be thinned a
bit with sandpaper. I improved the track lengths by doing two
things to them: first, using my motortool, I cut notches into the
track edges between individual links (see scan). Second, on the
lower track segments, and the short lengths, I scratched some
link detail onto the inner surfaces to differentiate between
individual links. It looks a little crude at first, but after
weathering, it's not too bad. After cleaning up all the track
parts, it was actually quite simple attaching them to the wheels.
It takes awhile, with all the dry-fitting of each individual
link, but there were no fit problems: no "half-a-link
short" problems here. There are no holes in the track links
for the sprockets, so you need to clip off the sprocket teeth
where the tracks wrap around the sprocket wheels. Regarding track
sag: most of the photos I have seen show the top track run to be
resting on the middle three wheels, and angling up to the idler
and sprocket wheels without touching the tops of the front and
rear-most road wheels.
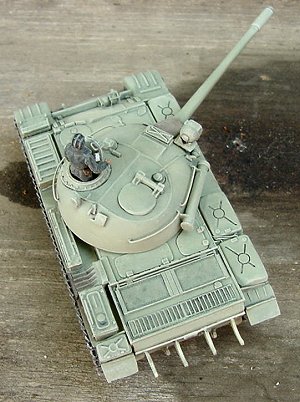
The front bow where the upper and lower hulls meet did not close cleanly. Some filler is needed here to smooth off the lower front glacis plate. Also, I extended the raised detail (mine plow attachments) to the edge of the upper glacis plate using styrene. If I had thought of it earlier, I should have added the very large bolts to these pieces of metal.

And that's it. Done. There are a few minor details I still need to complete, such as adding the tow cables and fuel drums. The tow cable end loops are included in plastic, and clean up very well. The modeler is to drill a hole in the end, and attach to fabricated tow cable (twisted fine-gauge solder works very well). The two large fuel drums which ride on the brackets on the rear hull need work to clean them up before attaching them. I will likely do that later.
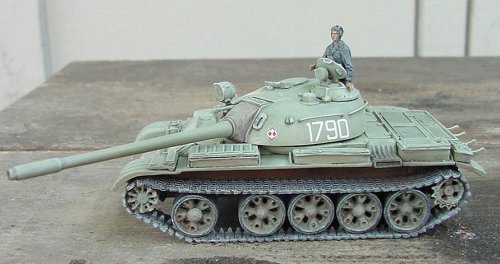
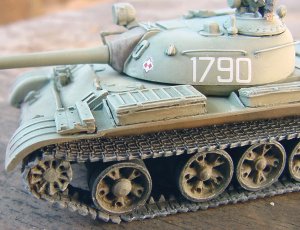
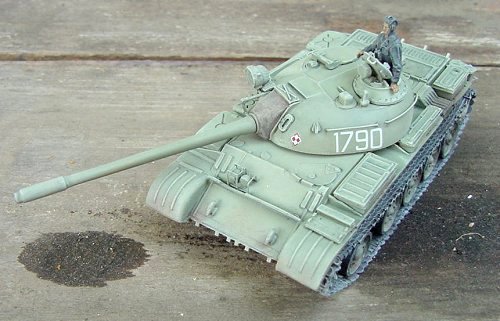
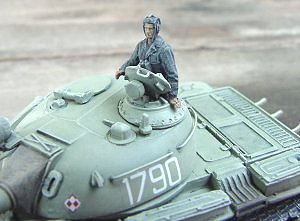
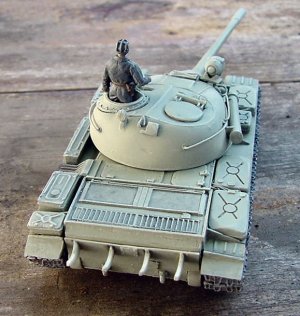
I painted the model in AeroMaster acrylic paints. The markings in the kit are very well printed, and from prior experience, are very good decals. But I wanted to take this opportunity to review a second product at the same time, so I chose to use some decals from YnoT instead. The markings I used represent a Polish T-55 of an unknown unit in the mid-1970's. But I think I may have made a mistake in my choice of markings. After completing the model, I've seen that Polish-built T-55's had a storage box on the left front face of the turret, with the vehicle number on top of the box. I didn't take the time to replicate this box, and put the number right on the turret face, but I think that perhaps ALL Polish tanks had this box, so my markings may therefore be wrong. Additionally, I don't know if Polish T-55's had the snorkel stowed on the right side of the turret, so again, the inclusion of this part may be incorrect for a Polish tank. Regarding the scale of the kit, according to my references, it as exactly 1/72nd.
The tank commander is a resin figure from Milicast, and is not included with the kit.
In conclusion, I have read some bad press about this kit, and frankly, I don't understand the criticism. Yes, it takes a bit of effort to build, but so do all limited-run kits. And compared to other companies' kits, this one is very reasonably priced. I really enjoyed building it; it really makes me feel like I've accomplished something. I can highly recommend this kit to anyone willing to put a little bit of extra time and effort into building it.
A suggestion to ACE: I think that a small fret of photoetched parts would have been very beneficial for this kit. Some specific parts which would have been better made in brass are: the splash guard on the front hull, the IR searchlight mounting plate, the headlight guard, toolbox handles, mounting brackets, other searchlight details, as well as some other smaller details. This should be considered for future versions of this tank.
Thank You ACE Models and Saul Garcia for providing the review kit.
References: Bronekollektsiya #3.2000, Soviet Armour, 1945-1995, by M. Baryatinski (in Russian), Tornado Armour Book: T-54/T-55 Part 1 (in Russian), Tornado Armour Book: T-54/T-55 Part 2 (in Russian), The Greenhill Armoured Fighting Vehicles Data Book, by Ian Hogg, The Illustrated Directory of Tanks of the World, by David Miller, and Jane's Tanks and Combat Vehicles Recognition Guide, by Chistopher Foss.
| Back to ACE Kit List | Back to Home Page |