| As the kit lists on
this website show, there are a great many multimedia kits
available on the market today. In many cases, if one
wants to build a specific vehicle, multimedia is the only
way to go. Multimedia kits typically come in polyurethane
resin, but in some instances, photoetched brass, and cast
metal parts are also included, and some kits are entirely
cast metal. This article provides beginner's tips on
building multimedia kits. It's really not as hard as some
people think. First of all, it is important to note that polyurethane resin provides certain health considerations when working with it. Specifically, the substance is toxic and a possible carcinogen. In its solid form, resin is safe to handle. I know of no studies indicating any sort of absorption through the skin from handling solid resin. However, when in a liquid state (if you are casting your own resin parts) care must be taken to not get the resin on your skin. As model builders, we need to use caution with solid resin when we sand and grind it. Resin dust is hazardous when breathed or otherwise ingested. So whenever producing resin dust, always wear a face mask (cotton breath masks are available at most good hobby shops), and glasses or goggles. You don't want to get any of the dust in your eyes either. If you can do all of your sanding outdoors, that's even better, or do it over a basin of water, which collects the dust. Wash your hands after getting covered with dust. Do not eat, drink or smoke until your hands are thoroughly cleansed. A Tip From John Elwen: "One way to cut down the dust is to either use a wet file, or file the parts whilst holding them underwater in a washing up bowl. Using the bowl helps prevent loss of the part, and the water prevents your file from clogging as it doesn't get filled with hot resin." Now onto some construction tips:
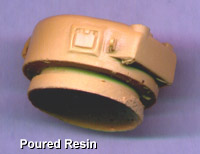
The advantage of poured resin kits is that they are much cheaper to produce. The disadvantage is that most of the large kit parts (turrets, hull) have very large blocks of resin on their bottom surfaces that require removal. The easiest way that I have found to remove these pour-blocks is to grind them off with a mototool (Dremel or equivalent). Keep in mind the dust warning above. If the part is sturdy enough, and the pour-block is laid out in such a way as to allow cutting it off with a hand saw, this produces much less dust. NEVER USE THE CIRCULAR SAW BIT ON A MOTOTOOL TO REMOVE THE BLOCKS! This is extremely difficult to control, due to the changing texture of the resin as it heats from the saw friction, and very dangerous. It's a good way to lose a finger tip or other important body parts. Be extremely careful when removing resin parts from their sprues as the resin is very fragile. Small parts especially can easily be broken. It's best to use a saw, or clippers to remove the small parts. Once all the resin parts have been removed from their sprues and pour-blocks, thoroughly wash them to remove any mold-release agents that might still be on the resin, and any resin dust from all the nooks and crannies. Use dish detergent and a toothbrush for best cleaning results. If you have warped resin parts, do not attempt to bend them back to shape without first heating the resin. Otherwise, you will break them. First heat the parts in hot (not boiling) water, with a hairdryer, or in an oven set on low (about 175 F). When heated through, bend the part back to shape and hold it there until it cools. Some resin parts are not as good as others, both from the perspective of the casting experience of the model maker, and also the quality of the resin itself. Many times your resin parts will have air bubbles on the surface or on the corners. These bubbles can be filled with either standard modeling putty, or gap-filling superglue. Some resin kits also have a very rough surface texture, which requires sanding with a fine-grit sandpaper. Many of the resin kits you get will come with broken parts from shipping. Just think of it as your kit having more parts than normal, and glue them back together. Most of the good resin companies pack their models in zip-lock bags, so any broken parts should still be with the kit.
To fold the photoetched parts, you need flat-nosed pliers, and very fine tweezers. Some people like to fold the parts on a flat surface using sharp, flat tools such as razor blades. You must use superglue (cyanoacrylate glue) to glue resin, brass and metal parts. Because of this, you must be very careful of part placement prior to gluing. Constantly dry-fit all of the parts, many times. When gluing plastic parts to brass or resin, such as conversion or scratch-built parts, you still must use superglue, so be careful. Basically, building multimedia kits is not much different than building plastic. Keep in mind the safety cautions, and use patience while building, and you should have no problems with multimedia. |
 From
what I've seen, there seem to be two basic methods for
casting in resin: pouring the resin into open-topped
molds, or injecting the resin into sealed molds, much
like injection-molded plastic kits. The advantage to
injecting the resin is that there are very small sprue
attachment points that need to be removed from the kit
parts. Sometimes, the attachment points are no larger
than with injected plastic.
From
what I've seen, there seem to be two basic methods for
casting in resin: pouring the resin into open-topped
molds, or injecting the resin into sealed molds, much
like injection-molded plastic kits. The advantage to
injecting the resin is that there are very small sprue
attachment points that need to be removed from the kit
parts. Sometimes, the attachment points are no larger
than with injected plastic.
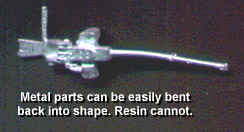 If the
kit comes with metal and brass parts, it is best to wash
those parts also. Cast metal is usually pretty soft, and
any casting nubs left on the metal can carefully be
removed with a sharp knife. Bent parts can be bent back
into shape. To remove etched parts from the fret, use a
very sharp knife blade, and place the brass sheet on a
hard, flat surface, like glass or ceramic. Cut the part
at the very edge of the part, trying to leave as little
of the attachment nub as possible on the part. For very
small parts (as most of ours are) you might want to stick
a piece of tape on the back of the brass sheet, so that
when you cut the parts, they don't fly off into oblivion.
If the
kit comes with metal and brass parts, it is best to wash
those parts also. Cast metal is usually pretty soft, and
any casting nubs left on the metal can carefully be
removed with a sharp knife. Bent parts can be bent back
into shape. To remove etched parts from the fret, use a
very sharp knife blade, and place the brass sheet on a
hard, flat surface, like glass or ceramic. Cut the part
at the very edge of the part, trying to leave as little
of the attachment nub as possible on the part. For very
small parts (as most of ours are) you might want to stick
a piece of tape on the back of the brass sheet, so that
when you cut the parts, they don't fly off into oblivion.