| This article is
intended to satisfy two purposes. First of all, we are in
the unusual position of having more than one choice of
kits for a particular tank; there are three manufacturers
producing kits of the Leopard 2A4 (actually, one is an
A3), plus one Leopard 2A5. I wanted to compare the
strengths and weaknesses of these kits to help modelers
make an informed decision when it comes time to buy one
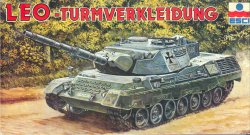
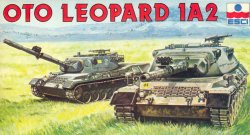
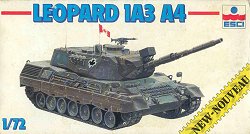
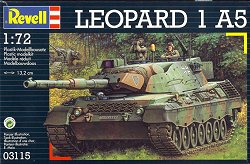
(the Leopard 2 is covered in Part 2 of this article). But first, since I am on the topic of Leopards, I thought that I would go ahead and do a comparative review of all the available Leopard 1 kits, and make particular note of accuracies and inaccuracies for the various versions. And I must say, I have never seen a nomenclature system for main battle tanks more convoluted than that used for the Leopard 1. The Leopard 1 The Kits We have several good kits of the Leopard 1 available; from ESCI we have the Leopard 1A1A1, the Leopard Turmverkleidung (same as the A1A1), the Leopard 1A2, the OTO Leopard 1A2 (same as the previous kit), and the Leopard 1A3-A4. Although these kits have been out of production for some time, modern tanks don't seem to sell as well as WW II tanks, so they tend to still be readily available in many hobby shops and on eBay. Also, the Leopard 1A2 has recently been re-released. In late 1999, Revell AG. released the Leopard 1A5, the only version not originally released by ESCI. ESCI Leopards
The hulls in all the ESCI kits are identical. The turrets in the A1A1 and A2 are the same, but the A1A1 includes add-on armor plating. The A3-A4 kit has a completely new welded turret. The ESCI kits share most of the same comments. The detail on both the hull and turrets is very good, although not molded quite as sharply as on the Revell kit. Panel lines are recessed, and there is good representation of the engine air intake and exhaust vents. The driver's hatch is molded shut. The pioneer tools are molded directly onto the hull, and because the hull sides are sloped, the tools have very little relief, due to molding limitations. The track ice cleats are molded as a separate part, so their relief is very good. Tow hooks, lift rings, mirrors, headlights and cannon barrel travel lock are all molded as separate parts, but the headlight guards are molded onto the hull. The turret includes stowage bin and baskets, individual smoke grenade launchers, gunsights, searchlight housing and gunfire simulator for training. Only the commander's hatch is molded open, the gunner's hatch is not. A decent MG-3 is included. The wheels have excellent hub detail, but each pair is molded as a single, double-wide wheel, and I think we all know by now how I feel about that :) The tracks are link-and-length hard plastic, with good outside detail, and individual link demarcation detail on the inside, but there are no track teeth molded to the inside surface (but there ARE a lot of sink holes). The A1A1 and Turmverkleidung versions include an extra sprue of parts, containing the add-on armor for the turret and gun mantle, and the early style of exhaust grills. The turret for the A3-A4 version has the commander's gunsight housing molded onto the turret roof, which is accurate only for the A4, and needs to have it removed for the A3 version. Again, only the commander's hatch is molded open. Markings in these kits are diverse. The Leo Turmverkleidung (A1A1) kit contains markings for Federal Germany; the A2 (OTO Leopard) has markings for Italy, Belgium and Norway; and the A3-A4 has markings for Federal Germany, Australia, Greece and Canada. The decals have a matte finish with thin carrier film, but most of mine are printed out of register. Revell Leopard 1A5
This kit is one of the finest small scale armor kits I have ever seen. The level of detail, and crispness of moldings is astounding. It basically includes all of the same parts as the ESCI A1A1, but with many more options. Both early and late style exhaust grills are included. Different front fenders are included depending on whether or not the side skirts are used. All hatches are open including the driver's. The crew intercom connection box on the rear hull comes in both early and typical styles (square vs. round). The MG-3 is gorgeous. The wheels are molded individually, with unbelievable detail, and the tracks are also some of the best I have seen. Contrary to the statement on the side of the box (which says that the tracks are vinyl), they are hard plastic, link-and-length. The only option not included is closed shutters on the thermal gunsight housing; they are molded open. My only complaint about this kit is the choice of molding the pioneer tools onto the hull. As with the ESCI kits, molding restrictions limit the amount of relief possible on a sloped surface, so these tools are no better than those seen on the ESCI kits. The same holds true for the ice cleats molded onto the front glacis plate. With all of the advances in molding technology, and the obviously large amount of thought that went into the design of this kit, I am surprised that Revell still molds the pioneer tools onto the hulls. When on a flat surface, the amount of relief to the tools can be acceptable; but not so for the tools on this kit. They will need to be sanded off and replaced with 3-dimensional examples. Markings are included for two German tanks. The decals are very nice (and in register for a change), and the instructions are some of the best I have seen. Plus, Revell has done away with the multi-page folding instructions, and switched to stapling the pages together into a small booklet, which is a great improvement. This is one of my most recommended kits of all times. Kit Dimensions For dimensional reference, I used the measurements in the Jane's and Osprey New Vanguard titles, as well as the measurements included in the ESCI kit instructions. Their measurements were all exactly the same.
It was difficult to measure the length of the models without having constructed them first, as there are fenders and rear hull stowage boxes to consider. However, it is obvious that the ESCI kit is larger than the Revell kit. As you can see, the ESCI kit scales out too long, about 1/70th scale. I don't have the actual measurements for the turret, but again, the ESCI turret is substantially larger than the Revell turret, and based on the hull numbers, it would appear that the ESCI turret is also overscale. The Leopard 1 Versions As I said above, the naming scheme for Leopard 1's is extremely convoluted and confusing. It is best to start describing them in their original names. The Leopards were constructed in "batches". Batch 1 To model this version, it would be best to start with the Revell kit, because it gives the option for the square intercom box on the hull rear, as well as the early style exhaust grills (horizontal and verticle struts). Leave off all of the lift rings (hookeyes) and fill their location holes on the hull, and remove the narrow deflector ring on the hull around the turret ring. Leave off the side skirts, and ice cleats. The most difficult change is to remove the thermal sleeve from the gun barrel. It might be easiest to copy the 105mm cannon barrel from an ESCI M60 model. Also, the stereoscopic gunsight apertures need to be added at the forward corners of the turret. These apertures are already present on the ESCI turrets (parts 69-70), but the ESCI kits do not allow for the square intercom box, and only the A1A1 kit comes with the early exhaust grills. Your choice of which details are easiest to scratch-build, but keep in mind the better scale accuracy of the Revell kit. Batch 2 For this version, leave on the turret deflector ring, switch to the round intercom box, but keep the early style exhaust grill. The lift rings are still missing, as is the thermal gun sleeve. Batch 3 Add the lift rings. Batch 4 Change to the later style exhaust grill (horizontal struts only). Batches 1 though 4 were all called simply, Leopard 1. Leopard 1A1 All Batch 1-4 Leopards went through this modernisation program. Many internal improvements were made. The thermal sleeve was added to the gun barrel. Side skirts were added. New tracks were introduced, but I don't think the track differences are noticeable at this small scale. Ice cleats (grousers) are stored on the front hull. I you wish to use the newer Revell A5 kit, you must leave off the thermal gunsight housing, and add the stereoscopic gunsights, and leave off the side skirts and turret armor. All the optional parts for building any particular batch are included. Batch 5 - Cast Turret - Leopard 1A2 The turret armor is thickened, but it is not noticeable. Difficult to distinguish from Leopard 1A1's. Only external difference is oval cover plates on optical rangefinder heads (parts 69-70 in ESCI kits) instead of round, as on earlier vehicles. Note that the ESCI A2 kit is incorrect by having round cover plates, so they will need to be altered. Except for that, the ESCI kit builds into this version very well. Note that this version never received the add-on turret armor from future upgrades. An alternative to using the ESCI kit is to use the newer Revell A5 kit. You must leave off the thermal gunsight housing, the side skirts, turret armor, and add the stereoscopic gunsights. Batch 5 - Welded Turret - Leopard 1A3 This is the entry of the welded turret versions. The ESCI kit is a very good representation of this version, except the gunsight housing in front of the commander's hatch needs to be removed, and replaced with a smaller, cylindrical housing for a periscope type sight. Batch 6 - Leopard 1A4 Changed the gunsight to the version included in the ESCI kit. ESCI kit builds into this version out-of-the-box. Leopard 1A1A1 Thie version marks the appearance of add-on armor to turret and gun mantle. All vehicles of Batches 1-4 underwent conversion. This vehicle is very well represented by the ESCI kit. Optional exhaust grills are included in the ESCI kit for the original Batch 2-4 vehicles, but a converted Batch 1 vehicle is only possible if you convert the intercom box from round to square. Again, the alternative to using the ESCI kit is to use the Revell kit. You must leave off the thermal gunsight housing, and add the stereoscopic gunsights. PZB 200 In 1980, a new image-intensification system entered service, called the PZB 200. This looks like a giant, telescoping camera lens, attached to the gun mantle, offset slightly to the right. It is protected by a cage-like framework. When added to the Leopard 1A1A1 (Batches 1-4), they became the Leopard 1A1A2. When added to the Leopard 1A2 (Batch 5), those became the Leopard 1A2A1, and when added to the Leopard 1A3 (also Batch 5), their name changed to the Leopard 1A3A1. It was never added to the Leopard 1A4 (Batch 6). Confused yet? Wait... it gets better. Leopard 1A5 The stereoscopic gunsight was replaced with a thermal gunsight. The two optical gunsight apertures on the forward corners of the turret were removed, and faired over. A housing for the thermal gunsight was added to the turret roof in front of the commander's hatch. A collimator was added to the tip of the gun barrel. Many other internal improvements were made. The Revell kit captures the essence of this version perfectly. To make this version from an ESCI A1A1, leave off the stereoscopic gunsights, fairing over the mounting positions, and fabricate a thermal gunsight housing for the turret roof. Radio Improvements The radios were changed to newer and better models (SEM 80/90). I don't think that the antenna mounts changed to such a degree as to be noticeable at this small scale. At this point, the vehicle designations changed.
Foreign Leopard 1s Belgian Leopards are called Leopard 1 BE, and came mostly from Batch 4 (and some Batch 3). External differences between the BE and Batch 4 vehicles include a thermal sleeve, extra stowage boxes on the fenders, and FN MAG machineguns in place of the MG-3's. There is also an exhaust port on the right side between two stowage boxes for a heater. These tanks are being upgraded to include add-on turret armor, and a new gunsight in a housing similar to that on the Leopard 1A5. Danish Leopards are called Leopard 1 DK, and are based on the Leopard 1A3. They have additional stowage boxes on their fenders. These tanks are being upgraded with new gunsights in armored housings like on the Leopard 1A5. Their designations are changing to Leopard 1A5 DK, but don't let it confuse you with the German Leopard 1A5. These Danish tanks are still the welded turret versions. Greek Leopard 1's are called Leopard 1 GR. These also are based on the Leopard 1A3, and are equipped with the same gunsight as the Danish Leopards (with armored housing) and also the PZB 200 camera system. Greece also received Leopard 1A5's from Germany, and several Leopard 1 V's from the Netherlands. The Dutch Leopards are orignally called Leopard 1 NL, and they resemble the Batch 4 Leopard 1's. The antenna mounts are different, as are the smoke grenade launchers, machineguns (FN's) and stowage boxes. These tanks were later modified with internal improvements, add-on turret armor, and side skirts. Their name was then changed to Leopard 1 V. Norwegian Leopards resemble Batch 4 Leopards. Some had thermal sleeves on the guns, some do not. Their early tanks are upgrading to A5 standards, and they are also receiving a new batch of Leopard 1A5's from Germany. The OTO Leopard is an Italian Leopard, and resembles the A2 version. They were going to be upgraded, but instead, they will be replaced with the Ariete. The OF-40 is an export version of the Leopard sold to the United Arab Emirates. It resembles the Leopard 1A3. Turkish Leopards are called Leopard 1 TR. I don't know which version these tanks are based on, but they have the same gunsight as the Danish Leopards, as well as the PZB 200. Versions without the PZB 200 are called Leopard 1 T. Turkey also received Leopard 1A1A1's, which may have been upgraded to A5 standards. Australian Leopards are known as Leopard AS 1. These resemble the A3 welded turret version with extra stowage boxes. Canadian Leopards are called Leopard C1, which are also similar to the Leopard 1A3. There is a PZB 200 mounted on the left side of the gun mantle, and a search light on the right side. An FN MAG replaces the MG-3. Leopards are also in use by Brazil and Botswana, but I have no additional information on those vehicles. And that's about all I have to say about Leopard 1s. See Part 2 of this article for information on the Leopard 2. References used: Osprey New Vanguard No. 16 - Leopard 1 Main Battle Tank 1965-1995 by Michael Jerchel and Peter Sarson; Jane's Tank Recognition Guide, by Christopher Foss; Tamiya News No. 8 - Photo Album of West German Leopard Tank, by Dieter Schmitz; and Concord Color Series No. 4004 - Armor of the West, by Yves Debay. |