| I'm sure that most of
us have heard of A.M.S. - Advanced Modeler's Syndrome.
This affliction is usually attributed to those people who
get so carried away with superdetailing and accurizing
their kits, that they normally complete about one model
every three to six years. Although there is nothing wrong
with this type of modeling habit, it has been known to go
to extremes, so that one never completes a model, because
they are never "good enough." (Yes, I've
suffered from it on occasion.) The opposite extreme is to build the kits
right out of the box, with no additions, details,
corrections or conversions at all. This is a great way to
master basic modeling skills. However, with the exception
of the "Out of Box" categories at model shows,
this type of model never wins trophies. Is this fair? I
think not, but there's not a whole lot we can do about
that.
When I build kits, I try
to aim for a middle ground between the two extremes.
There are many, very simple tricks to adding and changing
minor details on an "out of box" kit, without
taking too much time or effort. I refer to these
techniques as I.M.S. - Intermediate Modeler's Syndrome.
It's a step above the basics, and really helps a model to
stand out in a crowd. Yet it does not go quite as far as
A.M.S. As you will see, these techniques are quick,
simple and effective.
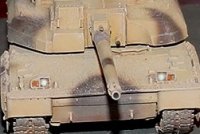
- Open the
end of the gun barrel. Use a pin vise
with a small drill bit. If there is one
single tip that I can give you to improve
the final look of your models, this is
it.
|
 |
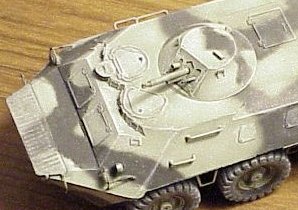 |
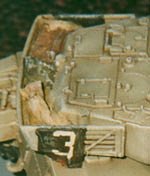
- Replace
hand holds and handles with brass wire.
Most good model shops (especially
railroad model shops) carry lengths of
brass wire in varying diameters. They
only cost a few cents each, so they won't
break your bank. Trim and sand off any
hand holds or handles (such as on
hatches). Using tweezers and flat-nosed
pliers, bend a small length of the brass
wire to match the size of the replaced
handle and glue to the kit. It is
beneficial to drill very small locator
holes in which to insert the wire
handles.
|
 |
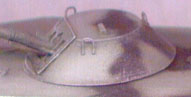
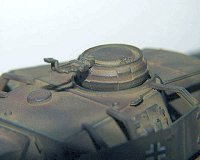
- Similarly,
replace the lift rings on tank turrets
and hulls. It is usually easier to use
copper wire or solder for these, if you
can find some, because they bend easier,
and lift rings need smooth curves. Some
lift rings require a fine diameter wire
(BTR-70), whereas others may require a
wider diameter wire (M4A6 Sherman).
|
 |
- Replace
overscale machinegun barrels with lengths
of metal or plastic wire or metal tubing
of a more realistic diameter.
|
 |
 |
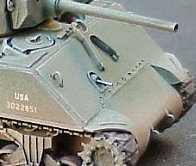
- Add stowage
to the vehicles. Boxes and cans can be
either made from scratch using styrene,
or stolen from other kits and accessory
sets. Bags and rolls are best hand made.
Most rolls that I have seen included in
kits are far too stiff and unrealistic
looking. To make simple rolls: cut a
piece of facial tissue to the size of a
tarp or tent or whatever that you need.
Soak it in diluted white glue
(consistancy of milk) and then fold and
roll it into the shape you desire. Tie
thread around it for straps, and stick it
to your vehicle while the roll is still
wet, so it conforms to the hull's shape.
If it dries too quickly and does not
conform well, keep adding diluted glue
with a paint brush until it takes the
shape you need. After it dries, paint it
the desired color. You may want to add
heavier straps with very thin styrene or
tape.
|
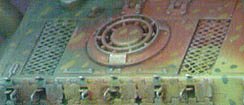
- Engine deck
screens. Many tanks have protective
screens covering air intakes on their
engine decks. It is easy to add these
screens. Most hobby shops carry sheets of
mesh of varying sizes (wire or plastic),
especially for use with car modeling. Cut
a piece to the size of your ventilation
grate, and attach. I find it easiest to
hand paint the area beneath the mesh
first, then glue on the mesh before
airbrushing the completed model.
|
 |
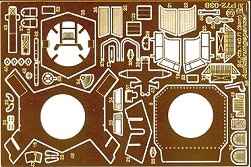 |
- Use
commercially available photoetched sets.
However, this technique can very quickly
move into the realm of A.M.S., so use
caution. Many brass parts directly
replace kit parts, or add additional
detail very easily, but some get much
more complicated. Sometimes major surgery
is required to the kit, in order to
replace plastic with brass. Take it only
as far as you are comfortable. Nothing is
worse than butchering a kit for the
addition of brass, only to have them fail
miserably in the end.
|
- Graphite
powder gently rubbed by finger to give
otherwise lifeless plastic the look of
metal. This technique is cheap, easy and
it always works. It is also little messy
sometimes, perhaps, but the result is
worth it. Being a softskin modeler mostly
I regret I cannot use this technique
often, but all my tanks and AFVs have
this worn "heavy metal" look.
Graphite simply brings them to life. - Ilian
Filipov
|
 |
- Here is a quick and
easy (but very effective) suggestion for your IMS
article. You can easily replace Schurzen,
side-skirts, fenders, and other things such as
bolt on armour plating with brass sheet. K&S
industries market shim brass that ranges from
.008 of an inch to .002 of an inch. Prices vary,
but they are quite cheap. Most thicknesses can be
cut with a pair of sharp scissors. It is easy to
dent and crumple, for easy battle damage. They
are paper thin but very strong, and add that
little touch to armour models. Thanks. -
Jason E Cormier, Canada.
- Here's a technique
that a friend of mine recommended: For realistic
rust on tracks or shot-up vehicles, take some
steel wool, and soak it in water for about two
days to one week. The time depends on how light
or dark you want the rust to look. Once you've
got the color you want, take the rusted steel
wool, crush it into powder, and dry brush it onto
the model. Seal it into place using a dullcote
finish. It's that simple, and gives a thoroughly
accurate and realistic appearance. -
Mark Deliduk
- One of the first
things I started doing on the road to I.M.S. was
to add figures. Several manufacturers don't have
tankers in their kits, so adding one is often a
quick and easy way to give a kit individuality. - Pat
Storto
- Another idea (which
I have not explored myself very much) is to look
for a novel paint schemes. Manufacturers usually
suggest the obvious schemes of the original
owning army, but I find color schemes of captured
or lend-lease vehicles quite intriguing. A
Sherman in the sand-yellow, olive-green,
red-brown German scheme with Balkenkreuze is
quite interesting. - Pat Storto
- For
sideskirts/Schurtzen I use clear plastic card,
the very thin stiff stuff [0.05?] used for
windshields from Evergreen. It is thin
& light, stiff but a little flexible,
easy to work with and drill, can be used with
regular model cement. It cannot be bent for
battle damage too easy though. -
Stephen Brezinski
- Adding or replacing
a model's antenna is another quick addition. I
used sections of heat-stretched sprue (my
favorite are sprues used for the old rubber
tracks) cut to the appropriate length. Others use
bristles from brushes (or very fine wire -
ed.). - Pat Storto
- I ran across a way
to add antennae to the vehicle much simpler than
copper wire or even heat-stretched sprues.
Plastic strips that usually hold tags to newly
purchased clothing are just the right size and
elasticity to make sturdy enough an antenna. Cut
off the length you want (it will already be
slightly bent, just like the real thing); then
drill a small hole in the model where the antenna
is supposed to stand (a dip will do, no need to
go all through the hull), then cement
the "antenna" in place. After the
cement dries, paint it gun metal.
That's it! - Nebojsa Malic
- You can replace the
towing cable with a steel cable which is made for
the fisherman: Its name is "leader" and
comes in different diameters: 0,5mm, 1mm etc. It
is usually covered by transparent plastic; you
must put a drop of super glue in every finish and
you can strip the plastic easily. -
Luis Cortelezzi
- You can use steel
in a diameter of 0,1 mm to make an
antenna; it can be purchased in a hardware
store or where you can buy pieces for clocks, and
it is straight. - Luis Cortelezzi
- Add weight. I glue
a handful of copper or lead shots (air-gun
bullets, fishing weights or whatever) inside the
chassis of my tank models. This makes tanks with
rubber tracks stand more realistically on the
ground (as the "memory" in the tracks
won't be able to bounce the vehicle half-way in
the air). Gives certain sturdiness and a feel of
massiveness to vehicles with link-and-length
tracks, too. - Marko Mäkinen
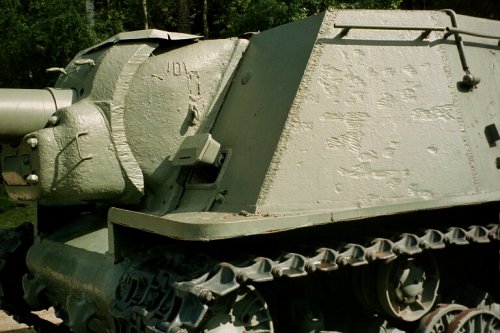
- Before painting:
scrape the protruding edges of the hull and
turret with random strokes of a sharp edged file
(don't overdo this!). Although this is not an
entirely natural way of steel to behave, the
result enhances the rough look of the armor steel
and gives a worn out appearance to the model (the
effect can be seen on my StuG IV in the gallery,
for instance). Tank armor plates are really very
unfinished and clumsy pieces of steel (see e.g.
enclosed picture of a ISU-152 in Parola tank museum, Finland),
wheras plastic models are often too neat and
smooth even the scale difference considered. - Marko
Mäkinen
- Replace bow machine
guns with tubes sawed from hollow injection
needles. Better than solid rods of plastic or
metal, although slightly out of scale. - Marko
Mäkinen
- Open the ends of
exhaust pipes (with needle file or a heated
needle if you don't have a drill small enough). -
Marko Mäkinen
- Add appropriate
supporters and hangers for stowage boxes, spare
tracks etc. from a thin brass, copper or even
paper band. - Marko Mäkinen
- Some tank models
(several Panzer IV models, for instance) have
wide gaps where you can see - unrealistically,
needless to point out - inside the hull beneath
the fenders. These are easy to block with sheets
of plastic and paint appropriately. - Marko
Mäkinen
- If you intend to
leave hatches open but don't want to do an
excessive job on the inside of the tank, an
adequate detail might be the application of seats
(easily constructed of plastic sheet or converted
from an aircraft pilot seat), since they
effectively block the view farther inside the
tank. Also, paint the inside of the tank
everywhere you can see through the hatches,
engine intake grills, etc. - Marko
Mäkinen
- Add a drop of super
glue to periscopes and sighting binoculars to
simulate lenses. - Marko Mäkinen
- After paint washes,
adding decals etc. but before the finishing cote
I spray my tanks with heavily diluted gray paint
overall. This cuts down the contrast of the
camouflage colours and gives an effect of wear
and dirt. - Marko Mäkinen
- One method of
applying antennae is to use a fishing line
(diameter approximately 0,15 mm). Its advantage
is that it is very flexible and does not get
damaged easily during transportation. - Marko
Mäkinen
- For camouflage
foliage try braided picture hanging wire to make
limbs and branches to add woodland scenics
foliage to. For tow cables use model ship rigging
thread wetted with alcohol and wiped with white
glue; super glue end in loop. Painted model
airplane tissue makes good air recognition flags.
Put artist's acrylic over glass headlight lenses.
For radio antenna on wargaming minis, shedded
housecat whiskers make good resilient aerials.
Glosscote basic finish before adding washes- that
way wash pigments do not settle in roughness of
flat paint's general surface. Coupler knuckle
springs from KayDee HO scale train couplers are
good to thread over antenna to base to represent
mount in some model scales. - Scott
Wood
- To get a quick,
sharp edge to roadwheels/tyres use a fine black
felt-tip pen from an art shop. These are also
good for adding black hand-written markings. You
may need to touch up the areas afterwards with
matt varnish. - Andrew Campbell
- For cammo nets use
a fine gauze bandages, held in place with
watered-down white glue and sprinkled with the
contents of a tea bag. - Andrew
Campbell
- To add a base to an
aerial, use a section of the very fine wire used
in telephone extensions. - Andrew
Campbell
- To create straps to
hold down tarps/nets etc use sliced sections of
Tamiya masking tape (this stuff is really thin!)
- Andrew Campbell
- To simulate [vinyl]
track sag on tanks (like the panther), drill
through the hull and insert metal wire in the
'dip' of the sag. The wire should be a few mm
narrower than the tank and should poke out each
side of the hull, thus holding the track in
place. - Andrew Campbell
There are many other
things that can be done to improve the looks of the final
model, but they tend to be a little more involved, and
enter the realm of A.M.S. If any readers have additional,
SIMPLE suggestions for easily detailing tank
models, let me know, and I'll add them to this list.
|