Sturmgeschütz
III Ausf. G Sd.Kfz. 142/1
A Compare & Contrast Building Review
Finnish Sturmi, 1944
1/72-scale Finnish Sturmgeschütz Ausf. G conversion
using the ESCI/Italeri kit.
A Chapter in the “All Things Sturmgeschütz” series.
1. INTRODUCTION
In 1943, during the beginning of the third year of World War 2 on
the Eastern Front, the Germans sold to Finland 30 early Sturmgeschütz
III Ausf. G assault guns. These weapons were the most modern and
formidable AFV’s in Finnish service at the time, though, according
to my resources, did not actually see combat till the major Soviet
offensive in July 1944. “Sturmi” was a Finnish nickname
for these vehicles, which were organized into an Assault Gun Battalion
with three companies and support units. In 1944 a second batch of
29 additional Sturmis arrived, unfortunately not in time to see
service in the Soviet 1944-offensive that re-conquered large areas
of Finnish territory from Finland.
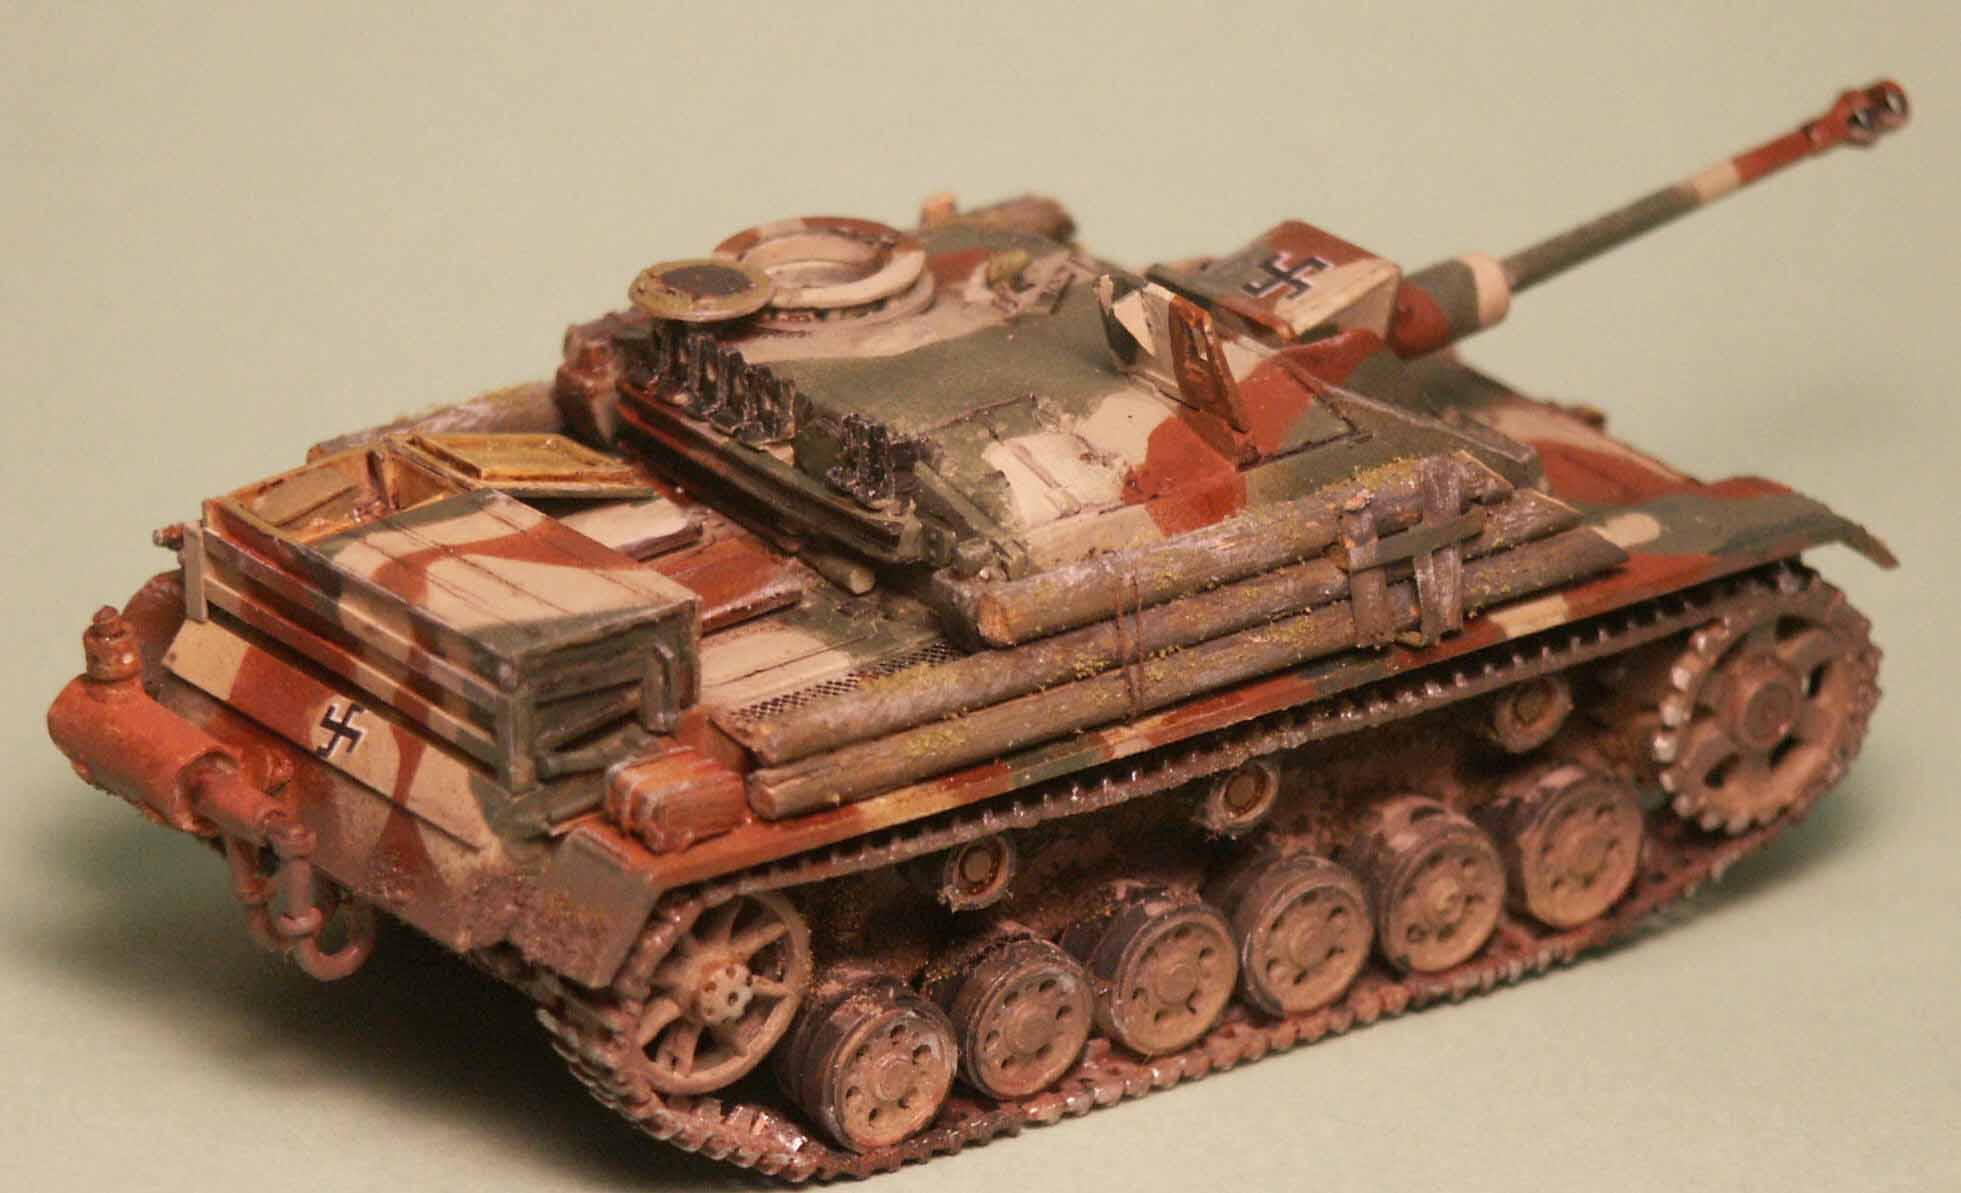
This initial batch of thirty Sturmis had a variety of features depending
on the particular German manufacturer that produced them. All had
the welded box mantlet; the rubber tired return rollers, and loader's
hatches opening fore and aft. One Sturmi (Ps531-17)
had 30-mm supplemental bow armor welded to the 50-mm glacis, the
others had 30-mm bolted-on additional glacis armor and some (for
example Ps521-30) had one-piece 80-mm bow armor plate.
None of this early batch had Zimmerit
coating or the cast Topfblende (a.k.a. "Saukopf") gun
mantlet, or the loader’s hatches opening to the sides. I understand
that none of the Finnish Sturmis used Schürzen plate in combat,
though one 1943 photo of vehicle Ps531-17 I have seen in the book
"Suomalaisten rynnäkkötykkien kohtalot" shows
it in its Finnish marking and camouflage and with attached
Schürzen! These vehicle features I have just described
will effect which kit we choose to use for our Finnish conversion.
For further details I refer you to a superb article ”The
Sturmgeschütz in Finnish Service” at: http://www.andreasLarka.net/sturmi.html.
Upon arrival in Finland this first batch of 30 were repainted in
a Finnish 3-tone camouflage of brush-painted Moss Green, Sand Brown
and Light Grey. The Russian DT tank machine gun (mg) was substituted
for the German supplied MG34 and the opening in the Sturmi’s
machinegun shield was enlarged and the mount changed for the DT
machine gun. On the bow, sides and on top of the gun mantlet the
Finns painted the Finnish national marking, the Hakaristi (to some
mistaken for a National Socialist’s (Nazi) swastika), used
by the Finns since 1918. This ancient Hindu (Sanskrit) symbol was
also used by Latvia (in red color) before the Soviet takeover of
1939, and the Finnish Hakaristi had nothing to do with German National
Socialism. On the front right of the main gun and on the stern of
the Finnish Sturmi was a vehicle number running from Ps531-1 to
Ps531-30 for this first batch of Sturmis. The Ps stands for ‘Panssarivaunu’
or 'Tank'. The number ‘531’ designates the vehicle as
a Sturmgeschütz.
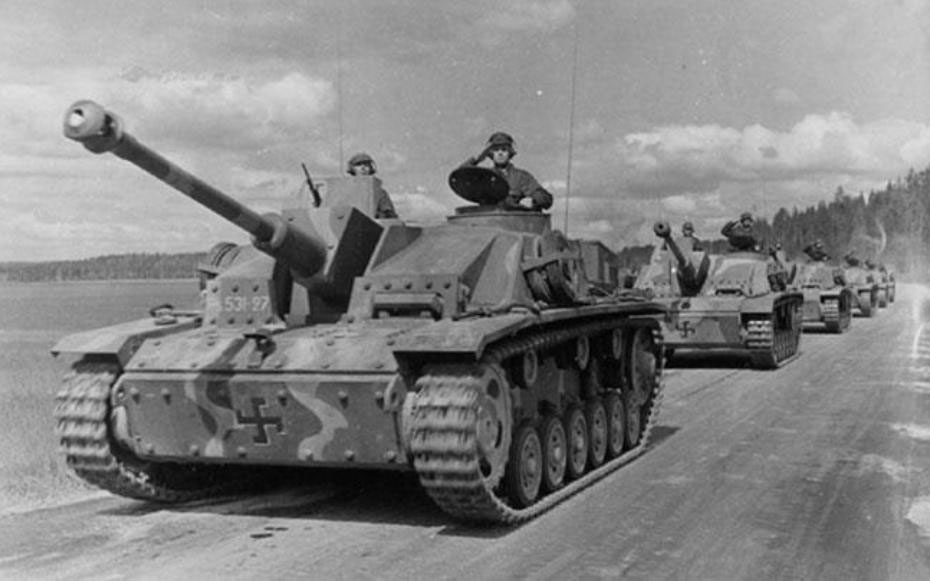
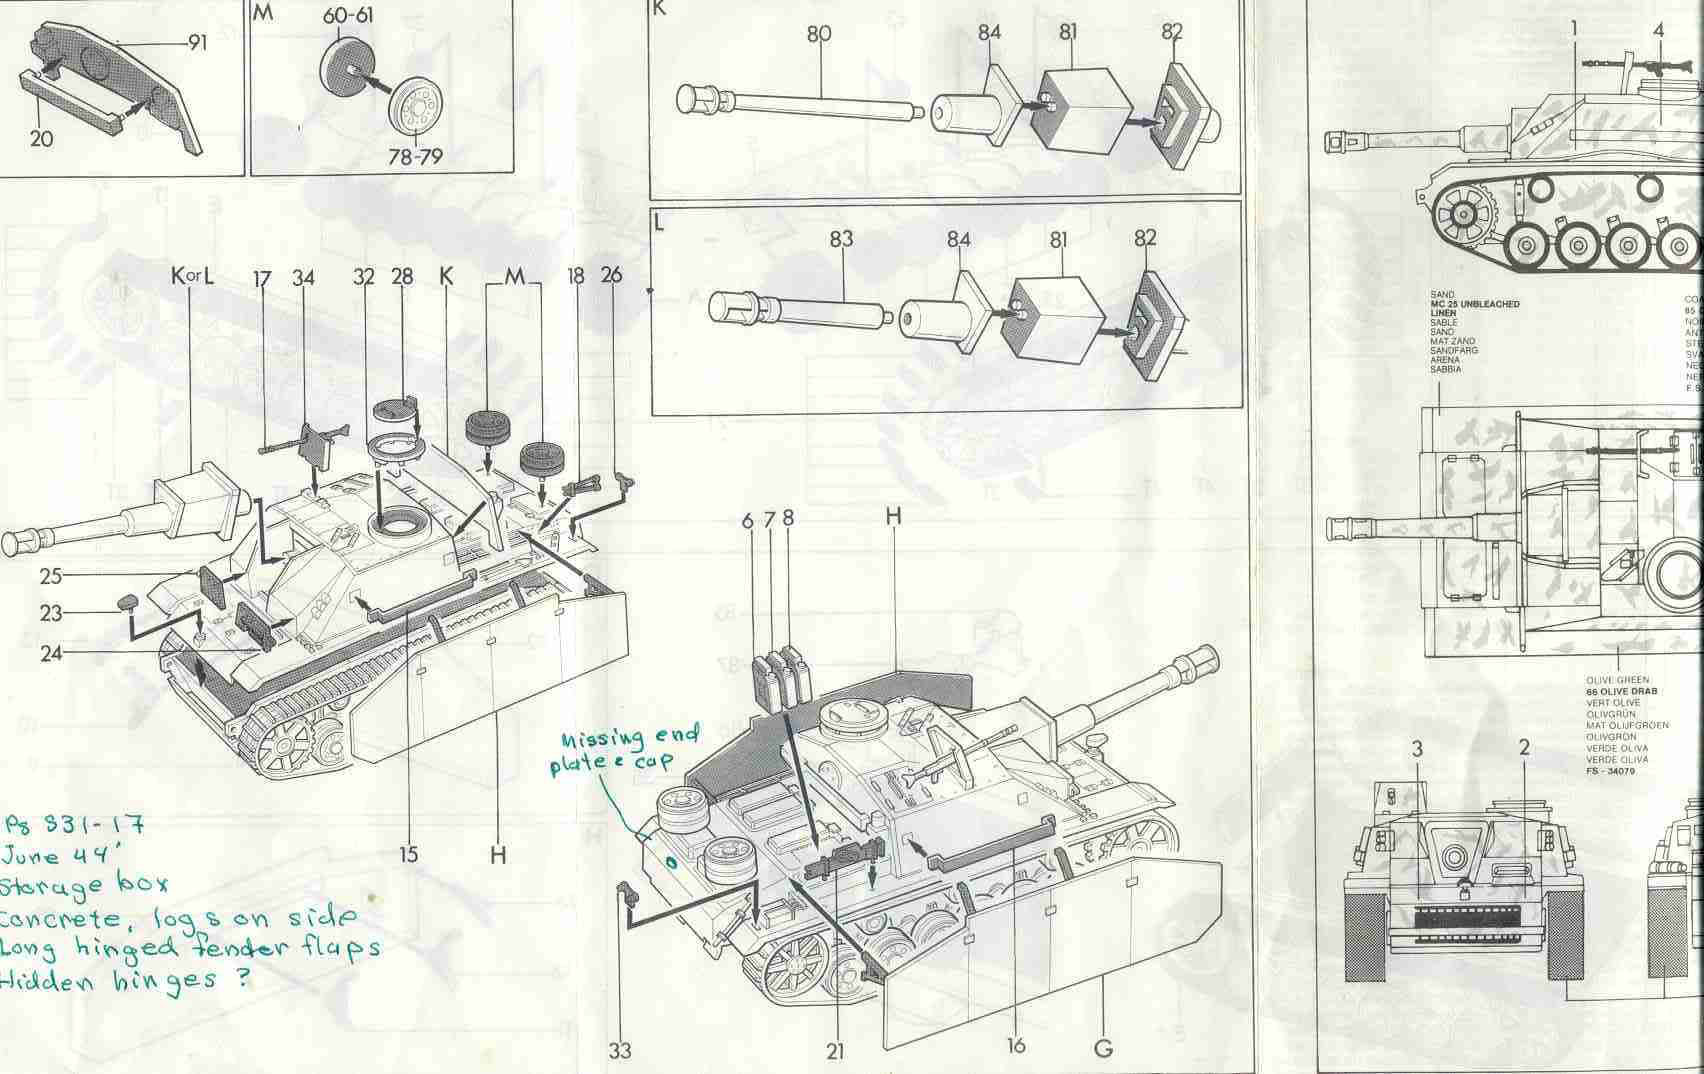
In the above photo (commonly found on the internet) is a column
of 1943 Sturmi’s on the Carelian Front near Enso on June 4th
1944. In front we see a MIAG produced Ps531-27 with bolted
on bow armor, welded mantlet, DT machinegun, the three-tone camouflage,
the spare roadwheels mounted on the side of the superstructure,
and a large wooden storage box mounted on the engine deck. The second
vehicle in line is the subject of this model article: Ps531-17
with welded bow armor, the box mantlet, no spare tracks on the bow,
and spare roadwheels mounted on the side. (Unfortunately I did not
know this vehicle was Ps531-17 until my model was complete.) Note
there is no concrete armor, hood over the driver’s visor,
or logs mounted on the sides that were particular to Sturmi’s
in July 1944. Note also that, though similar, none of the hand-painted
camouflage patterns on these Sturmis are the same.
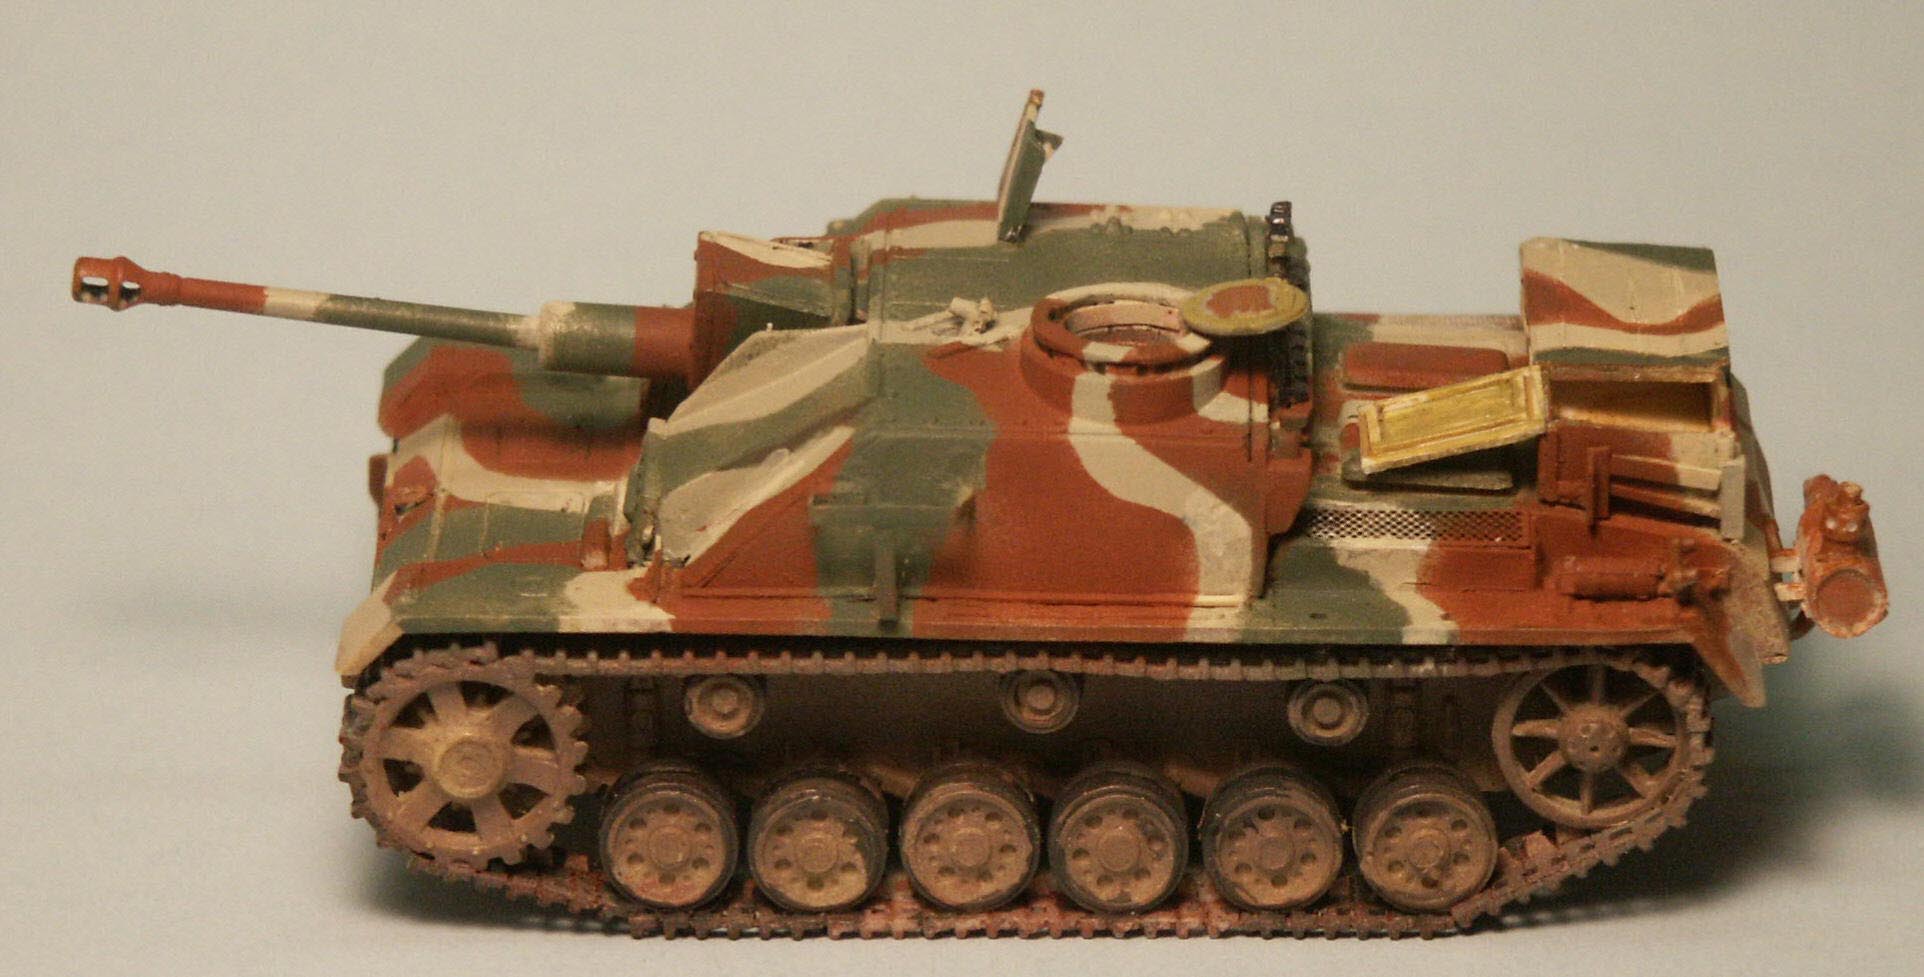
The particular vehicle I will be attempting is Ps531-17,
which was a relatively rare Sturmgeschütz built by M.A.N. on
a Panzer III Ausf. M chassis. With this chassis comes a deep-wading
snorkel exhaust in the rear and single front opening maintenance
hatches on the bow. Ps531-17 was one of the initial batch of 30
vehicles arriving in 1943. The vehicle was disabled and then destroyed
by its crew at Kuuterselka on June 15, 1944 during the Soviet summer
offensive and Ps531-17 did not get the opportunity to fire its weapon
in combat. At the time I built my model I had not yet found any
photos of Ps531-17 so some vehicle details and the color scheme
were conjecture on my part. Soon after completion of this model
of Ps531-17 I received a very helpful e-mail from Mr. Andreas Lärka
pointing out some minor and some big errors on my part. Along with
Mr. Lärka’s e-mail came four wonderful photos of Ps531-17
from a Finnish book "Suomalaisten rynnäkkötykkien
kohtalot". Murphy’s law would naturally have it
that actual reference photos of my vehicle’s camouflage scheme
would come AFTER the model was complete!
2. THE KIT
This kit was originally released by ESCI in the 1980’s and
at the time was much loved for its accuracy; how far we have come.
Presently, in 2008, this kit has been re-released by Italeri. ESCI
released the kit with stiff polyethylene band tracks and later injection
molded styrene link & length tracks. Italeri offers the kit
with the styrene link & length tracks. Through this article
I will refer to this kit by its original heritage: ESCI.
Of the several StuG Ausf. G kits available at this time in plastic
the old detail challenged ESCI kit was used for this conversion
along with parts from the ESCI Panzer III M/N kit. This box art
is unusual in showing a rear view of the StuG. No frame around the
engine deck is included in the kit despite the nice box art. I find
it interesting that in the box art there are no tools or other fittings
on neither fender nor engine deck.
Why the ESCI kit? Revell AG makes a fine StuG III kit that could
mate with a Revell Pz III Ausf. M kit chassis, but Revell’s
Sturmgeschütz it is a late 1944-1945 StuG with features not
typical of those sent to Finland. Dragon makes a very fine early
StuG that is near perfect for use as a 1943 Finnish vehicle, and
might even be able to be used with Revell’s Pz. III Ausf.
M kit parts. The deciding factor was that I wished to assemble the
ESCI kit and to freshly compare it to the Dragon and Revell. There
were also several ESCI StuG’s and Pz III kits in my collection
to use up and available for ‘butchering’ and not that
many Revell and Dragon kits.
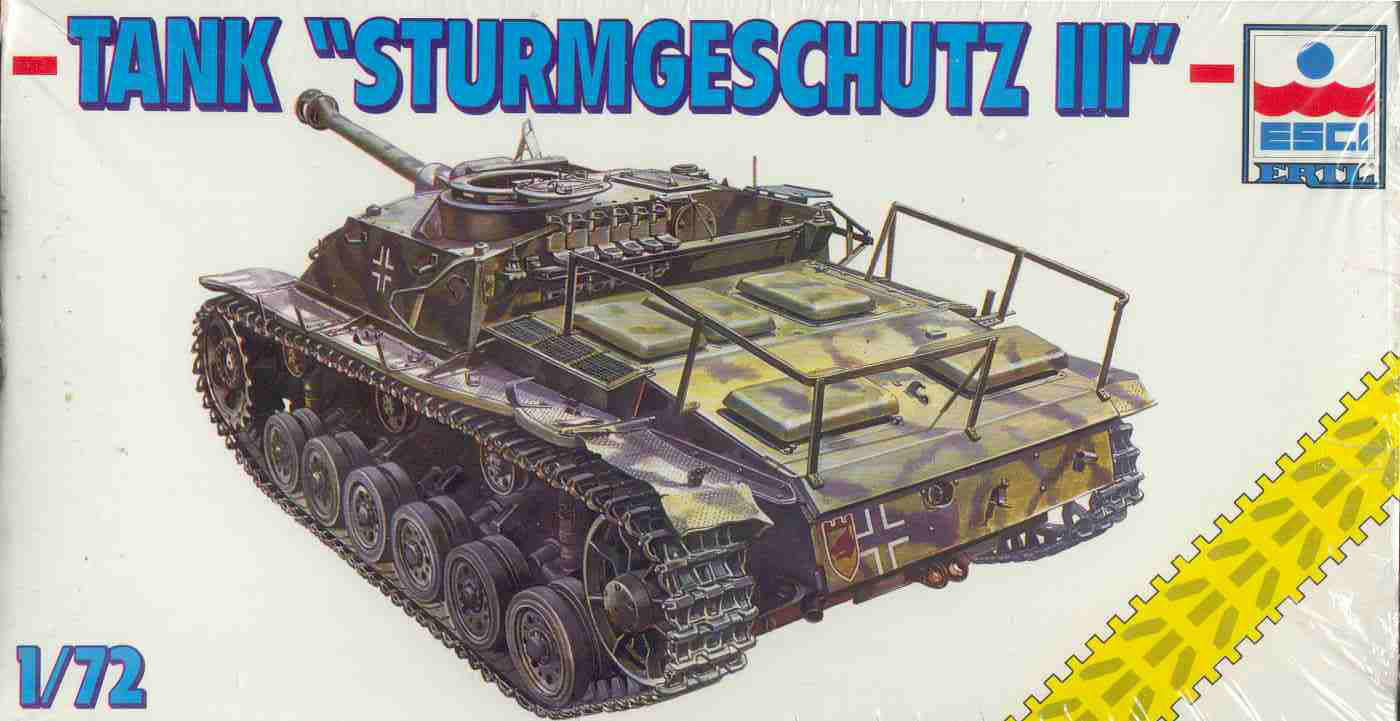
The very nice box art for Italeri’s re-release of ESCI’s
1/72-scale Sturmgeschütz shows off the features shown in the
kit. We see the towing points at the bow made from the extended
hull side plates, the Schürzen, the spare track holder on the
80-mm thick bow plate, and the welded and bolted box gun mantlet.
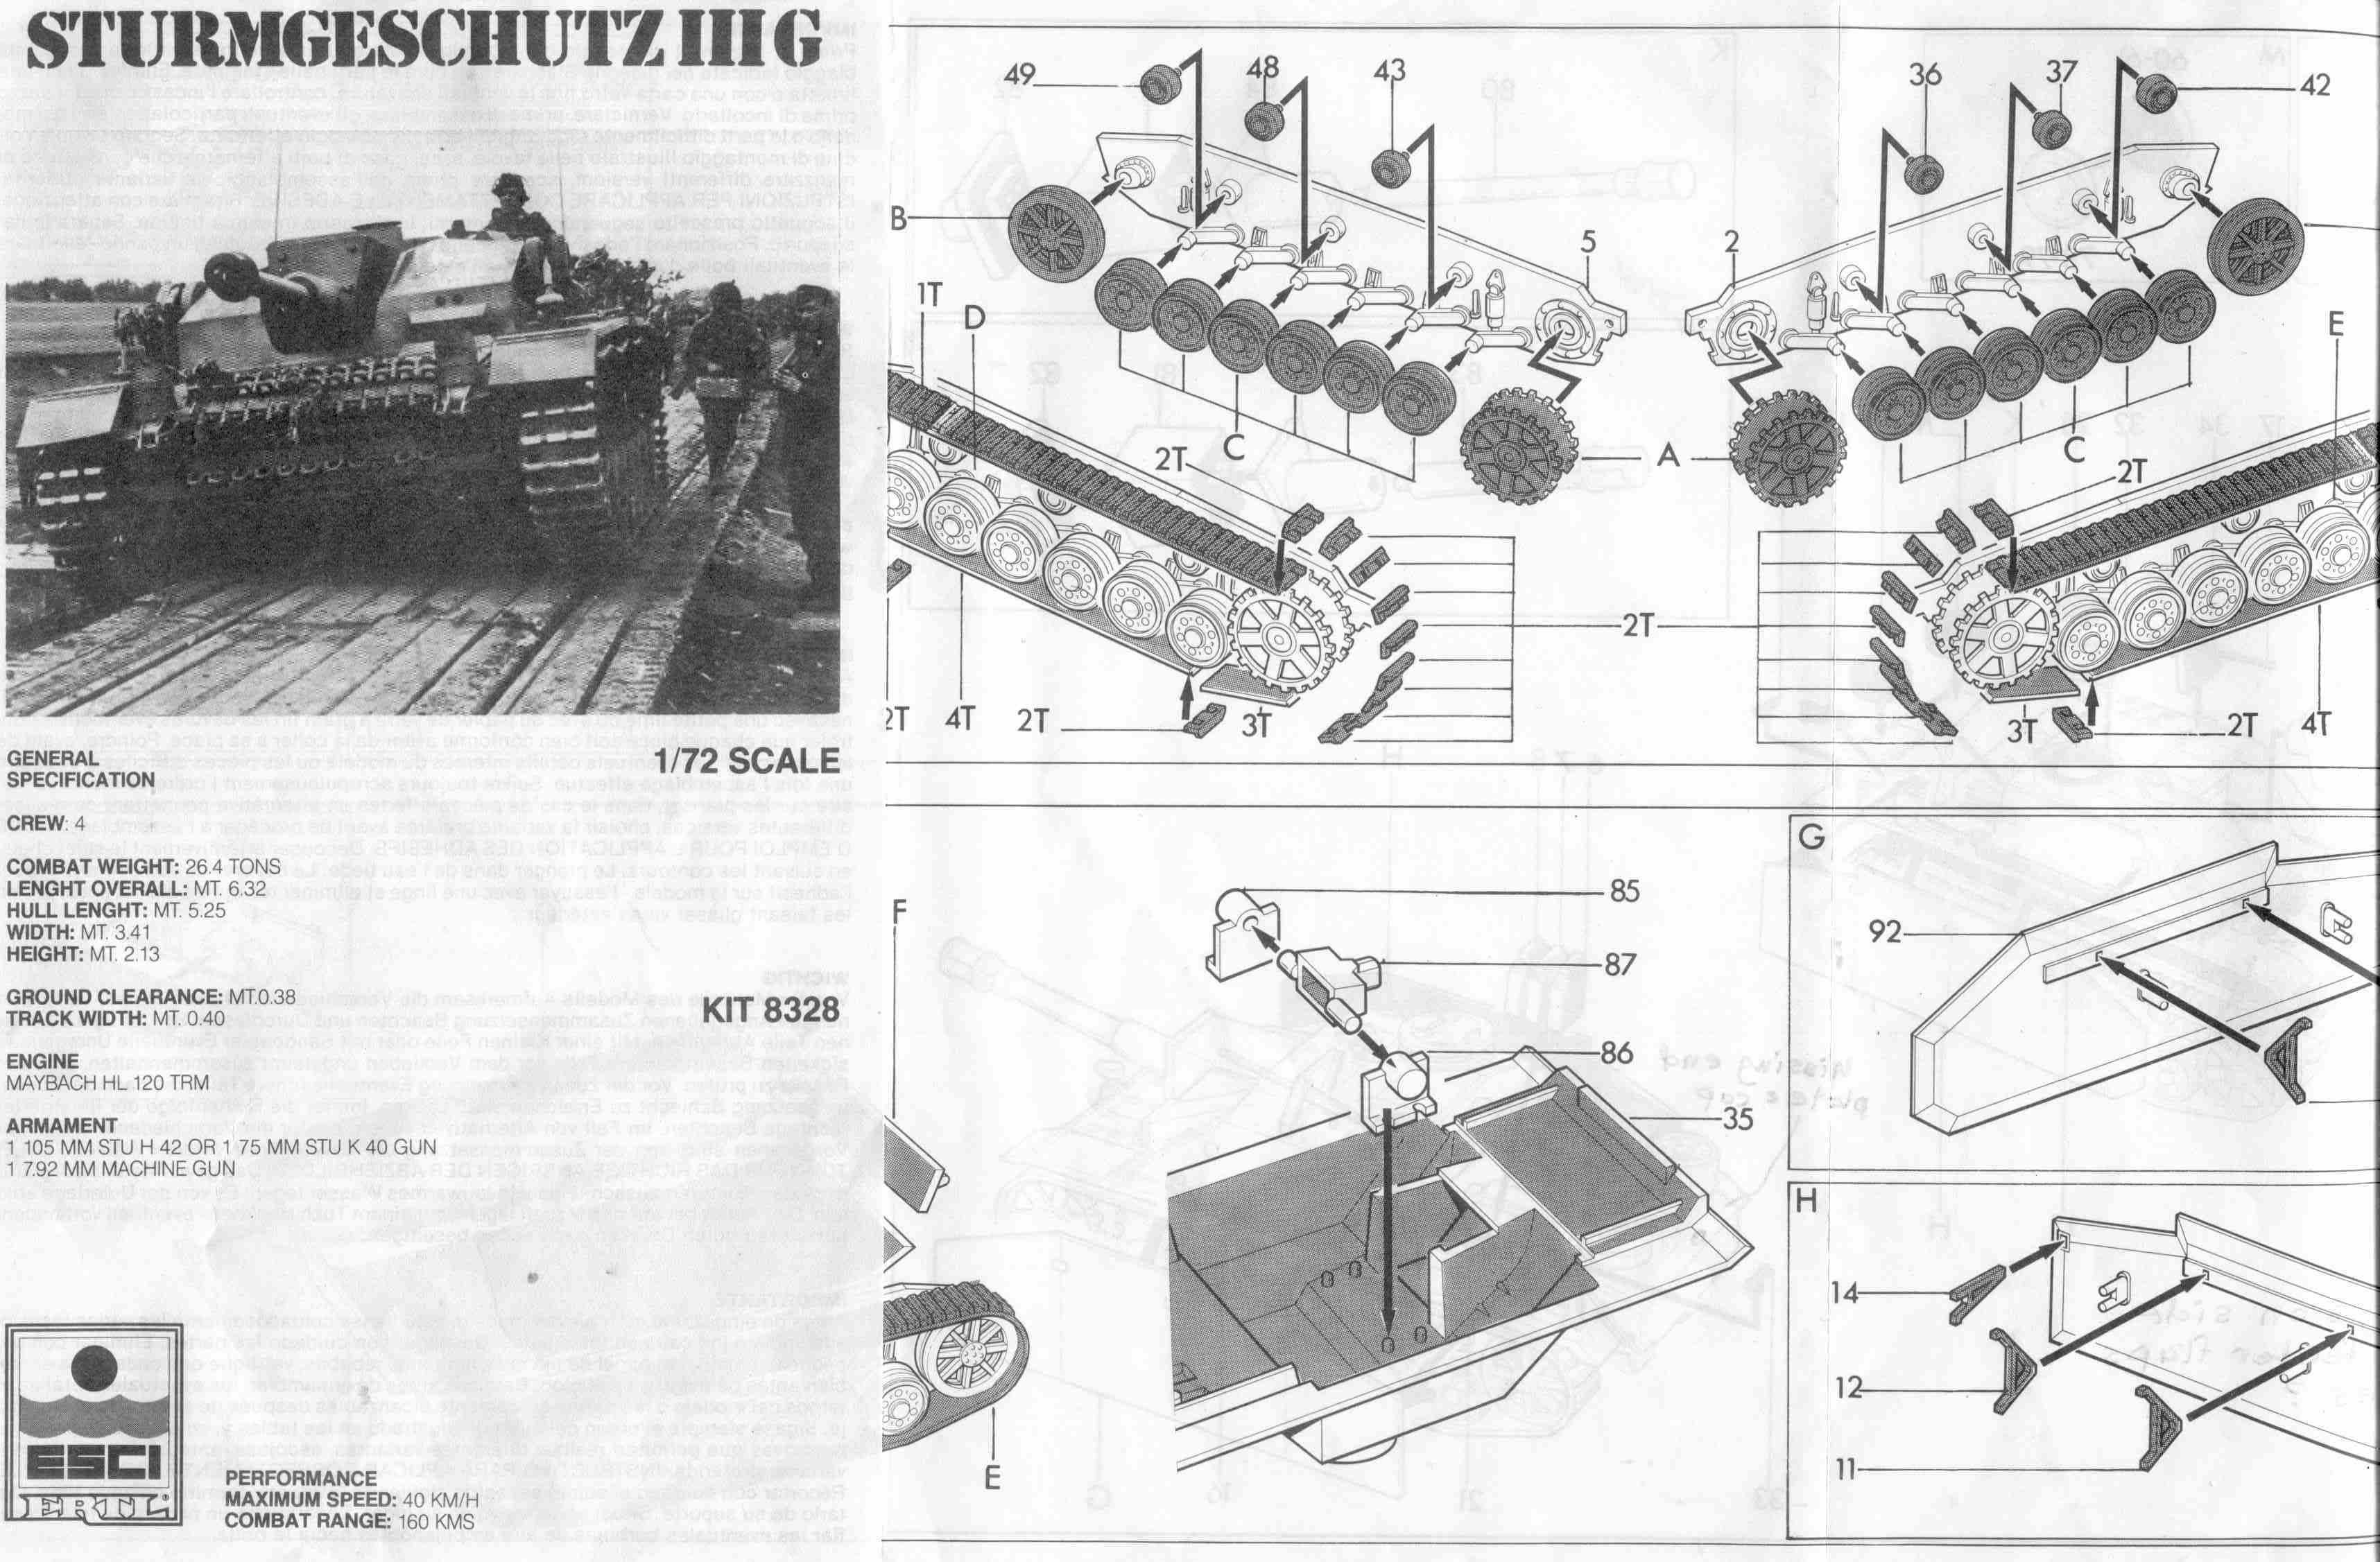
This scan of the ESCI kit instructions show assembly of the wheels
and tracks. The rear idler wheel (part 8) is unfortunately a single
wheel and not two wheels as offered by the Revell, Dragon and Trumpeter
StuG kits. Following these instructions I believe I faithfully installed
ESCI’s link & length tracks, but unfortunately this is
backward from what they are on the real StuG.
This scan of ESCI’s instructions show the final assembly of
the gun mantlet and Schürzen (side shields). A little
historical issue is that these 5-mm thick heavy armor plates were
actually intended to defeat armor-piercing bullets, and not shaped
(HEAT) charges like the US bazooka. The Finns generally did not
use these Schürzen in combat so the issue is mute
here (though I do now have a photo of an early Ps531-17 in Finnish
camouflage and with Schürzen!). A choice of
the 75-mm gun barrel or 105-mm howitzer is given by ESCI, but again,
as the Finns got no howitzer armed StuH 42’s, this choice
is also irrelevant in modeling a Finnish vehicle.
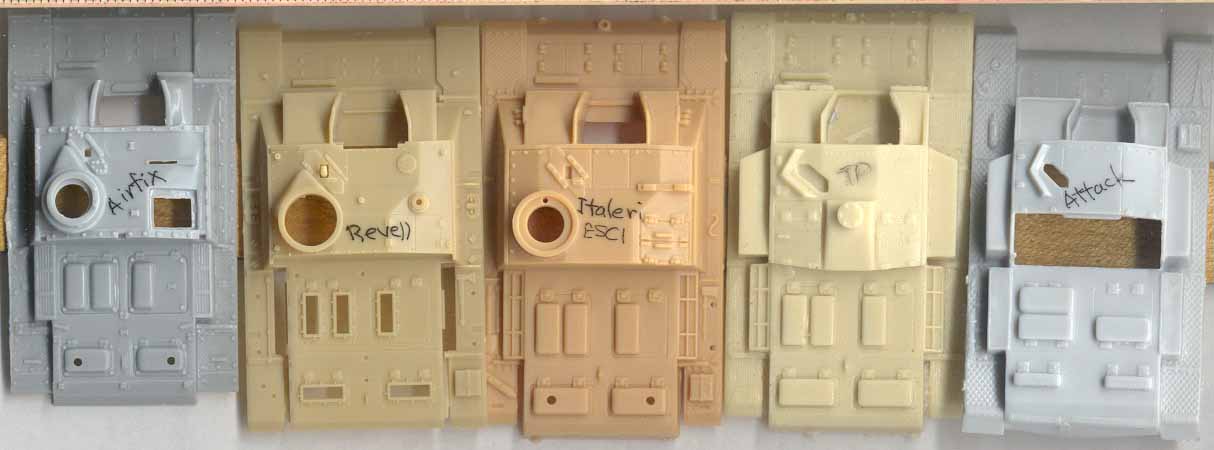
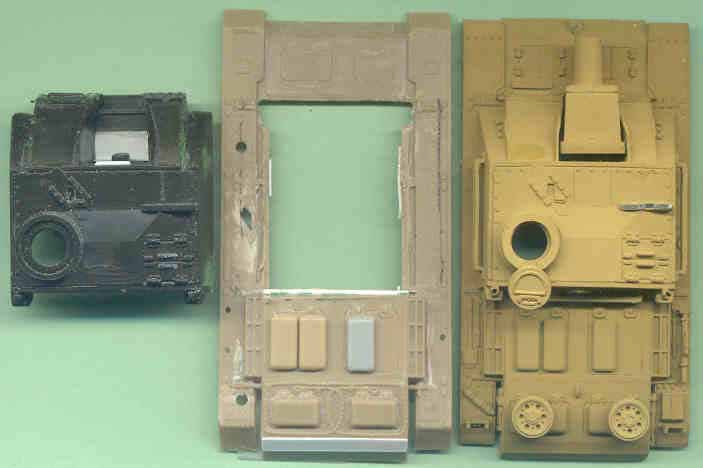
Above is a side by side comparison of five different Sturmgeschütz
kits. Revell’s late (final) version StuG III Ausf. G is second
from the left, with the mid-war ESCI [now re-boxed by Italeri] StuG
III Ausf. G used for this construction review in the middle.

This scan is a comparison of a number of 1/72 scale Sturmgeschütz
gun mantlets, holding the StuK 40 gun’s recuperator recoil
system within an armored box. The top four are the initial welded
box mantlet introduced with the StuG III Ausf. F. The box mantlet
was made with welded plate with a 50-mm armored front piece with
tubular sleeve attached with four bolts to the box. At the very
top is the dark green ESCI mantlet with a gun barrel. Comparing
the ESCI kit to Doyle’s plans and to the two gray mantlets
from Dragon and Trumpeter below it, we see that ESCI’s mantlet
is much too large, the rear plate is much too thick and has no inclination
(slope). For an overhead view see the photo below at Step-1.
The gun barrel is overly thick, has a nasty seam line down the length
and needs to have a thin piece of styrene glued to the front to
correct the shape of the muzzle brake.
The next mantlet and barrel down
is the Dragon offering, much improved and about the best so far
offered. The 3rd one down, is a partially scratchbuilt mantlet I
will use with this ESCI conversion, using a spare mantlet front
from Dragon’s StuH 42 kit. Dragon’s mantlet was used
as a model for this copy. Some detail on the rear face is still
needed. Below, 2nd from the bottom, is Trumpeter’s box mantlet
which is almost comparable to Dragon’s in quality; it is missing
the top weld seams though these can be scribed in with little effort.
At the very bottom is Revell’s yellow plastic Topfblende
cast steel mantlet with coaxial mg introduced in 1944 with a nicely
rendered gun barrel.

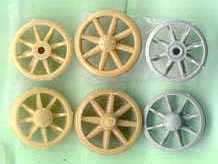
Above are comparisons of the sprocket
wheels and idler wheels from Dragon (in gray styrene), from Revell
(in amber color). The ESCI parts are the dark gray sprocket from
the Sturmgeschütz kit and the oversize amber idler wheel in
the center is from the ESCI Pz III kit. Based on the inaccurate
size and poor detail you can see why I wished to replace these ESCI
parts. I am disappointed in Dragon and Trumpeter by giving little
triangular points for sprocket teeth. ESCI gives us accurate looking
sprocket teeth.
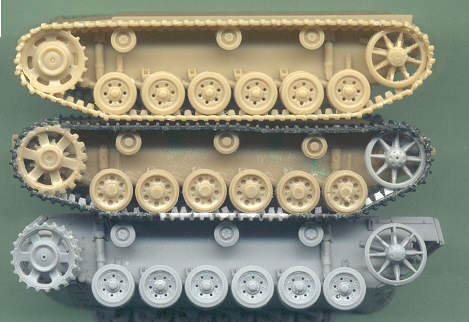
Here is a comparison of three StuG III Ausf. G chassis sides and
suspensions, with Revell at top in the light amber plastic, ESCI
in the center, and Dragon at the bottom in light gray plastic.
Revell’s link & length styrene tracks and Dragon’s
soft band tracks are much, much better than ESCI’s in accuracy,
and ease of assembly. ESCI’s StuG III rear idler wheel was
molded as one wheel with no groove for the track teeth so I replaced
it with a spare set of idler wheels from Trumpeter. The ESCI sprocket
is from the ESCI Panzer III Ausf. M kit, which is much better than
that from ESCI’s StuG, kit, but still not as accurate as that
from Revell, Trumpeter or from Dragon. ESCI’s sprocket’s
hub is too small. While the holes in ESCI’s sprocket are way
too big and too triangular in shape, the holes in Revell’s
sprocket are too small and too rectangular. Dragon has gotten the
sprocket closer to the truth. Dragon’s sprocket teeth are
a bit too small and Revell’s sprocket teeth are even smaller
and annoyingly inaccurate. Amazing enough, ESCI’s sprocket
teeth are closer to the real thing.
ESCI’s Panzer III return-rollers are also molded as one thick
tire, not as two separate halves like Dragon and Trumpeter. I am
surprised and puzzled that the ESCI Panzer III uses hull sides and
idler and sprocket wheels that are different from ESCI’s StuG
kit. I expected more consistency from the company. ESCI’s
hard link & length tracks were for many years the best available
and apparently have been copied by other manufacturers such as Attack
and by TP Models. By today’s standards ESCI’s tracks
do not compare favorable to Revell’s link & length or
Dragon and Trumpeter’s band tracks. ESCI’s tracks have
no inside link detail or track teeth. For my assembly I added track
teeth (made from styrene strip) on the lower, more visible run of
track.
3. CREATING
A FINNISH STURMI
The goal is to create a rare Sturmgeschütz built by M.A.N.
on the Panzer III chassis, of which only one was shipped to the
Finnish Army in 1943: vehicle Ps.531-17. Considering
the challenging kit I work with here I will not be attempting to
make a Gold-Medal winning model but a reasonable and representative
Finnish Sturmi. The features of this vehicle is the deep wading
exhaust system on the rear; on the bow are different sized brake
access hatches with no external hinges. The major differences of
this M.A.N. StuG from the typical StuG III Ausf. G of the period
would be on the engine deck and chassis. The upper superstructure
would be the same as other StuG’s manufactured at this time:
a welded box mantlet & machinegun shield. One photo of Ps531-17
after being destroyed shows the upper bow supplemental armor plate
blown away exposing two holes for the Panzer III’s brake ventilation
fittings that had been covered by the 30-mm armor plate. Finnish
StuG’s do not appear to have smoke dischargers but did have
many modifications particular to Finnish service.
Step-1
With the conversion process to a StuG III on a Panzer III chassis
underway we see the dark gray superstructure from the ESCI/Italeri
Sturmgeschütz kit at far left. In the center is the upper hull
with engine deck from the ESCI Panzer III Ausf. M kit. At far right
is a partially completed ESCI StuG upper hull built out of the box,
for comparison. In this case the Panzer III chassis had to be used
due to the Pz III’s different brake access hatches from the
StuG III chassis. The center Pz III hull has had the superstructure
cut away so as to accept the StuG superstructure. ESCI’s engine
deck vents on top are a little small and molded to the deck so there
is no undercut. After sanding the vents down about half way, three
spare vent covers were taken from a Revell and a Trumpeter StuG
kit to improve the accuracy and then were glued down over ESCI’s
vents. The two rear-most vents were not replaced since the large
storage box common to Finnish StuG’s will cover this area.
On the unmodified ESCI hull at far right note how unacceptably too-large
gun the mantlet is. We also see grab handles on top of the loader’s
hatch which is a pretty rare feature; there were grab handles on
the inside though. The underside of the commander’s hatch
is missing the padded cushion and we might perhaps want to install
a periscope gunsight. The Pz III hull in the center has a towing
cable molded into the engine deck; this cable will need to be scraped
off as StuG III Ausf. G’s put their tow cables on the track
guards. Note that on the Pz III’s rear a white plastic armor
plate has been glued on to improve accuracy.
Step-2
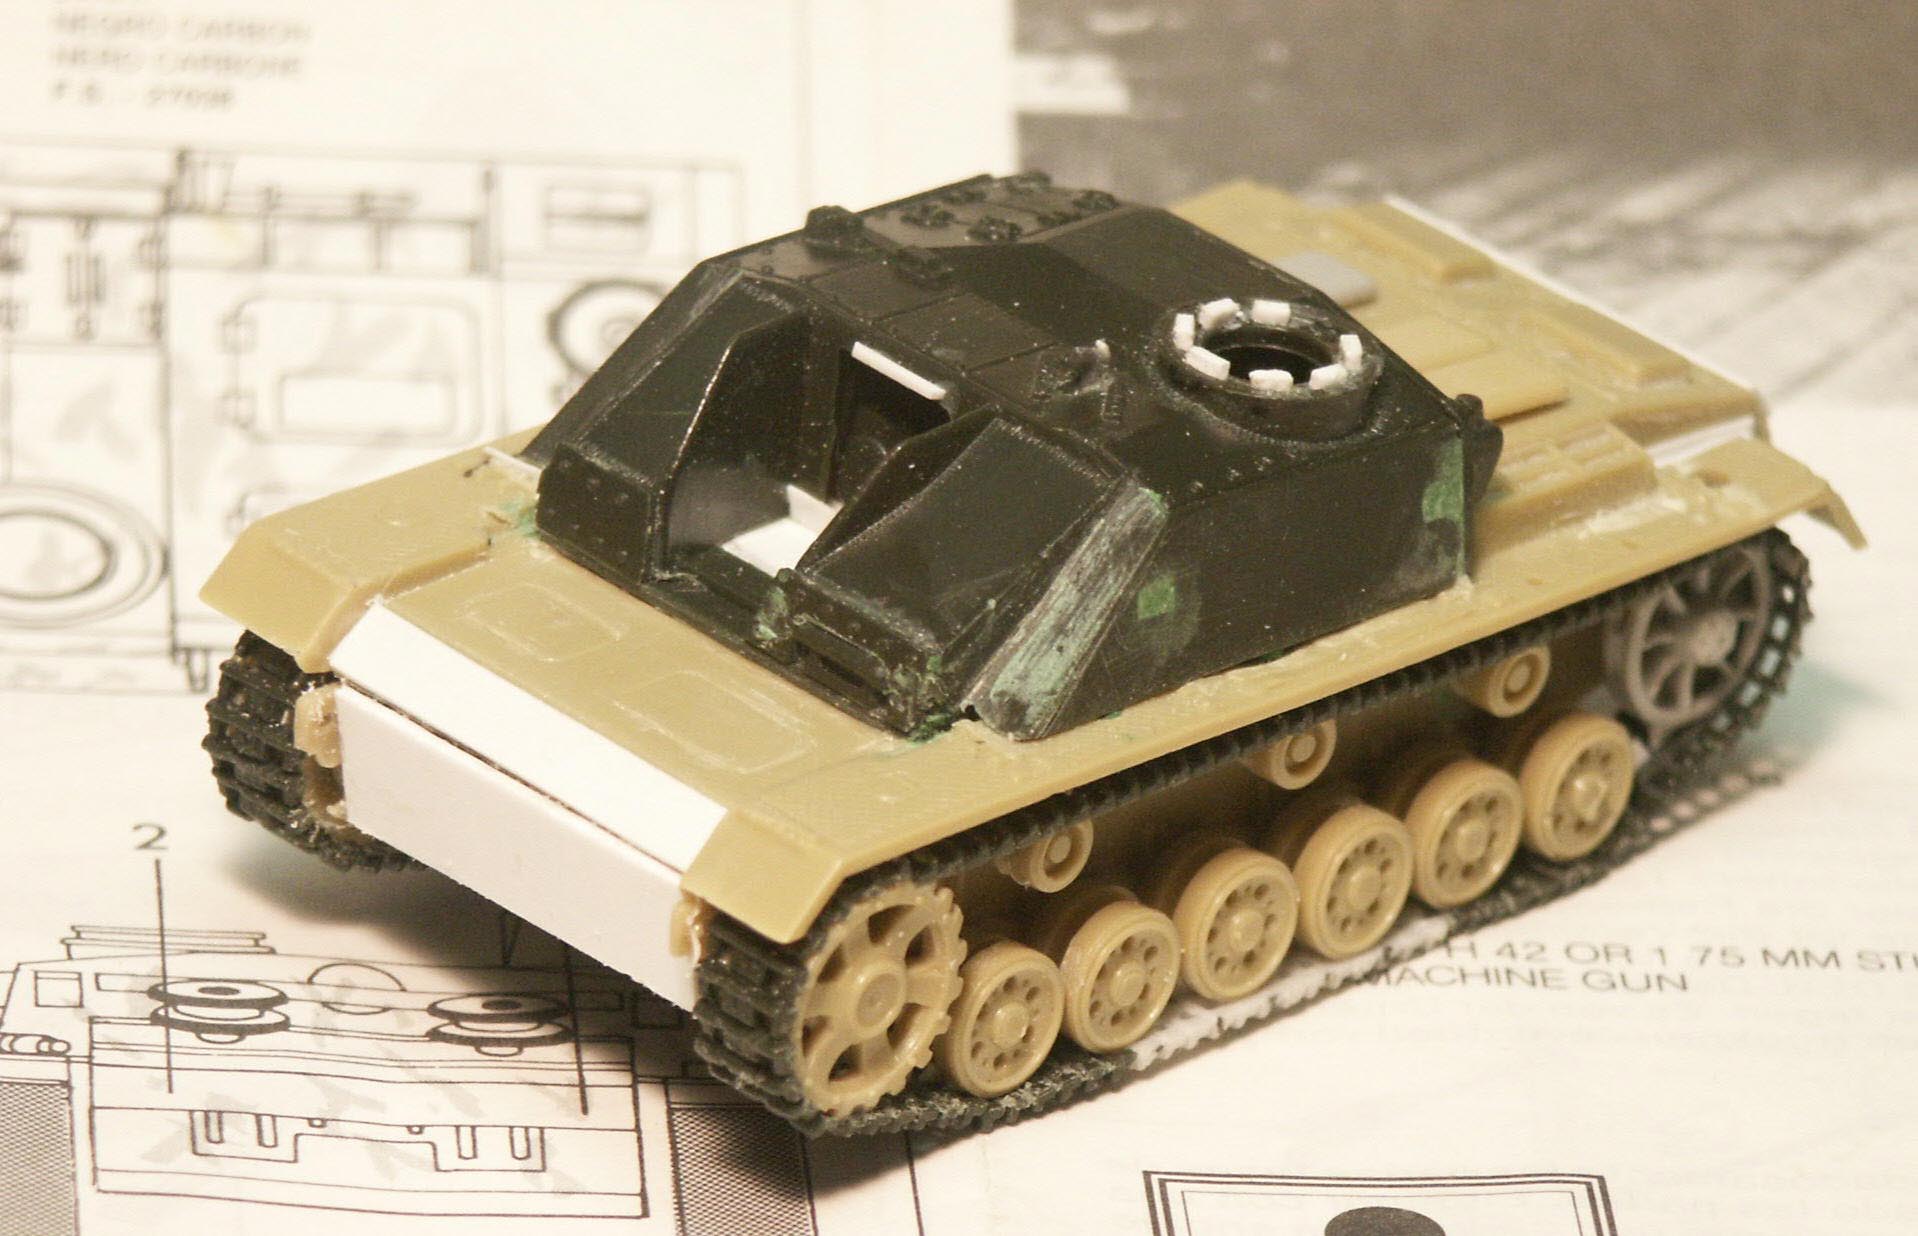
This is the left front of the ESCI model with the suspension and
tracks assembled. Additional welded-on supplemental armor plate
has been added to the bow in the form of white styrene sheet. According
to Spielberger this was typical feature of the Sturmgeschütz
built on the Panzer III chassis. The opening for the main gun has
had an additional plate added to the deck and some other armor strips
around the sides and top. Around the cupola pieces of plastic have
been added to represent the periscopes. On the front of the panniers
the poorly rendered smoke discharges have been scraped off. On the
sides of the panniers the holes for the kit’s side track-holders
(parts 15 & 16) have been filled in.
Step-3
A photo of the left rear quarter shows a little more development
with the large Finnish storage box and support frame added to the
rear, the armor plate just below the box, and ESCI’s Panzer
III Ausf. M deep-wading muffler improved with some styrene pieces.
The crew compartment exhaust vent has been replaced with a brass
part from Part company. This is a good view to see that the ESCI
Pz III sprocket is too wide coming almost out to the edge of the
tracks.
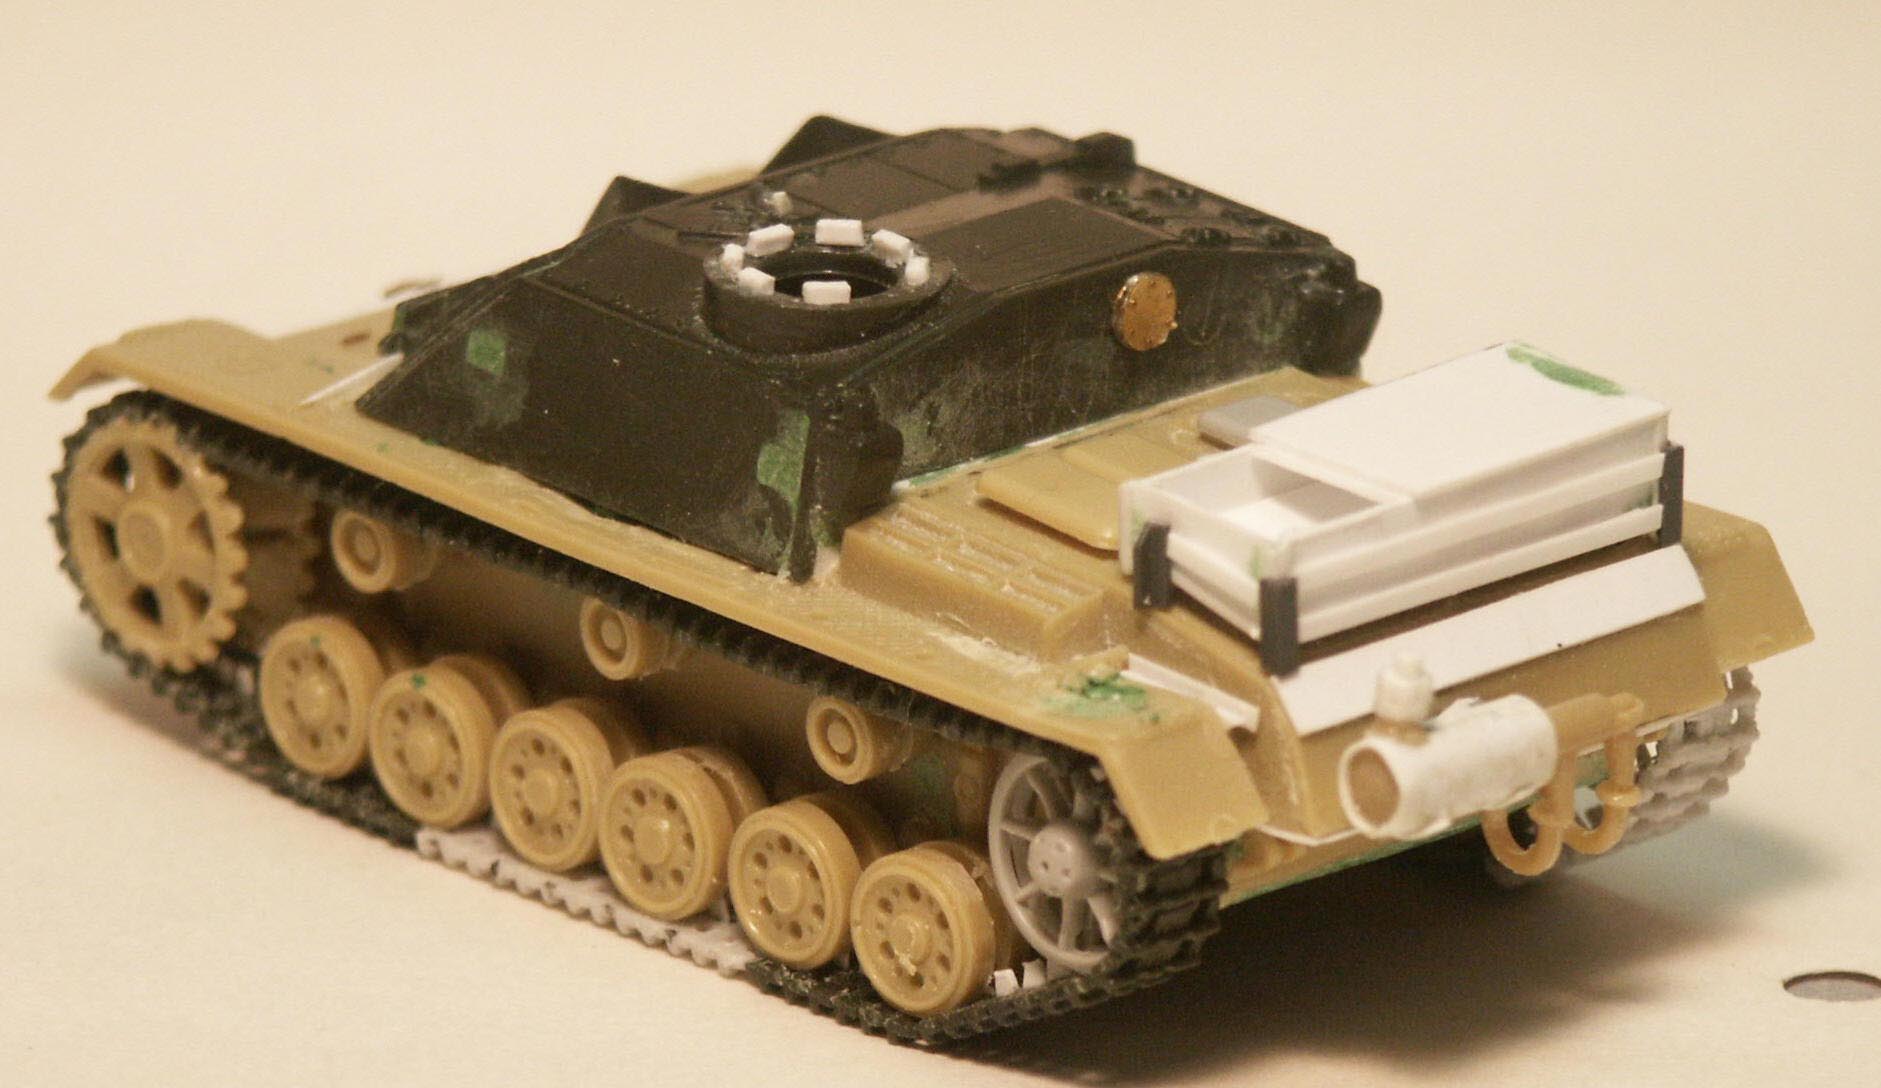
Step-4

At this stage the spare track links have been added to the rear
of the superstructure, and the spare roadwheel holders added to
each side of the superstructure sides (as seen in the photo of the
Finnish Sturmis at the beginning of this review). The spare roadwheel
holders on the side were one of the first modifications the Finns
did. The roadwheel holders have been made from brass strip glued
with super glue and painted with a white primer. The ring over the
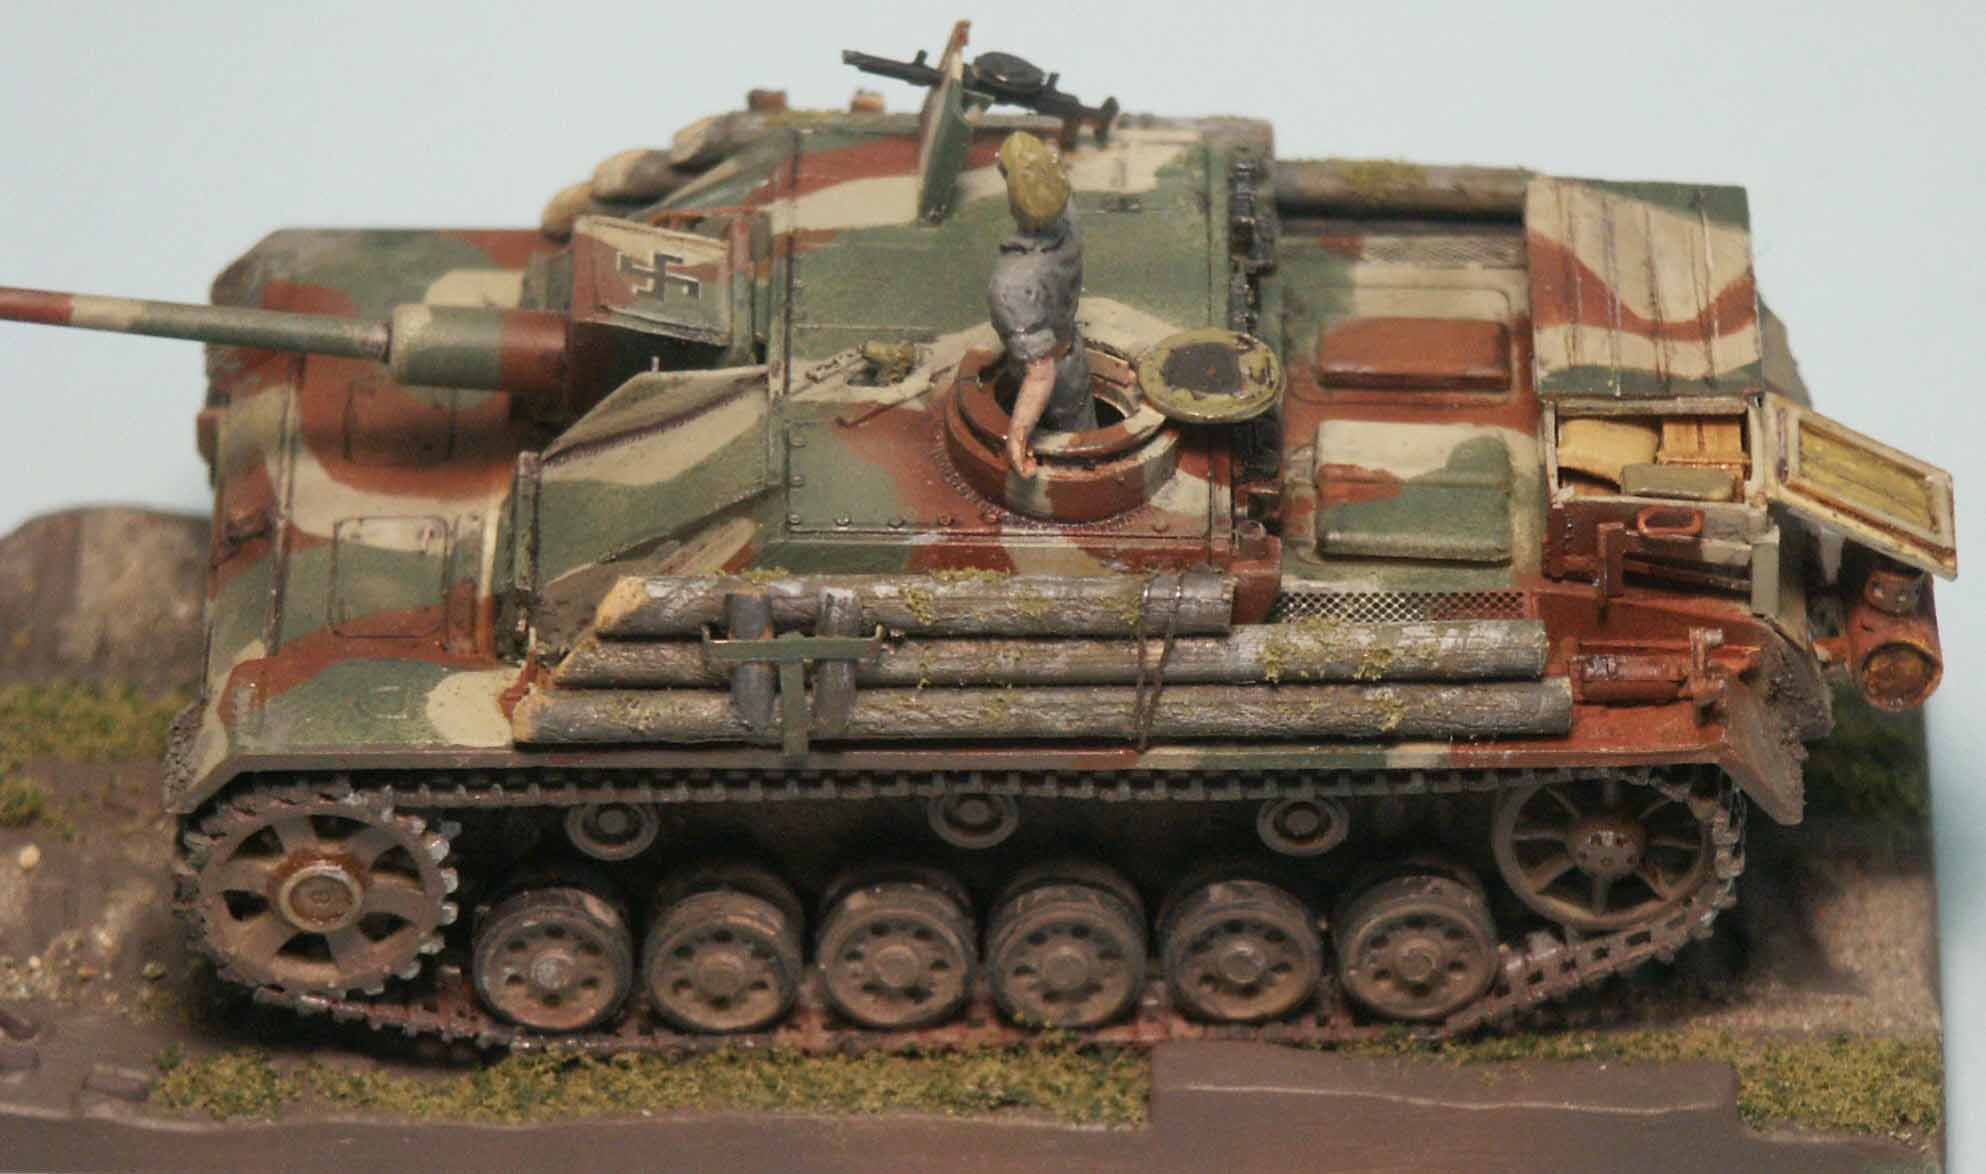
cupola periscopes has been installed.
The unpainted logs have been added to test their fit. After final
painting of the vehicle and the logs the latter will be glued on.
Note how the spare roadwheel bracket is used as the front support
to hold the logs on. These logs mean that many of the tools that
were mounted on the track guards have to be removed (likely stored
in the wood box on the stern?). Later variants had the logs mounted
with metal straps. See Andreas Lärka’s website for more
details on these logs. On the rear of the left track-guard a fire
extinguisher and the kit taillight have been added.
Step-5
At this stage we have the 3-tone camouflage pattern, prior to the
dark wash, final detailing, decal markings and weathering. Mr. Lärka
states that the Finnish camouflage pattern was hand painted and
had a hard edge. Based on the photos I’ve have studied I have
noted that none of the Sturmi’s were the same. The pattern
for this Sturmi was a compromise based on photos and diagrams from
Andreas Lärka’s website. I had contemplated using Silly
Putty for demarcation of the colors though feared the putty
would take off or damage tiny details. After painting on my interpretation
of the Finnish light gray (a gray color similar to Poly-S concrete
color acrylic paint) and allowing the gray several days to
cure, painter’s tape was carefully cut to shape and
applied over the gray; then the green was sprayed on. Allowing several
days for the green paint to cure, more tape was applied to protect
the green areas and the final color of brown was sprayed. The tape
worked well and no paint was pealed up when the tape was removed.
The Finnish green and brown appeared in contemporary museum photos
to be close to Poly-Scale Panzer Olive Green and Panzer
Brown so these are what I used. Mr. Lärka advised me that
the brown should be more of a chocolate color.

The exhaust muffler color is too close to the brown in the camouflage
scheme so for more color contrast this color will have to be modified.
The storage box on the stern and the commander’s hatch are
opened. Based on another modeler’s Sturmi I modeled the box
opening forward. Mr. Lärka later corrected me in stating the
box opened to the rear. The spare track on the rear of the superstructure
is painted gunmetal gray for nice contrast with the camouflage colors.
In these photos we can see that with the holes in ESCI’s roadwheels
not being all the way through, we’ll have to add a black wash
into these holes to add some depth.
On the front side of the pannier is a metal bracket for storing
spare roadwheels as seen in the black & white photo at the beginning
of this article.
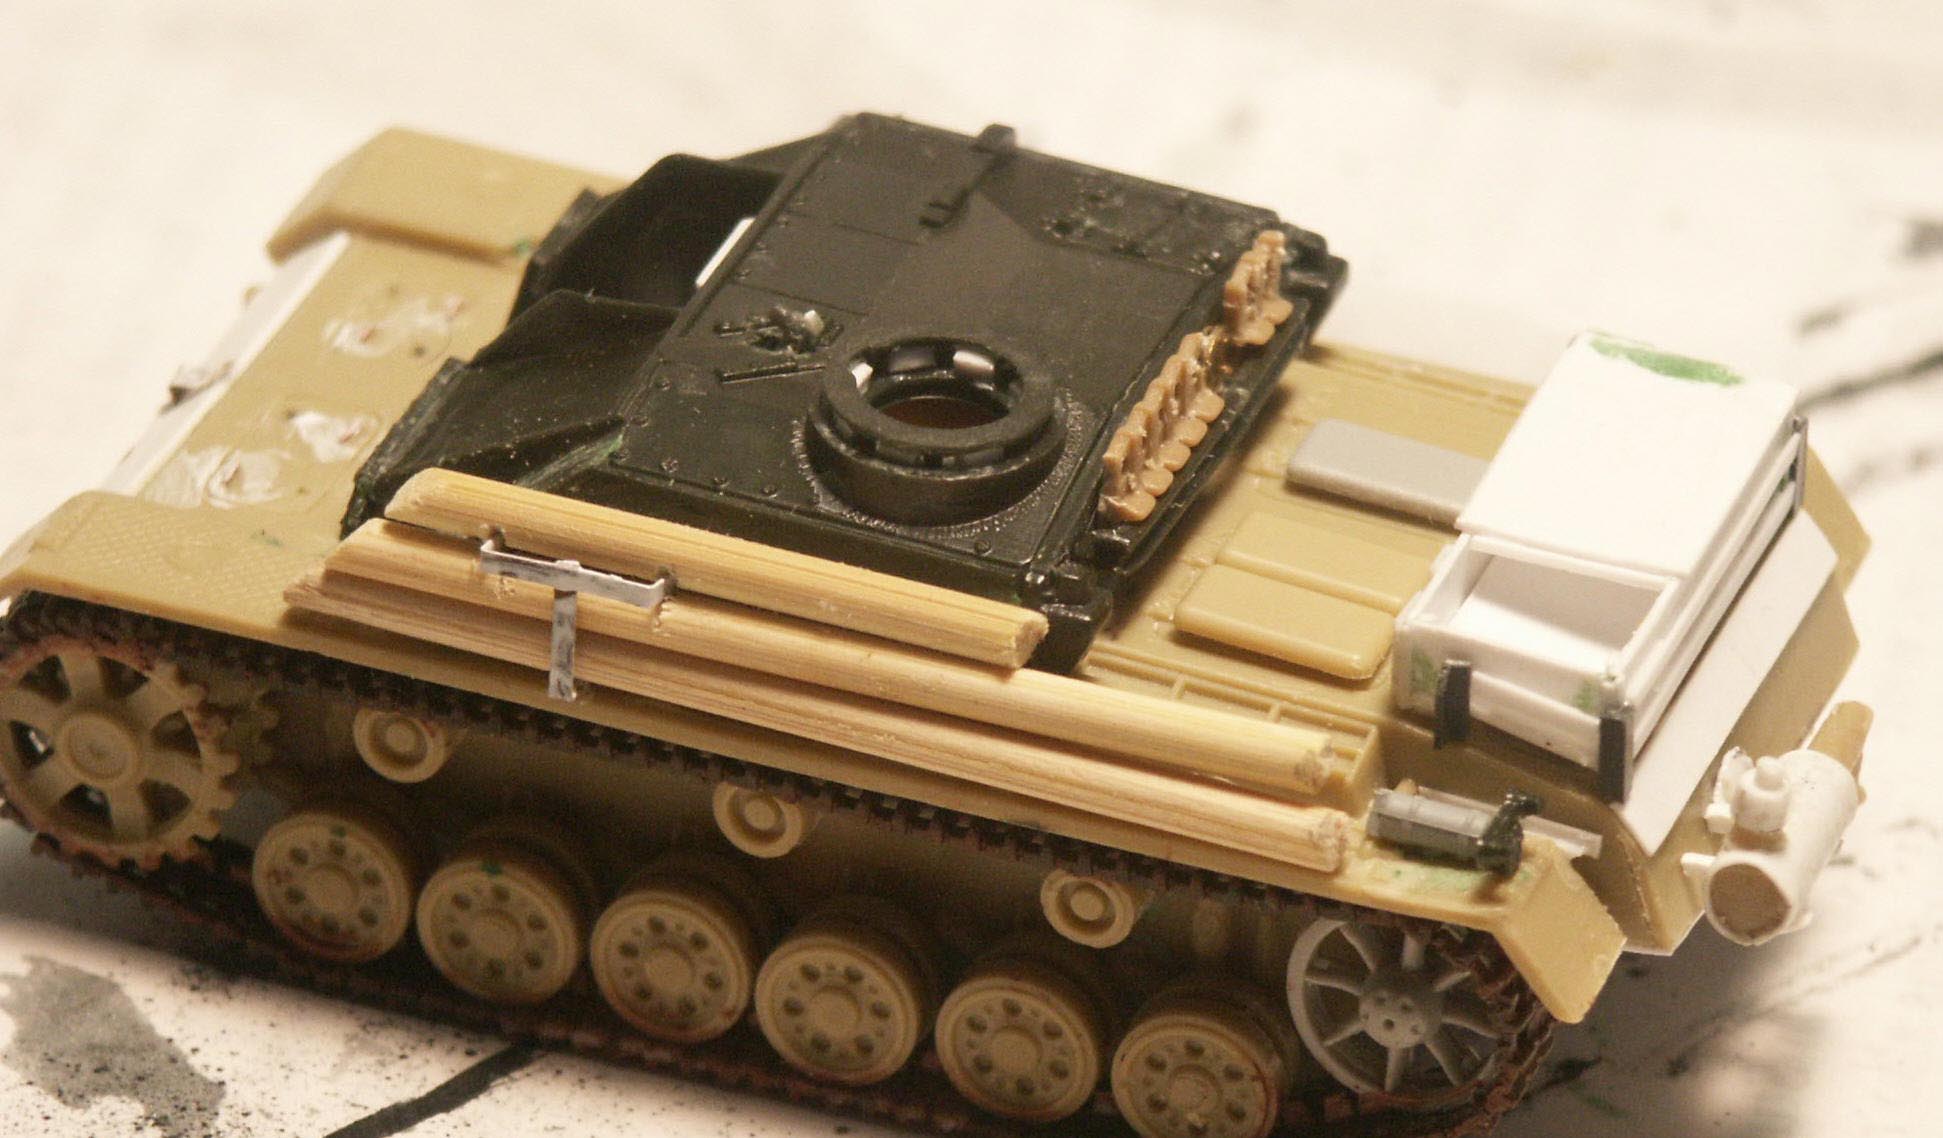
Step-6
In Step 6 here we have the addition of the log-armor on the sides.
As seen in WW2-period photos the spare wheel holder is used to help
hold the logs, the rear of the logs appears to be held on with steel
cable. Later Sturmis would have a different set-up for holding the
logs. The logs would mean that the tools stowed on the track guards
would have to be removed, likely going to the storage box. The above
two photos show the metal frame holding the box onto the engine
deck. The box would have to be removed to work on the engine, hence
the handles on the side.
Here we have the completed weathering using light sprays of water-based
dark wash, dark soil-color, paint pigment powders and pastel powder.
The commander figure is from the Revell Afrika Korps set
of soft polyurethane figures. The tracks and sprocket teeth have
been touched with silver paint and graphite to represent wear of
the steel. This photo was taken after correcting the storage box
lid to open to the rear and adding handles to the sides of the box.
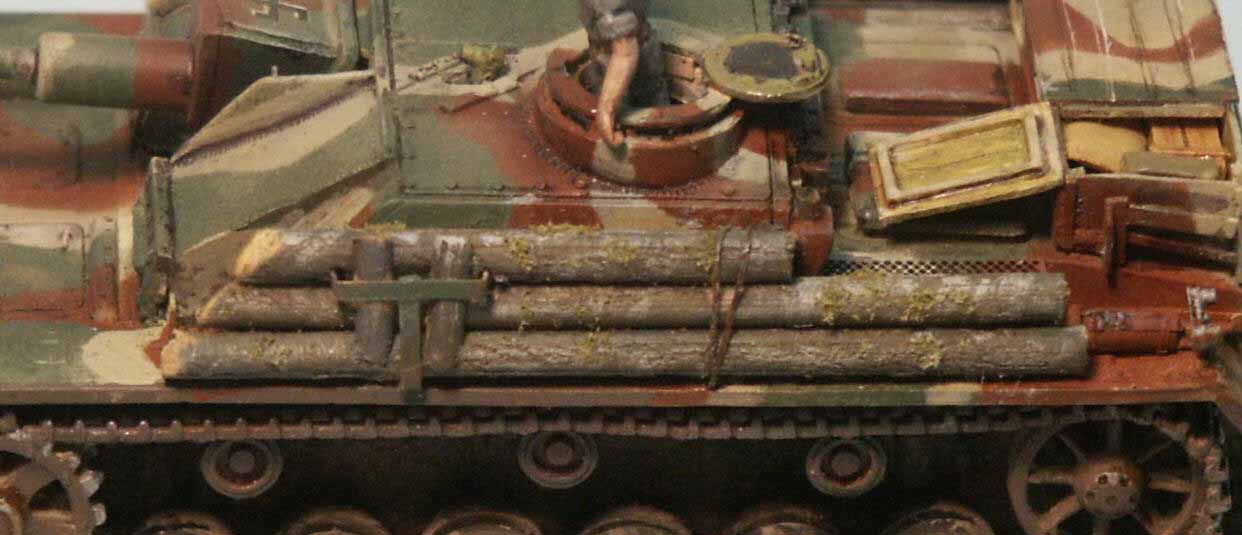
A close-up view of the left side of the Sturmi. The storage box
still has one lid opened incorectly forward, showing items stored
inside. The logs are made from wooden hibachi skewers scraped with
the side of a saw to create bark-like texture, then painted gray
(tree bark tends to be gray, not brown), given a dark brown
wash, and then light-gray drybrushing. Using dappled white glue
to hold it, light-green flocking was sprinkled on the logs to simulate
moss, typical of forest hardwoods.
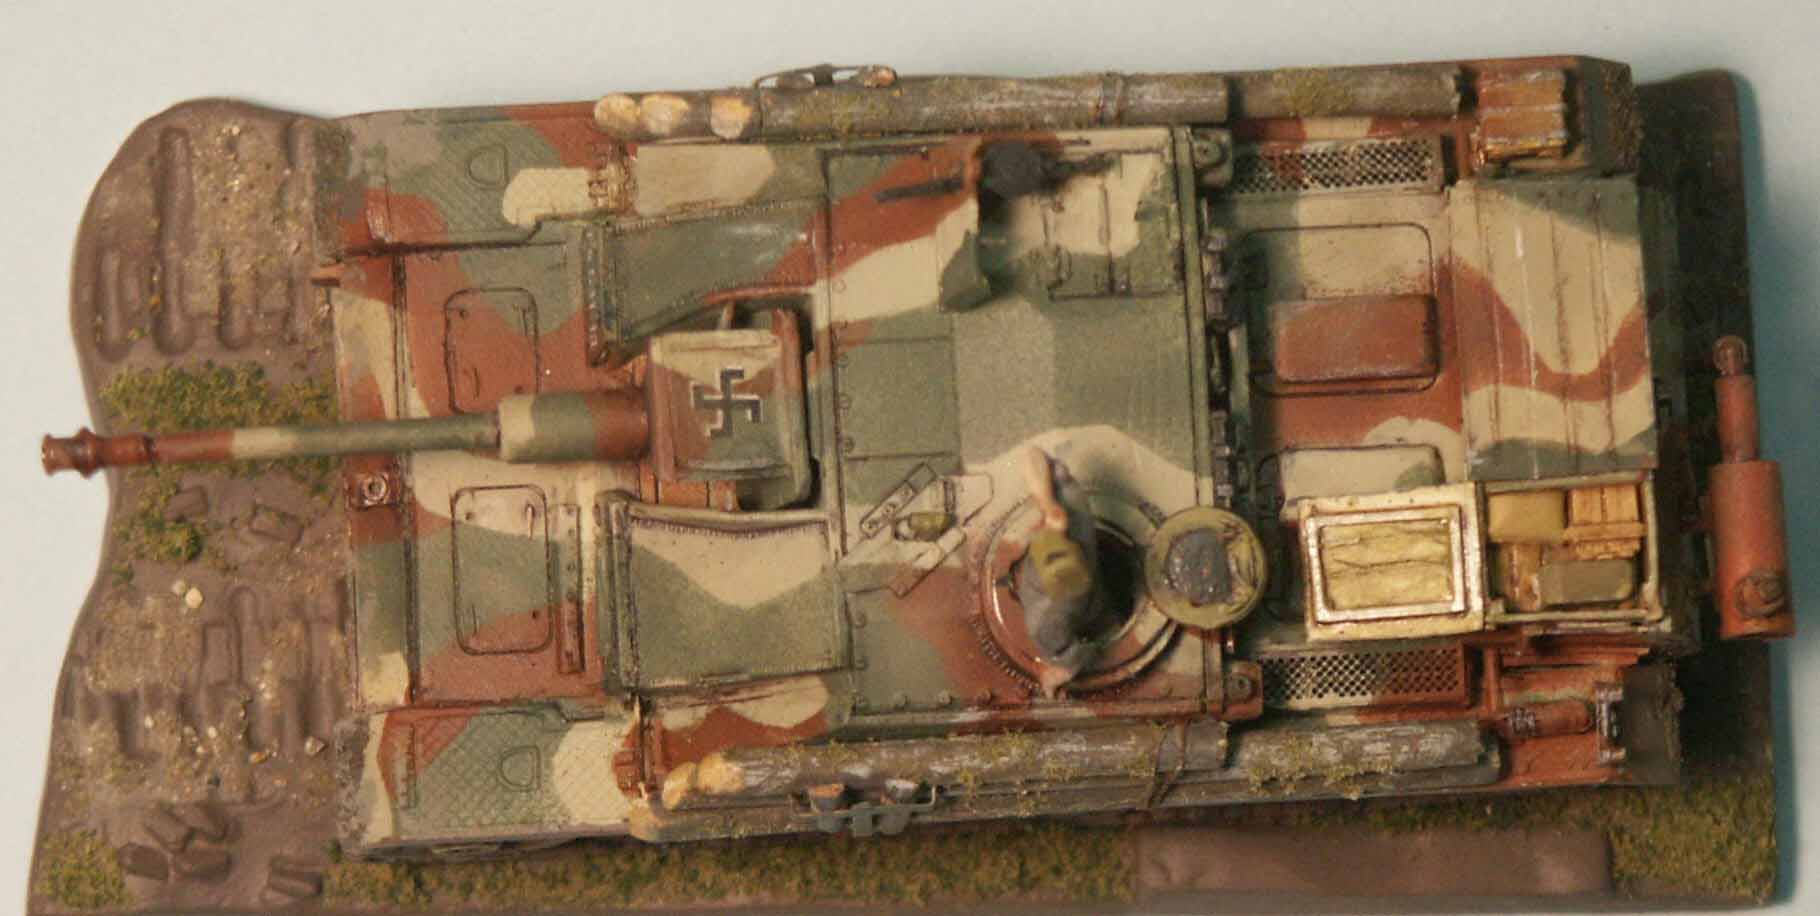
Overhead view of the completed Sturmi with the features of the Finnish
Sturmi evident: the logs on the side, the storage box on the rear,
the Hakaristi on the gun mantlet, and the Soviet DT machine gun
(taken from a PST KV-1 tank kit). This photo was taken before I
corrected the opening of the storage box. We can also make out the
features of the Sturmgeschütz built upon the Panzer III chassis:
the deep-wading muffler at the rear and the single maintenance hatches
with internal hinges at the bow (the typical StuG has two-part maintenance
hatches with prominent exterior hinges). The inside surface of the
open commander’s hatch is painted in the German panzer yellow
color to remind us where this vehicle originated.
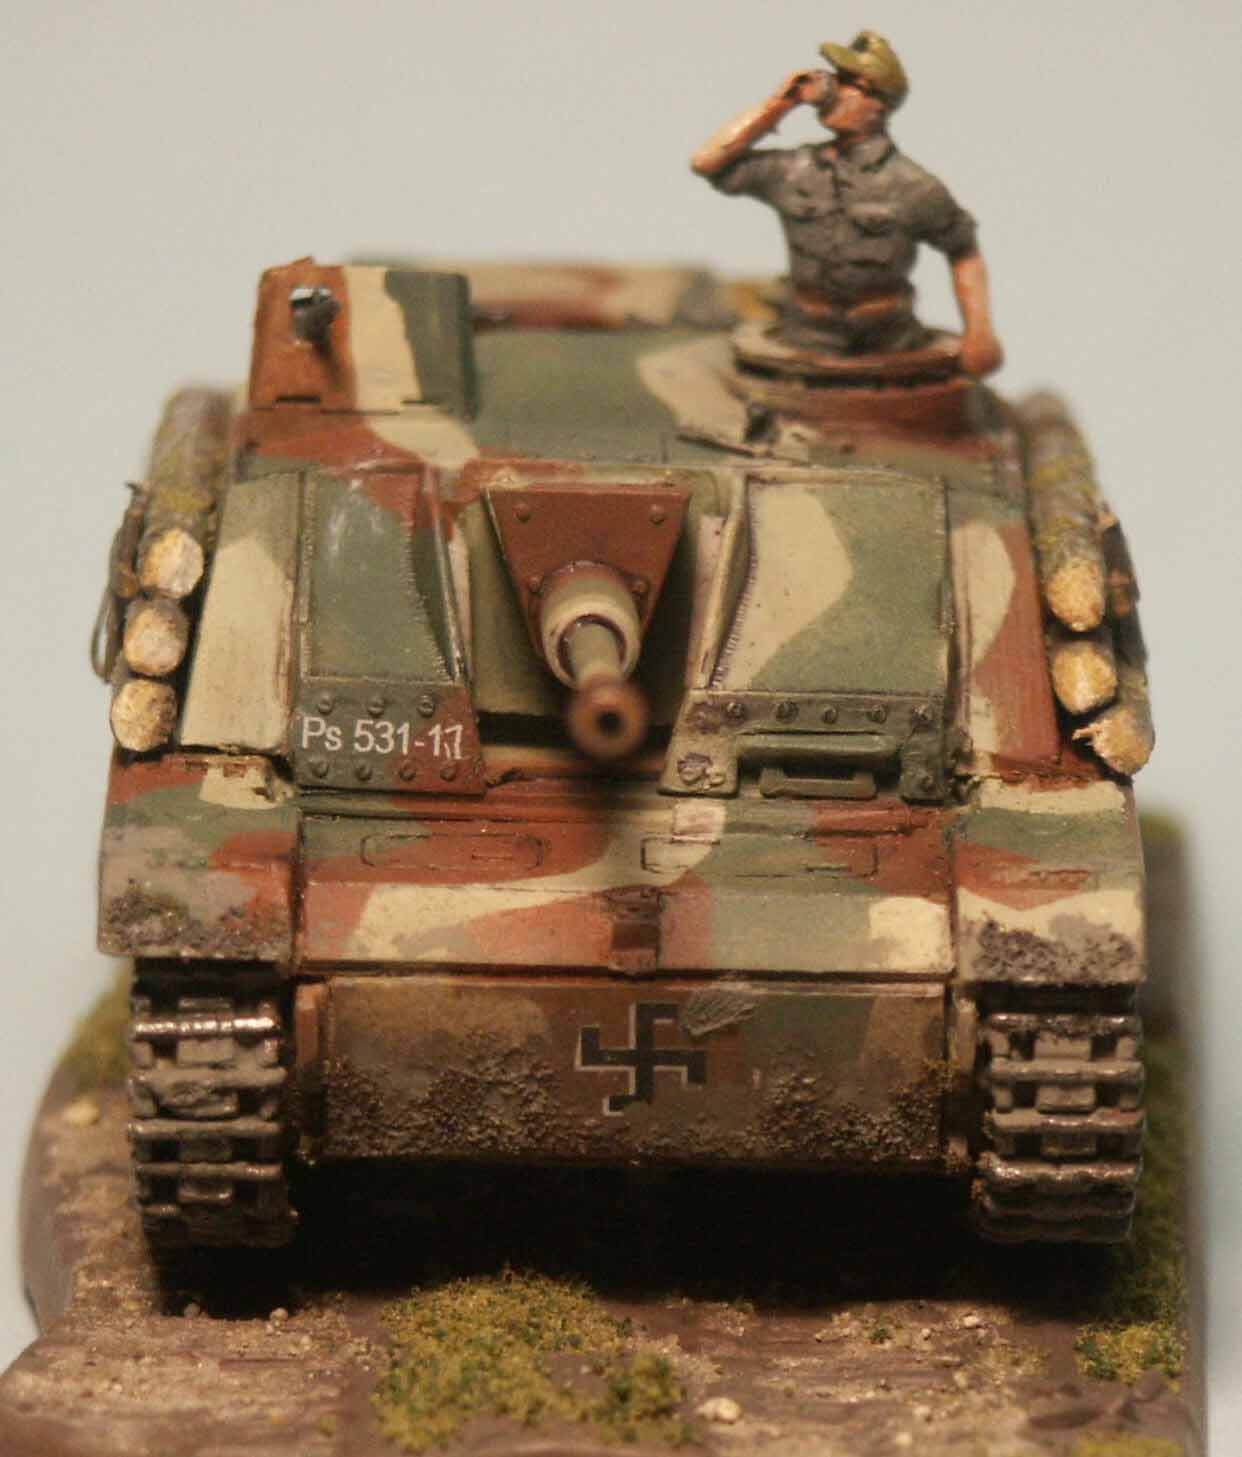
A bow view of ESCI’s Sturmgeschütz kit ‘Sturmi’.
Mud weathering has been applied to the bow and on the tracks to
somewhat mask the mediocre track detail. On many models I have noted
that the periscopes are often ignored and left in the green or tan
base coat, or portrayed poorly with dark paint. I have had good
fortune with simulating periscope lenses by cutting strips of exposed
camera film and gluing the strips of film over the periscope lens
using white (Elmer’s) glue. Add these shiny periscope-lenses
last so that any flat paint or dullcoat does not cover them.
The Finnish markings are water-slide decals from Aleran Miniatures
sheet AX-2 Axis Minors. The decals were applied over an acrylic
clear gloss coat, then sealed with a coat of acrylic dullcoat tinted
with dust-colored acrylic paint to mute the colors below. This set
included markings for two Sturmi, one from the 1943 batch and one
from the 1944 batch. Markings for this vehicle, P531-17 is not included
so was improvised from two different vehicle numbers. The numbers
were so small I did not notice that the number 7 was crooked until
the decal was dry and sealed, alas! Note the welded on supplementary
bow armor. The Notek light was not added to the bracket in the center
of the bow.
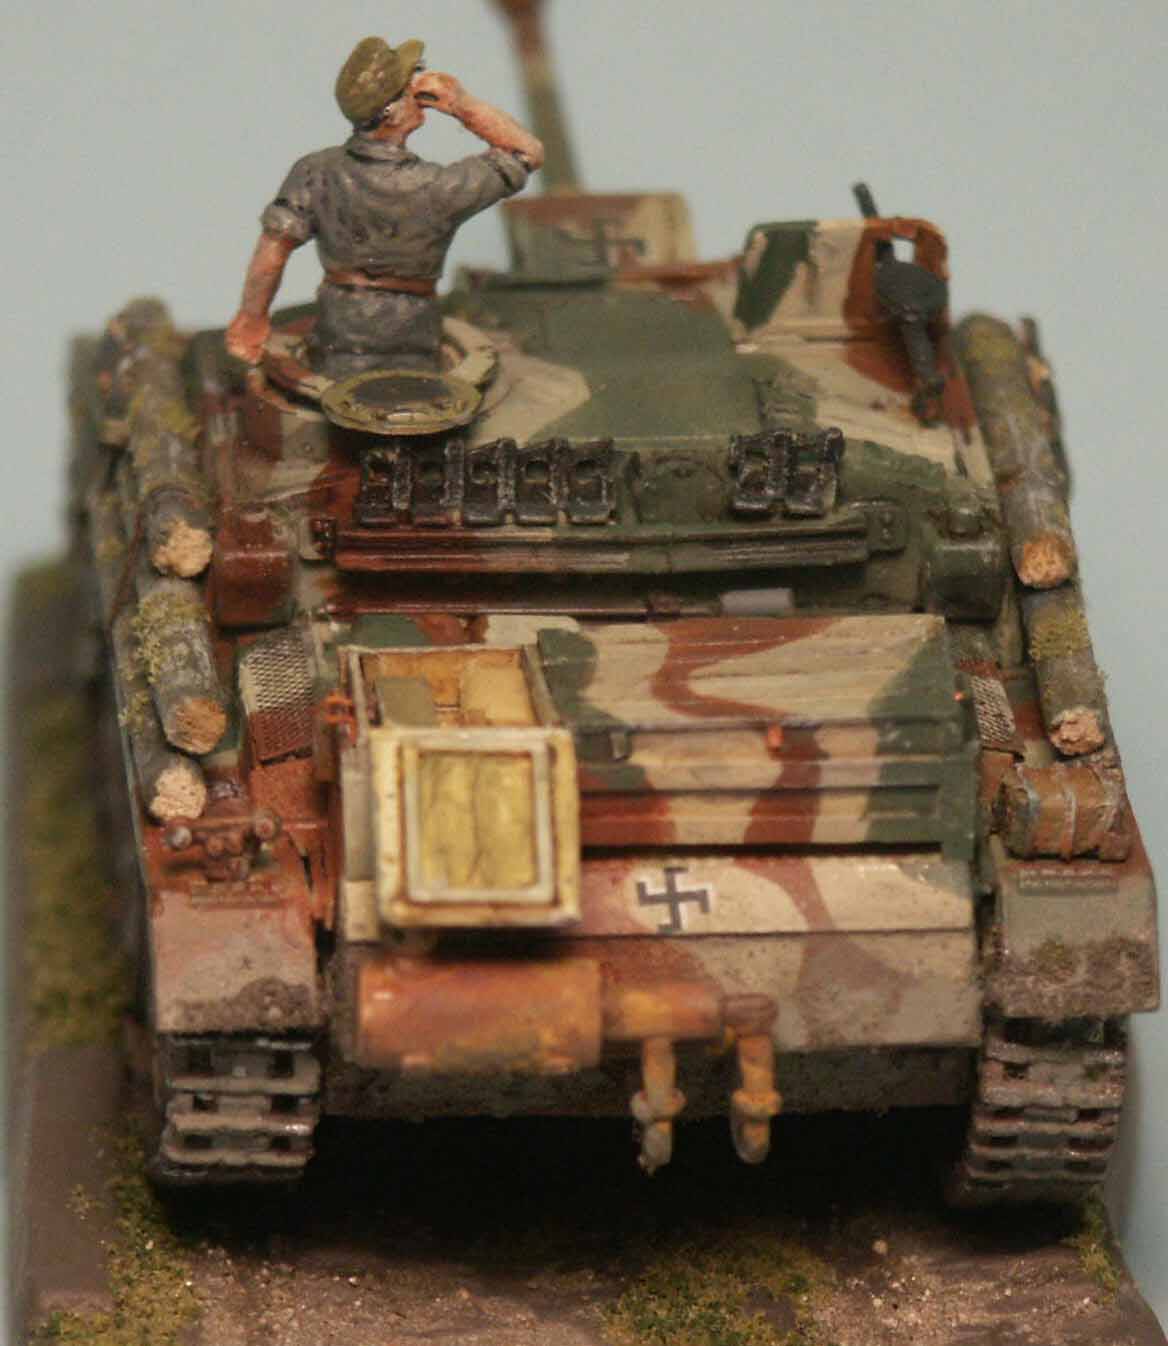
A stern view of the Sturmi after correcting the storage box lid
and adding wire handles to the port and starboard sides of the box.
The muffler on the stern has been weathered with some orange and
maroon pastel powders to represent a heat-rusted muffler. The stern
plate should also have a vehicle number Ps531-17 but unfortunately
the Aleran decal sheet only comes with one vehicle number
per vehicle.
Overall I think this model
is best appreciated from a distance, it would not do well at an
AMPS contest.
4. CONCLUSIONS
Overall I am happy with my Finnish Sturmgeschütz. It is certainly
no award winner based on the poor old ESCI kit I used and its influence
on me to not do my absolute best. A much better example of this
version of the Sturmgeschütz could be made using parts the
Revell Panzer III Ausf. M kit and either the Trumpeter or the Dragon
StuG Ausf. G kits. My feelings these days are that the ESCI (Italeri)
StuG model is best relegated to wargaming rather than being used
as a display model.
As a Finnish Sturmi during mid-1944, the presence of the side logs
and the camouflage pattern were speculation on my part; both were
done before I acquired photos of the real Ps531-17. Most of the
photos I’ve seen of the 1943 batch of Sturmis show them without
the logs on the side. According to Mr. Lärka these logs were
added after July 2, 1944; and this Sturmi number Ps531-17 was destroyed
earlier, on June 15, 1944. It is not clear in my Finnish Sturmi
resources if any of the modifications of the logs on the sides,
or concrete supplemental armor, etc. were used prior to the official
order of July 2. Based on photos of Ps531-17 that Mr. Lärka
has sent me, both before and soon after it was destroyed, this Sturmi
did not have the logs, and did not have concrete supplemental armor.
It did have the side holders for the spare roadwheels. Considering
my errors perhaps consider this article to be a guideline on how
not to build this particular Sturmi?
5. MODELING RESOURSES
[1] http://www.andreasLarka.net/assaultguns.html
A fantastic website devoted to the wartime and post war use of the
Finnish Sturmi, with many photos, thanks to Mr. Andreas Lärka.
(At the end of my painting of the assembled model I received a helpful
message from Mr. Lärka noting some errors on my model of Ps531-17.
Mr. Lärka’s comments are below:
[quote] “- Most
of the 1943-batch Finnish StuGs had the bolted on extra armour.
Only one had the welded on extra armour (Ps.531-17) the rest
had the new all-welded 80mm substructure [i.e. lower glacis
plate - Ed.] (not only Ps.531-30).
- Everything on the Karelian
Isthmus is "near Tali-Ihantala". The Isthmus is quite
narrow. The parade you are referring to took place in a place called
"Enso" on June 4th 1944.
-The problem with your model is - as you also state in your text
- you build it as it would have looked in July, when the real vehicle
was destroyed in Kuuterselka on June 15th 1944. The real vehicle
never had the logs...
- Another problem is that your brown paint is way, way too red.
It should be more of a chocolate-brown.
- The rear deck equipment box opens up to the rear, not to the front.”
[unquote]
[2] http://www.stugiii.com/schurzen.html
A website with a wealth of information of the Sturmgeschütz
and their deployment and unit organization.
[3] Sturmgeschütz &
Its Variants, by Walter J. Spielberger, Schiffer Publishing
Ltd., (1993). I consider this one of the finest references on the
StuG III, also including information on the StuG IV and the StuIG
III, StuG Battery organization and production and support vehicles.
A hard cover book of 253 pages it includes many high quality black
& white photos and vehicle plans by Hillary S. Doyle.
[4] PANZER TRACTS No. 8 Sturmgeschuetz,
by Thomas Jentz and scale prints by Hillary S. Doyle.
A good inexpensive softcover book of sixty
pages, good black & white photos and Doyle’s excellent
scale drawings. This book covers all the StuG variants and the Sturmhaubitze
42 and the Sturmmörser as well.
[5] http://hem.passagen.se/burrabee/72scale/axis2.html
Bjorn Backland’s website with his article on making a Sturmi
from several 1/76 Airfix models.
[6] Aleran Miniatures decals,
18530 Mack Ave., #424, Detroit, MI 48236. Decal SheetAX-2 Axis
Minors – Finnish, Bulgarian, Slovakian, Croatian. water
slide decals. Decal markings are varied but there is little instruction
on placement or use.
[7] "Suomalaisten rynnäkkötykkien
kohtalot". A Finnish book referred to me by Andreas
Lärka covering Finnish Sturmi.
Editor’s note.
As books on Finnish armor are quite rare, we also recommend Suomalaiset
Panssarivaunut 1918-1997, published by Apali.
|