Converting
Fujimi’s (Nitto’s) StuG III Ausf. D kit to a "Battle
of Altdamm 1945" long-gunned StuG in 1/72 scale.
1. INTRODUCTION
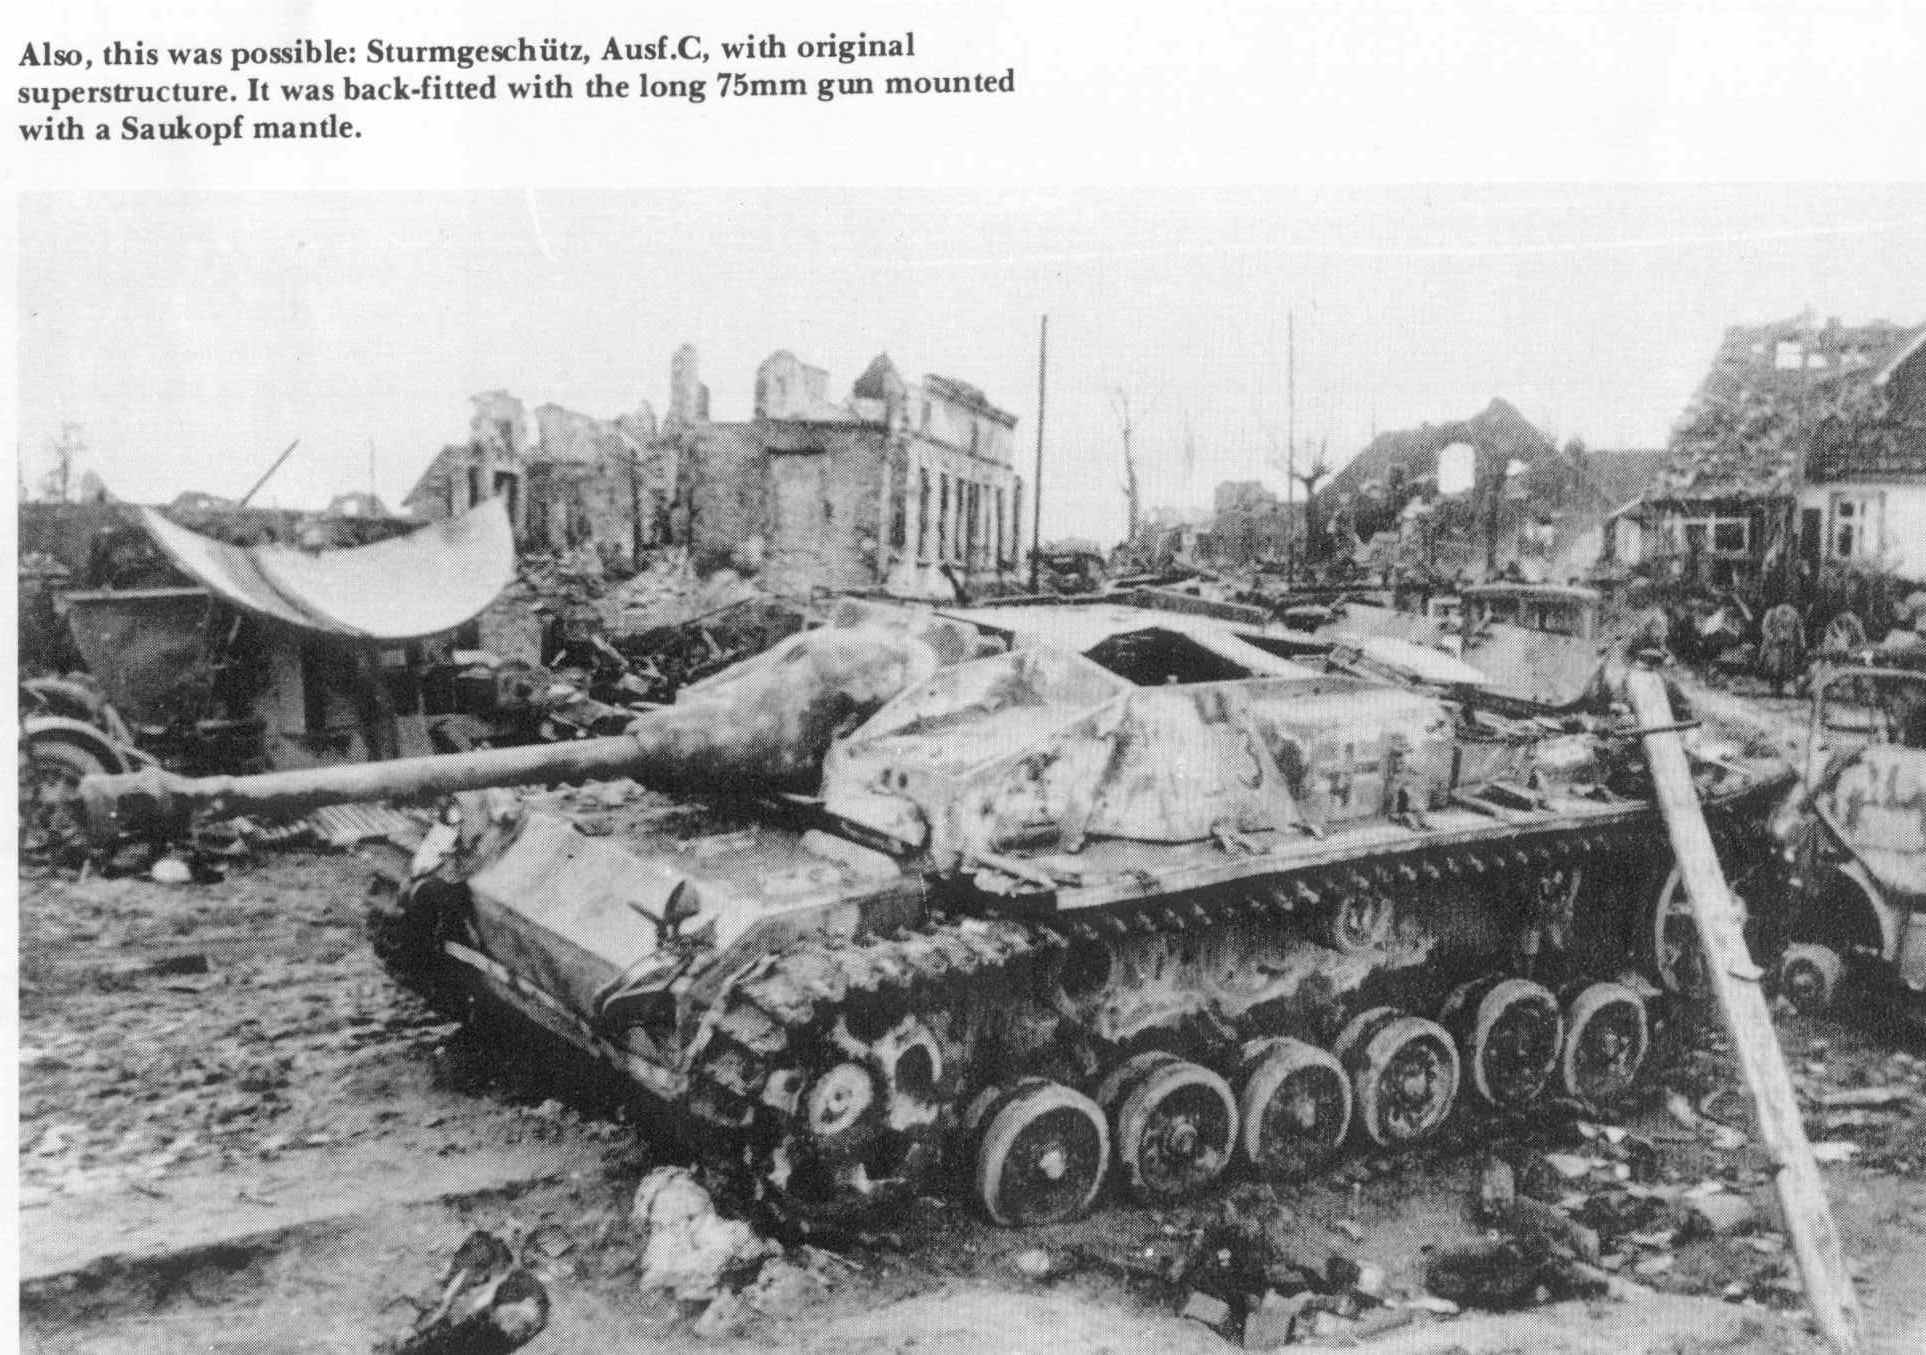
Ever since I saw the below photo in Spielberger’s book on
the Sturmgeschütz, I knew this would be a fun and interesting
conversion project. At the time I started the project back in the
year 2002, the only kit available of the StuG Ausf C/D was the old
Nitto kit, now packaged by Fujimi Co. kit #22. Now in 2008 I am
just getting around to finishing this conversion and the corrections,
just in time for Trumpeter Models to release their very fine 1/72-scale
StuG Ausf. C/D kit # 07257. This Fujimi kit must be 30 years old
or so and many parts suffer from simplified and just wrong details.
Though about 1/76 scale in length, it’s odd in being 1/72
scale in width! We have a choice of either to lengthen the hull
to 1/72, or to narrow the width to 1/76, or just accept it as is?
Obviously it’s easier to add a little length which was done
by adding to the engine deck and the bow plate.

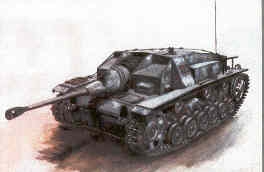
Looking at this photo from Spielberger’s
book Sturmgeschütz & Its Variants we can see that the vehicle
has been given a late war Topfblende [a.k.a. Saukopf or pig’s
head] mantlet and long 75-mm StuK 40 L48 gun. The book calls it
an Ausf. C though it could also be an Ausf. D; there was essentially
no exterior difference between the StuG C and D. Note that it lacks
the cupola of the Ausf. G, it lacks the square pannier of the Ausf
E and F, and it lacks the roof ventilator of the Ausf. F and the
F8. According to http://www.stugiii.com/sturmartillerie.html this
vehicle is from a Sturmgeschütz training unit and has been
scraped together for the defense of Altdamm, the location of a Soviet
bridgehead over the Oder River and now part of Szczecin, Poland.
The exterior paint is well beaten up and dirty, and the front track
guards ripped or cut off, perhaps from several years of rough driver
training. Though well beaten upon, I see no evidence that this Sturmgeschütz
was blown up or burned.
Tools and other equipment are missing from the track guards implying
to me that the vehicle was abandoned. On the side we can see a cross
marking and forward of that there appears to be a vehicle number
3 in black and white outline; other modelers that have done this
vehicle interpret this differently and have not put on the number.
The weathered paint looks like it could be a worn whitewash camouflage,
particularly on the lower side. There is a bracket for spare tracks
on the bow but no spare tracks. I see no evidence of welded-on or
bolted-on supplemental armor plates.

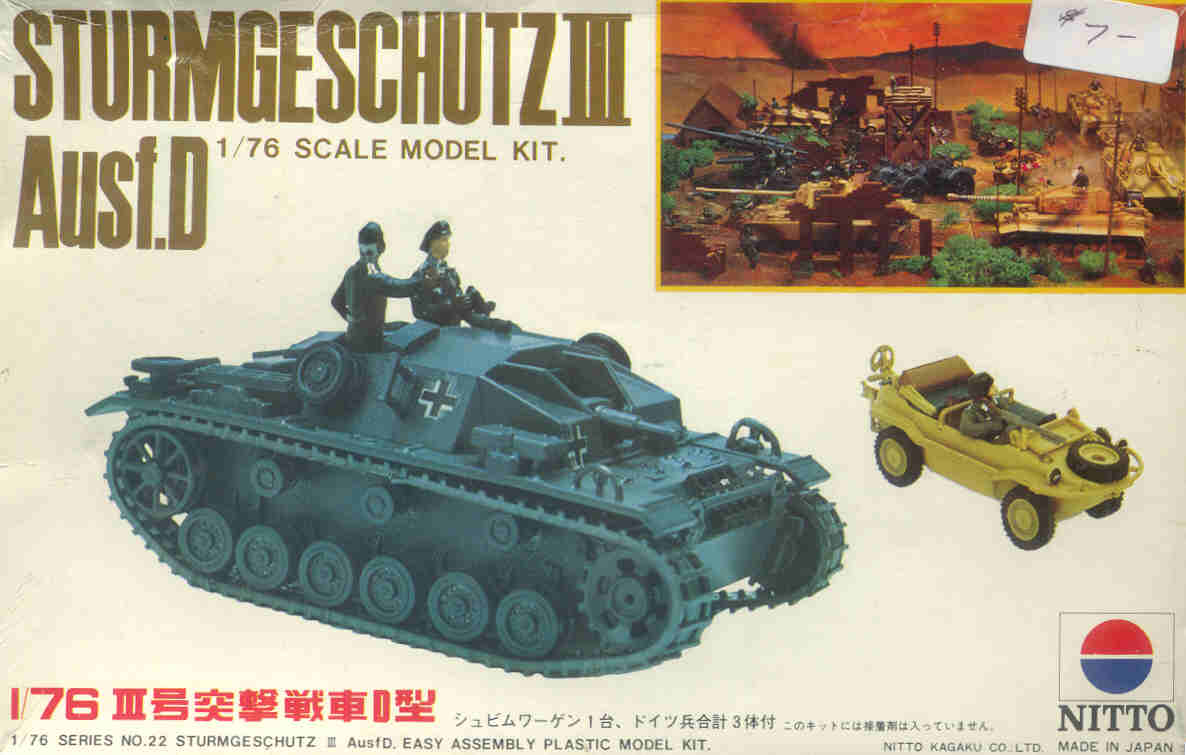
Here is a photo of Fujimi’s injection-molded plastic model
as packaged by Nitto of a StuG III D that was captured by Allied
forces in North Africa and shipped to Aberdeen Proving Grounds in
the USA. Though the superstructure is reasonably accurate the tracks
are very crude band type, and the roadwheels and other parts simplified.
We’ll need a lot of scratchbuilding to get this kit presentable
and accurate.
This is the TP Models version of
the up-gunned StuG III Ausf. C featured in the photo above, in case
you wish to save yourself the effort of scratchbuilding parts and
enacting the conversion process. It is all cast resin with resin
track lengths and is based on the old ESCI StuG III Ausf. G kit.
I do not have this particular TP model but based on their StuG F8
kit I do have, it is a bit crude and rough cast but will build into
a passable display model.
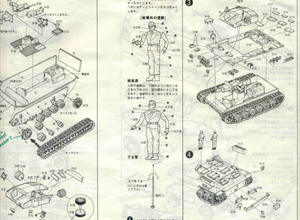
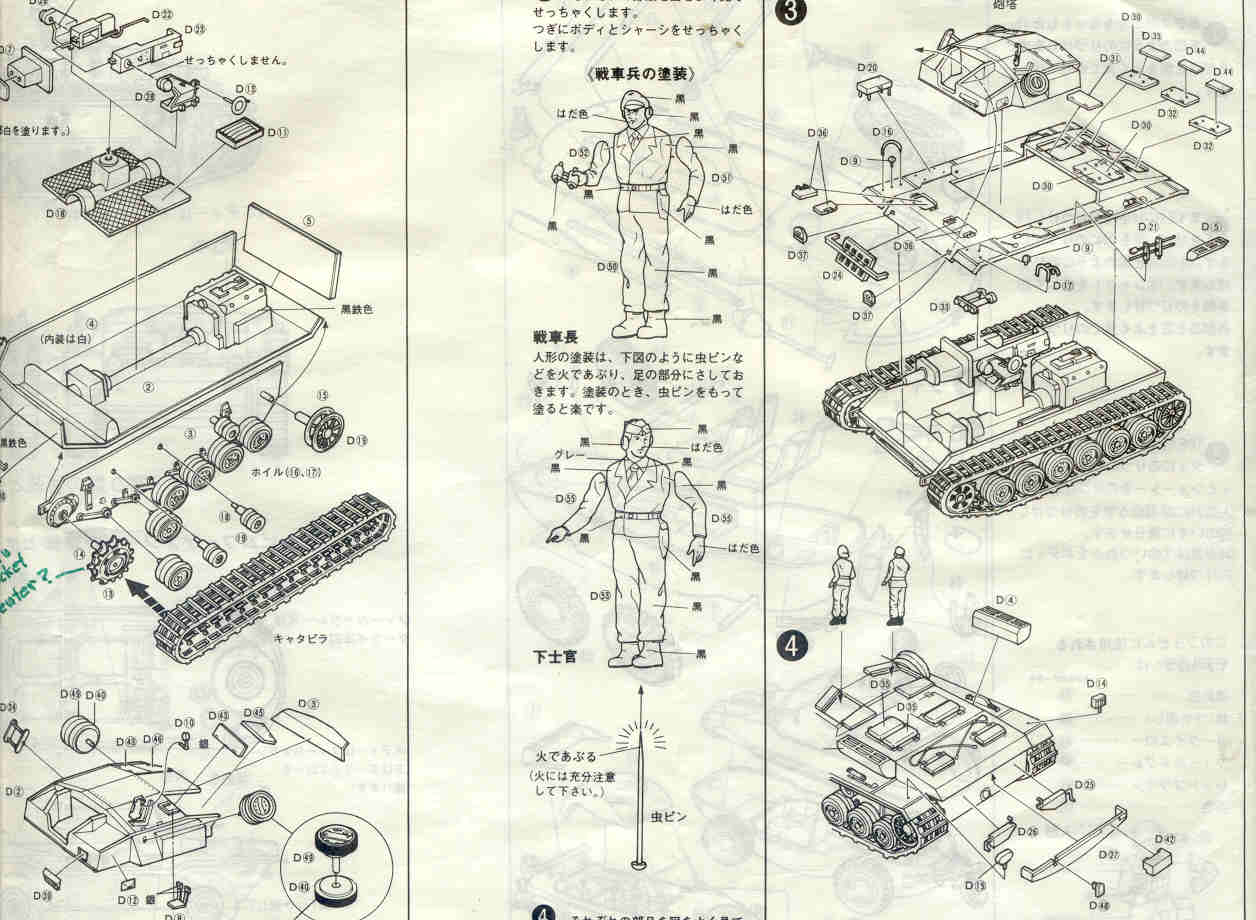
This scan shows us Fujimi’s
kit instructions for their Ausf. D kit with two mediocre crew figures,
a simple engine and a simple crew compartment with a carriage and
breach for the short 75-mm gun. Several nice things about the Fujimi
model are that the transmission hatches, crew hatches and engine
hatches can all be modeled open, unlike the Trumpeter StuG III Ausf.
D and F kits, which have all hatched molded closed. The Maybach
HL 120 engine and 75-mm StuK L/24 gun parts can also be used with
another StuG, or Panzer III; the engine could also be used with
the Pz IV.

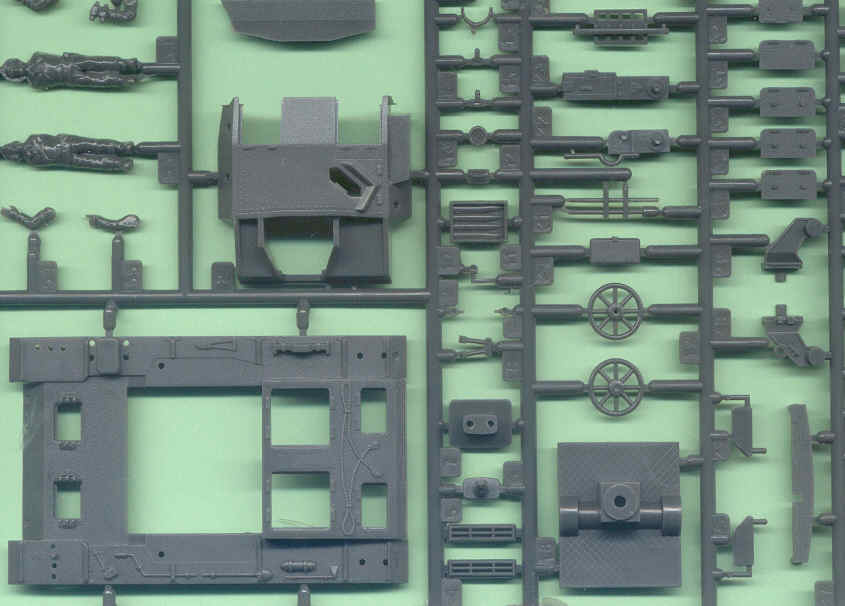
This scan of one of two of Fujimi’s
sprues shows the lower hull and fenders at the bottom left, if you’re
familiar with the Sturmgeschütz you’ll notice how it
appears short compared to its width. Measuring it, it appears 1/76
scale in length but 1/72-scale in width. Above the hull is the Ausf.
C/D superstructure with the open crew hatches, the opening for the
gun sight is too small for this early version.
2. THE CONVERSION PROCESS

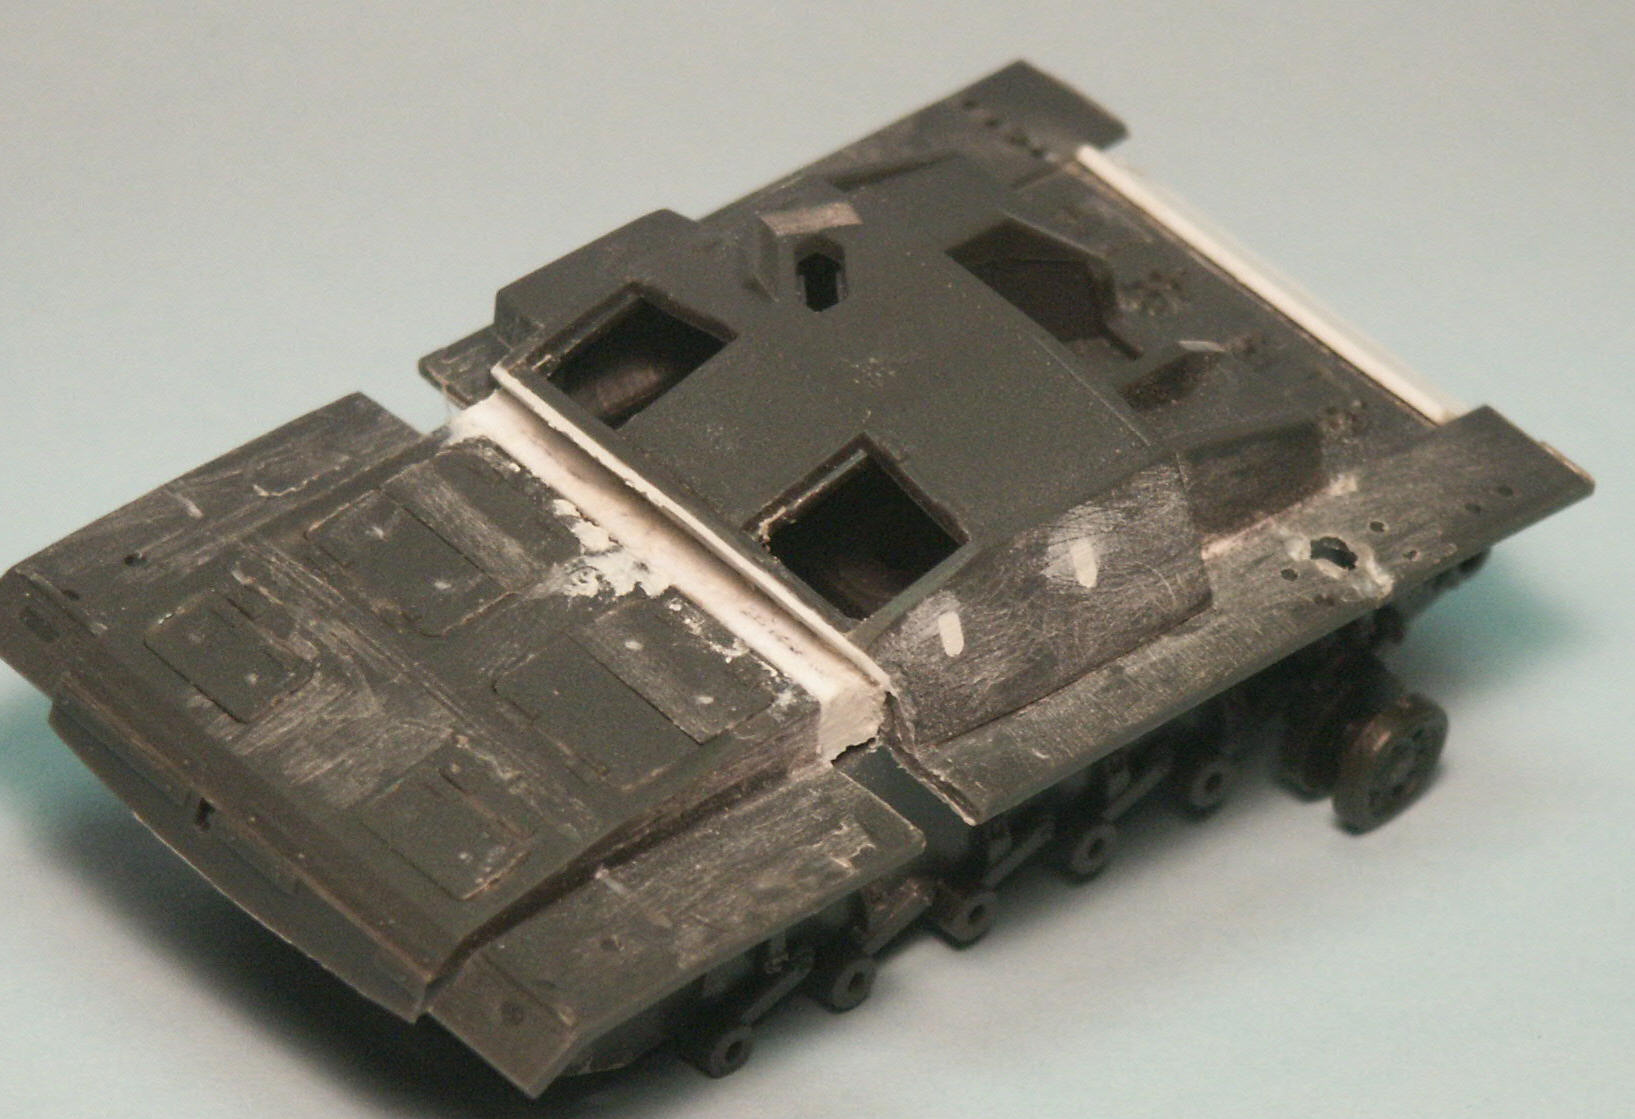
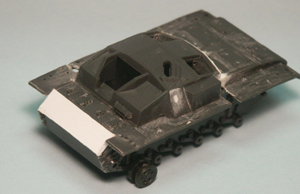
a) View of the right rear of the Fujimi kit after the rear engine
deck and fenders have been cut off and styrene spacers glued in.
The ESCI and the Revell StuG kits were used as guides to get the
length correct. It was at this point that it was decided to totally
remove the plastic fenders and replace them with Part etched [P72-118]
brass fenders, designed for the Revell kit but usable here. Unused
holes on the superstructure sides have been filled and smoothed
over with white modeling putty. I find it interesting that the lower
chassis did not have to be lengthened or modified. Fujimi’s
chassis sides [parts 3 & 4] appear to have been too long for
the upper superstructure and did not have the appropriate overhang
at the rear.
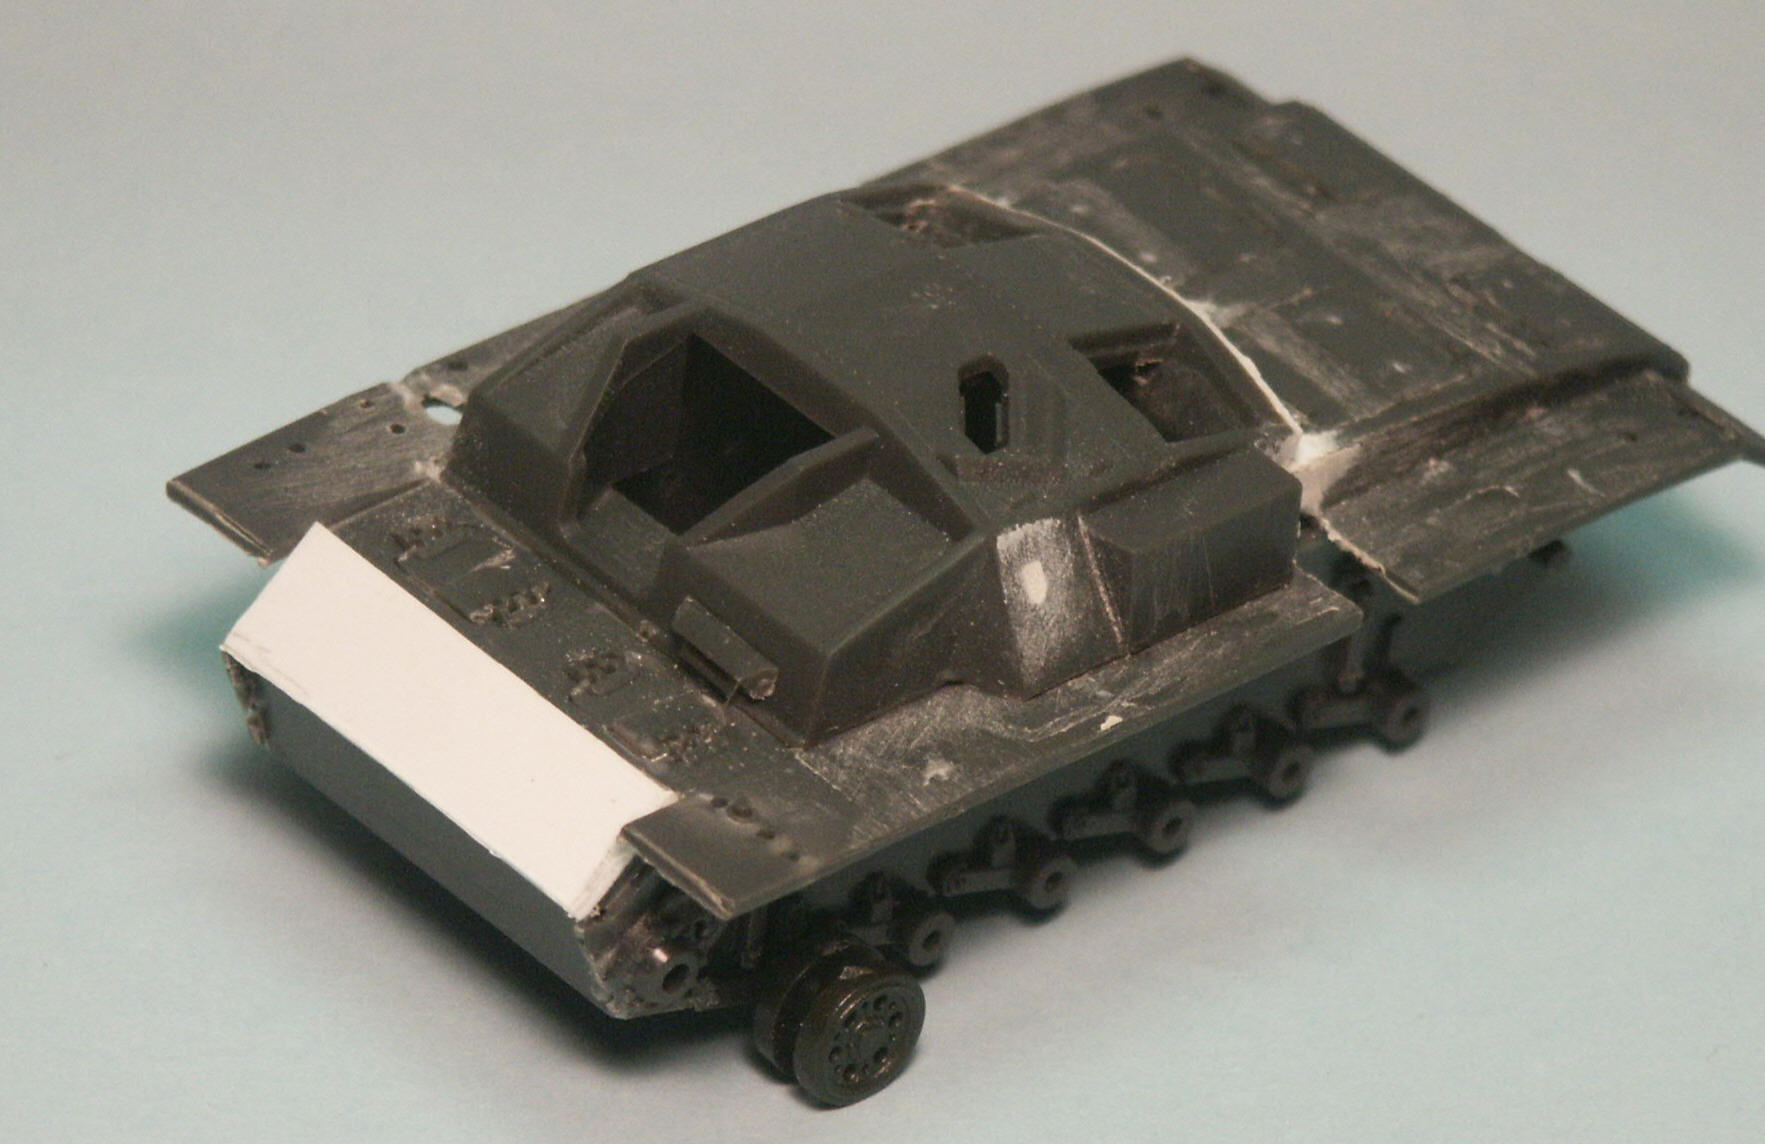
b) The front left quarter showing additional styrene sheet added
to the bow. After puttying and sanding smooth a new weld seam was
scribed in. This additional length unfortunately puts the transmission
hatches too far back, hatches that are already too small for a 1/72
model to begin with. The roadwheel is from an ESCI kit; Fujimi’s
roadwheels are too ‘detail challenged’; one example
is the lack of the holes going around the hub.

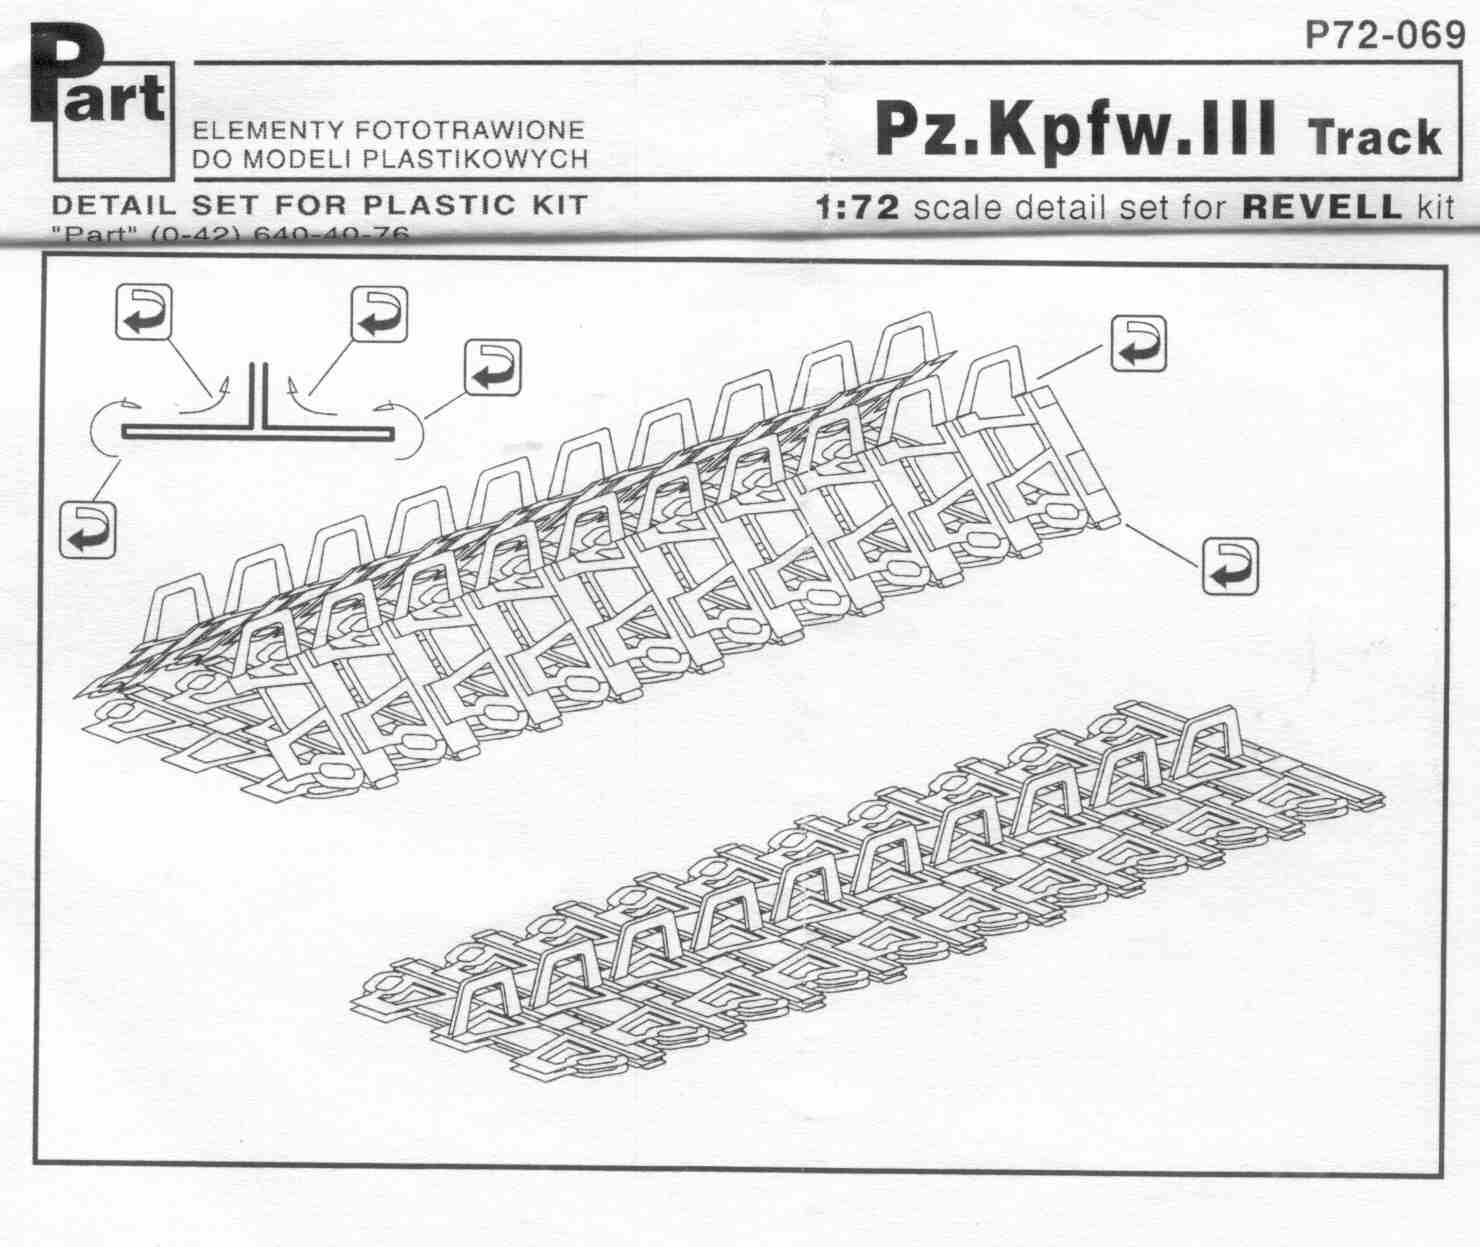
Assembly of Part’s etched-brass
tracks requires some tricky bending. The set I have has additional
brass fillets with tracks texture to be glued to the track faces
to add some needed thickness to the brass tracks. Gluing these dozens
of fillets on straight was difficult and they had a propensity to
come off. Too much cyanocrylate [Super] glue will mask the nice
detail. These are the only small-scale Pz III/IV tracks with open
guide horns [a.k.a. track teeth]. Getting the brass tracks to adequately
stick to the plastic wheels was not easy. What is great about this
type of track is the natural sag that can be modeled.

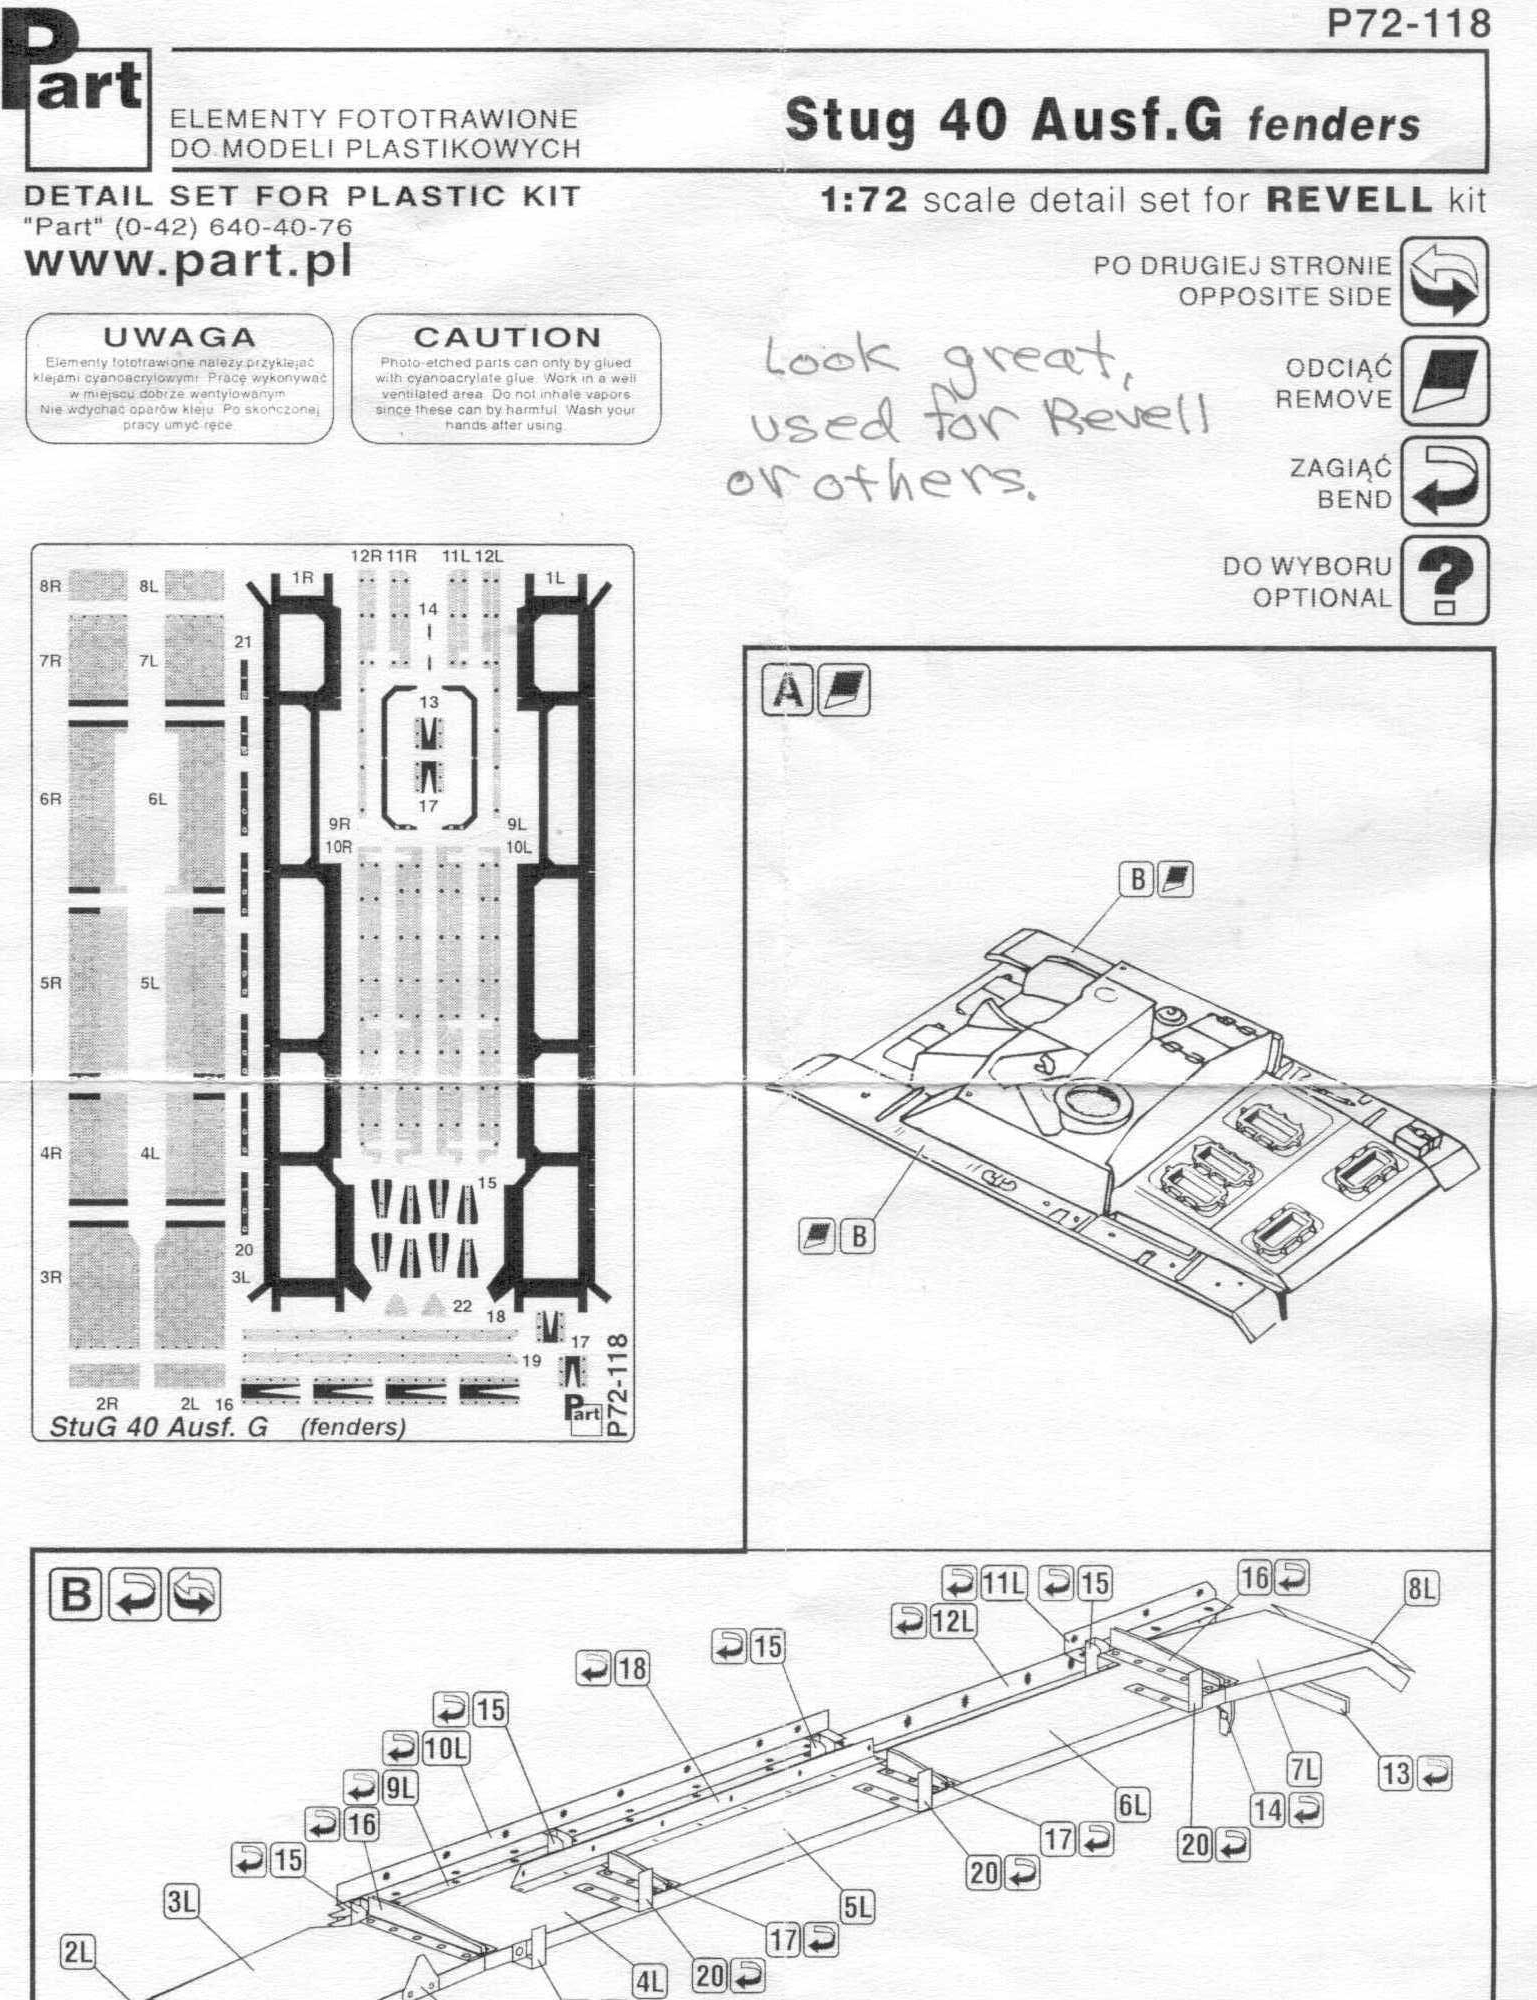
The instructions for Part’s
etched brass fenders [track guards]. This turned out to be an excellently
detailed part. Marketed for the Revell StuG Ausf. G, it worked out
well for this odd conversion and I suspect it will work on the TP,
Dragon and Trumpeter StuG Ausf. F/8 through Ausf. G Sturmgeschütz
kits. For wat may seem like a simple part, it has a lot of parts!
The pressed triangular supports indicate that this is for an Alkett
produced Sturmgeschütz.

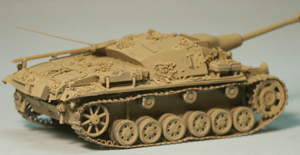
c) Skipping ahead in construction. A spare Trumpeter outer sprocket
wheel has been used as it has the exposed bolts evident in the photo
above. The Saukopf mantlet is a resin copy of Revell’s old
StuG IV kit and the L/48 gun with muzzle brake were both taken from
the Revell StuG Ausf. G kit. Comparing this photo with the one above,
notice that the roof opening for the gun sight has been enlarged
to reflect a actual Ausf. C Sturmgeschütz. A spare radio antenna
trough was taken from a Trumpeter StuG kit. The starter crank and
crowbar on the track guard were made from copper wire and then fine
wire latches added. A shot-deflector has also been added in front
of the driver’s visor. The tracks are PART etched-brass tracks
for the Pz III or StuG III; fussy to assemble and a tad too thin
but much better than the Fujimi, ESCI, Attack or TP Models tracks.
The tracks in this photo have been primed with white primer acrylic
paint. They have to be glued to the wheels with cyanoacrylate [Super]
glue. Track supports for the early fenders have been made with thin
styrene rod.
Two holes have been drilled above the driver’s visor for the
driver’s periscope, lifting rings and wire grab handles have
been added on the sides. Original Fujimi parts include the gun-cleaning
rod (with an extra, third rod added), the headlights, the return
rollers, and the driver’s side viewport.
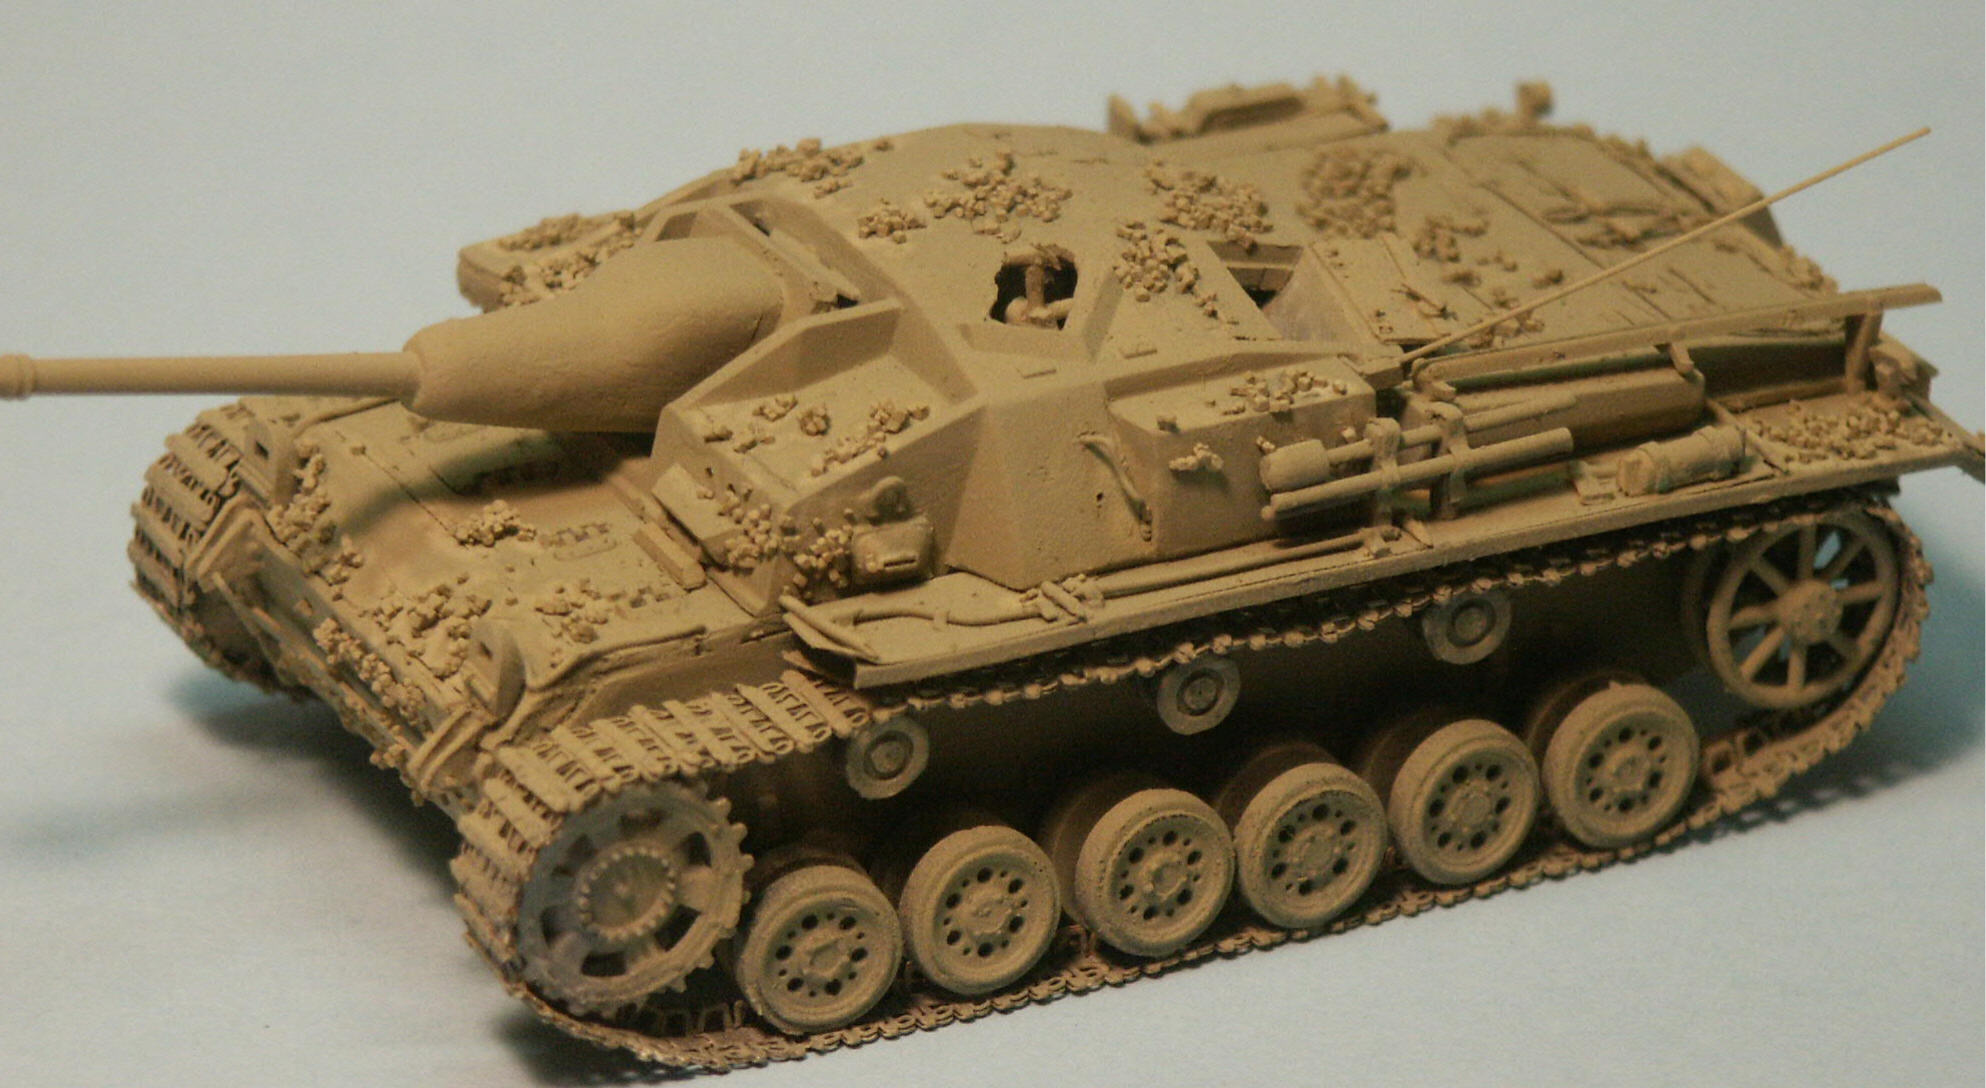
d) In this photo, the model does not
have a bad case of a shingles, a skin disease! As part of the weathering
and extreme wear associated with an old training vehicle I opted
for the salt technique for showing chipped and worn paint. At Step-3
above, paint dark panzer gray on areas you are going to display
worn; after the paint has dried and cured for several days we wet
the to-be-worn areas with water and quickly sprinkle on salt crystals.
A tow cable made from thin string has been made and glued to the
rear engine deck. Injection molded tow cables are typically too
thick and poorly rendered to be convincing on a good display model.
New, more accurate exhaust pipes have been made from solder wire.
The jack has been detailed a little and tools scratchbuilt.
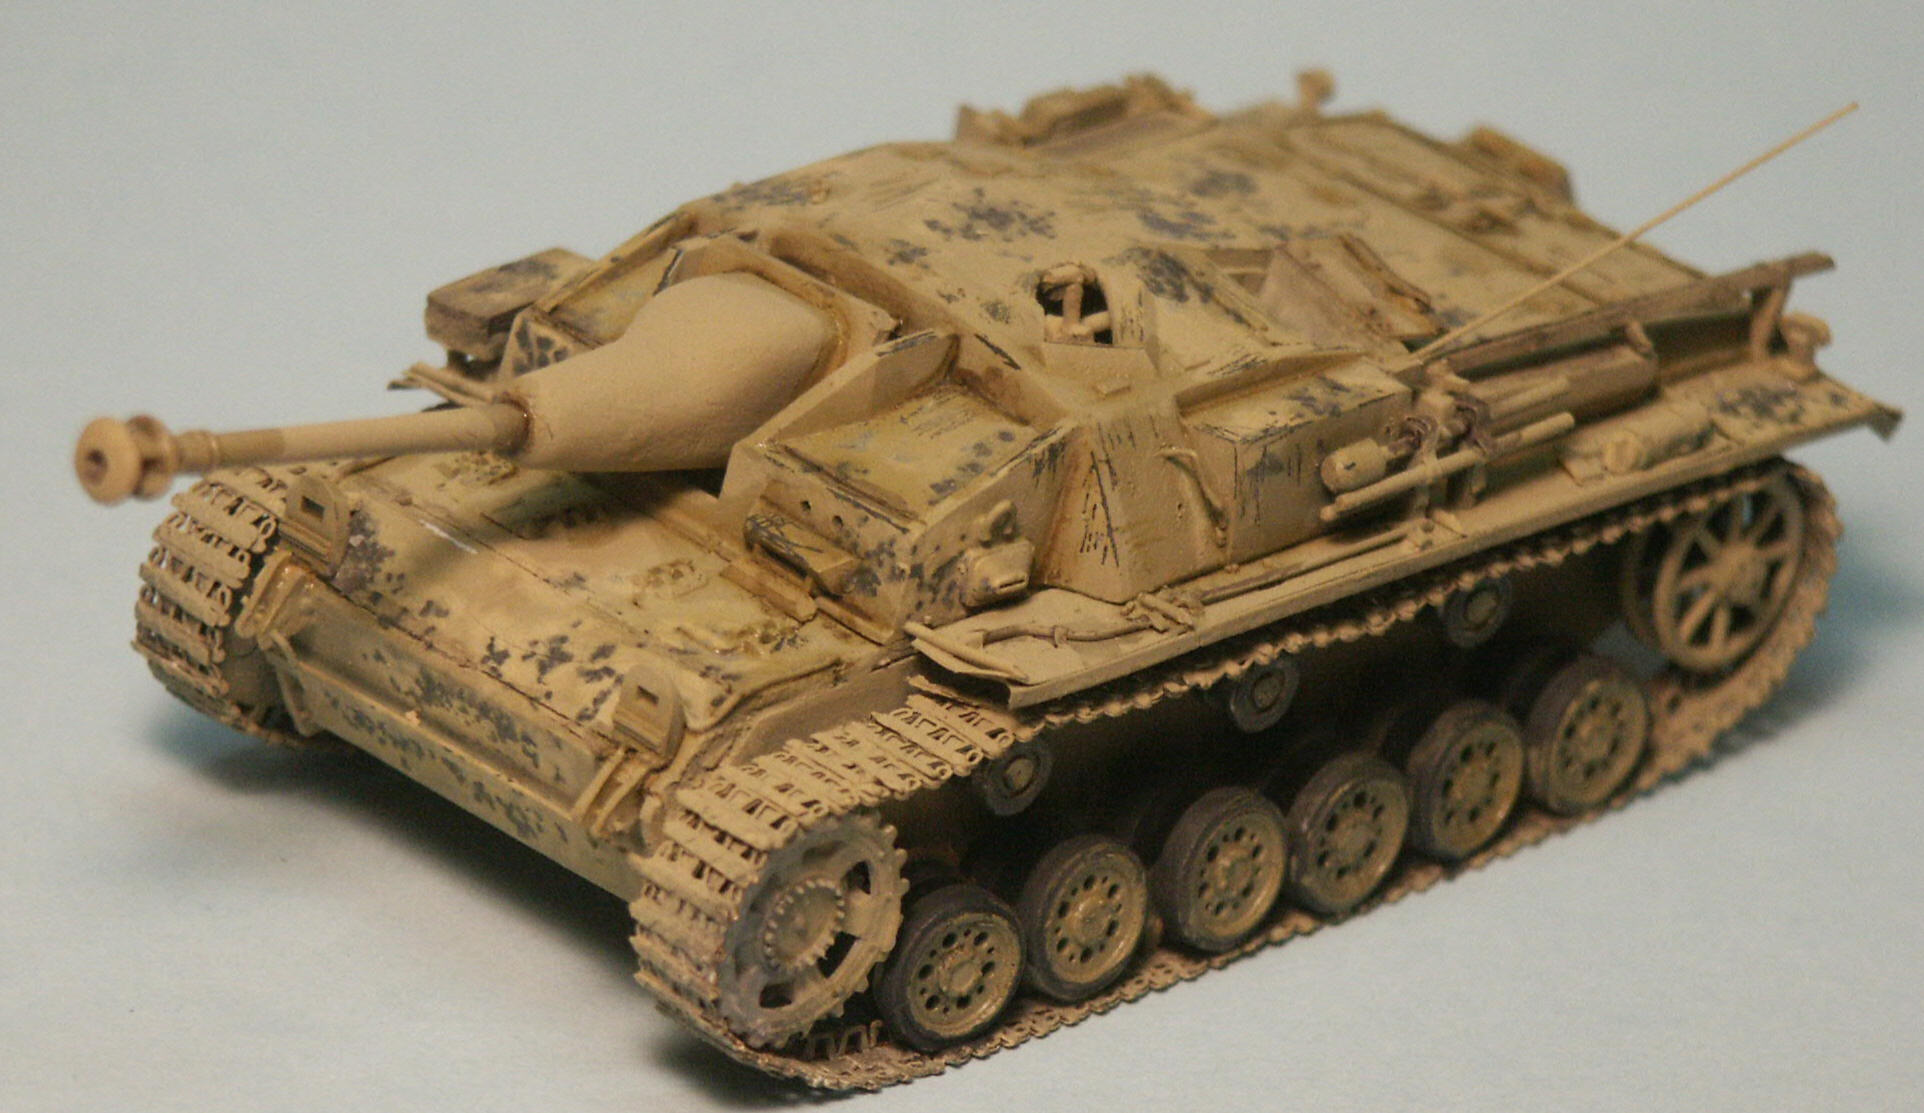
e) After the water and salt dries into individual crystals and clumps,
lightly spray your model with the base color, Tamiya Panzer Yellow
in this case. Use a very low pressure to keep from blowing the crystals
clear off the model and adjust the paint viscosity as needed. We’re
going to lose some crystals so don’t be too concerned; we
can always reapply them as we wish. I planned on no paint wear on
the mantlet and gun as it’s to be a recent up-gunning. The
hand tools and exterior gear will be painted in-place later.
A scratchbuilt gunsight is now added and sticks up out through the
roof opening. It wasn’t till the StuG Ausf. G that the gunsight
opening got an armored cover.

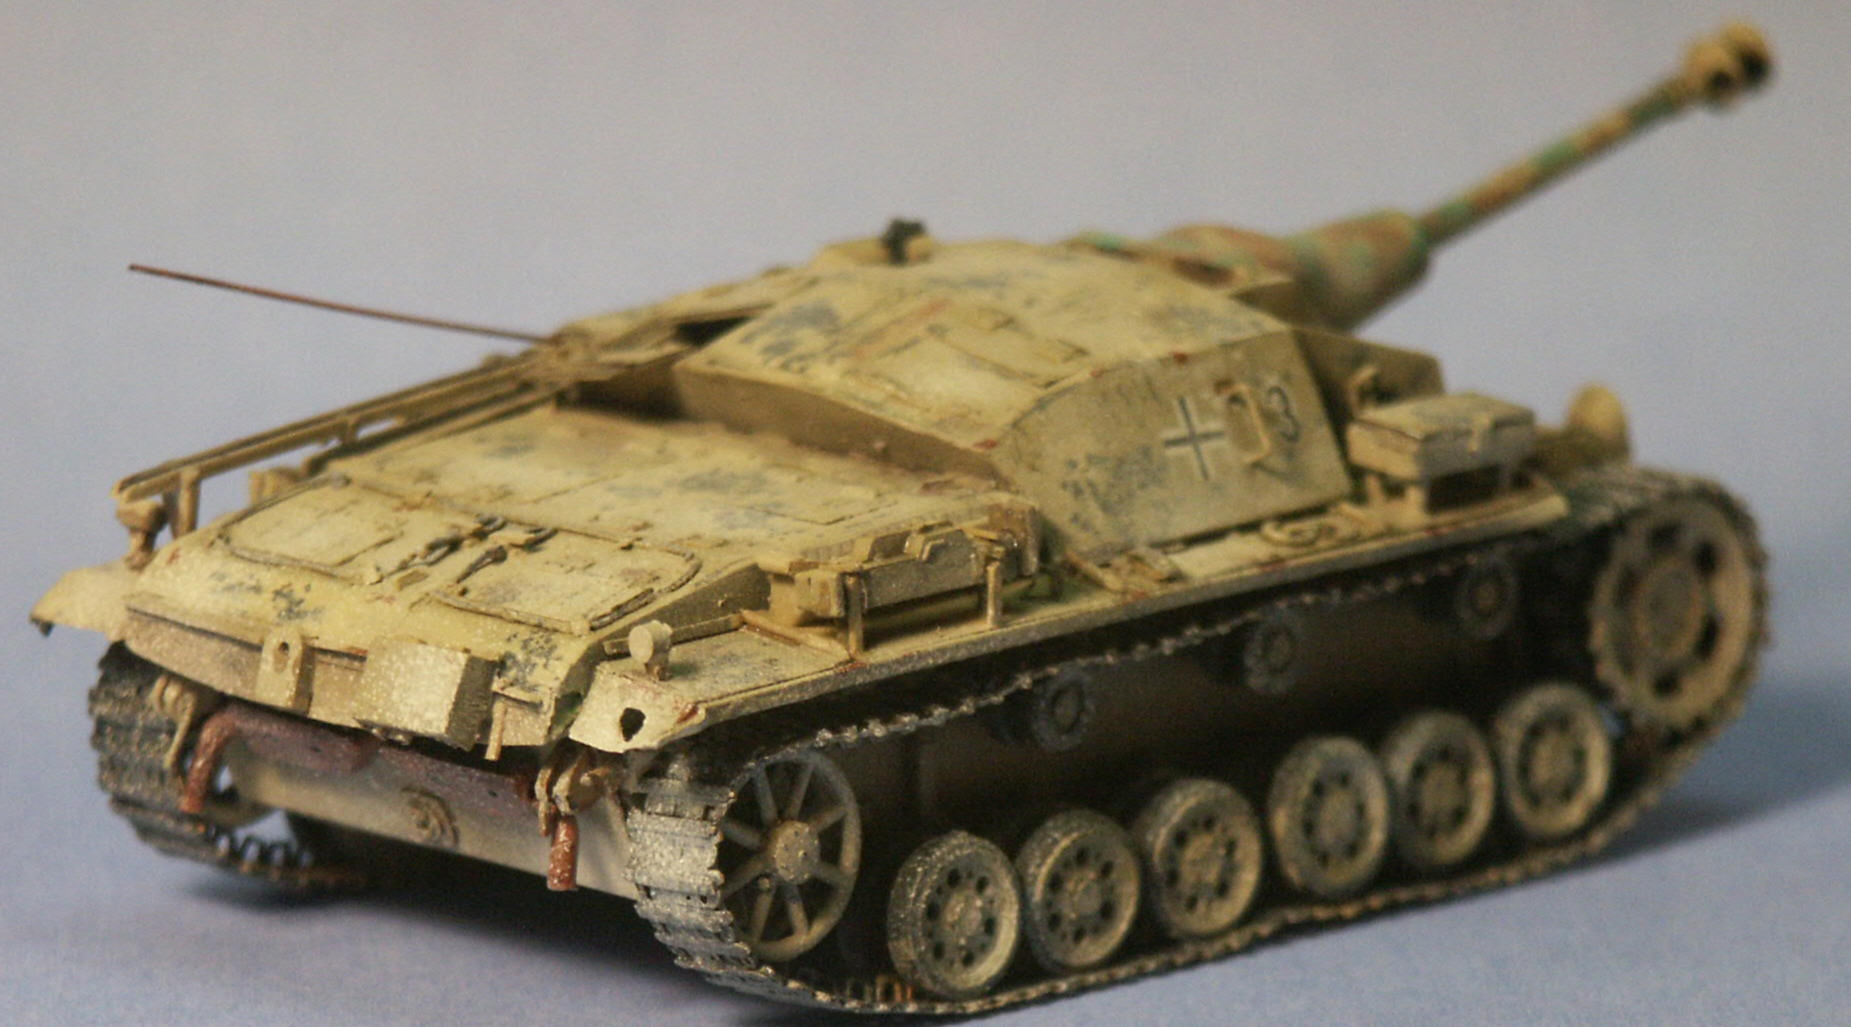
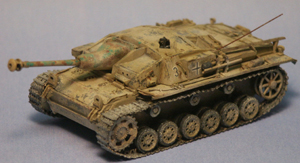
f) In this Step-6 the paint has dried about 30-minutes and the salt
crystals carefully then removed with a soft brush and tweezers.
In areas light scratches have been made in the topcoat with a sharp
knife blade further exposing the dark gray color underneath. My
intentions for the paint and wearing are to represent an early StuG
Ausf. C repainted several years later in panzer yellow, then worn
off through a year or two of abusive crew training. A dark-brown
oil pin-wash has now been added to corners and dark recesses. At
this point I noticed that much of the delicate track detail was
being lost beneath the layers of paint and cyanocrylate glue.
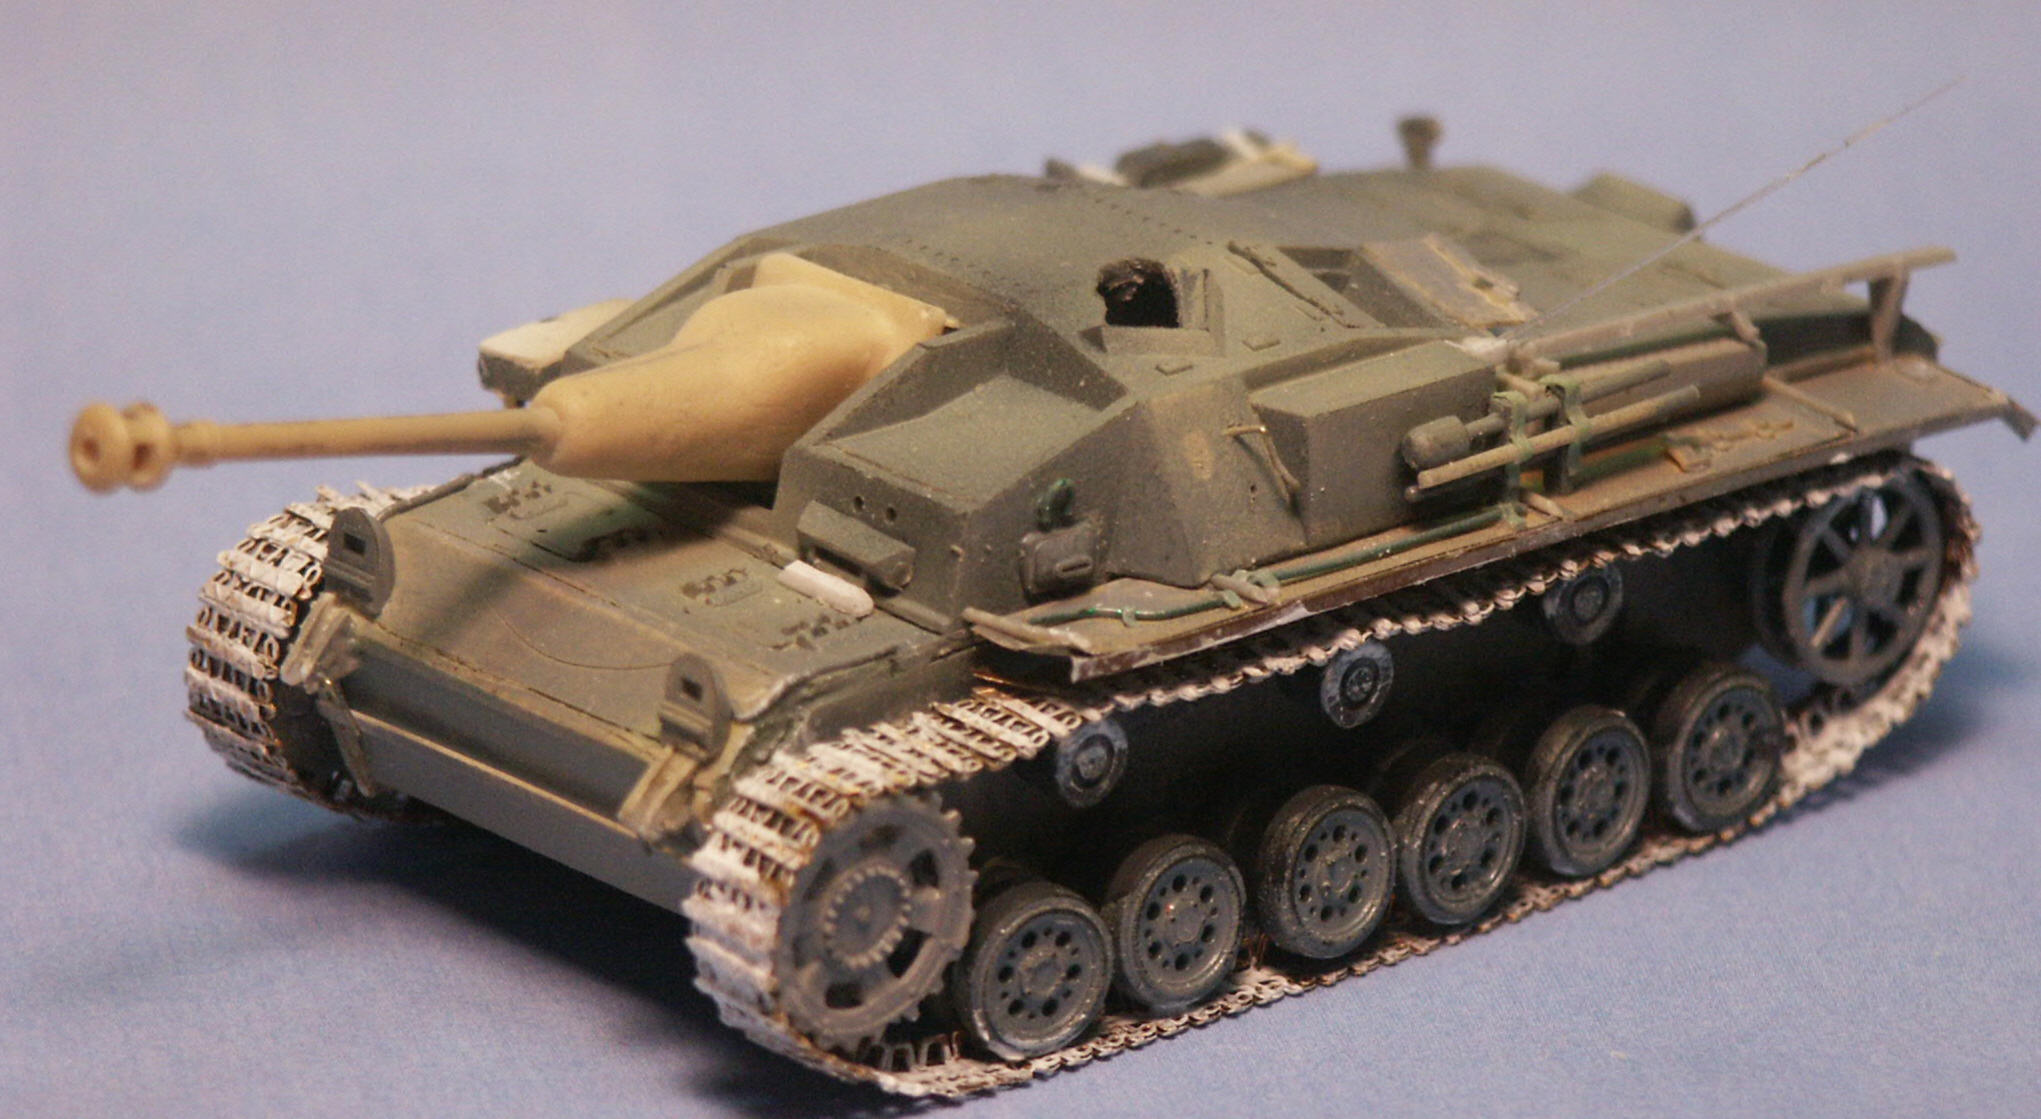
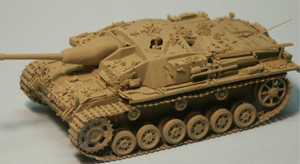
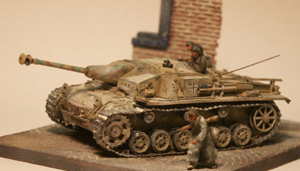
g) Here in Step-7 is the 99.9% finished model and my interpretation
of this unique vehicle. On the side pannier is the vehicle number
3. The gun and mantlet have a splotchy two-color camouflage suggesting
it be taken from another StuG during a rebuild at a repair facility.
At this point it's obvious I did not go with a weathered winter
whitewash scheme.
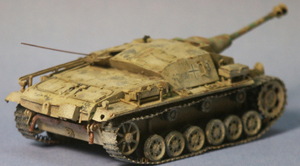
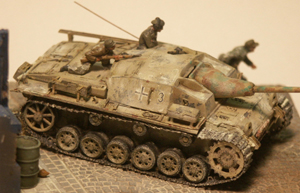
h) The stern of the vehicle shows the new exhaust pipes made from
thick soldering wire and glued to Fujimi’s mufflers. A tow
cable on the engine deck was replicated with coarse thread.
3. CONCLUSION
This conversion project is a great exercise in taking a mediocre
model kit and seeing what we can do with it to make it a better
representation of an obscure model. There are still some details
and proportions that are not done well. With only one photo we have
to make a lot of interpretation and guessing as to what the other
sides looked like and of what it looked like before it was abandoned.
Here is where ‘artist’s license’ comes in. As
typically only one or two photos of any particular vehicle exist,
I argue that every modeler must exercise ‘artist’s license’
with most every model. It would have been easier and quicker to
just use Trumpeter’s StuG C/D kit recently released, but this
Trumpeter kit did not exist when I started my conversion. Today
I probably would not have started this awesome project but now that
it is complete, I am glad I did start it. When we do a major conversion
and detail project we come away with a model that is more truly
ours, and not just someone else’s kit we slapped together,
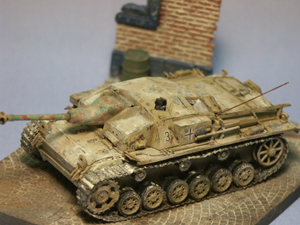
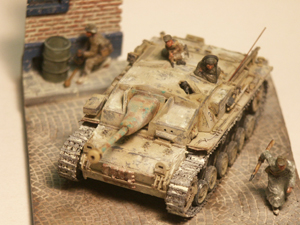
The final display on a polyurethane resin cobblestone street with
building section made by HQ72 RESIN PRODUCTS; and with three Battle
of Berlin infantry figures from Pegasus Models, and a StuG commander
figure from Preiser. Spare T-34 tank tracks have been added to the
StuG’s bow as supplemental bow armor. Make your own judgement
on the Part etched brass tracks.
The resin base and building section is painted with Model Master
acrylic paints. MIG pigments were perfect for simulating the soil
between the cobblestones and the mortar between the bricks. Brush
the pigments in with a wet brush then after it's dry, wipe the excess
off the stone and brick with a damp paper towel.
4. RESOURCES
Sturmgeschütz & Its Variants, The Spielberger German Armor
& Military Vehicle series Vol. II; by Walter J Spielberger,
and with vehicle plans by Hilary Doyle. Schiffer Publishing Ltd.
(1993). A 250-page hardcover book that is about the best single
reference book on the Sturmgeschütz. The photos are sharp and
printed on good quality paper.
STUG III Assault Gun 1940-1942, by
Hilary Doyle & Tom Jentz and color plates by Peter Sarson, Osprey
Military’s New Vanguard #19. This is a 48-page soft cover
book in Osprey’s series on historical and modern AFV’s
which covers the initial short 75-mm StuK L24 gun armed StuG’s.
This series strikes a balance between a historical reference and
photo reference; the color plates are very nice but the 1/76-scale
plans photos are not large enough and there are not enough photos.
Panzer Tracts 8 - Sturmgeschuetz
to Sturmmoerser, by Tom Jentz & Hilary Doyle, published by Panzer
Tracts, P.O. Box 312, Boyds, MD 20841. This and other books in the
Panzer Tracts series are soft cover books featuring good representative
photos and Doyle’s 1/35 scale vehicle plans noted for their
great accuracy. Panzer Tracts books are noted for being the most
accurate and up to date publications on German WW2 armor.
Modeling the Sturmgeschütz III,
by Gary Edmundson, and Robert Oehler. Published by Osprey Publishing,
2006. This is an 80 page softcover book featuring the assembly,
detailing and painting of three StuG’s, both short and long
gunned. I like the idea of this book, quality is very good and am
happy with purchasing it but I feel the 22 x 15.5 cm size pages
are just too small for this type of subject that is so dependent
on good ‘big’ photographs.
http://www.panzernet.net/panzernet/stranky/stihace/stug3.htm
A fine website focusing on the Sturmgeschütz.
http://www.stugiii.com/sturmartillerie.html
|