Since the two Hasegawa
8.8-cm Flak kits are almost the same model this kit review covers
both kits.
History For
The Modeler
The origin of the German 88-mm Flak gun dated back to WW 1 as an answer
to higher flying and faster aircraft. Between the wars, the original
Flak gun was redeveloped into the Flak 18 which was very different
from the WW1 gun, and came into service in the 1930’s [The “18”
in its designation was a smoke screen to hide its origin from Versailles
Treaty inspectors]. Famous as an anti-aircraft gun, it is even more
famous for its use as an anti-tank weapon. Its use in a ground role
as an AT gun and artillery piece is so well documented already I shall
not go over its history any further.
Terminology in English describing the features of the weapon in this
review are from the US War Department Technical Manual GERMAN 88-MM
ANTIAIRCRAFT GUN MATERIAL 29 June 1943, TM E-369A. German terminology
is from The 8.8 cm Flak 18/36/37 In The Anti-Tank Role, by Thomas
Jentz.
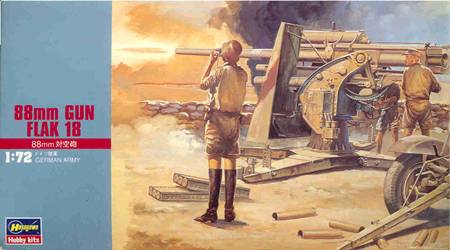
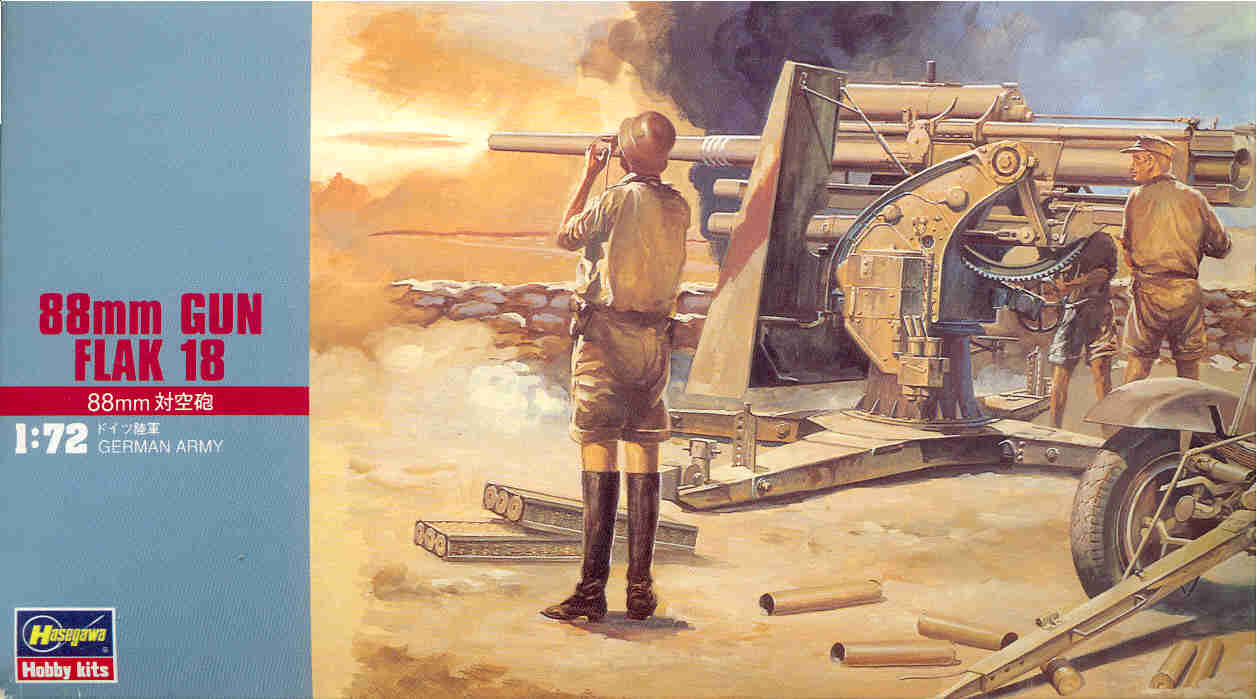
Before going over the box
contents, I like to delve into what’s on the box and then see
if what’s inside matches. I like the box art for Hasegawa’s
Flak 18 which shows the gun in full recoil as it fires at a ground
target. With the gun barrel in recoil and this view its hard to see
the tapered barrel that differentiates the Flak 18 barrel (8.8 cm
Flak-Rohr 18) from the collared Flak 36 gun barrel (8.8 cm Flak-Rohr
36). On top of the gun barrel is the recuperator cylinder with a vertical
peg for an indirect fire sight. There is the typical Flak 18 and Flak
36 gun shield with a Y-shaped brace supporting the shield. The gun
pedestal rests on a cruciform mount (Kreuzlafette für Kraftzug
or 8.8 cm Flak-Lafette 18) with four outriggers. In the center of
the artwork, sticking up through the outrigger we see a ground-stake
anchoring the gun firmly to the ground (these ground-stakes are not
included in the kit). The fuse setter’s seat with footrest,
just behind the shield, is un-occupied since they are not firing on
aircraft.
In the foreground are some empty shells and two woven basket cases
holding three 8.8-cm rounds. At lower right of the painting is one
of the Sd.Ah. 201 trailers (a.k.a. bogies). Based on the lack of vegetation
and shorts the gun crew is wearing, the setting is the North African
theatre. The gun is finished in a light desert tan color and there
are three white kill-rings on the gun barrel.
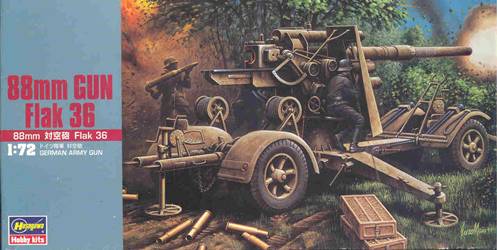
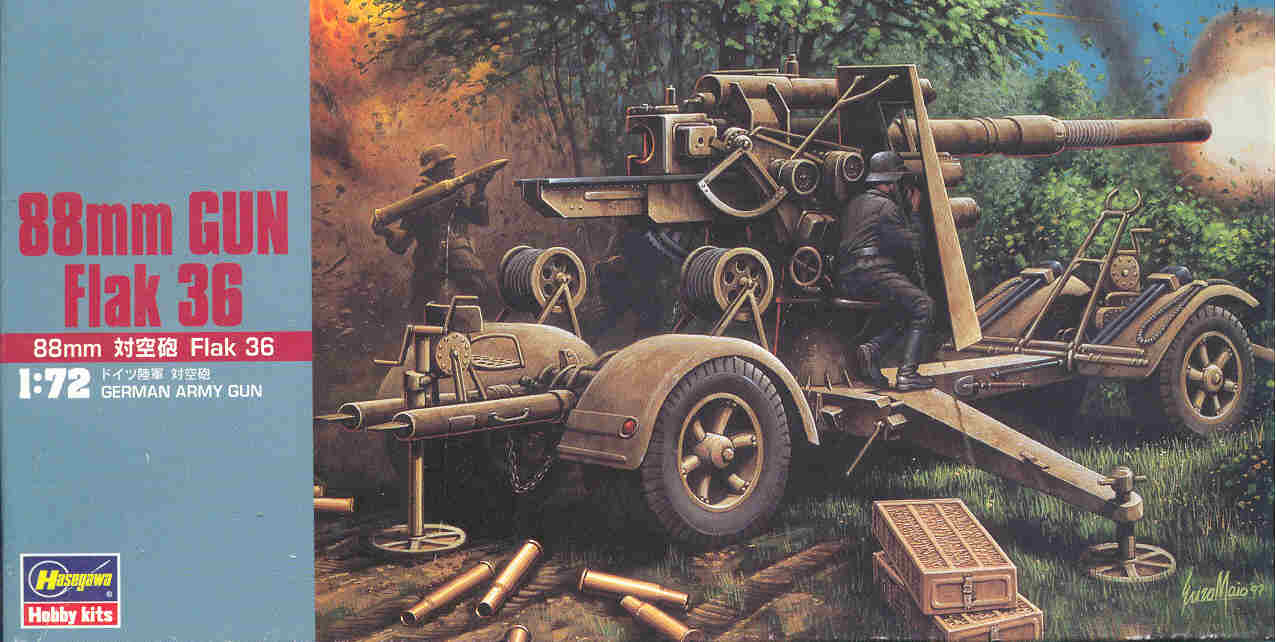
Hasegawa’s box art is great and
gives me an exciting impression of a gun in the middle of combat with
ground targets. (I guess depicting this antiaircraft gun firing at
high altitude bombers would require the box art to be on end?) The
gun is firing but the gun barrel is not yet in recoil unlike the artwork
for the Flak 18 above. Forward of the shield we see the bulge and
collar on the barrel identifying it as a 3-section Flak 36 barrel.
The gunner is in his seat looking through his direct-fire sight at
a target while another crew member is in the background holding the
next round. Above the gunner is the Y-shaped brace supporting the
shield to the carriage (a part not included in the model). Behind
the gunner we see the elevation quadrant but no pointer (see the references
to see what I am speaking about).
The weapon is firing from its Sd.Ah 201 trailer with the side outrigger
down on the ground. The round groundpads and the noticeable difference
between the front and rear trailer bogies are a quick giveaway that
this is the Flak 18 gun and Sd.Ah 201 trailer but with an interchangeable
two or three section Flak 36 barrel. Looking at the end of the outrigger
left of the rear trailer, I see a very long jack holding the round
ground-pad on the ground; I am pretty sure this is too long and the
pad could not reach the ground from this high! On the fenders of the
rear trailer are spools of communications cable.
In the foreground are empty 88-mm cartridges and two woven wooden
baskets for three rounds. These rounds look like bottleneck type shell
cases which are not the correct type for this gun; they should be
long strait shells with no bottleneck. (The 88-mm rounds for Tiger-1
tank were shorter and bottlenecked in order to better fit in a cramped
tank.)
The weapon appears painted in a panzer yellow (Dunkelgelb) color with
a red taillight on the rear trailer. The tires are a dark gray with
light gray and tan highlights, not black.
The Kits
The Hasegawa Flugabwehrkanone (Flak) 18 kit MT10 has about 90 injection-molded
light gray styrene parts on four sprues for the gun and forward and
rear Sonderanhänger (or Sd.Ah) 201 trailers. Since most all the
parts between the two models are identical, comments on the MT10 kit
should be the same as for Hasegawa’s MT38 kit. Overall Hasegawa
put out a nice kit with clear directions, good fit, and clean crisp
molding with little to no flash. Unfortunately the kit lacks much
detail and could stand some correcting of the detail it has. As I
already have a Flak 18 kit I opted to go through the work to convert
it to a factory issue Flak 36.
The Hasegawa Flugabwehrkanone (Flak)
36 kit MT38 consists of about 90 injection-molded styrene parts of
the Hasegawa Flak 18 kit plus a new additional gun barrel on Sprue-E.
The true Flak 36 version of the famous 88 differed from the earlier
Flak 18 in having an easier–to-change three piece gun barrel,
new cruciform platform and two new trailers, the Sonderanhänger
(or Sd.Ah) 202. While Hasegawa gives you a new Flak 36 gun barrel,
they opted not to mold new trailers (one at each end of the cruciform
platform) nor a new carriage and control instrumentation to produce
a correct Flak 36. As the barrels were interchangeable between the
Flak 18 and Flak 36 this does not really pose a big problem if you
wish to build it out of the box, just call it a Flak 18 with Flak
36 barrel. In the reference section below is a photo from Aberdeen
of an example of a Flak 36 barrel on a Flak 18 carriage & Sd.Ah
201 trailer.
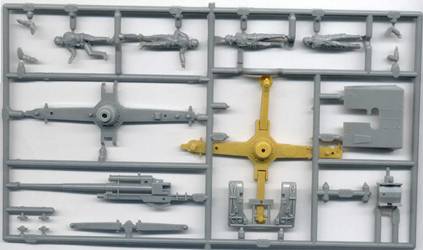
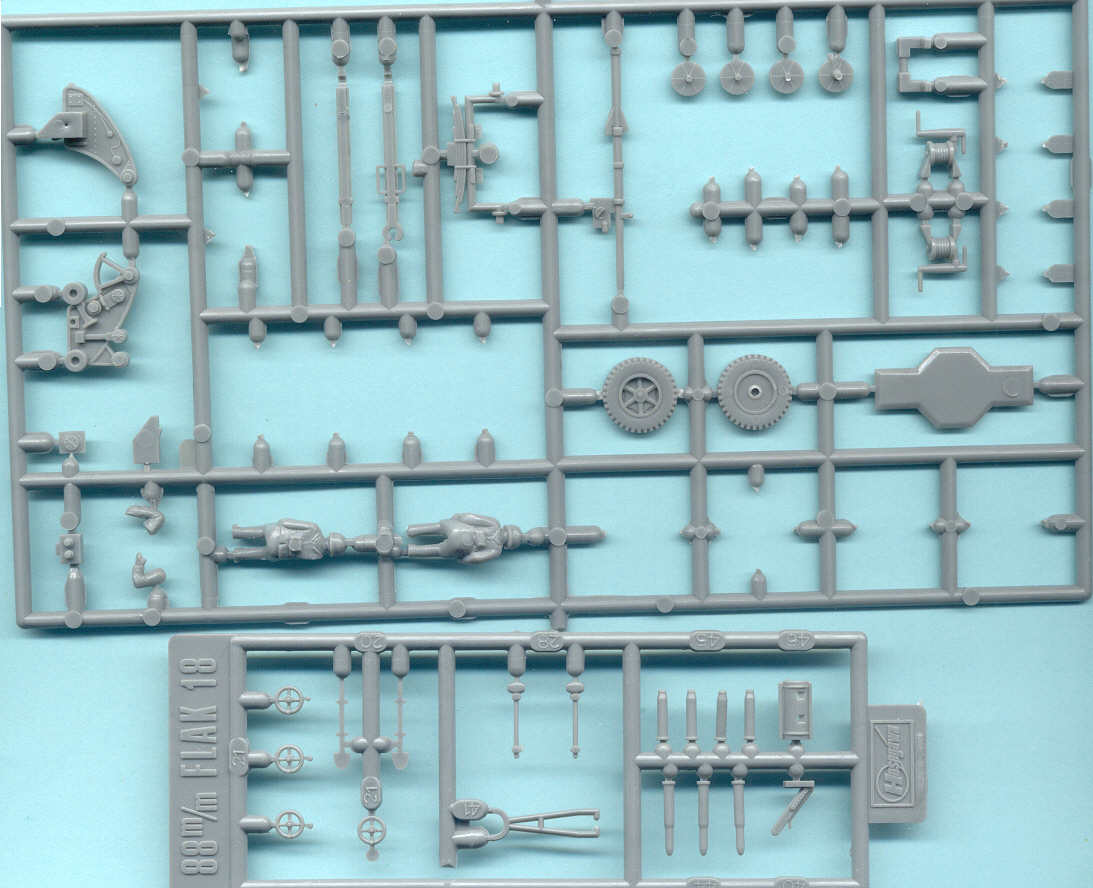
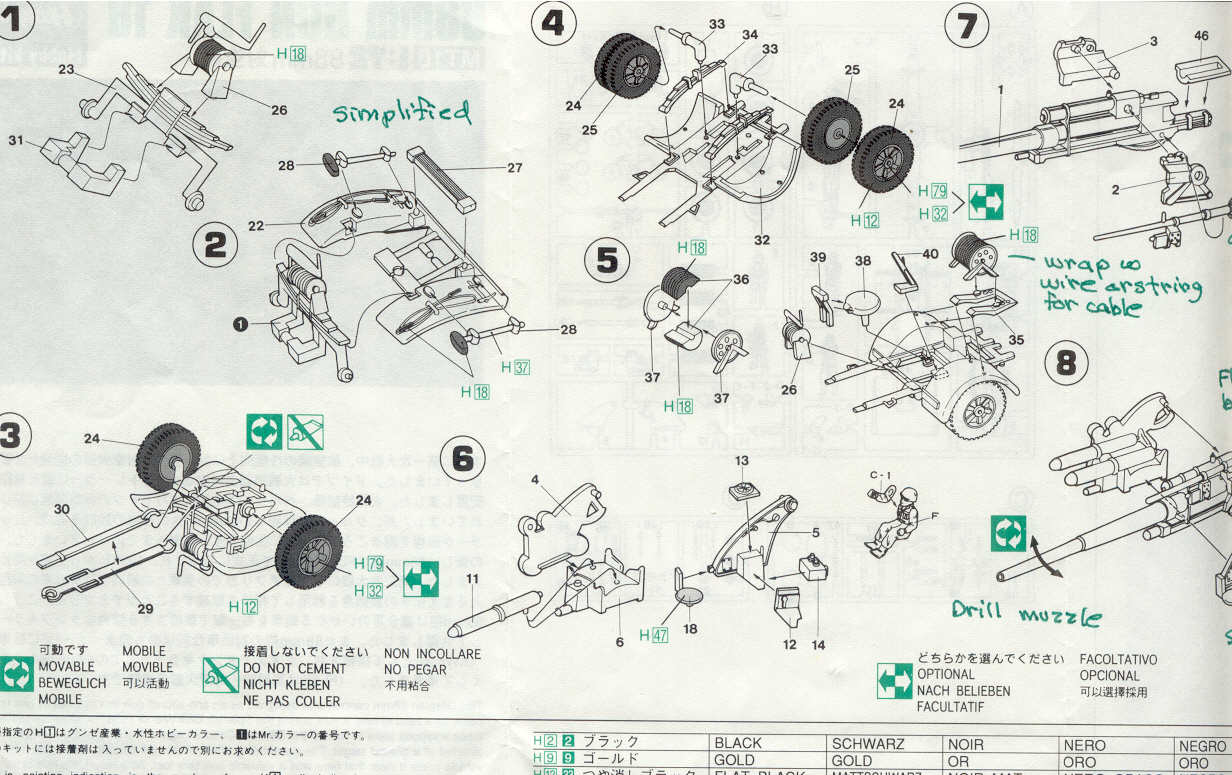
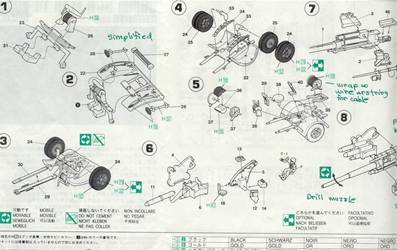
Sprue A contains the major parts
for the Flak 18 cruciform mount (Part-6, 7 and parts 8). (In the center
is Airfix’s 1/76-scale Flak 18 mount which, except for being
a little smaller, is comparable in detail to me.). The gun barrel
is molded one-piece with the recuperator cylinder on top and the cradle
below (part 1). For Hasegawa's
Flak 18 version we use Part-1 in kit MT10: the Flak 18 gun, recuperator
& cradle; but for the version with the Flak 36 barrel we use Hasegawa's
Part-E1 whish is an additional part that only comes with kit MT38.
The cradle is solid and can be
opened up like a trough to make it more accurate and the muzzle should
be drilled out after separating it from the sprue. I am sorry I have
no separate Hasegawa Flak 36 barrel to display as I have already used
it in the model below.
At bottom center is the front Sd.Ah. 201 trailer (part-22) with rope
and hand tools molded onto the mudguards.
At top are four of the six mediocre-quality figures with helmets that
are toolarge, and with indistinct hands and faces. At far right is
the gun shield (part 42) with closed gunner view port plate, so to
have this model engaging a ground target we’ll have cut the
hole open and make a new plate. There are two ejector pin marks on
the rear of the shield that have to be sanded down. Many Flak 18s
had no shield so we could just build the model without one.
At this point I want to talk about the gun sights: the Hasegawa kits
don’t have any. For the AA role the 88-mm Flak was guided by
a command device controlling multiple guns. For the indirect fire
role, uses like a typical piece of artillery, where they can’t
see the target, there is an artillery sight that mounts on a vertical
rod on top of the recuperator cylinder. One photo I’ve seen
shows a gunner standing on his seat to adjust this sight. For direct
firing like in anti-tank use there is a binocular sight mounted just
forward of the indicator dials, that looks through the opening in
the shield. In Hasegawa’s Flak 36 box art above, they portray
the gunner peering though this direct fire sight.
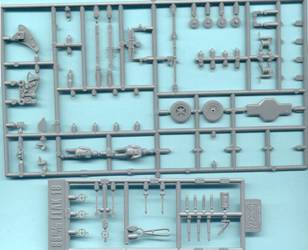
Above is Sprue-B and below
is the smaller Sprue D. Sprue-B holds the gun carriage parts 4 and
5 at upper left, trailer wheels and parts and two sitting crewmembers.
On the gun carriage (Part-5) we see a sink mark to fill in. Many parts,
like wheels and the ammunition baskets, have already been snipped
off for the completed model below. The wheels have a few ejector pin
marks to sand down. The four ground pads for the outriggers (Parts
16 & 17) are round which is fine for the Flak 18 but should be
square for a true Flak 36 and Flak 37.
Sprue D below has the 88-mm ammunition rounds, shovels and the gun
and carriage handwheels (Parts 21) and the tall travel lock for the
gun barrel (Part-41).
Kit Instructions
Here the left side of the
simple but clear exploded-view instructions for the Flak 18 kit MT10
which shows us assembly of the front trailer (steps 1 through 3) and
the rear trailer (steps 4 and 5). Below center and far right we have
assembly of the gun carriage. Looking far right at the part of the
gun barrel we see the gradual taper of the Flak 18 gun barrel in the
drawing over at Step-8. The brakeman’s seat (parts 38 &
39) on the rear trailer is simplified compared to the real seat.
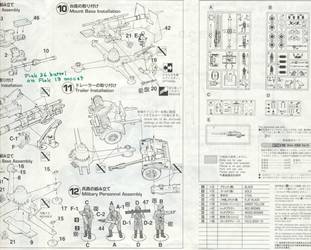
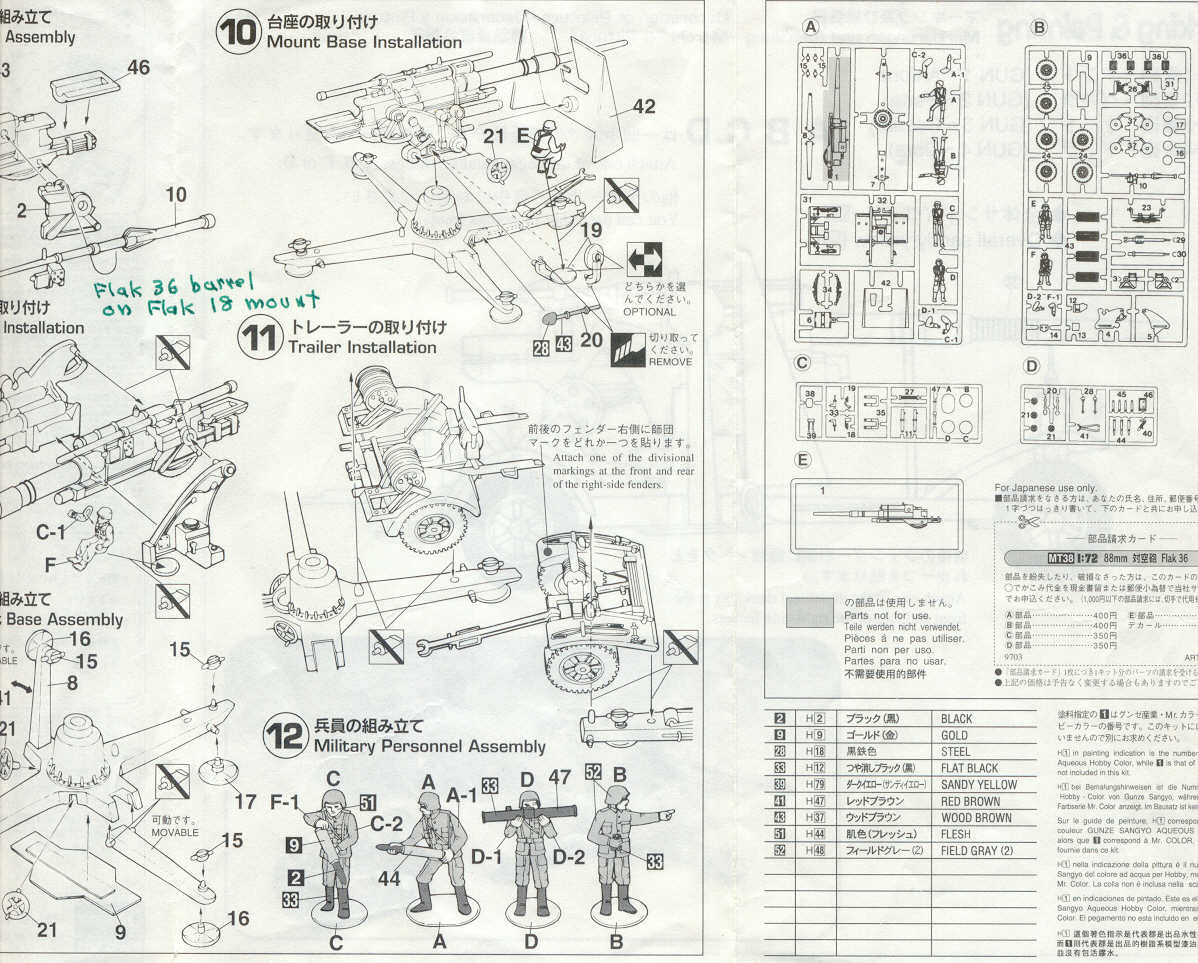
The left side of the instruction
sheet continues with final assembly of the gun in either firing or
travel mode, and of the crew figures. This is actually the instruction
sheet for kit MT38 so we can see the slightly-different gun barrel
(8.8 cm Flak-Rohr 36) Part-E1 and the separate Sprue E at left. Note
the shell rammer (part 10), a feature not included in the new Revell
88-mm Flak model kit. The shell rammer was helpful when loading at
high elevation.
The cruciform mount (Parts-7, 8, 9, 15, 16, 21, etc.) lacks a lot
of small details like the ground stakes and various levers, etc.

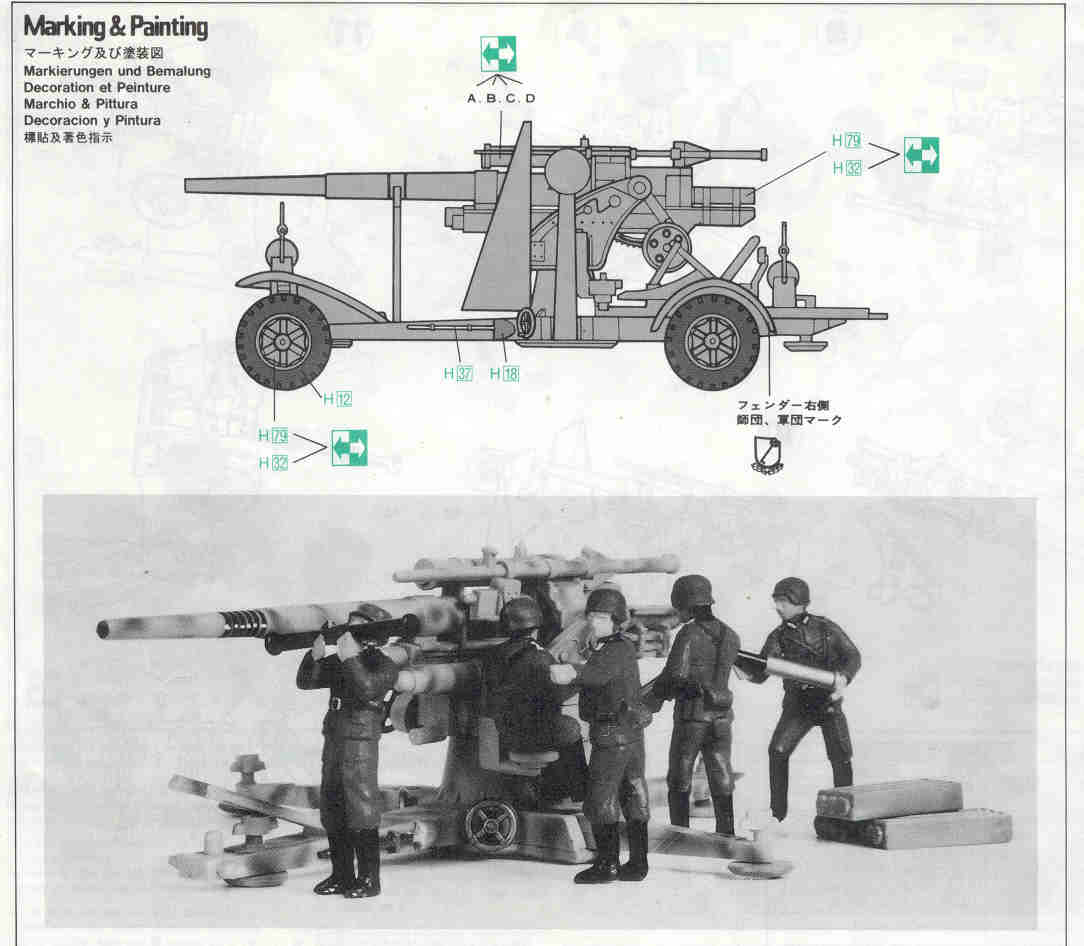
From the Flak 18 kit MT10
is a side view line-drawing of the Flak 18 kit with painting and marking
guide. At bottom is a photo of the finished model with the mediocre
quality looking crew figures and minus the Sd.Ah. 201 trailers. At
bottom center of the photo we can see one of the two handwheels (Parts-21)
for the top carriage leveling mechanism. Some things missing are the
ground stakes for holding the carriage to the ground. It’s a
little interesting in that Hasegawa chose to leave off the gun shield
(Part -42).
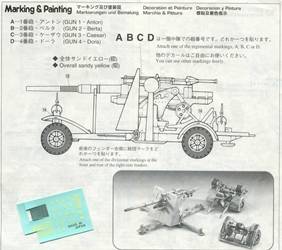
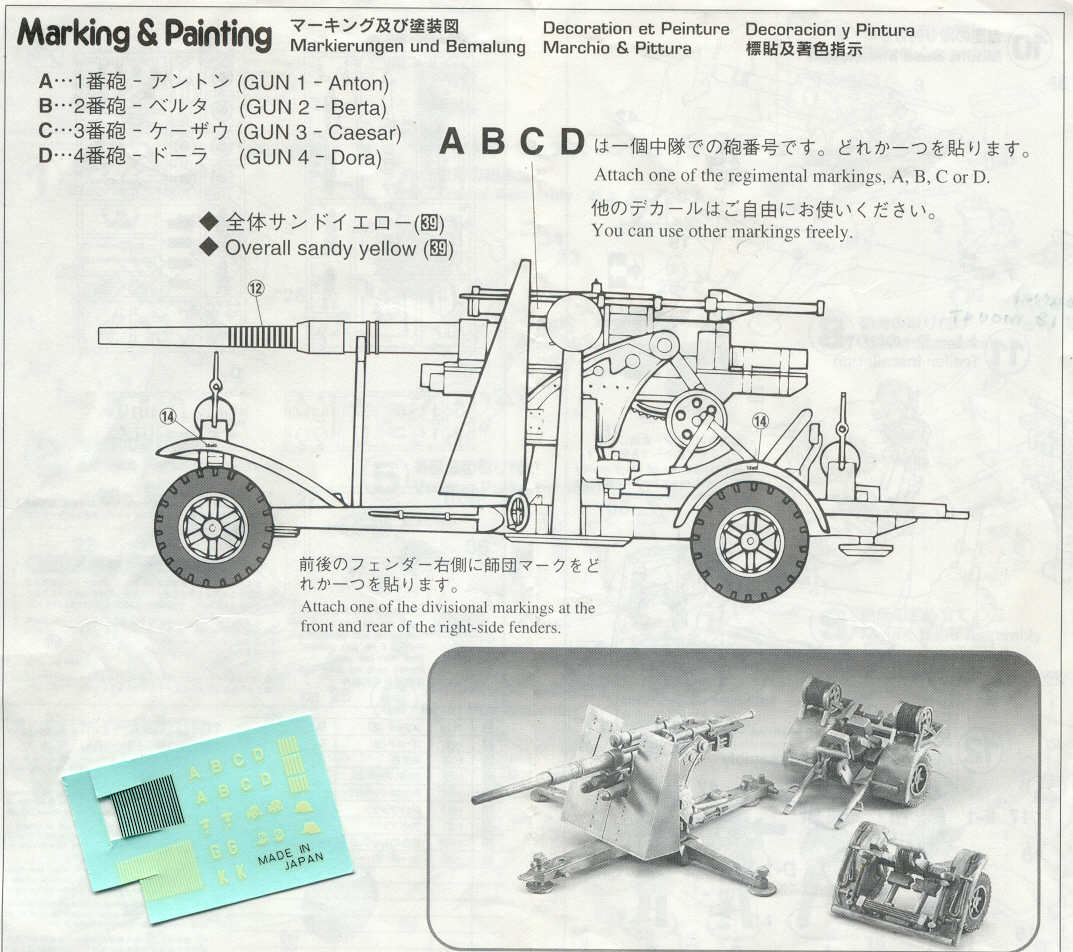
I like this side-view line
drawing showing Hasegawa’s pseudo Flak 36 gun in travelling
mode and with directions for placement of the kit decals. The partially
used decal sheet is at lower left; the decals applied well with no
problems. The decals sheet for kit MT10 is different from the decals
in kit MT38. The photo at lower right shows us what the finished model
MT38 looks like when completed in firing mode.
Conversion Hasegawa pseudo
Flak 36 to a more Accurate Flak 37
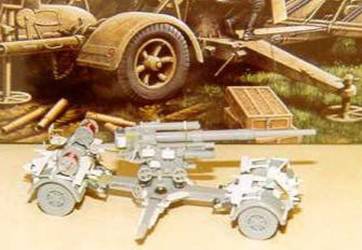
I apologize for the photo quality but
this is the only one I have of my partially completed model of the
conversion of the Hasegawa kit to a more accurate Flak 37. The white
parts are scratchbuilt parts. The Flak 37 was almost the same as the
Flak 36 but for the replacement of the light signal receiver (Lampenempfänger)
with a directional indicator with dials (Folgezeigeempfänger)
for fire control with a central fire director. On my model above the
two white rectangular boxes above the handwheels represent the Flak
37’s Folgezeigeempfänger.
I won’t say this is a conversion to an “accurate”
Flak 36, just a more accurate. From the white scratchbuilt
styrene parts we have an idea of the work needed to convert this detail-challenged
Flak 18 gun to a more representative Flak 36. The only thing accurate
about the unaltered Hasegawa pseudo-Flak 36 kit is a reasonably accurate
Flak 36 barrel. Everything else about it, from carriage to trailers,
are actually Flak 18 gun components. The Flak 36 has twin symmetrical
trailers which Hasegawa does not provide, so a rear trailer will have
to be stolen from another Hasegawa Flak 18 or Flak 36 kit for major
modifications.
The Flak 36 and 37 Trailers:
As the Flak 36 and the Flak 37 had the same Sd.Ah. 202 trailers fore
and aft, I had to steal a rear single-axle 4-tired Sd.Ah 201 trailer
from a Flak 18 kit for conversion to resemble an Sd.Ah 202. Be aware
that the Flak 18’s Sd.Ah. 201, and Flak 36 Sd.Ah. 202 trailers
were not interchangeable between the cruciform mount of the two guns.
In other words, you could not pick up a Flak 18 carriage with the
later 202 trailer. If you study the trailers in reference photos you
will see why.
Except for the communication-cable spools I discarded most of the
fittings. Scratchbuilt with styrene card, brass, and wire were the
towropes, storage boxes, communication-cable spool frames, hand tools,
ropes, fender supports and crew seat. Wrap some soft wire around the
cable spools to make more convincing 1/72-scale cable. As I was building
two nearly identical trailers I could have built just one of each
part and resin-cast a second for exact copies, though most parts were
simple enough to construct and only a few of each were needed. One
gun-crew member rode on the rear trailer to work the brake, so a good
seat is critical to a convincing model. This was made with plastic
card and brass wire (see photo below).
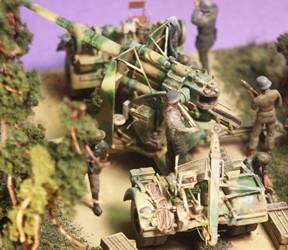
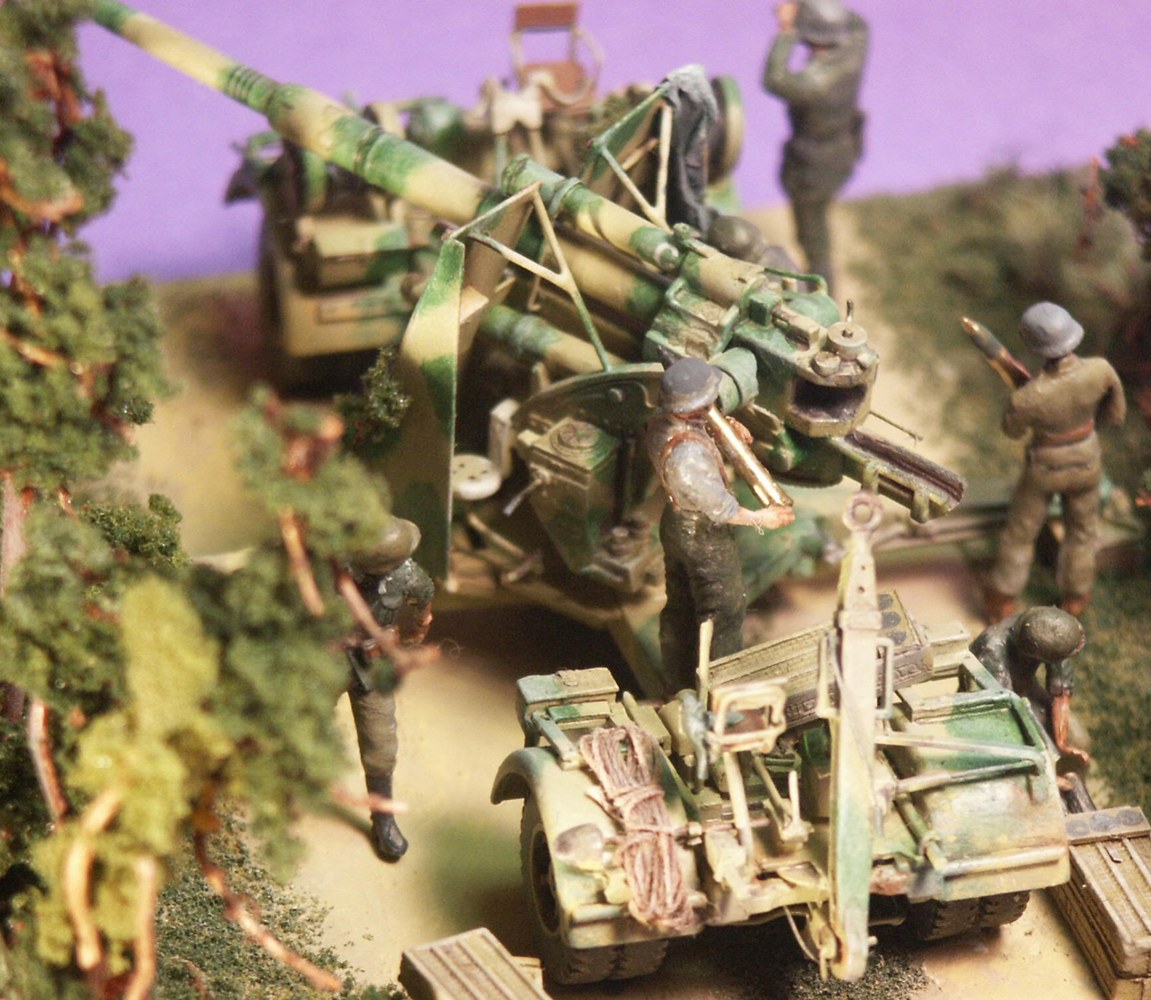
Here is a photo looking from
front to rear of the model as portrayed as a weapon of the German
Großdeutschland Division in Romania, 1944, being used in a ground,
anti-tank role. In the foreground is the front trailer bogie with
the towing tongue, a crew seat (which in hind sight should probably
not be there on the front trailer), brake lever and crank mechanism
for lifting the gun mount up to the trailer. From the shield two scratchbuilt
Y-shaped braces attach to the carriage.
The Gun: using your
references, the gun should be detailed with the appropriate elevation
and traverse indicator gages, the recoil slide opened/hollowed out,
assorted levers added and the barrel drilled out, etc. A solid gun
cradle seems to be a bane of most small-scale artillery kits; with
a drill and small file I made a trough. Do not forget to drill out
the muzzle. Like with the trailers, detailing & scratchbuilding
the dozens of separate features of the gun and fire control is too
much for me to list here so I refer you to the photos below of real
Flak 36 and Flak 18 guns on display at Aberdeen Proving Grounds and
in the references.
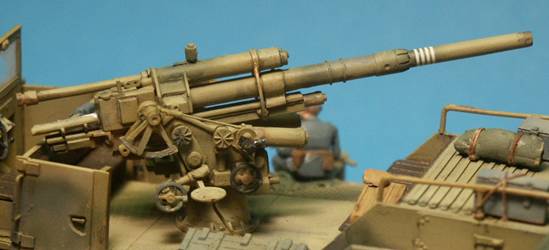
Viewing the right side of
the gun, there is a gunner peering through a scratchbuild direct fire
sight. Behind the gunner are two scratchbuilt azimuth and elevation
indicator dials for AA use. Modeling the gun ready for a new round
I added a square block of styrene to simulate an open breach block
sticking out. On the rear trailer is the rebuilt crew seat with rebuilt
cable spools; in travel these spools were often covered with a cloth
cover. On the outrigger are visible the outrigger locking lever and
pedestal leveling handwheel.
Cruciform Platform & Gun
Carriage: As I mentioned earlier, the Flak 36 cruciform platform
was also changed from the earlier one for the Flak 18, though you
can use the one enclosed as a start. Ground stakes attached and stored
on the outriggers need to be scratchbuilt from styrene rod & strip.
The ground stakes were to be driven through holes in the ends of the
outriggers to secure the gun to the ground. The stakes were attached
to the sides of the outriggers as the gun is modeled deployed on its
trailers. I also had to scratchbuild and make resin copies of the
ground pads. A storage box and standing platform were added around
the pedestal base.
Large front shields (Schutzschild)
were added to the 88-mm Flak after 1940 but guns in 1945 could still
be seen without them. The kit shield is okay but a wee bit thick and
was replaced by one constructed out of plastic card using the kit
part as a template. Do not forget the viewing port for the gunsight
and its door that swings up to the side (having its handle on the
backside). If you add a shield remember to construct braces going
back to the gun carriage (see photos). Hasegawa does not provide these
Y-shaped braces.
Painting: Prior to
a finish coat in Poly-S acrylic Depot Buff RR color (a convincing
Dunkelgelb color), I gave a light undercoat of gray enamel primer
for the metal parts and to bring out any defects in the finish. On
top of the Dunkelgelb a camouflage scheme of green stripes was applied,
simulating a summertime scheme to match the display base. Rather than
use an airbrush though I tried painting the pattern with artists oils
(the creamy stuff that comes in a tube) and a fine, soft brush. I
think the artists oils worked out well, getting fine lines and realistic
feathered edges. What I do not care for is the brightness of the color.
To try and mute this brightness down I gave the model a light coat
of tan paint diluted with clear dullcoat to simulate road dust.

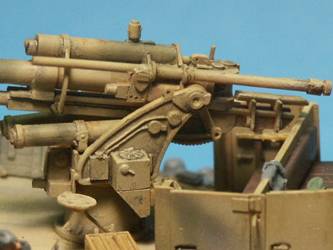
In the view of the front,
towing end, of the gun and trailer we see the lack of tire tread on
the tires. MODELLTRANS produces resin aftermarket replacement wheels
for Revell’s 8.8 cm Flak Sd.Ah. 52, item #MT72365, that should
also fit on the Hasegawa models kits On the trailer fender is a longitudinal
tubular brace, a crew seat and lifting mechanism. (After completing
the model I found that the front trailer typically did not have a
seat as the brakeman sat on the rear trailer.)

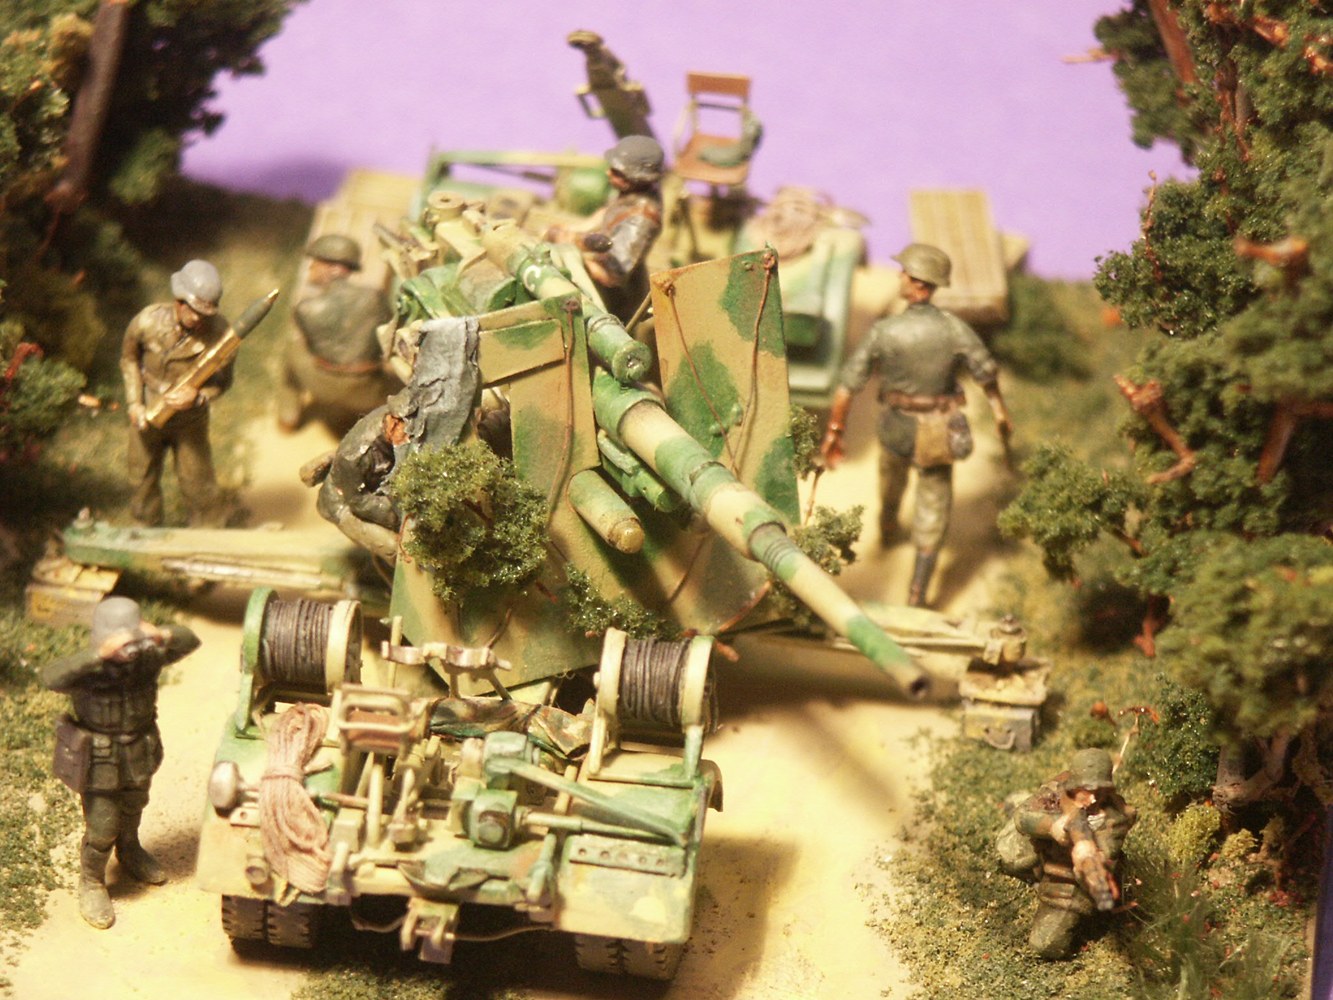
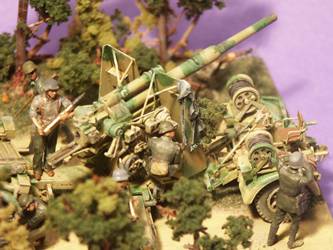
Tail end of the gun and trailer
with good view of the trailer fittings and the new gun shield made
from sheet styrene, a crank for lifting the mount up to the trailer
and some handtools. On the fender is a white helmet (Stahlhelm) emblem
of the Army Großdeutschland (Greater Germany) Division. The
side outriggers have been lowered and are resting on blocks of wood
to help steady the gun. We see a crew of six, in actuality there would
be several more handing ammunition.
The Display:
When I started this kit I wished to depict a rear guard action for
retreating German forces in Romania, 1944 similar to Hasegawa’s
box art. The base of the display starts with a 0.2 sheet of styrene,
primed, and built up with hard foam pieces and Sculpta-Mold (kind
of a shredded paper mache material). A little white glue and brown
acrylic paint was added to the molding material to improve adherence
to the base and dull its whiteness. After a coat of earth colored
paint, model RR flocking created a spring & early summer grass
texture adjacent to an unimproved country road. Trees were created
using small twigs and sapling roots dressed with model RR Clump Foliage
from Woodland Scenics Co. The base and subject were finally coated
in Poly-Scale dullcoat and a light dusting of pastel powders.
I painted the gun’s camouflage so it would blend well into a
small grove of trees next to the road. A friend (and honest critic)
of mine stated that the camouflaged gun blends too well into the groundwork
so it is hard to delineate. My reply is "that’s what it
is supposed to do"; even though he is right in that it does not
enhance the model display. A few 1/72-scale Preiser, Airfix &
Revell figures were added in order to give a better sense of scale
and of action. The Hasegawa crew figures are rather poor. Eventually
I will turn this into a mini-diorama in combination with an SdKfz.
7 prime mover halftrack kit.
Overall I recommend the kit. A beginner and
war gamer can build a good-looking and robust model out of the box
and an experienced model builder can go crazy and attain a lot of
experience with scratchbuilt detailing. The Revell Flak 36 model is
a notably more accurate model but we can learn so much and have a
lot of personal satisfaction from a conversion project like this.
Just for reference, I throw
in several photos of the 8.8-cm
Flak 36 on the Bussing Nag self propelled gun truck kit from MarS.
The gun is an improvement on Hasegawa’s model but still simplified.
This is the side with the gunner’s seat, azimuth and elevation
dials and handwheels. In the center is the direct fire sight just
above the forward handwheel. Behind the gunsight are the azimuth and
elevation indicator dials (the Lampenempfänger, light signal
receiver)
This is the left side of the MarS Flak 36 gun showing the auto rammer
and the fuse setter below. Looking at this close-up photo I see all
the blobs of paint and resin, flash and mold-seams I missed before
I completed the model! I wonder why MarS never released a complete
Flak 36 version or fixed-mount version of this gun model?
Reference Photos
(By Stephen Brezinski taken at Aberdeen Proving Grounds, USA. No copyright,
please feel free to print and copy.)

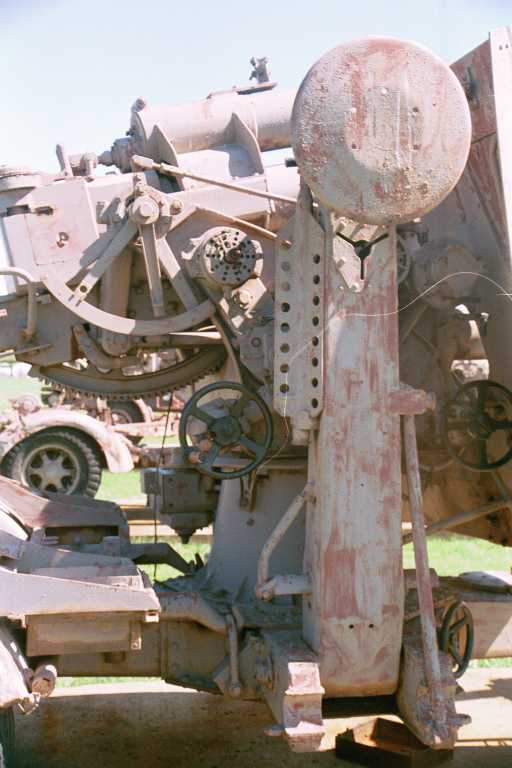
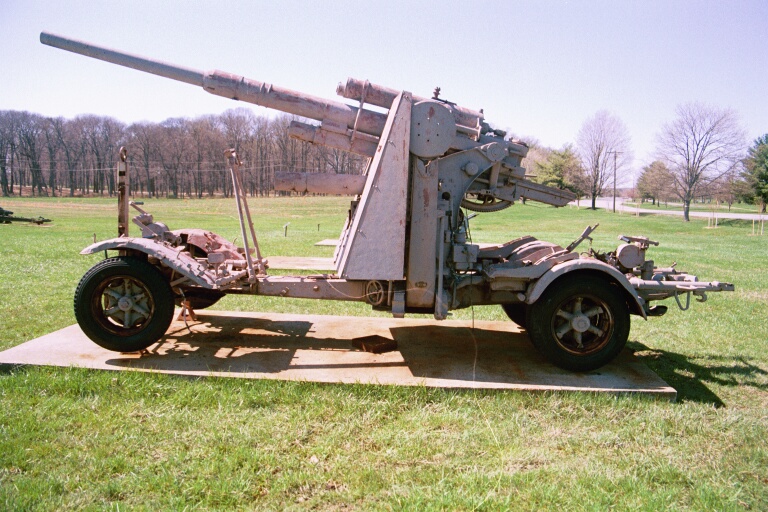
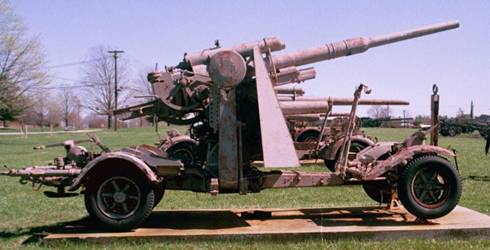
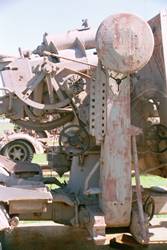
This is a Flak 18 gun with
sectioned Flak 36 gun barrel on display at Aberdeen Proving Ground
in 2001. In front of the gun carriage is the gun shield (Schutzschild).
Notice the seam where the side shield extensions join with the 10-mm
thick front shield; we’ll have to scribe that seam on the kit
part. The towing tongue and the travel lock at the left are both raised.
On the two Sonderanhänger 201 trailer bogies there are handcranks
visible and a brake lever on the rear (right) trailer but no brakeman
seat. On the front trailer bogie (Vorderwagen) at left are the flatter
fenders and single steerable roadwheel. On the rear bogie (Hinterwagen)
at right is the more curved fender for dual wheels on each side.
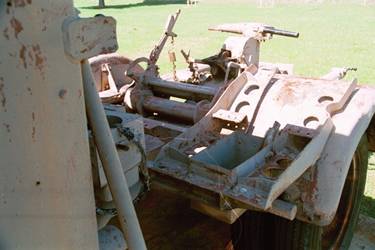
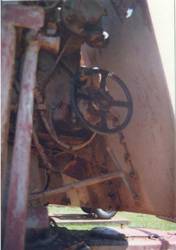
This is a view looking back
on the rear Sd.Ah. 201 trailer (Hinterwagen) in the photo above. The
handbrake is to the left, and right of the handwheel is the crank
(winch) for raising the cruciform mount up to the trailer. The cable
spool belongs in the big bracket on the fender. At far left is a raised
outrigger.
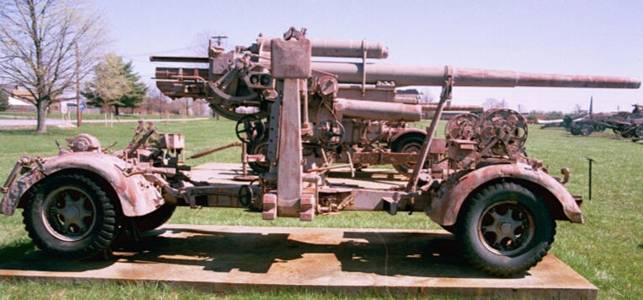
View of Flak 18 carriage
& trailers combined with the barrel of a Flak 36 (with its characteristic
bulge of the sectioned barrel). Note the round groundpad for the folding
cruciform outrigger and the forward steerable Sonderanhänger
(Sd.Ah.) 201 trailer with only one roadwheel on each side, and the
long sloping fenders. See Photo 6 below for a closer view.
This is actually a Flak 36 mount,
carriage and Sd.Ah. trailers with an interchangeable Flak 18 gun barrel.
On the right (front) trailer are the spools for the communication cables.
On either side of the raised outrigger are black elevation and traverse
handwheels. The T-shaped rod below the right handwheel is the gunner’s
footrest. The small box with two dials
off the lower left corner of the ground pad are the gun's elevation
indicator dials (Folgezeigeempfänger) like that seen on an 88-mm
gun identified as a Flak 37. This is notably different than the Flak
18 and the Flak 36 azimuth and elevation indicator dials (the Lampenempfänger,
light signal receiver) seen on the MarS kit above.
This is a close-up photo
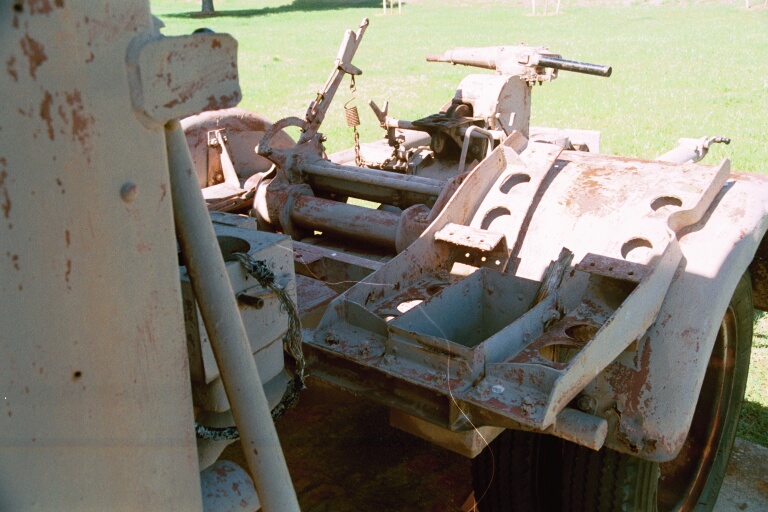
of the Flak 18 gun and 8.8 cm Flak-Lafette 18 in the first photo above.
The raised ground pad has six small concentric holes. On the raised
outrigger just below the round groundpad is a hole with three slots
radiating off it. This hole is for the ground stake to go through when
anchoring the weapon down for firing. To the left of the hole, still
attached to the outrigger, is a groundstake. (I am amazed that after
60-years this stake has not been stolen as a souvenir.) Below the groundstake
is the lever for locking the outrigger in place, a feature missing in
the Hasegawa kit. On the right side of the raised outrigger is a long
rod (locking bar plunger) which appears to be for holding the outrigger
up in the vertical position; this is another feature not in the Hasegawa
model. To the right, down on the cruciform mount is one of the two handwheels
for the carriage leveling mechanism.
At about 7-o’clock orientation to the round groundpad is the elevation
indicator dial, the type of dial that is featured on the Hasegawa model.
The single dials for the elevation and azimuth are common to the Flak
18 and Flak 36. Left of this dial is the arc-shaped elevation quadrant
and elevation indicator pointer. Going right from the top of the elevation
quadrant is a long rod which is a link to the direct gunsight, another
feature not included in the Hasegawa model kit. On either side of the
raised outrigger are the black handwheels for gun elevation (left) and
for gun traverse (on the right).
This photo shows the direct
sight bracket (minus the Flakzielfernrohr 20 gun sight) at very top
center above the traverse handwheel. Below and behind the handwheel
we can just make out the two brackets that attached the shield to the
carriage. In front of the bracket is the folded-up T-shaped footrest
for the gunner’s seat.

The forward trailer (Vorderwagen)
attachment of the Flak 18 and Sonderanhänger 201 trailer. Once
attached to the gun, this was the forward trailer with steerable wheels
so the gun could only be towed in one direction once the trailers were
attached. This is what we need to make Hasegawa’s Sd.Ah. trailer
look like.
References:
- The German 88 Gun In Combat, by
Janus Piekalkiewicz (1992). Schiffer Publishing’s hardcover
book focusing on the Flak gun’s AT and ground use with many
black & white photos and English text.
- Dreaded Threat, The 8.8 cm Flak
18/36/37 In The Anti-Tank Role, by Thomas Jentz. Panzer Tracts (2001)
- George
Parada’s Achtung Panzer website
Tthere is also an excellent section on the Flak 88 with photos of
a restored Flak 36 and Sd.Ah. 202 trailer,
- Photos of the three guns at Aberdeen
Proving Ground. [I have noted so many slight variations in details
of the actual guns in photos that I would not worry if something
wasn’t exactly as one photo or expert claims it is.]
- US War Department Technical Manual
GERMAN 88-MM ANTIAIRCRAFT GUN MATERIAL 29 June 1943, TM E-369A.
-
http://www.onthewaymodels.com/reviews/Hasegawa/AlMagnus_Hasegawa_Flak36.htm
Al Magnus’ review of the Flak 36 kit.
- http://www.onthewaymodels.com/gallery11/MMakinen_Hasegawa_Flak18.htm
Marko Mäkinen build of the Hasegawa Flak 18 kit.
- German Artillery of World war Two,
by Ian V. Hogg. From Greenhill Books and Stackpole Books (1997).
- Anti Aircraft Artillery, by Ian
V. Hogg.
- Editor's note.
Scans of the manual and sprues can also be found on the Henk
of Holland website.
|