|
An edited for length version of this article has previously appeared in the  magazine, "Random Thoughts", Volume 34, Number 3, Summer 2012. magazine, "Random Thoughts", Volume 34, Number 3, Summer 2012.
A Brief History
The Landing Craft, Vehicle, Personnel (LCVP), or Higgins boat, was a landing craft used extensively in amphibious landings in WW II. It was created by Andrew
Higgins of Louisiana, USA, who based it on his boats designed for swamp and marsh operations. More than 20,000 were built by Higgins Industries and various licensees.
The majority were used by US forces, though some also went to Great Britain. Usually constructed from plywood, this shallow-draft, barge-like boat could ferry a
platoon-sized complement of 36 men, or a 6,000 pound vehicle, or 8,000 pounds of cargo at 9 knots (17 km/h).
LCVPs were used extensively in the Pacific Theatre for amphibious landings during the US island-hopping campaign and also for landings in Europe and North Africa.
A Navy contingent of LCVPs was also used to ferry troops and materiel across the Rhine River in the final days of the war in Europe. As far as I can tell, only
wood hull LCVPs were used in World War Two.
Research
Not having any reference material on the LCVP in my library I searched for as much information as possible. The Squadron book on US Landing Craft helped some, but the
vast majority of what I found came from a variety of web sites including builds of 1/35 scale LCVP kits.
One thing that became quite apparent was that LCVP photographs showed many differing details: the interior ribbing, the cable guard, side armour/no side armour,
splash board shape, cleat shapes, ribbing on the exterior of the ramp, etc. And the details didn't always jive with what any of the LCVP kits offered. So it
looked like I'd just have to concentrate on making the Airfix/Heller kit look more like an LCVP than what came in the box.
(Refer to my page on LCVP Detail Points)
I found that camouflage and vessel markings also showed many differences. Photos bear out that LCVPs, and all landing craft in general, were painted to match their
mother ship. Colour photos showed light blue boats (probably Haze Gray) and darker boats (close to Dark Navy Blue). One black and white photo showed a
boat that appeared to be mostly white.
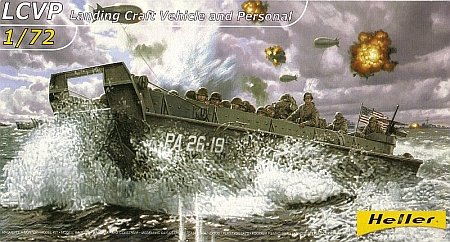
The Airfix/Heller Kit
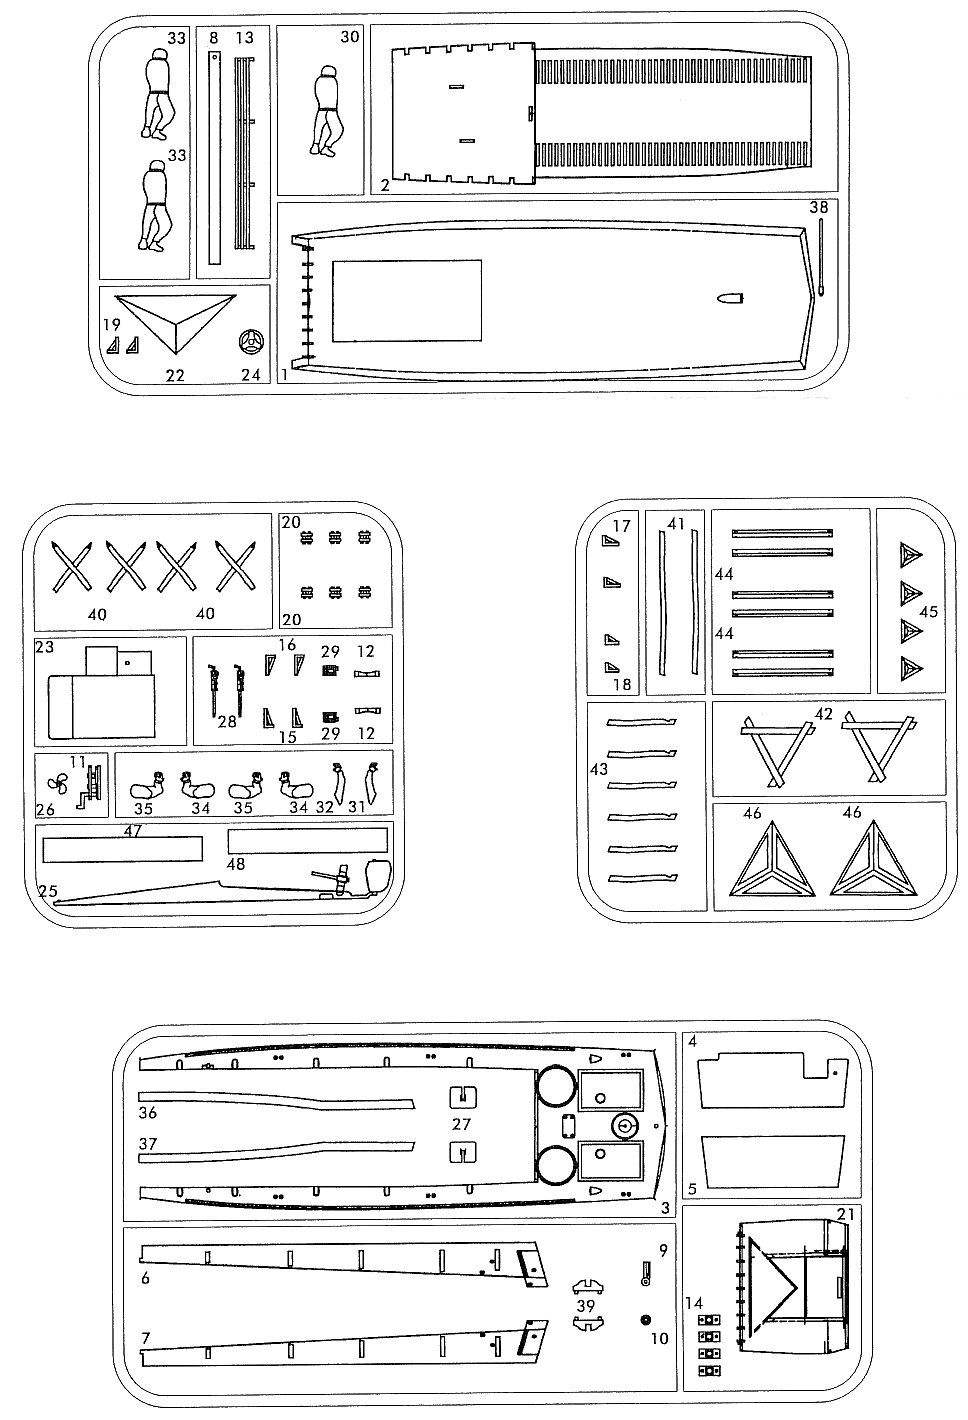
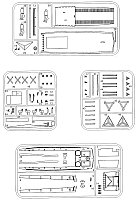
The kit represents a wooden hull LCVP. What you get in the box is a set of four sprues containing 88 parts moulded in a soft light blue plastic.
Two of the sprues contain parts strictly for the boat, while the other two share boat parts with beach obstacle parts. Almost all parts have noticeable seams and in
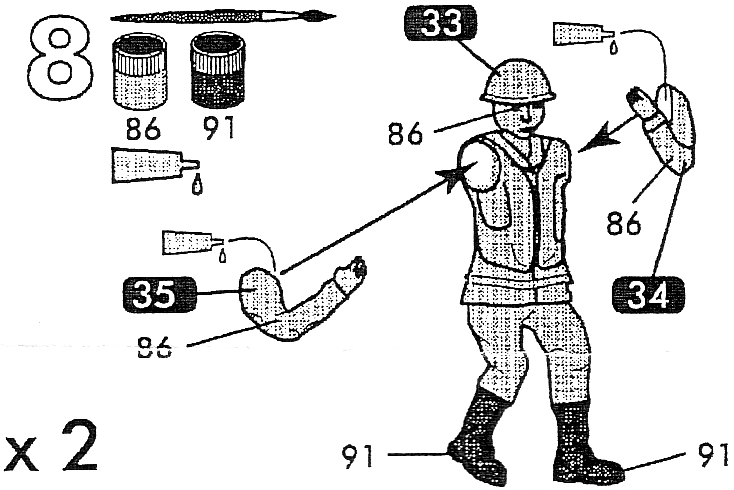
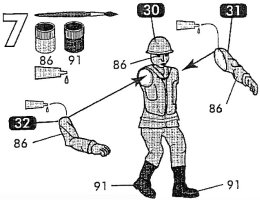
some cases there was a bit of flash and ejector pin marks. Detail is soft, many of the small pieces were clunky, and a few were not much more than blobs, especially the three crew figures.
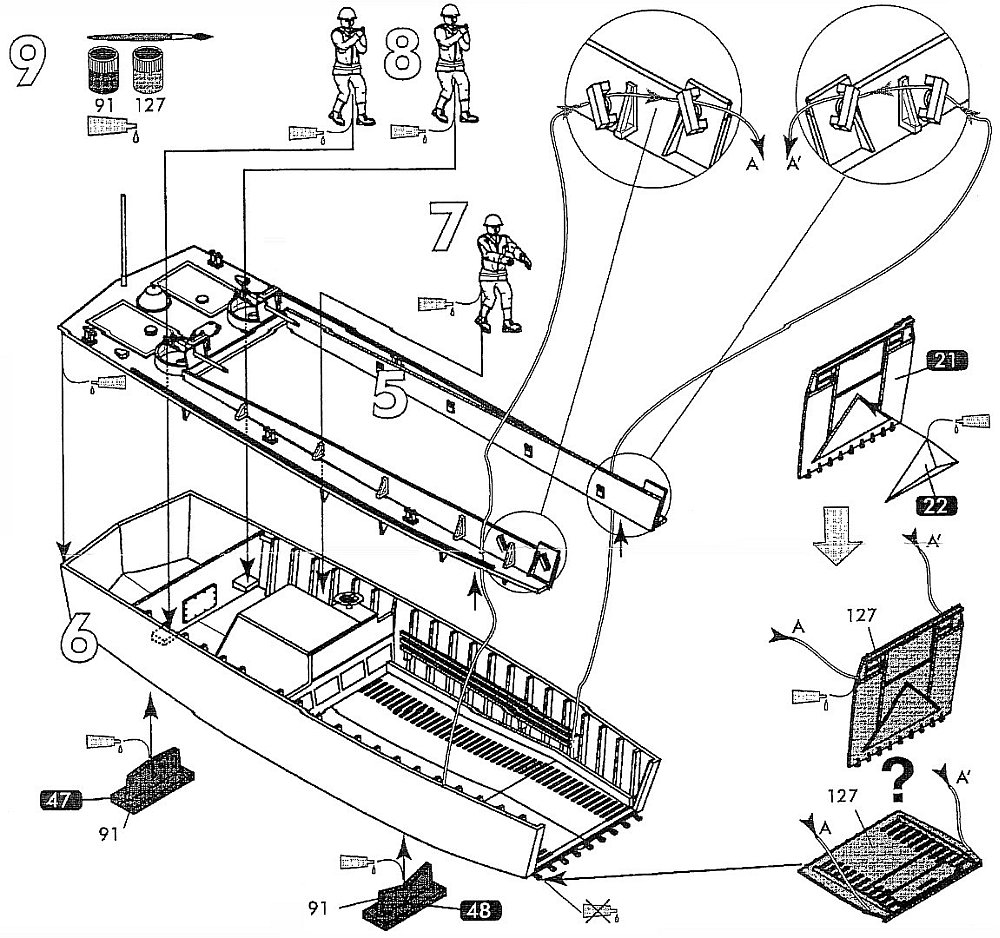
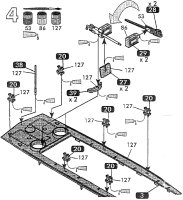
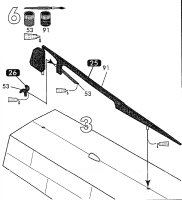
There was a lot of minor detail missing as well. Instructions are printed on both sides of an A3 sized paper. Construction sequence is outlined as ten separate steps in
exploded diagram format. The diagrams are a bit crude and busy in places, but even as such they were relatively easy to follow.
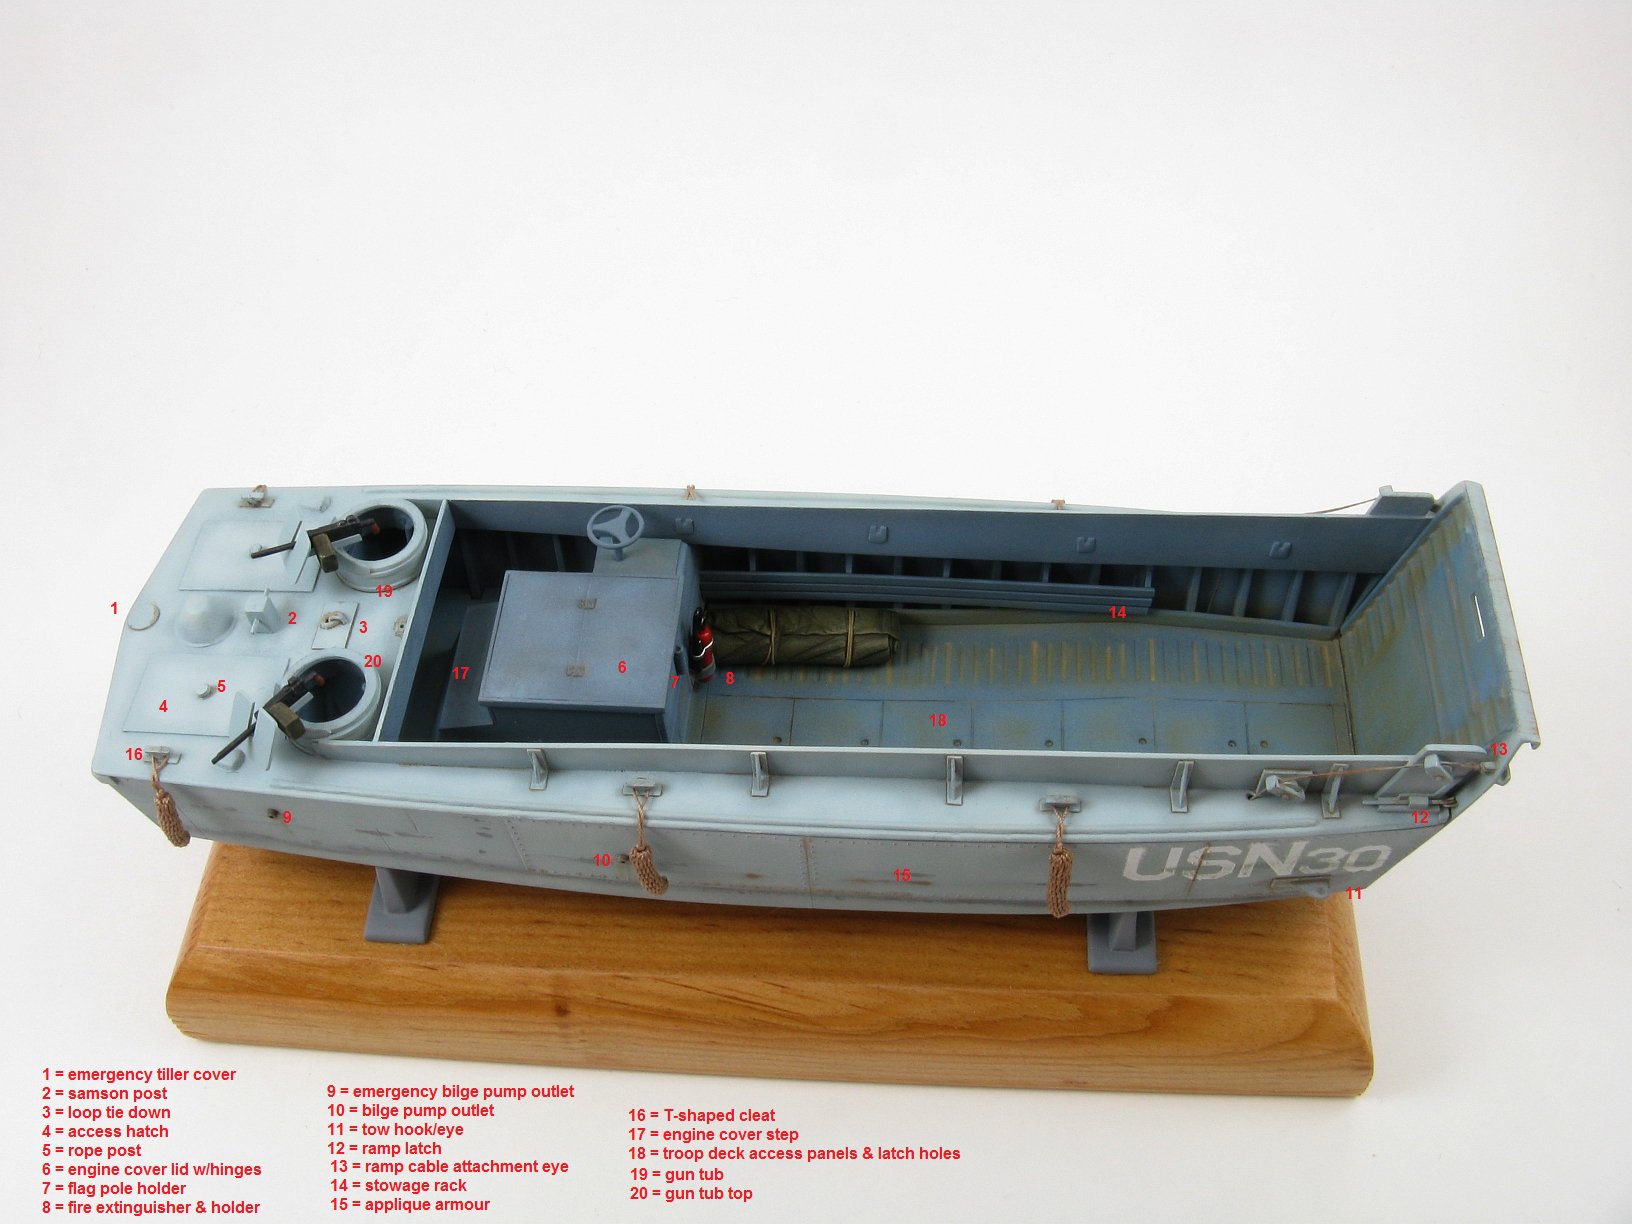
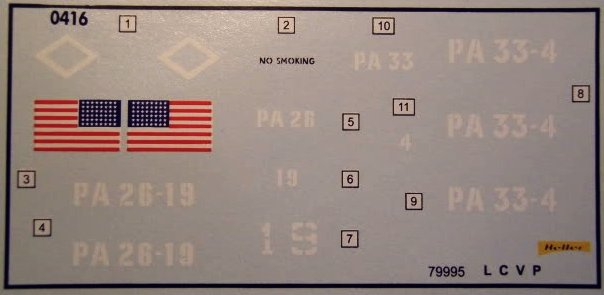 |
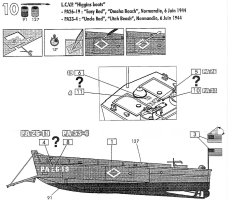
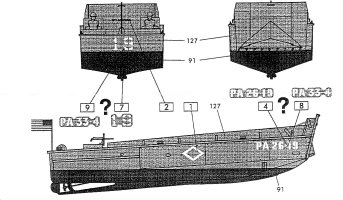
The kit decal sheet contains hull numbers for two American LCVPs used during the D-Day landings on June 6, 1944: PA26-19 from the USS Samuel Chase and PA33-4 from the
USS Bayfield. Photos proved the font for the hull numbers to be totally incorrect. For PA26 the characters are a squared stencil style with serifs and for PA33 they have the
USN 60o clipped corners.
(Refer to my page on US Boat Hull Numbers)
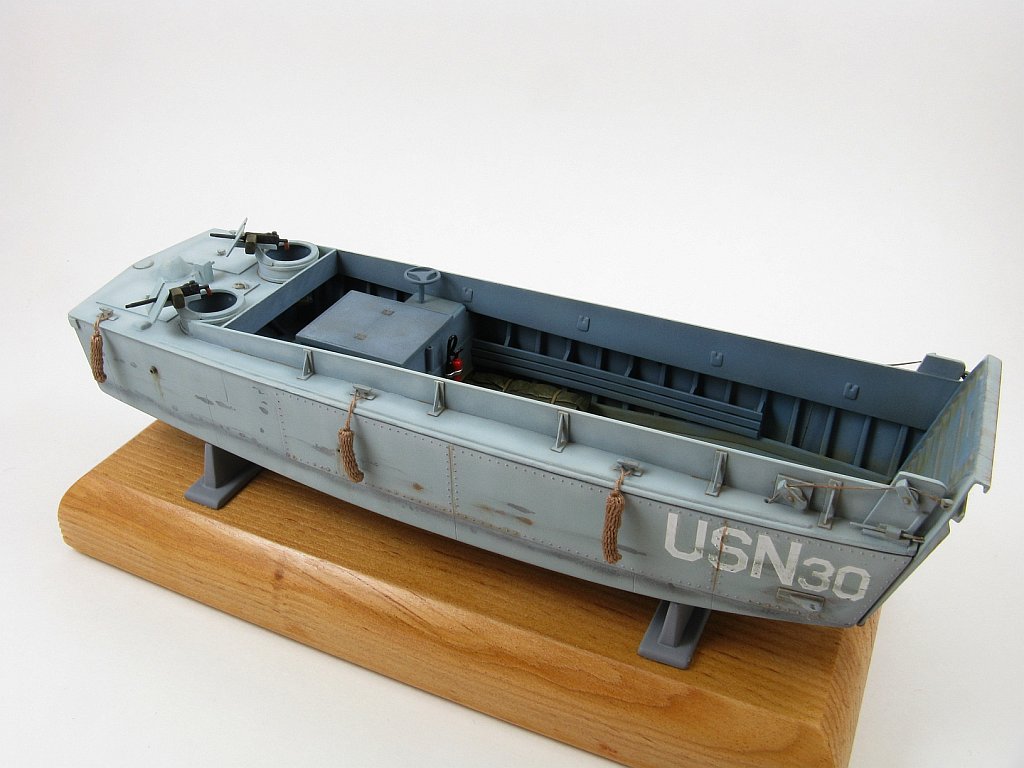
It was obvious that the kit decals would not do and an alternate scheme had to be found. I'd located two pictures on the web that looked promising. One was of an
Olive Drab LCVP with a white hull code USN30 and the other showed USN30 again, along with USN47, both having their Haze Grey hulls being repainted in Olive Drab. The
web also provided a series of colour photos of some LCVPs being loaded in Weymouth Harbour just prior to D-Day which were a lovely light blue-grey colour. I assumed
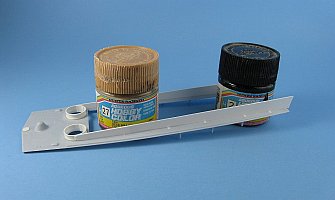
this to be Haze Grey. Some web sites suggested the Luftwaffe colour RLM76 as a close match to Haze Grey. I had two bottles of RLM76 at hand: Testors (2086) and
Aeromaster (9027). A quick test showed the Testors paint to be the closest match to my colour photos.
As for the hull lettering, the reference pictures didn't show them too well, though they definitely had clipped corners. USN letters and numbers usually had 60o clips
but I have seen some Navy craft with corners that looked to be closer to 45o. Well in 1/72 scale the difference between 60o and 45o isn't that noticeable, so I decided
that I could get by using my old Aeromaster 45o ID Numbers & Letters sheet for USN30.
|
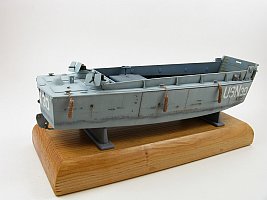
With colour and markings decided, it was on to the building of USN30.
Construction
For an injected plastic kit, this one was as crude as they come! But then again, some parts showed promise, such as the hull, which was flawlessly moulded with an
overall shape that looked good to my eye, so I decided to give it a go.
The first thing to do was to take stock of the parts. I made a couple of lists, one with items from the kit to keep, and one with the parts I would need to add or
replace because they were either not included in the kit or were too crude to use.
Keep list:
- hull
- skeg
- gun shields (need thinning)
- stands
- ammo boxes
- ramp pulleys
- upper and cargo decks
- steering wheel
- engine cover (add step, hinge line and hinges)
- bulkheads
- prop
- ramp (interior and exterior)
|
Scratch build/replacement list:
- cleats
- ramp winch
- cable guard and cover
- stowage rack
- machine guns (from the spares box)
- cleat braces
- samson post
- gunwales
- skeg braces
|
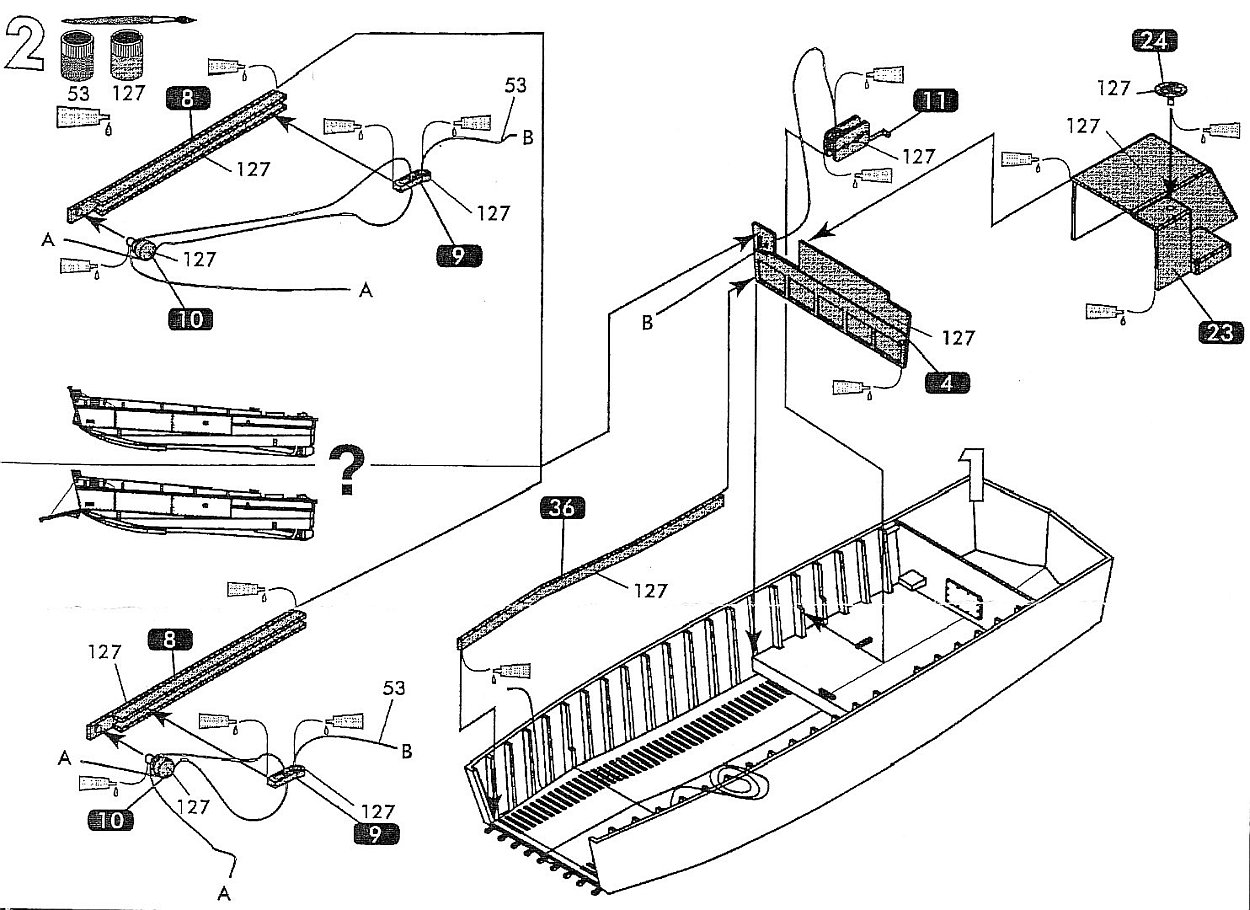
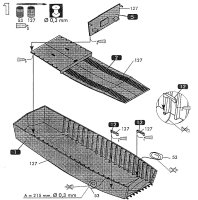
Hull and Troop Deck

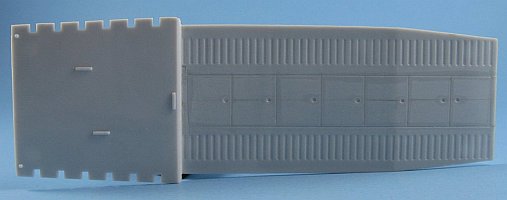
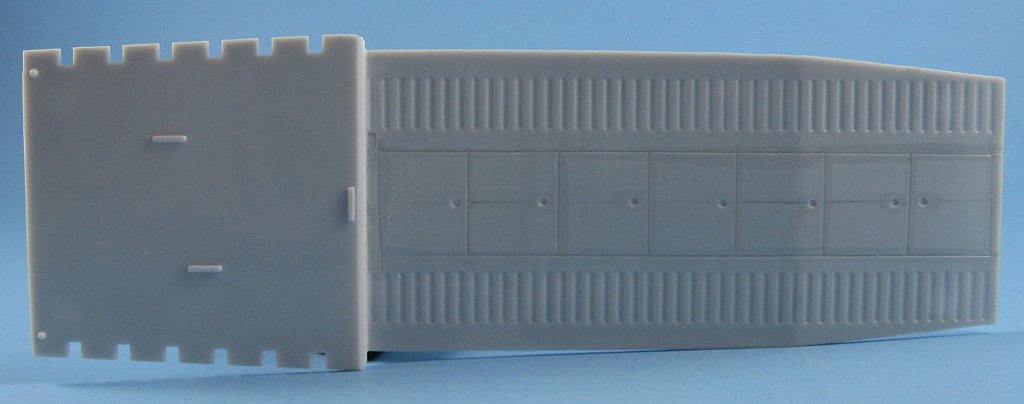
This is the start point according to the instruction sheet and seemed like the logical place to begin the build. The detail on the cargo deck is somewhat soft, but usable.
Unfortunately, it does not have any of the access panels as seen in my references so I first penciled in the lines and then scribed them with a dental pick, using a
steel ruler as a guide. The plastic is quite soft and the scribing proceeded smoothly. The circular depressions (which I assumed are finger holes for lifting or maybe for
latches) were added with a drill bit in a pin vise.
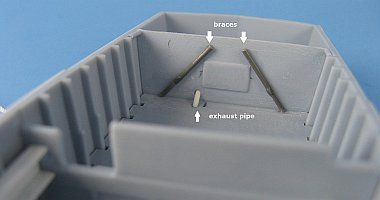
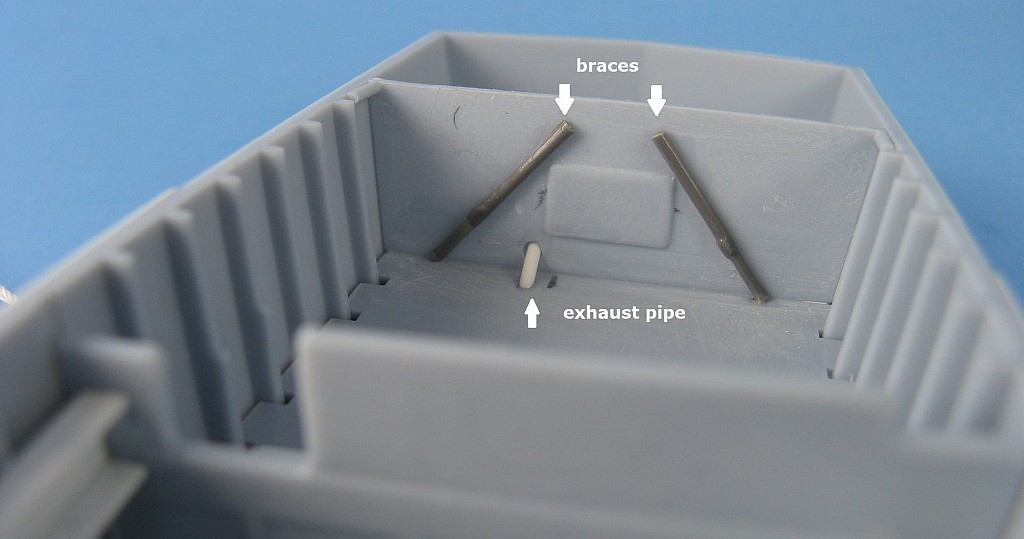
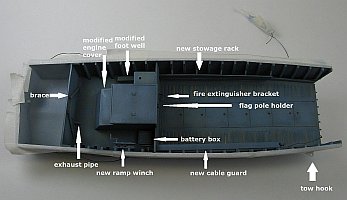
The cargo deck fit inside the one-piece hull without any interference. I did have to shim it a bit at the rear so it would sit level. The rear bulkhead has the gunners'
seats moulded to the bulkhead. These were cut off and sanded flush. I added some braces (a pair of aircraft oleo legs scavenged from the spares box) and what looks like
a piece of the engine exhaust pipe.
Here is where you need to lay the kit's string/cable across the bottom. If you don't do it now then there's no way to run the string once the cargo deck is in place.
My original plan was to use the string to represent the ramp cable as intended by Heller but I didn't like the fact that it was very fuzzy and I had doubts that it would
stand up well to being painted. Instead I sourced some six-pound test braided nylon fishing line. I did run the string as per the instructions but now its purpose was to
act as a 'fish line' for the braided fishing line later in the build.
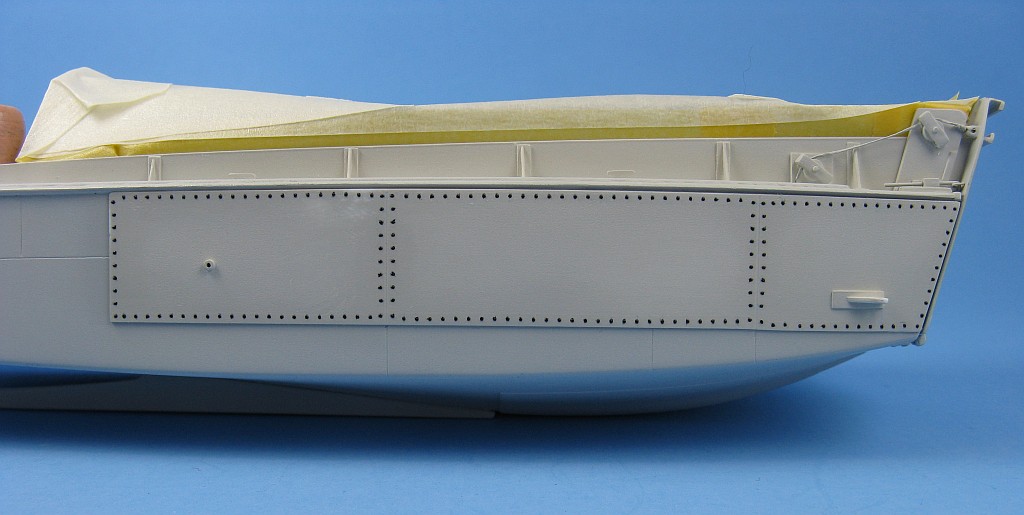
USN30 needed appliqué armour added to the exterior of the hull which I cut from a sheet of 0.010" plastic. Lines were scribed to represent plates. The kit is missing
the prominent tow rings so I fashioned a pair, measured out their location and glued them to the hull. A hole was drilled in the stern for the engine exhaust and a
pipe made from plastic rod added, drilling out an opening. I also added the ring that goes around the pipe.
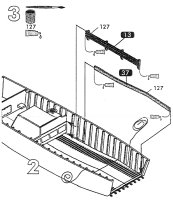
Detailing the Hull Interior and Cargo Deck
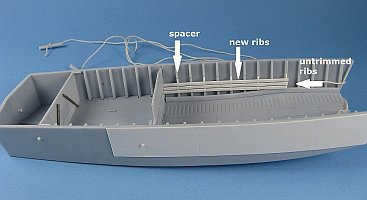
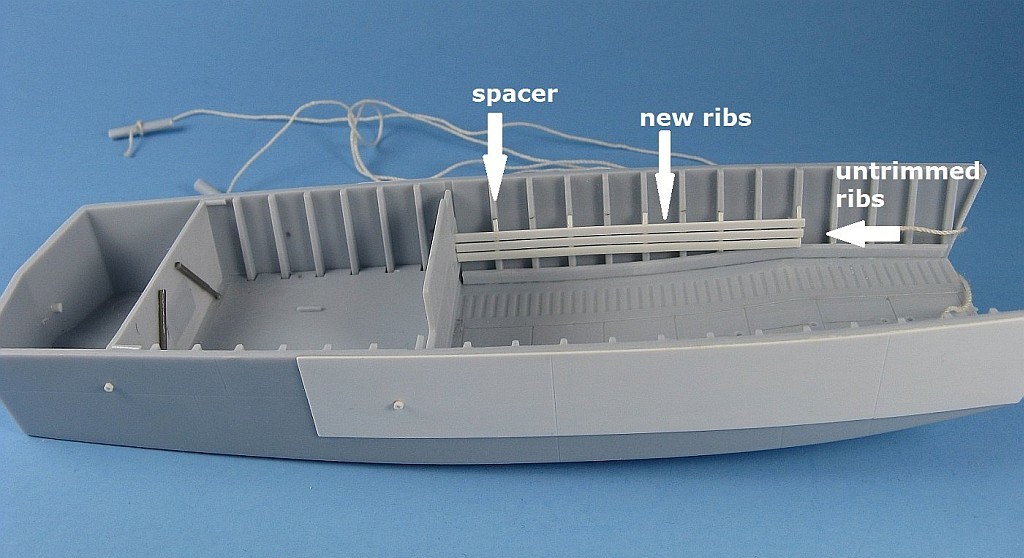
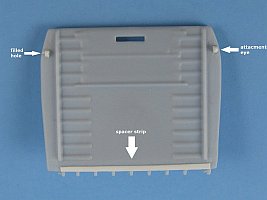
I could see that the kit's port side storage rack and starboard cable guard were not up to snuff and desperately needed to be replaced. First, the bulkhead was glued in
place. For the storage rack a set of five triangular spacers were cut from some plastic strip. These were glued to alternate ribs (5, 7, 9, 11 and 13 when counting from
the bow). New ribs from lengths of plastic strip were glued on top of the spacers. When dry, the ends were trimmed and sanded flush to the edge of the spacer at rib 5.
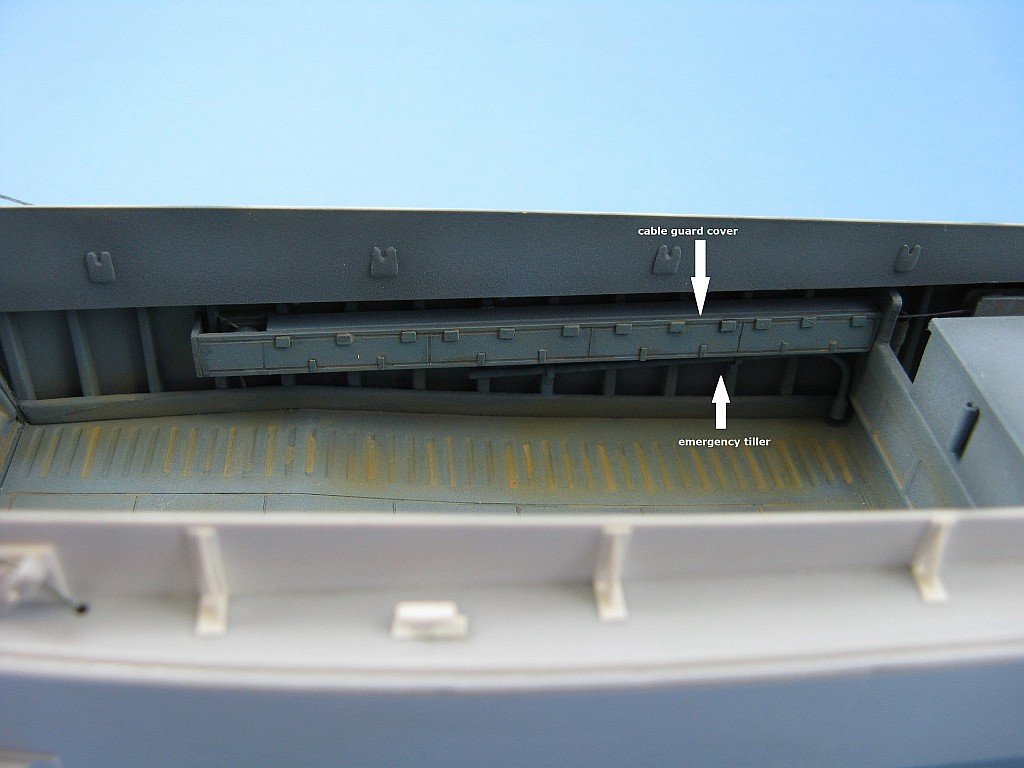
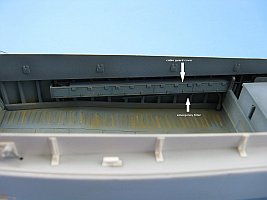
The new cable guard/equalizer was a bit more involved.
On a real LCVP, the cable guard/equalizer is a U-shaped channel containing a slider with a cable running from each end. From the aft end, the cable runs to a pulley in the ramp
winch. From the fore end, the cable runs in two directions. To port it runs under the cargo deck, up through a hole in the deck, then around a couple of pulleys to the
ramp. To starboard it runs up through a hole in the deck, around another couple of pulleys and then to the ramp. So, when the handle on the winch is cranked, the cable
running from the winch moves the slider, which then pulls on the fore end cables to either move the ramp up or down.
My reference photos showed at least three different styles for the guard. I chose the more common variant. First I made
measurements for length and then constructed a U-shaped channel from plastic strip. At the fore end I replaced the kit pulley. A cover was fashioned from pieces of
plastic strip. Lines for the access panels were then scribed. Hinges and latches were made from small pieces of plastic strip. On the back side I added plastic strips
to aid in placing the cover over the U-channel. Since the cable was going to be hidden from view by the cover I made a solid anchor point for it at each end of the channel.
After gluing it in place I had to add spacers between it and the hull because the guard is straight while the hull is curved.


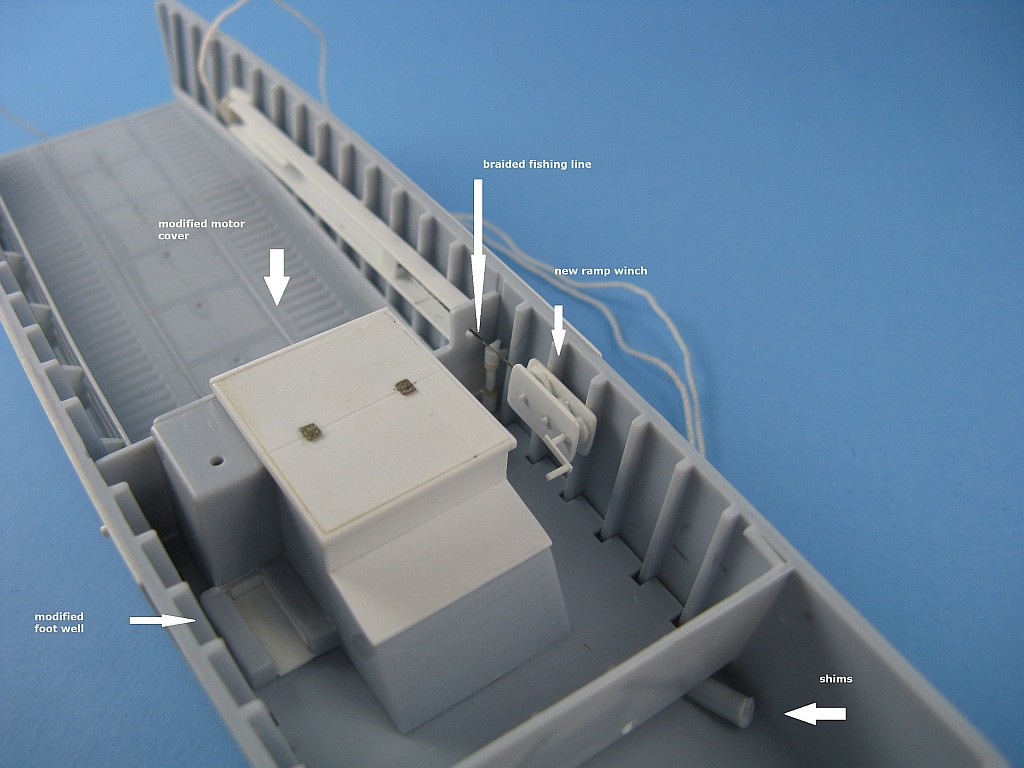
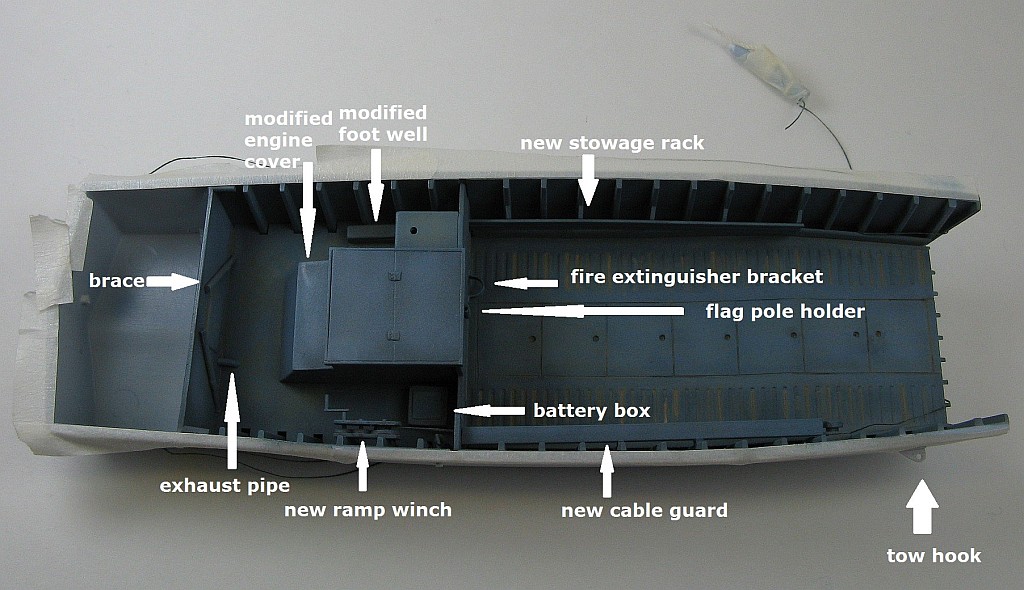
I cut the kit's engine cover to add the missing the step at the rear. I also added a new top, scribed a hinge line across it, and put on some hinges chiselled from a
spare AFV hull. The driver's station should have a space between it and the engine cover. I left this as is because fixing it would have also forced me to make a
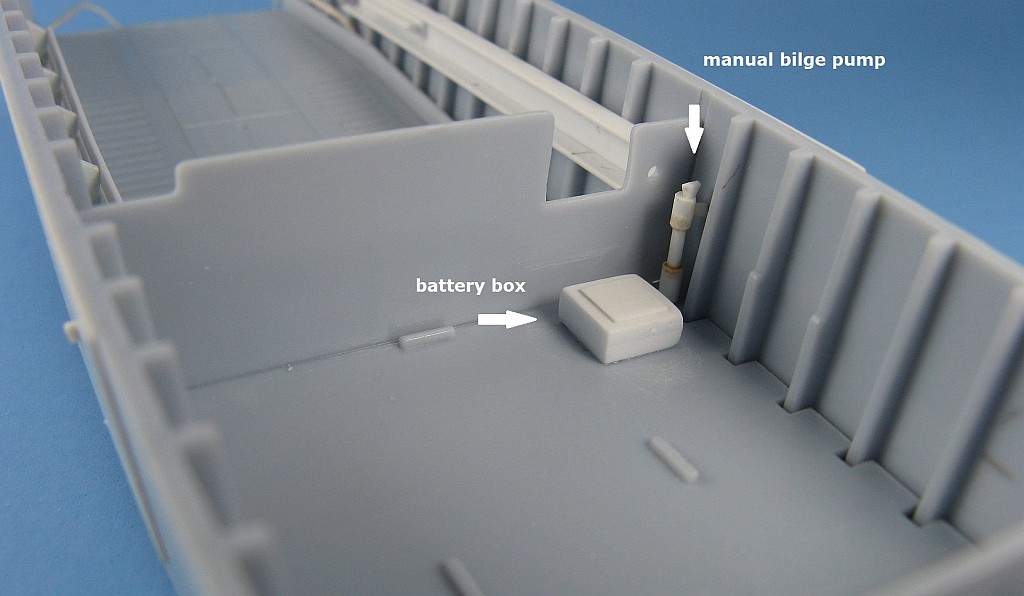
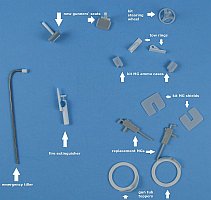
completely new bulkhead. Instead I just added the missing foot well. A new ramp winch was made from plastic sheet and rod using the kit version as a template. A manual bilge pump and a battery box were
scratch built from plastic sheet and rod. The bilge pump needs to exit the hull so a hole was drilled here and the pump's outlet pushed through. The end of the pipe
was drilled out.
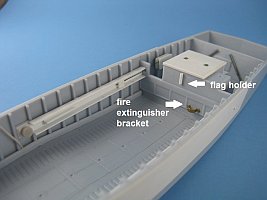
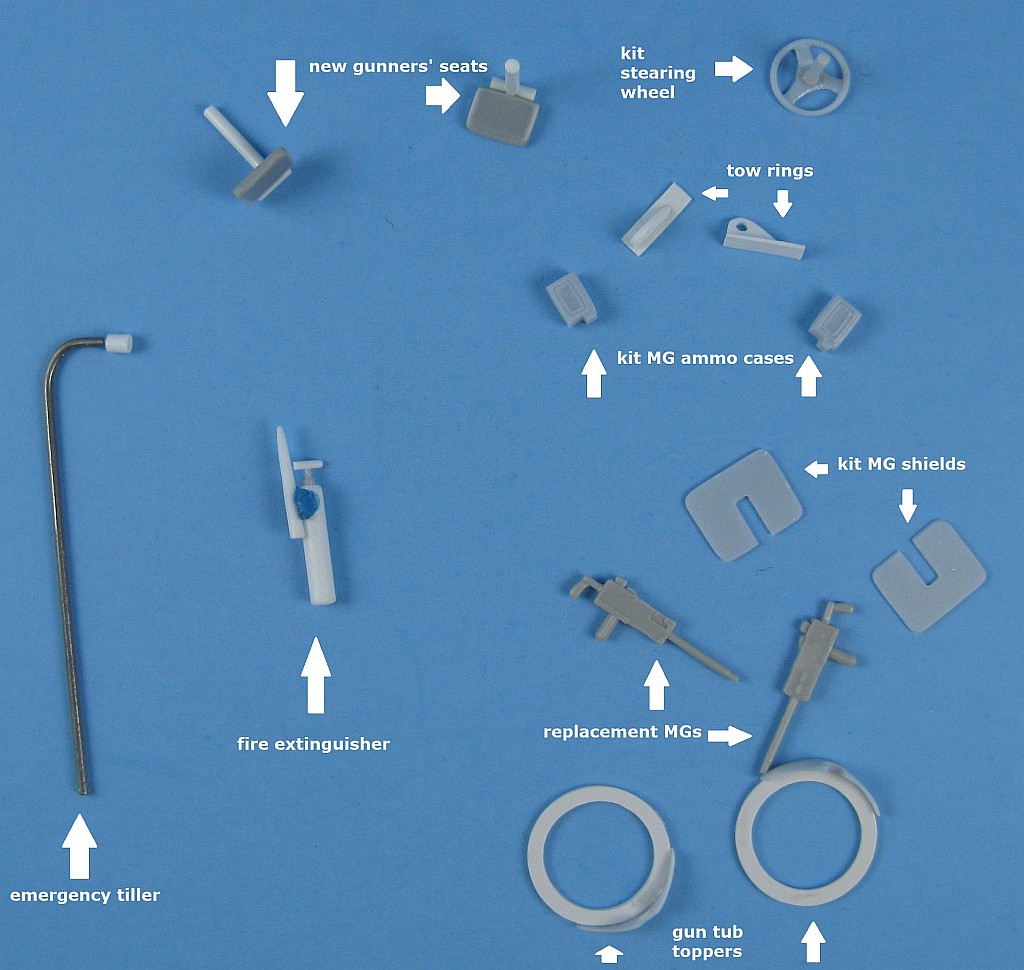
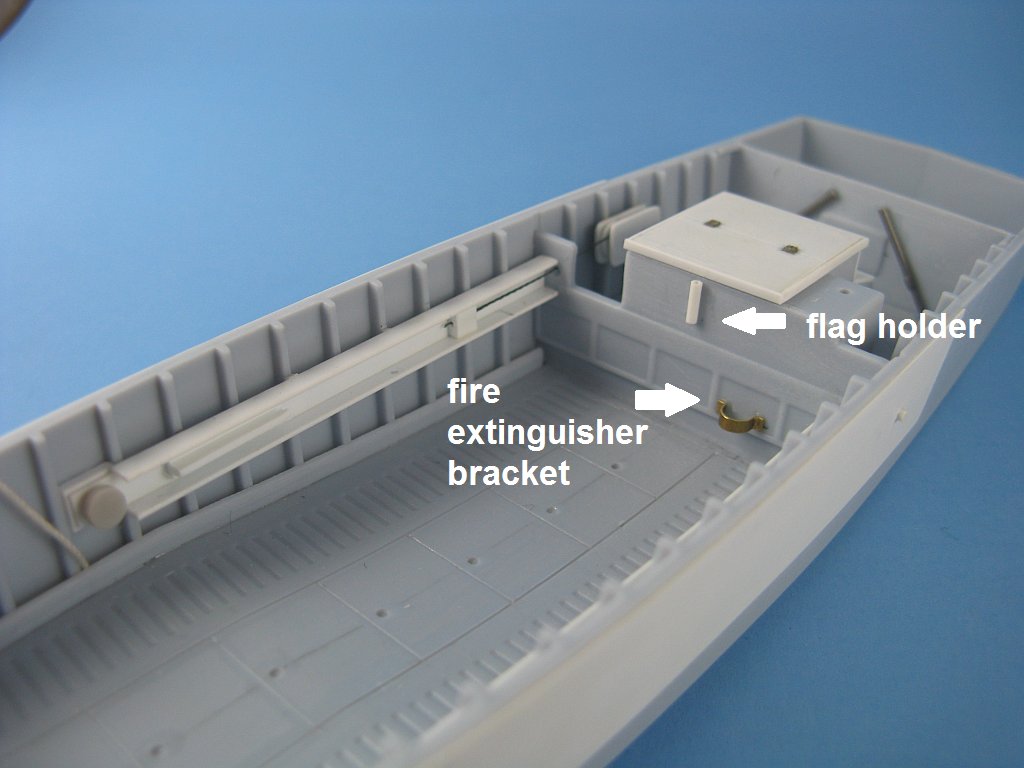
Some scrap brass was bent into a loop for the fire extinguisher bracket and a piece of plastic rod with a hole drilled in the top was used for the flag holder, both being attached to the
fore side of the bulkhead. At this time I also fashioned an emergency tiller (bent from a piece of piano wire with a socket made from plastic rod), and a
fire extinguisher using the one in the Trumpeter LCM(3) kit for dimensions. Thin solder (The Source Nexxtech 0.6mm (0.022") Solder, item no. 6400013) would be used for the hose.
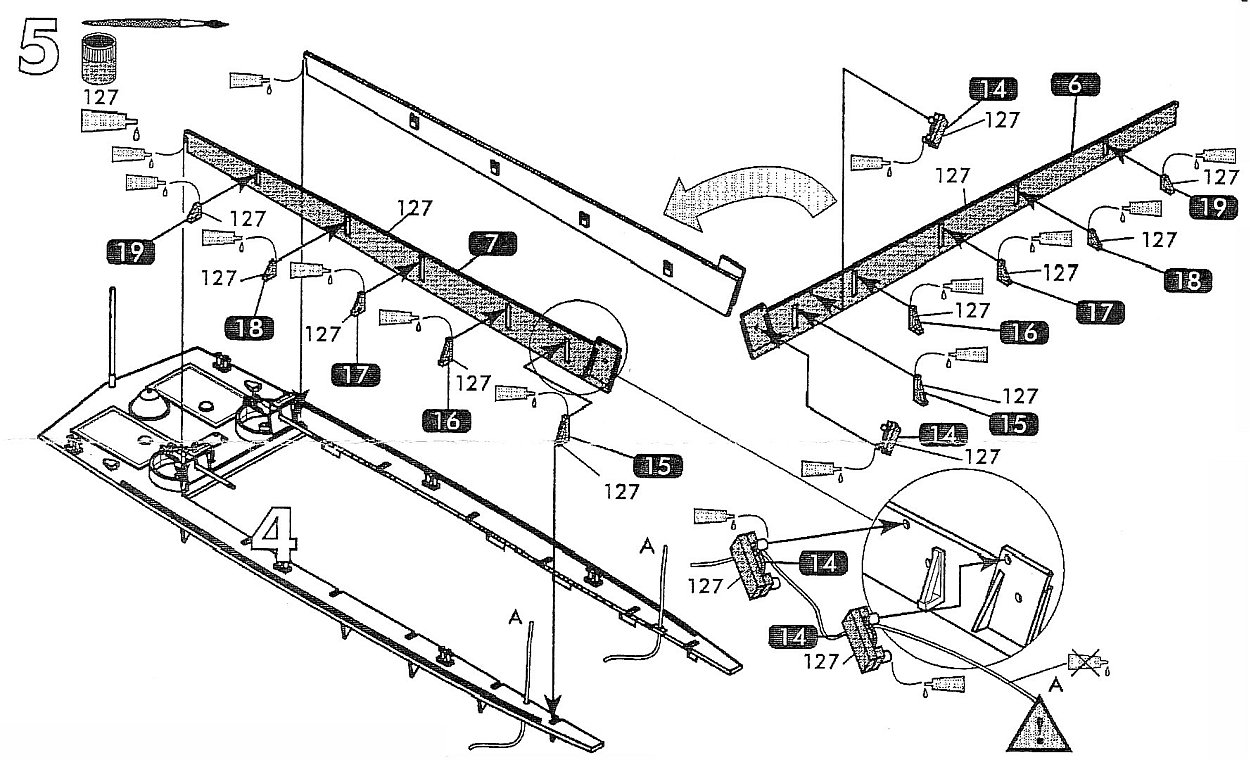
Deck and Gunwales

The moulded-on gun tubs were wretched. They are conical in cross section, versus the correct cylindrical shape, with deep grooves in the plastic. First, the old tubs
were cut from the deck (not an easy task), and, try as I might, I couldn't get a very circular opening. Strips were cut from 0.010" plastic and rolled into cylinders
for the new tubs. At the point where the ends joined I added a small strip of plastic for support. The tubs were inserted into the holes, measured for height, glued,
and left to set thoroughly. Once dry the excess plastic sticking down below the deck was trimmed flush.
The new tubs did not quite fill the holes in the deck. My options were to either fill and sand the gaps or cover them over. After some thought I resorted to the latter
and cut four thin strips from some plastic sheet. Each tub got one strip wrapped around its base, and one wrapped around its top. A few drops of thin cyano glue filled
any gaps and some light sanding removed the seams. Tub covers were thin slices cut from a piece of 0.45" plastic tubing. They had to be sanded to match each other in
thickness. The kit's lower gun shields were thinned and glued to the tubs. Using the 1/35 scale Italeri LCVP kit for reference, I fashioned some new gunners' seats.
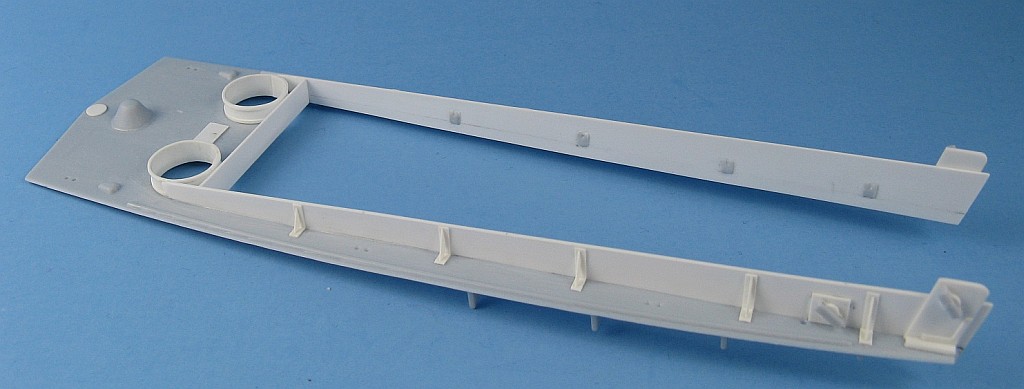
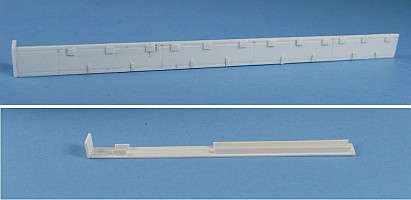
The kit's gunwales are much too thick. New ones were cut from 0.020" plastic using the kit pieces as templates. The new gunwales were extended some so they would meet
the gun tubs as per my reference pictures. The new gunwales were notched so they would fit between the plastic strips previously placed on the top and bottom of the
tubs. The forward ramp supports are moulded to the kit's gunwales so these were cut from the gunwales and used as templates for copies made from 0.020" plastic. I added
a brace to the bottom of the ramp supports as per my references.
Both the kit's gunwales and deck have indentations to locate the gunwale braces. I filled each of the deck indentations with some plastic strip. To figure out where the
edge of the deck would run along my new gunwales I used the top of the indentations on the kit gunwales as a guide and I drew a line along the length of my replacements.
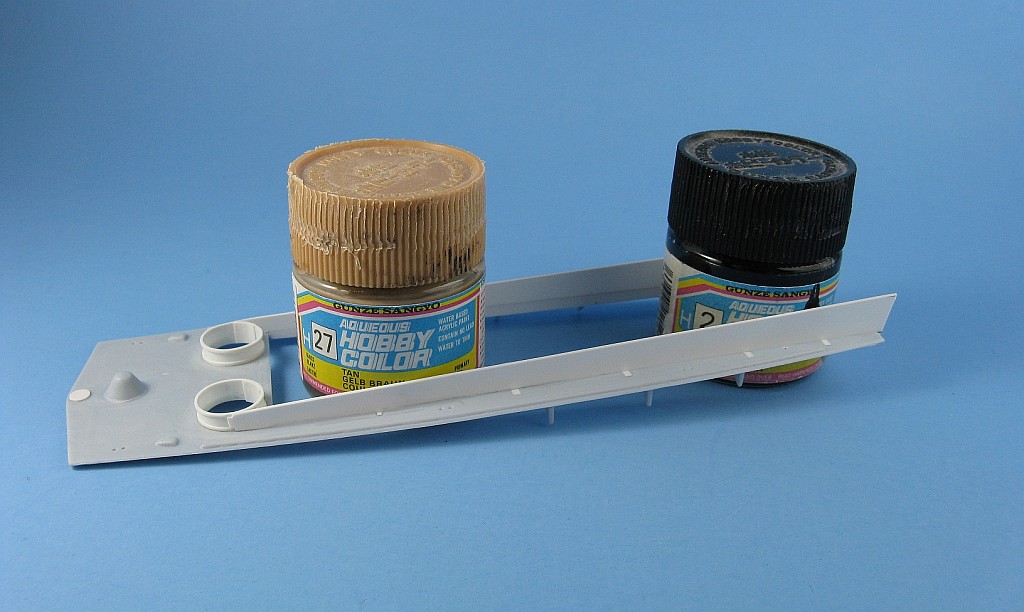
Attaching the gunwales to the deck uses a simple butt join. Keeping the gunwale in place while applying the glue looked to be difficult. After some experimentation I
found that a Gunze Sango paint bottle spanned the gap of the deck perfectly, so with a couple of bottles inserted inside the deck opening, I slid the gunwales between
the bottle and the deck and ran some glue along the seam.
Like all of the small parts in this kit, the gunwale braces are chunky. New braces were made, each comprised of three parts: small plastic strips were used to cover
the previously filled indentations in the top of the deck, then a matching strip was glued to the gunwale, and finally a new angle brace was added. Once the braces were in place the
deck assembly was very strong.
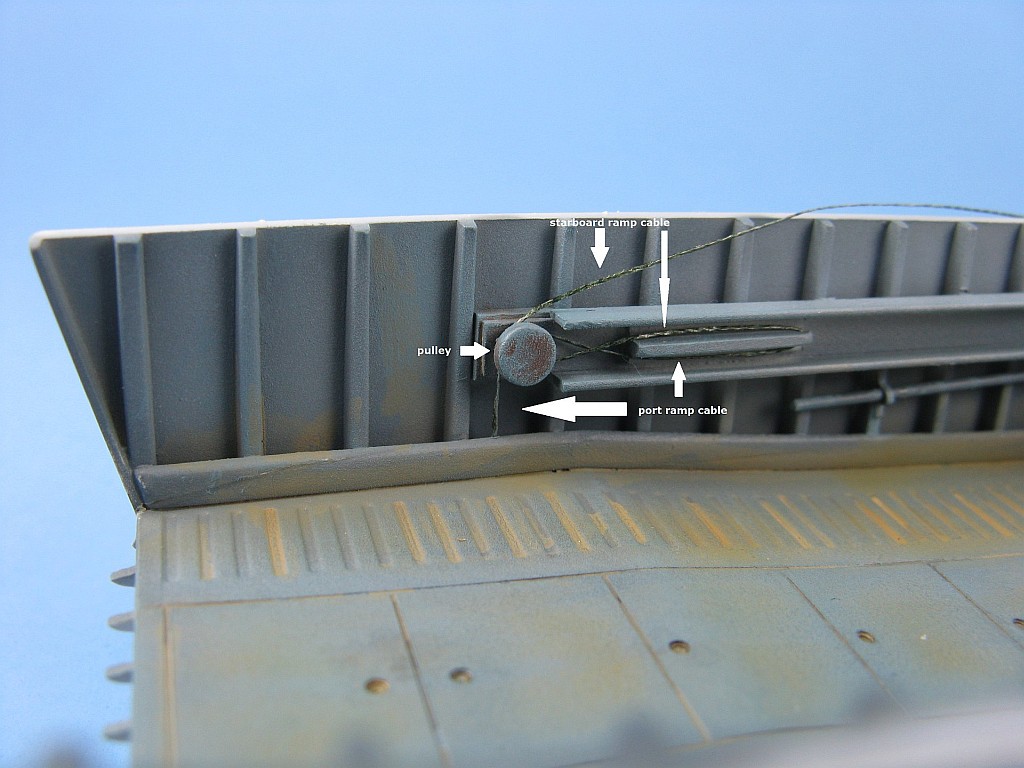
On the inside surface of each of the kit's gunwales is a set of four tie downs which I chiselled off and glued to the inside of my new gunwales. The kit's pulleys
are not great. The U-shaped support was acceptable so I trimmed the kit pulleys from their supports, punched out new pulleys, glued them to the underside of the
supports (first scraping them with a hobby knife to thin them some) and then glued the pulley assemblies in place. The ramp pulleys on the gunwales need to have a
support plate under them which was cut from 0.010" plastic. The finishing touch was adding axle ends cut from some round plastic rod.
The kit's access panels on the rear deck are soft-looking. They were scraped and sanded off and new panels made from pieces of plastic card. In the centre of each I
added a rope post plus a cap from a punched piece of plastic sheet. After looking over my references again I felt that the posts should have been more towards the
boat's centreline than where I have them. At this time I also added an emergency tiller cover plate, punched from some plastic sheet. The plate conveniently covers
the hole in the deck for the kit's flag pole.
Between the gun tubs is a plate with a loop style tie down. I replicated the plate with a piece of plastic. The tie down was a piece of copper wire bent into a half-loop
and inserted into holes drilled in the plate. For the link I liberated an AFV tow rope loop from my spares box.
The kit's MG shields were sanded to a thinner profile.
The Ramp
|
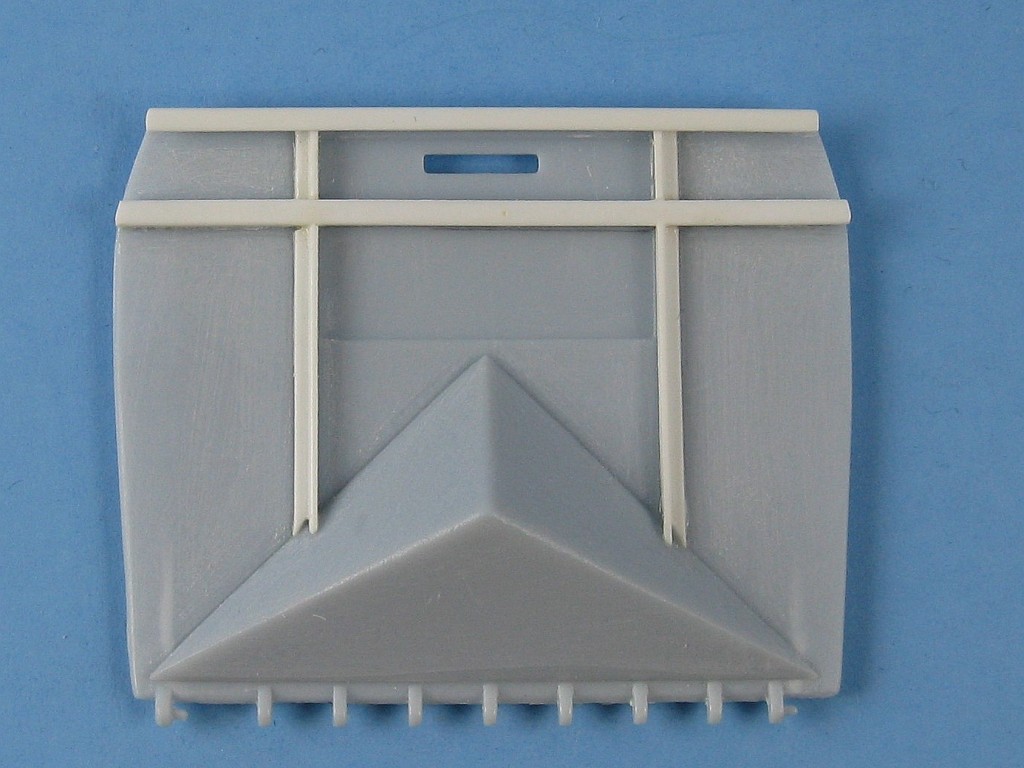
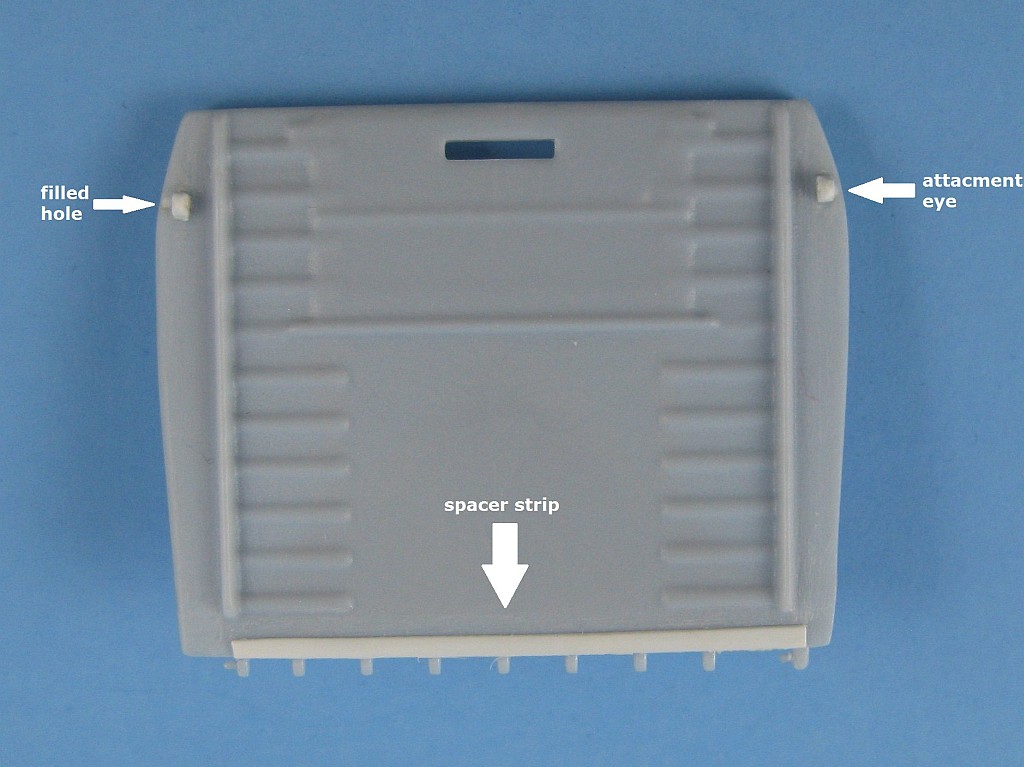
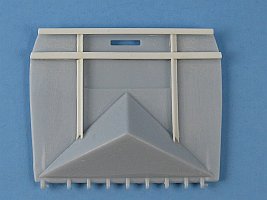
The ramp detail is barely adequate on the walking surface side, and the rib detail on the outside is much too soft. I removed the outside detail and replaced
the ribs with L-shaped plastic strip. There are two holes in the ramp to run the cable through, which is incorrect, so I filled them and made some attachment eyes.
A dry fit of the ramp revealed a gap at the bottom between the ramp and hull. A strip of plastic along the bottom of the ramp interior closed the gap.
|
Painting, Part 1
With the interior complete it was time to paint it. The interior colour is a dark-blue grey. I custom mixed this, using some Humbrol Flat Blue (H25) with some
Testors Flat White (1768) and Navy Blue (2055). I sprayed this over the interior, underside of the deck, inside surface of the ramp, the cable guard cover and the
emergency tiller.
A shot of Testors Glosscote sprayed straight from the can followed. I weathered the interior assuming the boat would have been heavily used, with a lot of foot
traffic in particular, so most of my weathering was to the troop deck. I dirtied up the deck with pin washes, dry brushing and airbrushing with my favourite dirt
coloured paint, Testors Africa Dunkelgrau '42 (2103). Some additional dry brushing afterwards with Testors Intermediate Blue toned down some of the more exaggerated
weathering. My flat coat finished the interior painting. |
|
Deck, Hull and Ramp

Before joining the deck, hull and ramp, I had to do some extra work inside the hull to save myself some future grief. The emergency tiller was attached beneath the
cable guard. Two small strips of lead foil were formed to represent the holders, glued to the ribs overlapping the handle, and touched up with some paint applied with
a brush.
Now it was time to run the braided fishing line under the cargo deck. I tied the fishing line to the string, keeping my knot a small as possible, and then pulled on
the string from one end to drag the fishing line through. My only worry was that the knot might snag on its way under the deck. Much to my relief, everything proceeded
as planned. Now I routed the line around the pulley and the anchor inside the cable guard and attached the guard cover.
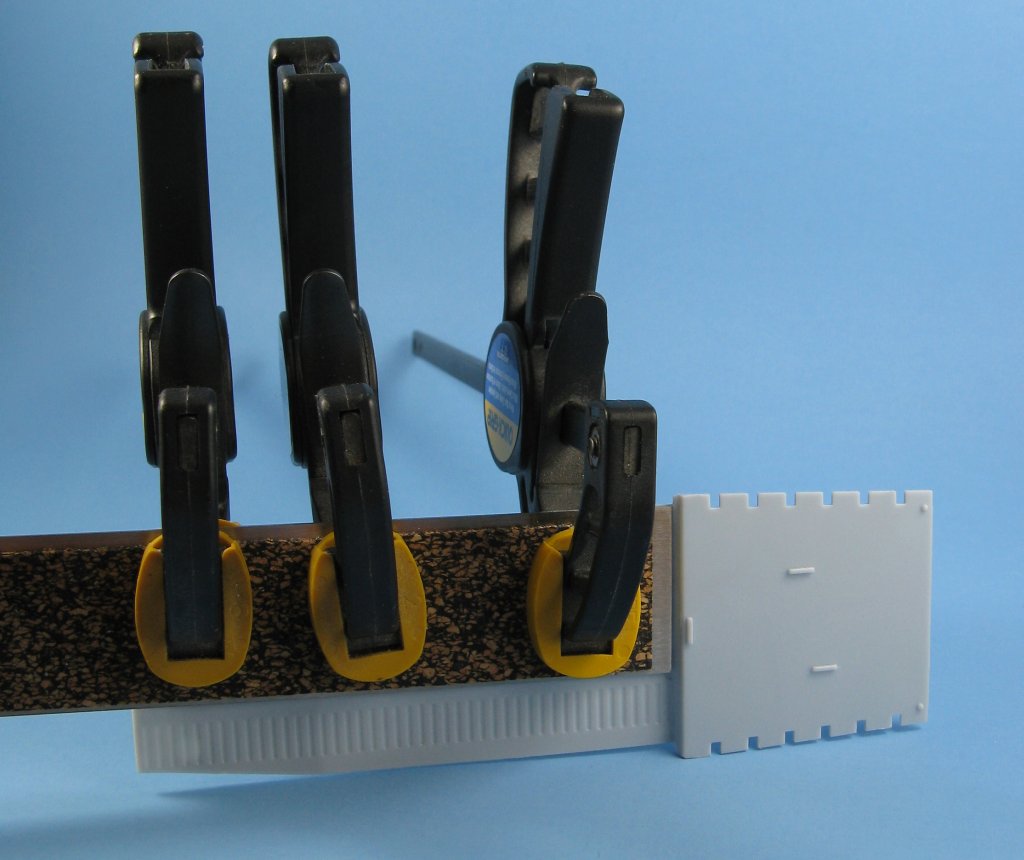
The deck-to-hull join is not good. I managed by gluing them together a few inches at a time with Methylene Chloride and applying clamps as needed. Care was needed not
to break any of the items already on the deck. Where the hull meets the ramp I had to use some cyano glue because the Methylene Chloride just wouldn't want to hold on
its own. Here I also noticed that the deck was about 1mm shorter than the hull. A small piece of plastic was glued in the gap and trimmed to fit. With the deck on I
then glued the ramp into place with cyano glue and the cable was routed, one side at a time, first through the hole in the deck, then around the pulleys, and finally
tied off at the eyes on the ramp, then hit with some cyano glue to keep them in place. I also noticed that the arms of the hinges on the ramp and on the hull did not
touch, leaving a gap between them, so I cut thin spacers from some plastic rod and glued them between the arms.
More Detail Parts
Here I added the small parts that were left off until the deck was in place. The kit's cleats are H-shaped. I could not find any period photos of LCVPs with this
cleat style so I made T-shaped cleats from a T-beam rod. I cut cross-sectional pieces from the rod and sanded them to shape. They're not perfect, but they'll do.
The kit lacks ramp latches. These were made from square plastic rod, with a hole drilled longitudinally through the centre to take hooks bent to shape from some
guitar wire. On the web I'd found many varying styles for the samson post so I chose the most common type and built one from a section of square rod. I drilled a
hole through it near the top and added a cross bar. At the stern I added the rub rail supports and the gun tub covers.
The Skeg and Rudder
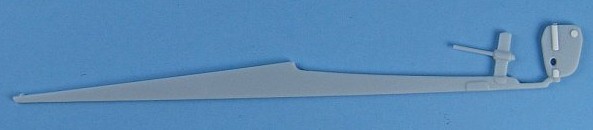 |
Not much needed here. A small hole drilled in the rudder plus a small plastic disk and some rudder posts were added to each side. Once glued in place I added a
pair of braces to the skeg and replaced the kit's prop shaft with a piece of plastic rod.
|
Painting, Part 2
My plan was to approach the final camouflage painting as if my LCVP were an armoured vehicle. With all the work I'd done following the painting of the interior, a quick wash of the complete model to
remove any sanding dust was in order. The nice thing about enamel paints is that this wouldn't affect them.

Since the armour was bolted to the hulls, I needed to replicate the bolt heads. I figured one of the Archer Fine Transfers' rivet/fastener sets
(Rivet Fastener Heads Rivets/Screws 0.011" (0.28mm) diameter, item no. AR88015) would fit the bill.
Archer offers a variety of sizes and I settled on the 0.011" set which works out to a little over 3/4" in real size. The rivets are small dots of resin attached to
a continuous clear decal backing. You apply them like ordinary water slide decals, so to get the best adhesion I sprayed a thin coat of Testors Glosscote (1261)
along the edges of the armour over my primer coat. Lines of rivets were cut from the sheet and dipped in water. I slid them into position lengthwise right from
the paper to prevent them from curling up on themselves. Once all the long runs were complete I filled any the gaps where the runs met with single rivets. Then
I masked the interior with tape and stuffed the gun tubs with facial tissue.
Streaking and rusting started with some dark grey Aeromaster RLM75 (9026) and rust coloured Testors Leather (1736) paint in longitudinal strips along the hull,
keeping the rust-coloured patches only on the metal appliqué armour, and the dark grey to both the armour and hull. When dry I dabbed and streaked some Humbrol
Maskol liquid overtop of the grey and rust paint, avoiding the rivets. Next was a pre-shade of dark grey along edges and seams, then came the RLM 76, which I
lightened with some Testors flat white. It was sprayed in cloud patterns inside the panels, layer by layer, building up the colour while still allowing some
of the dark grey pre-shade to show through. This was followed by some vertical streaking with unlightened Haze Grey and a waterline stain along the hull was
sprayed with dark grey. I then removed the Maskol with some tape to expose the dark grey and rust streaks, being careful not to touch the Archer rivets. Since
the rivets are black I actually gave some of them a light rubbing with my fingers to remove some paint and expose the tops to give some contrast. A blast of
Testors Glosscote straight from the can sealed everything for decaling.
Decals
As mentioned previously, my letters and numbers came from an Aeromaster decal sheet (US 45 Degree ID Numbers & Letters, set no. 72-165).
I love Aeromaster decals. They are amongst the best decals I have ever used and it's unfortunate they are no longer in business. As expected I had no
troubles with any of the images I used. The inks are very opaque and no bleed though of the underlying camouflage occurred. To make sure they had that 'painted on'
look, the clear film surrounding the images was perforated with the tip of a sharp #11 blade and liberal doses of Micro-Sol ensured that the decals settled down
tight, even over the rivets. I have to mention here that with all the handling along the way I did not have one problem with the Archer rivets lifting or being damaged.
Weathering
Now it was time to make the boat look well used. First I applied some dark grey and rust pin washes along the seams, panel lines and some of the rivets.
Using the dark grey paint and a brush with stiff bristles I vertically streaked the waterline stain and added some horizontal rub marks on the hull. Some paint
chipping was done, mostly in the area of the letters. Another dry brushing with RLM76, concentrating most of it on the waterline stain and lettered areas, toned
everything down to a more even finish. A matte coat was sprayed with my favourite flat finish, Golden Hard MSA Varnish with UVLS (Matte) mixed with lacquer thinner.
This combination provides a very smooth matte finish and dries within seconds.
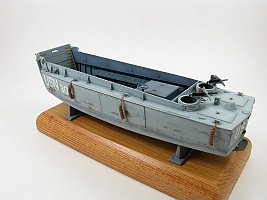
The Finishing Touches
Now the MGs were placed into U-shaped plastic channels, their shields and ammo boxes were added, and then glued to the tubs. The fire extinguisher was put into its
bracket. The troop deck looked rather bare, so I added a tarp rolled from some Tamiya two-part epoxy putty. Rope ties were made from stretched sprue and painted an
appropriate colour.
Bumpers were one of the more noticeable items missing from the kit. During the course of my research I chanced upon Thachweave Products, based in London, ON. They
produce a variety of hand-woven bumpers in the more popular scales. I contacted Thachweave and Scott Taylor kindly provided an LCVP set
(Woven Bumpers for 1/72 LCM/LCVP (Type A), item no. TW202) for me to review.
Thachweave's bumpers are absolutely gorgeous. The package provides you with six bumpers and an instruction sheet. The instructions suggest that those wishing to have
darker bumpers stain them with some tea or soya sauce. Unfortunately, neither method worked well for me, and I tried paint as an alternative. The end of each bumper was
lightly touched to the surface of a thin mix of Testors enamel thinner and some Testors Flat Black paint, allowing the pigment to wick up into the thread. This produced
a nice darkening of the thread, running from quite dark at the bottom to next to no change near the top. For two of the bumpers I darkened the ends even more by allowing
the paint pigments to settle a bit and then re-dipping just the end of the bumper into the darker solution. Perfect! Now I had a set of bumpers that looked like they had
spent quite some time in the water.
Being made from thread, the bumpers don't hang well on their own. To fix this, I resorted to an old, and maybe somewhat disgusting trick, and bent the attaching threads
with my fingers and applied a little bit of saliva on the threads to make them hold their shape. Works for me!
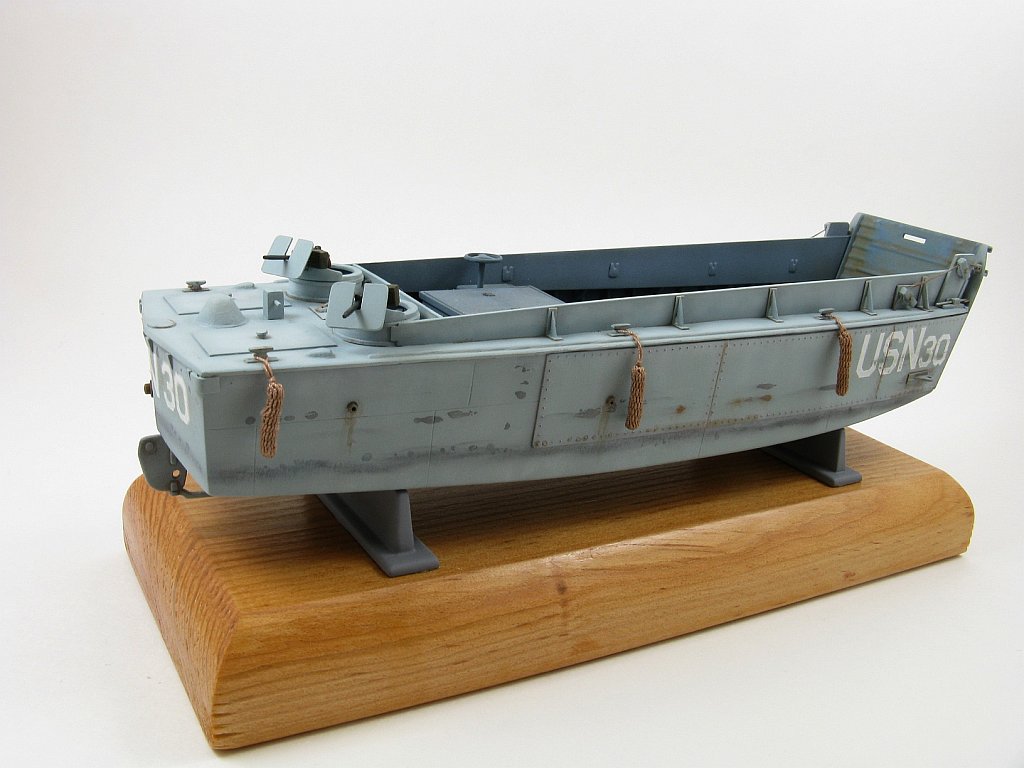
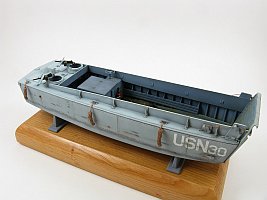
It was nice of Heller to include stands. These were cleaned up, ejector pin marks filled and then sprayed with fast drying automotive grey lacquer primer. They were epoxied to a nice simple base and the
LCVP was set on the stands to complete the project.
Conclusion
So there you have it. I now have an LCVP that's head and shoulders above what the kit provides. A lot of extra worked was needed to get there but none of it was too
difficult skill wise. Only a lot of hours were consumed to get a crude kit to look more presentable.
Out-of-the-box, this kit is only good for war gaming or for keeping your company in the bath tub.
Review sample purchased by the author.
References
[1] numerous period photographs found on the web
[2] US Landing Craft in Action: Warships Number 17, Al Adcock, Squadron/Signal Publications, Carrollton, Texas 2003 ISBN: 0-89747-451-1
[3] web reviews and pictures of the 1/35 scale Italeri LCVP kit
[4] Airfix Forum
[5] photosnormandie (with beautiful colour photographs of LCVPs from the USS Thurston (AP-77) at Weymouth Harbour, 1944)
[6] USN30 photograph
[7] modelgeek.com (has a photograph of USN LCVPs
being repainted olive drab, taken from Time-Life Books "Across the Rhine")
[8] Skill in the Surf: A Landing Boat Manual.


|